
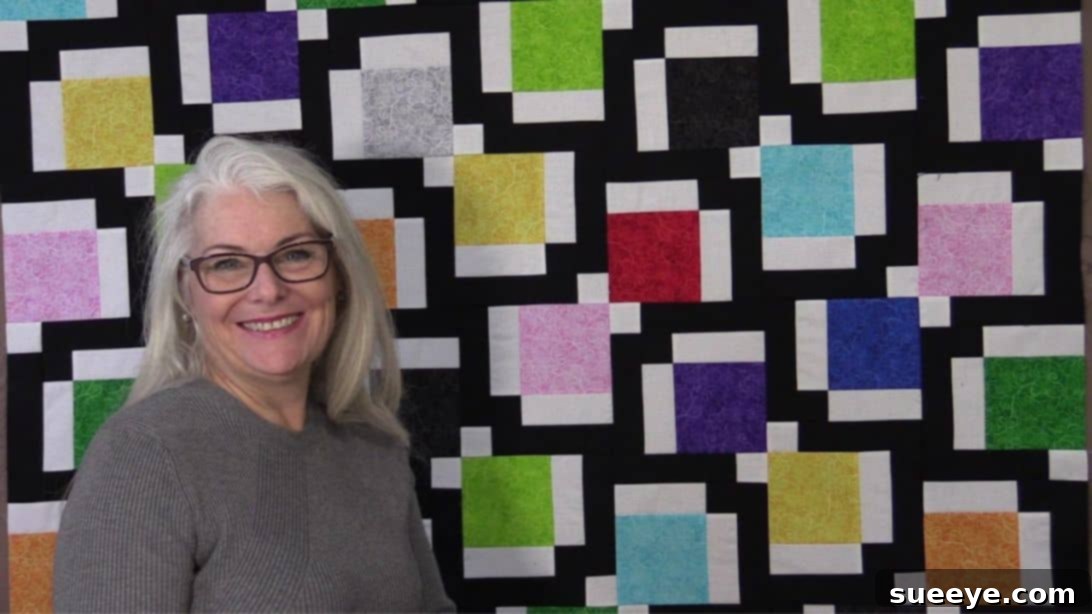
Master the Easy Simon Quilt Block: A Beginner-Friendly Tutorial for Stunning Quilts
Embark on a delightful quilting journey with the incredibly versatile and strikingly beautiful Simon Quilt Block! Whether you’re a seasoned quilter looking for a quick and satisfying project or a complete beginner eager to create something impressive, this block is an absolute joy to make. In this comprehensive guide, inspired by the fantastic video tutorial from SewVeryEasy on YouTube, we’ll walk you through every step to transform simple fabric pieces into a captivating quilt design. Prepare to be amazed by how easily this block comes together and the endless design possibilities it offers. Your friends and family will surely be impressed by your stunning creation!
The Simon Quilt Block is renowned for its simplicity, making it an excellent choice for those new to quilting. Its unique design allows for dynamic layouts, creating intricate patterns simply by rotating the finished blocks. This tutorial will provide you with all the essential details, from precise cutting instructions to expert sewing tips, ensuring your project is a resounding success. Get ready to unleash your creativity and enjoy the rewarding experience of quilting!
Essential Materials for Your Simon Quilt Block Project
Gathering your supplies is the first exciting step in any quilting adventure. For the Simon Quilt Block, you’ll need just a few key items. Precision in cutting and sewing is crucial for a professional finish, so make sure your tools are sharp and your measurements accurate.
- Charm Pack: A charm pack typically contains 42-45 pre-cut 5-inch squares. These are perfect for this project as they offer a wide variety of coordinating fabrics, saving you time on fabric selection and cutting. Choose a pack with colors and patterns that inspire you!
- Solid White Fabric: A crisp, high-quality white cotton fabric will provide a beautiful contrast and help your charm pack fabrics pop. Ensure it’s preshrunk if you plan to wash your finished quilt.
- Solid Black Fabric: Similar to the white fabric, a good quality solid black fabric will add depth and definition to your block. The contrast between black and white with your colorful charm squares is what gives the Simon Quilt Block its distinctive appeal.
- Scissors or Rotary Cutter and a Cutting Mat: A rotary cutter with a sharp blade and a self-healing cutting mat are highly recommended for efficient and accurate cutting of fabric strips and squares. If using scissors, ensure they are sharp and dedicated to fabric only.
- Quilting Ruler: A clear acrylic quilting ruler with precise measurements is indispensable for accurate cutting. Look for one with clear markings that are easy to read.
- Needle and Thread: High-quality polyester thread in a neutral color (like white or light gray) is a great choice for piecing, as it blends well with most fabrics. Make sure your sewing machine needle is sharp and appropriate for quilting.
- Iron and Ironing Board: Crucial for pressing seams. Proper pressing is as important as sewing for creating flat, professional-looking quilt blocks.
- Sewing Machine: A reliable sewing machine capable of a consistent quarter-inch seam allowance will make your quilting experience smooth and enjoyable.
Step-by-Step Instructions: Creating Your Simon Quilt Block
Let’s dive into the core of this tutorial! We will meticulously guide you through each stage of cutting and assembling your Simon Quilt Block. Remember, accuracy is your best friend in quilting – take your time with each cut and seam to ensure stunning results.
Step 1: Preparing Your Fabric Pieces
Precise cutting is paramount for any quilting project, especially for blocks like the Simon, where small pieces align to create a larger pattern. Take your time with this step to ensure all your fabric components are perfectly sized.
- Begin by cutting your solid white fabric. You will need 96 strips measuring 5 x 2 inches and 48 squares measuring 2 x 2 inches. Using a rotary cutter and ruler will help maintain accuracy.
- Next, prepare your solid black fabric. Cut 96 strips measuring 2 x 6½ inches and 49 squares measuring 2 x 2 inches. Double-check your measurements before cutting multiple pieces.
- Now, select your charm squares. For each Simon Quilt Block, you’ll be working with a single 5-inch charm square as your central element.
Step 2: Assembling the First Half of Your Block
This stage involves attaching the initial set of white and black strips and squares to your charm squares, forming the foundational elements of the Simon block. Maintain a consistent ¼-inch seam allowance throughout your sewing.
- Take half of your stack of 5×2-inch white strips. Sew one of these white strips along one side of each 5-inch charm square. When sewing, use a consistent ¼-inch seam allowance.
- After stitching, gently press the seams open to ensure a flat and crisp finish. Pressing seams open helps to reduce bulk and creates a smoother block.
- Next, take a 2×2-inch black square. Align and sew this black square onto the shorter end of one of the remaining 5×2-inch white strips. Again, press the seams open once joined.
- This newly created black-and-white unit will then be sewn onto the other side of your charm square. Position this unit so that the black square sits at the corner, aligning perfectly with the two white strips already attached to the charm square. Carefully press this final seam open, making sure the entire assembly lies flat.
Step 3: Completing Your Simon Quilt Block Unit
This section completes the individual Simon quilt block units, adding the final black and white fabric pieces that define its characteristic look. Pay close attention to orientation to achieve the desired pattern.
- Now, take half of your stack of 2×6½-inch black strips. Attach one black strip on top of either of the white strip sides of your existing charm square assembly. Ensure right sides are together and stitch with your consistent ¼-inch seam allowance.
- Next, take a 2×2-inch white square. Sew this white square onto the shorter end of one of the remaining 2×6½-inch black strips. Press the seams open for a smooth finish.
- Finally, take this black-and-white unit and sew it onto the other side of your charm square assembly. Carefully position it so that the white square appears in the corner, directly above the black square on the opposite corner. This creates the “L” shape with the white and black squares. Press the seams flat.
- You have now completed one Simon Quilt Block unit! Repeat these steps for all your charm squares until you have a sufficient number of blocks for your desired quilt size.
Assembling Your Quilt: Bringing Your Blocks Together
Once all your individual Simon Quilt Blocks are complete, the real magic begins as you start to assemble them into a larger quilt top. This is where your design vision comes to life!
- Layout: Before sewing, lay out all your finished Simon Quilt Blocks on a design wall or a clean floor. Experiment with different orientations and arrangements. The beauty of the Simon block is how different patterns emerge simply by rotating the blocks. You can create intricate secondary designs and optical illusions!
- Joining Blocks: Once you’re satisfied with your layout, sew the blocks together into rows, maintaining your ¼-inch seam allowance. Be mindful of nesting your seams (pressing seams in opposite directions for adjacent blocks) to ensure perfect points where blocks meet. Press the seams of your rows open or to one side.
- Joining Rows: After creating all your rows, join them together to form the complete quilt top. Again, pay attention to seam alignment and press carefully.
- Adding Borders (Optional): If desired, you can add borders to your quilt top. Borders can help frame your design, add extra size, and provide a resting place for the eyes. Measure your quilt top accurately and cut border strips to fit.
- Quilt Sandwich: Once the quilt top is complete, you’ll create the “quilt sandwich” by layering your quilt top, batting (the fluffy middle layer), and backing fabric. Baste these layers together using pins, basting spray, or hand stitches.
- Quilting: Now comes the quilting! You can choose to machine quilt with simple straight lines, a free-motion design, or send it to a professional long-arm quilter. The quilting stitches hold the three layers together and add texture and dimension to your project.
- Binding: The final step is to bind your quilt. This involves attaching fabric strips around the edges of the quilt to create a clean, durable finish.
Tips for Quilting Success with the Simon Block
To ensure your Simon Quilt Block project is as enjoyable and successful as possible, consider these helpful tips:
- Accurate Cutting is Key: We can’t stress this enough! Even a slight variation in your initial cuts can lead to wonky blocks later on. Invest in a good rotary cutter, mat, and ruler, and always double-check your measurements.
- Consistent Seam Allowance: A perfect ¼-inch seam allowance is the cornerstone of successful quilt piecing. Practice on scrap fabric to find your machine’s exact ¼-inch mark.
- Pressing, Not Ironing: When quilting, we “press” seams, rather than “ironing” them. This means lifting and placing the iron, rather than sliding it, to avoid stretching or distorting your fabric.
- Chain Piecing: To save time and thread when sewing multiple identical units (like attaching all the white strips to charm squares), use chain piecing. Sew one unit, then feed the next unit under the needle without cutting the thread between them. This creates a chain of sewn units that can be cut apart later.
- Square Up Your Blocks: After completing each Simon Quilt Block, use a square ruler to trim it to its final desired size, ensuring all corners are 90 degrees and all sides are straight. This makes joining blocks much easier.
- Fabric Selection: While charm packs are great, don’t be afraid to experiment with your own fabric combinations. The strong contrast between the solid black and white fabrics is essential for the Simon Quilt Block’s visual impact.
- Watch the Video: For visual learners, watching SewVeryEasy’s tutorial is highly recommended. Seeing the steps in action can clarify any uncertainties.
Conclusion: Your Beautiful Simon Quilt Awaits!
Congratulations! You’ve learned how to create the charming and versatile Simon Quilt Block. This pattern is not only quick and easy but also offers immense potential for stunning visual effects, making it a fantastic choice for quilters of all skill levels. From a simple throw blanket to a bed-sized quilt, the possibilities are truly endless once you master this basic block.
We encourage you to experiment with different charm pack themes, fabric colors, and block arrangements to make each quilt uniquely yours. Don’t be afraid to try new things and let your creativity shine through every stitch. Remember, every quilt tells a story, and yours is just beginning.
Ready to get started? Grab your materials, watch SewVeryEasy’s detailed video tutorial, and prepare to be amazed by the beautiful quilts you can create with the simple yet striking Simon Quilt Block. Happy quilting!
*These amazing images are all credited to SewVeryEasy via YouTube. Check her other content and follow for more inspiring quilting tutorials!