
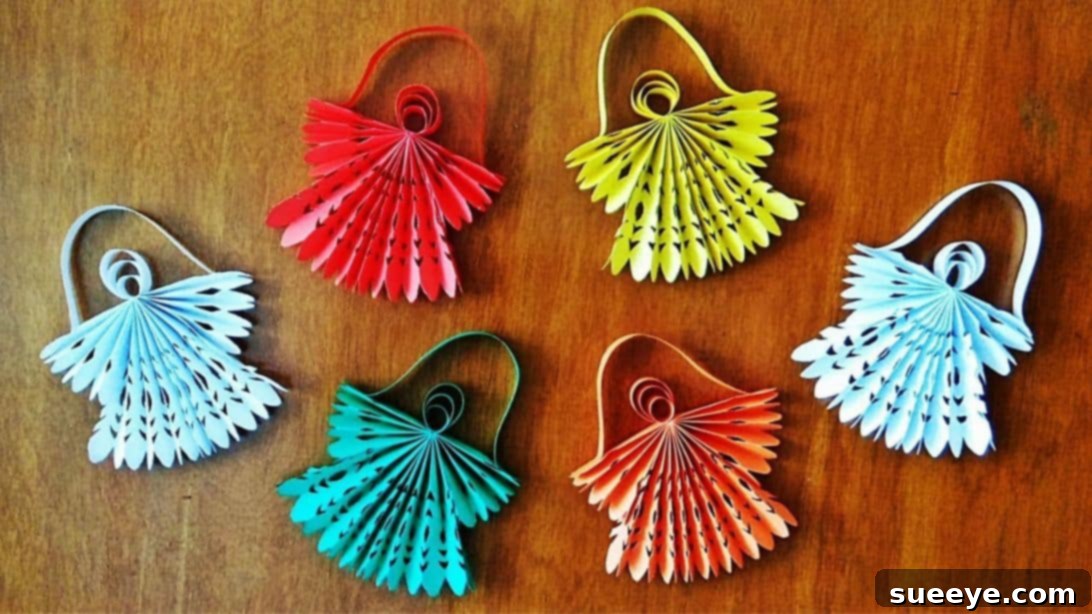
DIY Paper Angels: Craft Beautiful Holiday Decor Effortlessly
As the festive season approaches, the quest for unique and heartwarming holiday decorations begins. While store shelves are brimming with options, there’s an unparalleled joy in adorning your home with handmade creations. This year, ditch the expensive decor and embrace the charm of DIY with these exquisite paper angels. Not only are they incredibly budget-friendly, requiring just a few simple materials, but they also offer a delightful crafting experience for all ages. Imagine the sparkle and grace these delicate angels will bring to your Christmas tree, mantelpiece, or as thoughtful gift toppers. This comprehensive guide, inspired by the brilliant tutorial from Craftastic, will walk you through each step, ensuring you can create a flock of these beautiful paper angels with ease. Let your creativity soar and infuse your home with the spirit of the holidays!
Creating your own decorations is not just about saving money; it’s about adding a personal touch to your celebrations, fostering family bonding, and enjoying a relaxing, creative activity. These paper angels are particularly special because they embody simplicity and elegance. They are light enough to hang from branches, durable enough to be stored for future seasons, and versatile enough to fit into any decor style, from rustic to modern. Whether you’re a seasoned crafter or a beginner looking for a fun project, this tutorial is designed to guide you seamlessly from a flat sheet of paper to a charming three-dimensional angel. Gather your supplies, clear your crafting space, and prepare to embark on a magical journey of paper art.
Essential Materials for Your Paper Angel Project
One of the many beauties of this DIY project is its minimal material requirement. You likely already have most of these items lying around your home, making it an incredibly accessible craft. Here’s what you’ll need to begin crafting your stunning paper angels:
- A4 paper: This forms the foundation of your angel. White paper offers a classic, ethereal look, perfect for angels, but feel free to experiment with colored, metallic, or even patterned paper for unique variations. Standard printer paper works wonderfully, providing enough flexibility for folding and cutting.
- Pencil: Essential for sketching your patterns and curves onto the paper. A light hand is recommended so that guide lines can be easily erased or hidden by folds.
- Glue: A reliable adhesive is crucial for securing the different parts of your angel. White craft glue, like Elmer’s Glue, or a strong glue stick will work perfectly. Ensure it dries clear to maintain the angel’s pristine appearance.
- Sharp Scissors: Precision cutting is key to achieving crisp, clean edges for your angel’s intricate details. Using sharp scissors will prevent tearing and ensure a professional finish.
- Optional additions: While not strictly necessary, consider adding items like glitter, small beads, ribbons, or markers to embellish your angels once they are assembled. These can add extra sparkle and personality to your finished creations.
Having these simple tools at hand will ensure a smooth and enjoyable crafting process. The simplicity of the materials truly highlights the magic of transforming ordinary paper into something extraordinary.
Step-by-Step Guide to Crafting Your DIY Paper Angels
Follow these detailed instructions carefully to bring your paper angels to life. Each step is designed to be straightforward, allowing you to enjoy the creative process from start to finish. Remember, precision in folding and cutting will yield the most beautiful results.
Step 1: Preparing Your Paper with Initial Folds
Begin by taking your A4 sheet of paper. Place it horizontally on your workspace. The first critical step is to fold the paper in half crosswise, aligning the short edges perfectly. Press down firmly to create a crisp crease. Now, with the paper still folded, repeat this process three more times, folding it in half three additional times along the same axis. This means you will have folded the paper a total of four times. Each fold should be precise and well-creased. Once you’ve completed these folds, gently open the entire sheet of paper. You will now see a series of parallel creases running across the paper, which will serve as your guides for the next step. These initial folds are crucial as they establish the foundational grid for your angel’s symmetrical structure.
Step 2: Creating the Accordion Fold Base
With your paper laid flat and its numerous creases visible, it’s time to create the iconic accordion or zigzag fold. Starting from one end, fold the paper along the first crease, then flip the paper over and fold along the next crease, continuing this back-and-forth motion. Follow the existing creases diligently to ensure even and consistent folds. Each fold should be sharp and neat, resembling the bellows of an accordion. This technique creates a beautiful, rippled texture that will form the body and wings of your angel, giving it a delicate, ethereal quality. Take your time to make each zigzag fold as precise as possible, as this directly impacts the final shape and grace of your paper angel.
Step 3: Shaping the Top Edge of Your Angel
Once your paper is neatly folded into an accordion, gently hold it together. Focus on the top part of the folded paper. Using your pencil, draw a gentle curve along this top edge. This curve will form the elegant shoulders or the upper outline of your angel’s dress. It’s important to ensure that the curve does not extend all the way to the very edge of the folded paper. Instead, leave a small, uncurved space at both ends of the top edge. This slight allowance is essential for maintaining the structural integrity of the paper once it’s cut and opened, preventing it from tearing and ensuring a cleaner, more defined silhouette for your angel. Repeat this drawing on both sides if the fold isn’t perfectly symmetrical or if you want to ensure the design matches when unfolded.
Step 4: Sketching the Intricate Angel Patterns
This step requires a steady hand and attention to detail. On the folded paper, specifically on one side (the side you’ll be cutting from), draw the intricate patterns that will define your angel’s form. Begin by sketching two half-crescent shapes near the top, which will eventually form the delicate wings. Below these, draw a distinct half-circle, which will become the angel’s head or a prominent feature of its upper body. Following the half-circle, draw two more half-crescent shapes, but this time flipped or mirrored, creating a graceful design that flows downwards. These shapes will be on both the left and right sides of your folded paper, ensuring symmetry. Towards the bottom of the folded paper, draw a small triangle. This triangle will contribute to the base or the distinct shape of the angel’s dress. Refer to the visual aid provided in the original tutorial (or imagine it) for precise placement and shape. Remember, these are guide lines for cutting, so aim for clarity and accuracy in your drawing.
Step 5: Carefully Cutting Out Your Angel’s Design
Now that your patterns are meticulously drawn, it’s time to bring them to life with your scissors. This step is critical for the final appearance of your angel. Use sharp scissors and proceed with utmost care and precision. Follow your pencil lines diligently, cutting along the curves and straight edges you’ve drawn. Take your time, especially around the intricate details of the crescent shapes and the small triangle. A clean, smooth cut will result in a professional-looking angel, while jagged or imprecise cuts can detract from its elegance. If working with children, ensure adult supervision or assist them with the cutting process to ensure safety and accuracy. The quality of your cuts here will directly impact the beauty of your unfolded paper angel.
Step 6: Assembling the Angel’s Body and Skirt
Once all patterns are cut, gently unfold your paper. You’ll now see the full, symmetrical design. The next step is to create the three-dimensional form of the angel. First, cut approximately one-third of the total length of the paper in the middle. This cut should be a straight vertical line, effectively dividing the bottom section of the angel’s skirt. After making this cut, carefully fold the paper back into its original zigzag accordion shape. Now, take the bottom one-third sections of the paper, which were affected by the cut, and fold them outwards towards the left and right sides. This action creates the volume and flare of the angel’s skirt or dress. Once these sections are folded, you’ll notice the overall width of the angel’s base becomes smaller and more defined. Finally, apply glue to the bottom center of the folded paper and also to the folded one-third parts, securing them together. Hold them in place until the glue sets. This process creates the elegant, flowing body of your paper angel, ready for its head and finishing touches.
Step 7: Crafting and Attaching the Angel’s Head and Halo
Now it’s time to give your angel its distinct head. Take another strip of paper, measuring approximately 8.3 inches in length and 0.6 inches in width. At one end of this strip, tightly roll the paper to form a small, neat circle. This will be the core of your angel’s head. Secure this roll with a dab of glue. Next, to add more volume or create a halo effect, take two more similar strips or wider strips and form two slightly larger circles. Glue these larger circles onto the same sides as your initial small circle, essentially creating a layered or concentric headpiece. This layering adds depth and presence to the head. Once the headpiece is complete and dry, carefully glue it onto the top center of your angel’s body, ensuring it is securely attached and perfectly centered. This step brings a focal point to your angel, completing its delicate form.
Step 8: Adding the Wings and Final Touches
The final structural step involves enhancing the angel’s wings and preparing it for display. Take another strip of paper, identical in size to the one used for the head (8.3 inches by 0.6 inches). Carefully glue this strip across the back of the angel, connecting the two wing sections. This strip can serve multiple purposes: it can reinforce the wings, provide structural stability, or even be shaped into a small loop at the top to serve as a hanger for your ornament. If you choose to make it a hanger, ensure the loop is strong enough to support the angel’s weight. Once this strip is securely glued, your paper angel is structurally complete! Now comes the fun part: personalization. Feel free to create more of these charming angels, experimenting with different colors of paper, various sizes, and additional embellishments like glitter, paint, or delicate ribbons. Imagine a collection of these angels, each unique, gracing your home this holiday season.
Tips for Crafting Flawless Paper Angels
To ensure your DIY paper angels turn out beautifully and last for many seasons, consider these helpful tips:
- Quality Paper Matters: While standard A4 paper works, using slightly thicker paper (like cardstock) can make your angels more durable and give them a more substantial feel, especially for larger creations.
- Precision is Key: Take your time with folding and cutting. Sharp creases and clean cuts make a significant difference in the final aesthetic.
- Let Glue Dry: Allow ample time for the glue to dry completely at each stage before proceeding to the next. This prevents shifting and ensures strong, lasting bonds.
- Experiment with Colors and Textures: Don’t limit yourself to white paper. Try metallic gold or silver for a shimmering effect, pastel colors for a soft look, or patterned paper for unique designs.
- Add Personal Touches: Embellish your finished angels with glitter glue, tiny rhinestones, painted details, or even a small piece of string to create a halo. These small additions can elevate their charm.
- Involve the Family: This is a fantastic project for kids, with adult supervision for cutting. It’s a wonderful way to spend quality time together and create lasting memories.
- Create a Template: Once you’ve successfully made one angel, consider tracing its pattern onto a piece of cardstock to create a reusable template for future projects, ensuring consistency.
Creative Ways to Display Your Paper Angels
These versatile paper angels aren’t just for the Christmas tree! Here are some inspiring ideas to incorporate them into your holiday decor:
- Christmas Tree Ornaments: The most classic use! Hang them gracefully among your tree lights and other ornaments.
- Garlands and Banners: String multiple angels together to create a charming garland for your mantelpiece, doorway, or stair railing.
- Gift Toppers: Attach a small angel to holiday gifts for a personalized and elegant touch.
- Place Card Holders: For a festive dinner party, write guests’ names on small angels and place them at each setting.
- Window Decorations: Hang them in varying lengths in a window for a delicate, floating display.
- Centerpiece Elements: Arrange a cluster of angels around candles or greenery for a beautiful table centerpiece.
- Nursery or Kids’ Room Decor: Use softer colors and whimsical embellishments to create a serene mobile or wall decor.
- Holiday Wreaths: Adorn a plain wreath with several paper angels for a handcrafted look.
Conclusion: Embrace the Joy of Handmade Holiday Decor
Crafting these DIY paper angels is more than just a seasonal activity; it’s an opportunity to create cherished memories and infuse your home with warmth and personal style. With just a few basic materials and a touch of creativity, you can transform ordinary paper into extraordinary decorations that will delight everyone who sees them. Whether you’re aiming for a minimalist aesthetic or a lavish display, these angels offer endless possibilities for customization and artistic expression.
So, why wait? Gather your supplies, follow this detailed guide, and embark on a rewarding journey of handmade holiday decor. Share the joy of crafting with loved ones, and proudly display your beautiful paper angels, knowing that each one carries a piece of your festive spirit. Happy crafting and happy holidays!