
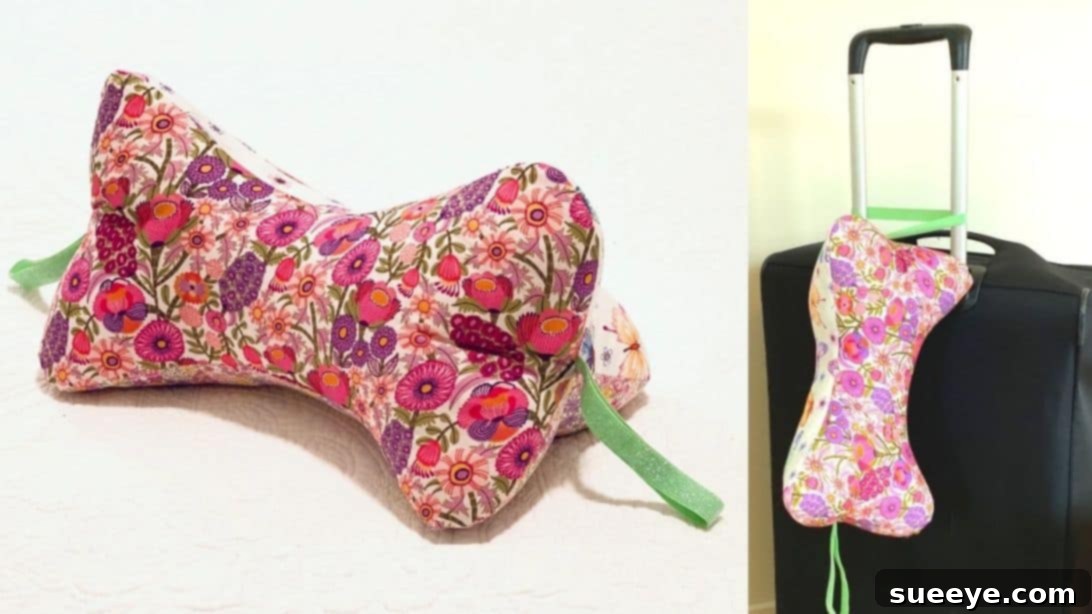
DIY Bone Pillow Sewing Tutorial: Craft Your Own Comfort & Style
Are you passionate about sewing and eager to embark on a new project that’s both rewarding and incredibly useful? Whether you’re a beginner looking to learn the basics or an experienced crafter wanting to refine your skills, this comprehensive tutorial on sewing a DIY bone pillow is designed just for you. This charming and practical pillow is surprisingly easy to make and offers a myriad of uses, making it an excellent addition to your personal comfort collection or a thoughtful handmade gift.
Imagine having a super comfy, portable neck pillow that you can take anywhere – perfect for long car rides, flights, or simply relaxing on your couch. Its unique bone shape provides excellent ergonomic support, cradling your neck and head in comfort. Beyond its functionality, a bone pillow can be an adorable accessory that adds a touch of personality to any space. The beauty of this project lies in its flexibility: you can utilize scrap fabrics, upcycle old clothes, or choose a vibrant, patterned fabric to match your style. The possibilities are endless, and the result is always a delightful, personalized item.
We are thrilled to guide you through each step of this creative journey, with expert instruction inspired by the talented Notches Sewing from YouTube. Her clear and concise approach makes learning enjoyable and ensures a successful outcome. Get ready to transform simple fabric into your new favorite comfort item!
Essential Materials for Your DIY Bone Pillow
Gathering your materials before you start is crucial for a smooth and enjoyable sewing experience. Most of these items are standard sewing supplies, but we’ll highlight some key choices to help you achieve the best results for your bone-shaped neck pillow.
- Ruler: A standard measuring ruler is essential for accurate pattern preparation and fabric cutting. Precision is key in sewing!
- Three Pieces of Fabric: You’ll need three fabric pieces, each large enough to accommodate your pattern. This is where your creativity truly shines! You can opt for three identical fabrics for a cohesive look, mix and match coordinating patterns, or even use three completely different fabrics for a vibrant, eclectic design. Cotton, flannel, or minky fabric are excellent choices for their comfort and ease of sewing.
- Pins or Fabric Clips: These are indispensable for holding fabric layers together securely while cutting and sewing, preventing shifting and ensuring accurate seams.
- Fabric Scissors: A sharp pair of fabric scissors is vital for clean, precise cuts. Avoid using them for paper to keep them sharp!
- Fabric Cutter (Rotary Cutter): While optional, a rotary cutter used with a cutting mat can make quick work of cutting fabric, especially for straight lines, and can be more precise than scissors for some.
- Needle and Thread: You’ll need a sewing machine with an appropriate needle for your fabric type, along with a spool of all-purpose thread that matches or complements your chosen fabric colors. A hand-sewing needle will also be needed for closing the final opening.
- Elastic Ribbon or Fabric Strip (2 x 11 inches / 28 cm long): This elastic element adds a unique touch to your bone pillow, allowing you to hang it, attach it to luggage, or even loop it over a car headrest. Ensure it has good stretch and durability.
- Cardboard: A sturdy piece of cardboard is used to create a durable, reusable pattern template. Cereal boxes or old shipping boxes work perfectly.
- Bone Shape Neck Pillow Pattern: Don’t forget to download the essential pattern! Click this link to download the pattern directly from Notches Sewing’s website. Printing this out accurately is the first critical step.
- Poly-Fil Stuffing: This soft, resilient polyester fiberfill is perfect for creating a plush and supportive pillow. The amount needed will depend on the desired firmness and size of your pillow.
Step-by-Step Directions for Sewing Your Bone Pillow
Now that you have all your materials ready, let’s dive into the creative process. Follow these detailed instructions carefully to construct your very own comfortable and stylish bone pillow.
Step 1: Pattern Preparation and Fabric Cutting
The foundation of any successful sewing project is accurate pattern work. Begin by preparing your downloaded pattern. The pattern likely comes in several pieces marked with ‘A’ and ‘B’ edges that need to be aligned and joined. Carefully match all the corresponding ‘A’ edges together and then all the ‘B’ edges. Use tape to secure them firmly, ensuring the pattern is perfectly aligned to maintain the correct bone shape. Once assembled, cut out the paper pattern.
To create a durable template for repeated use, place your assembled paper pattern onto a piece of sturdy cardboard. Trace meticulously around the perimeter of the paper pattern onto the cardboard. Then, cut out this cardboard shape using strong scissors or a craft knife. This cardboard template will be your reliable guide for cutting fabric and will withstand multiple uses without tearing.
Next, prepare your three chosen fabric pieces. For best results, it’s often helpful to “square off” your fabric pieces, ensuring they have clean, straight edges before you begin. Lay one fabric piece flat, then carefully place your cardboard bone pillow pattern on top. Using a fabric marker or chalk, trace around the cardboard template onto your fabric. Repeat this process for all three fabric pieces, ensuring you have three identical bone-shaped outlines. To ensure all pieces are cut identically, stack the three traced fabric pieces neatly, aligning all edges perfectly. Use pins or fabric clips along the edges to hold them together securely. Now, carefully cut out all three fabric layers simultaneously, following your traced lines. As you cut, pay close attention to the notches indicated on the pattern – these are crucial for proper alignment later. Cut these notches as small snips, approximately 1/8 inch (3mm) in from the edge of your fabric. These small marks will guide you perfectly during assembly.
Now, take your elastic ribbon or fabric strip. Match its ends together and find the center point. On one of your cut fabric pieces, locate the side notch that corresponds to where the elastic should be attached (refer to the video tutorial for precise placement if unsure). Center the elastic ribbon over this notch, aligning its raw edges with the raw edge of the fabric. Stitch the elastic securely in place, close to the edge of the fabric, ensuring it’s firmly attached and can withstand gentle pulling. Repeat this process on the opposite side notch of the same fabric piece. This first piece will be your central panel, and the elastic will act as a versatile loop for your pillow.
Step 2: Assembling Your Bone Pillow and Finishing Touches
With your fabric pieces prepared, it’s time to begin assembly. Take the fabric piece with the attached elastic. This will be your “middle” piece. Place a second fabric piece directly on top of it, ensuring their “right sides” (the decorative or intended outer sides) are facing each other. Carefully align all the edges and, most importantly, the notches. Pin the two layers together, paying special attention to the area around the elastic ribbon to ensure it remains flat and secure. Also, pin along all the outer edges of the bone shape. These pins will prevent the fabric from shifting as you sew.
Using your sewing machine, stitch around the perimeter of these two pinned fabric layers with a 3/8 inch (or 1 cm) seam allowance. It is crucial to leave an opening of about 3-4 inches (7-10 cm) along one of the straighter edges – this gap is essential for turning the pillow right side out and stuffing it later. Start sewing from one side of this intended opening, continue all around the bone shape, and stop halfway down the side where the opening will be. Be sure to backstitch at the beginning and end of your seam for added security.
Now, carefully open the fabric layers you’ve just partially sewn. Take your third fabric piece and place it right sides together with the other side of your central elasticized fabric piece. This means the elasticized fabric is now sandwiched between the other two fabric pieces, with its right side facing the right side of the third fabric piece. Align the remaining unsewn edges, paying close attention to matching the notches, especially the one at the center of the elastic. Pin these layers together securely.
Continue your seam from where you left off, stitching along the remaining unsewn perimeter, maintaining the same 3/8 inch (1 cm) seam allowance. Remember to leave the same 3-4 inch opening for turning. Stitch around the center of the other side of the elastic, ensuring all raw edges are enclosed in the seam. Once you’ve completed this stitching, you’ll have effectively created a fully sewn “tube” of fabric with an opening.
Before turning, trim the seam allowances, especially around the curves, to about 1/4 inch (6mm) to reduce bulk and allow the curves to turn smoothly. For a neat finish, clip into the curves without cutting through your stitches. Now, carefully reach into the opening and gently pull the entire pillow right side out. Use a pointy tool (like a chopstick or a dull pencil) to gently push out all the corners and curves of the bone shape, ensuring they are as crisp as possible. Fold in the raw edges of the opening to the inside of the pillow and crease them with your fingers to create a neat, defined line.
Finally, it’s time to stuff your bone pillow! Begin inserting poly-fil (or your chosen stuffing material) through the opening. Gradually add small handfuls of stuffing, gently pushing it into all areas of the pillow, especially the ends of the “bones.” Continue to fill until your pillow reaches your desired level of firmness and plushness. Avoid overstuffing, which can make it hard and uncomfortable, but also ensure it’s firm enough to provide support.
Once filled, it’s time to close the opening. Thread a hand-sewing needle with a double strand of matching thread for extra strength. Using a slip stitch (also known as a ladder stitch), carefully sew the opening closed. This stitch is ideal because it creates a nearly invisible seam, blending seamlessly with your machine stitches. Take small, even stitches, pulling gently to close the gap. When you reach the end, secure your thread with a sturdy knot and bury the tail inside the pillow for a clean finish.
Congratulations! You’ve just created a beautiful, functional, and personalized DIY bone pillow. Take a moment to admire your handiwork and enjoy the comfort it brings!
These amazing images and the original tutorial are all credited to Notches Sewing via YouTube. We highly recommend checking out her other fantastic content and following her channel for more inspiring sewing projects!
DIY Bone Pillow Sewing Tutorial: Your Journey to Comfort and Creativity
We hope you’ve enjoyed this detailed guide on how to sew your very own DIY bone pillow. This project offers a fantastic opportunity to practice essential sewing skills while creating something truly practical and lovely. The versatility of the bone pillow makes it a must-have item, whether you’re looking for extra comfort during travel, a supportive neck rest while reading, or a unique accent piece for your home decor.
Remember, the beauty of handmade items lies in their individuality. Don’t be afraid to experiment with different fabrics, colors, and even embellishments to make your bone pillow truly your own. Imagine a soft fleece pillow for cozy evenings, a vibrant cotton one for a pop of color, or even a waterproof fabric version for outdoor use. The possibilities for customization are boundless, allowing you to tailor this project to your specific needs and aesthetic preferences.
Sewing is a wonderfully rewarding hobby that allows you to bring your creative visions to life. Each stitch you make adds to the story of your creation, and the satisfaction of completing a project like this bone pillow is immense. If you’re a beginner, this project is an excellent stepping stone, introducing you to crucial techniques like pattern cutting, seam allowances, turning, and invisible stitching. For more experienced sewers, it’s a quick and enjoyable project that can be easily adapted and personalized, perhaps with added piping, embroidery, or unique fabric combinations.
So, why not gather your materials, fire up your sewing machine, and create a bone pillow for yourself, a loved one, or even as a thoughtful gift? Handmade gifts carry a special sentiment that store-bought items simply can’t replicate. A custom-sewn bone pillow shows care, effort, and a personal touch that will be cherished. Dive into the delightful world of sewing, and let your creativity flourish with this charming and comfortable DIY bone pillow!