
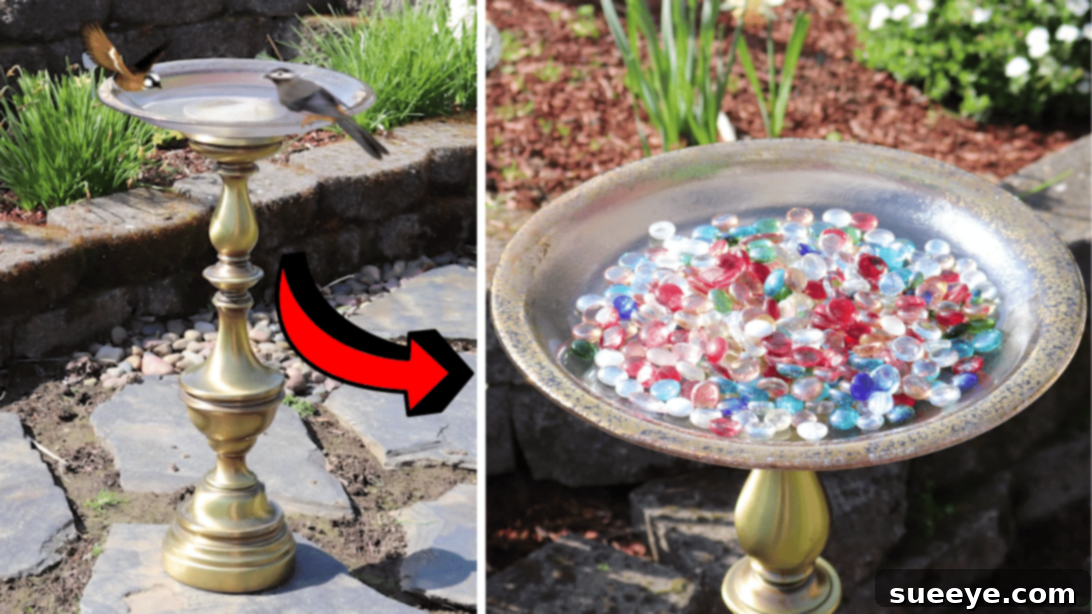
As the weather warms and nature awakens, it’s the perfect time to enhance your outdoor living space with creative and sustainable projects. There’s a unique satisfaction in transforming forgotten items into something beautiful and functional for your garden or yard. Today, we’re diving into one of our absolute favorite upcycling adventures: crafting a stunning and versatile piece of garden art from an old lamp. This ingenious DIY project can serve multiple purposes – whether you envision it as an inviting bird bath, a charming bird feeder, or even a whimsical decorative table to accent your outdoor oasis. The possibilities are truly endless, and the result is guaranteed to add character and life to your outdoor haven.
What makes this particular project so appealing is its commitment to repurposing. You likely already have an old lamp gathering dust in your attic, garage, or a forgotten corner of your home. If not, these hidden gems are readily available and incredibly affordable at your local thrift store, flea market, or yard sale, often for just a few dollars. This not only makes the project budget-friendly but also contributes to a more sustainable lifestyle by giving new life to an item that might otherwise end up in a landfill. The process is surprisingly straightforward, and we’re confident that you’ll be as delighted with the enchanting outcome as we are. Let’s embark on this creative journey and learn how to construct your very own upcycled lamp bird bath or feeder, inspired by the fantastic video tutorial from mybloomsource on YouTube.
Why Choose an Upcycled Lamp for Your Garden?
Repurposing an old lamp for your garden offers a myriad of benefits beyond just aesthetics. It’s a wonderful way to embrace sustainable living, reduce waste, and infuse your outdoor space with personality that store-bought decor simply can’t match. Every scratch and imperfection on an old lamp tells a story, and by transforming it, you’re giving that story a new chapter in the heart of your garden.
- Eco-Friendly & Sustainable: By upcycling, you prevent items from entering landfills, contributing to a healthier planet.
- Cost-Effective Decor: Old lamps are often inexpensive or free, making this a very budget-friendly way to add significant charm to your yard.
- Unique & Personalized: No two upcycled lamp projects will ever be exactly alike, ensuring your garden decor is truly one-of-a-kind. You can customize the paint, dish, and embellishments to match your personal style and garden theme.
- Attracts Wildlife: A bird bath provides essential water for local birds, especially during dry spells, helping them stay hydrated and healthy. A feeder, of course, offers much-needed sustenance.
- Aesthetic Appeal: The elegant design of many lamps, particularly vintage ones, makes them ideal candidates for stately garden features that draw the eye and create a focal point.
Essential Materials for Your DIY Upcycled Lamp Bird Bath:
Before you begin this exciting transformation, gather these key materials. Most are easily accessible, and you might already have some around your home!
- An Old Lamp: Look for a lamp with a sturdy base and an interesting design. Taller lamps often make for more impactful bird baths. Ensure it’s stable and capable of supporting the weight of a dish and water.
- Glass Dish or Similar: A shallow glass dish, ceramic planter saucer, or even an old metal serving tray works perfectly. Choose a dish that complements the lamp’s size and style. Glass allows for easy cleaning and won’t leach chemicals into the water.
- E6000 Adhesive: This industrial-strength adhesive is crucial for its superior bonding capabilities, flexibility, and weather resistance. It will securely attach the dish to the lamp base, ensuring it withstands outdoor elements.
- Washable Marker: Used for precise marking on the glass dish without leaving permanent residue.
- Spray Paint (Outdoor Grade): Select a durable, weather-resistant spray paint in your desired color. Consider using a primer first, especially if painting over a dark or glossy surface, to ensure even coverage and longevity. Rust-Oleum or Krylon outdoor paints are excellent choices.
- Optional: Wood Spacer: If your lamp’s internal structure requires extra support or height adjustment.
- Optional: Sandpaper: For roughing up surfaces before painting to improve paint adhesion.
- Optional: Clear Outdoor Sealant: To protect your painted lamp from the elements and ensure its beauty lasts longer.
How to Make a DIY Upcycled Lamp Bird Bath: A Step-by-Step Guide
Follow these detailed steps to transform your old lamp into a magnificent garden feature. Remember to prioritize safety and take your time for the best results.
Step 1: Safely Disassemble the Lamp
Your first and most critical step is ensuring safety. Begin by unplugging the lamp from any power source. Next, carefully dismantle the lamp, starting from the base. You’ll need to access the internal wiring. Gently remove the bottom cover of the lamp, taking care not to damage it, as you’ll likely want to reattach it later for a finished look. Once the base is open, completely remove all electrical components, including the plug, switches, and any wiring. These are unnecessary for your new garden piece and could pose a hazard if left intact. Use basic tools like a screwdriver or pliers as needed for this process.
Step 2: Remove Lamp Harp, Socket, and Address the Threaded Pipe
Now, focus on the top portion of the lamp. Remove the lamp harp (the metal frame that holds the lampshade) and the bulb socket. You’ll be left with the central threaded pipe that runs through the lamp’s body. At this point, you have two primary options:
- Re-secure the Pipe: If the pipe feels loose or wobbly after removing the electrical components, you can choose to reinforce it. Apply a strong adhesive like E6000 around the pipe where it meets the lamp’s structure, then re-tighten any nuts to secure it firmly in place. This ensures maximum stability for your bird bath.
- Create a Spacer: Alternatively, you might decide to remove the threaded pipe entirely and replace its function with a custom-made spacer. A spacer, often made of wood, can provide a solid, level surface for your dish while maintaining the lamp’s structural integrity. This option is particularly useful if the original pipe is damaged or doesn’t provide a flat enough surface.
Assess your lamp’s specific design and choose the method that provides the most stable and level surface for your dish.
Step 3: Preparing and Painting Your Spacer (If Applicable)
If you’ve opted to create a spacer, cut a piece of wood or other sturdy material to the appropriate shape and size. It should fit snugly atop the lamp’s column and provide a flat, stable platform for your dish. Once cut, paint the spacer with the same outdoor-grade spray paint you plan to use for the rest of the lamp. This ensures a cohesive and professional finish. Allow the paint to dry completely according to the manufacturer’s instructions before proceeding to the next step. Multiple thin coats often yield a better, more durable finish than one thick coat.
Step 4: Reassembly, Securing, and Initial Painting
With the electrical components removed and the pipe/spacer solution determined, it’s time to secure the lamp’s structure. If you reinforced the threaded pipe, apply a generous amount of strong adhesive to the pipe before reattaching the top nut. Tighten it securely, ensuring the lamp’s structure is stable. If you’re using a spacer, attach it firmly to the top of the lamp column with a generous amount of E6000 adhesive, ensuring it’s centered and level. Allow this adhesive to cure as per product instructions, which can take several hours to a full day for maximum strength. This is also a good time to apply a base coat of your chosen spray paint to the entire lamp body, ensuring all surfaces are covered evenly. If your lamp has a smooth, glossy finish, lightly sand it first to help the paint adhere better. Let the paint dry completely.
Step 5: Centering and Attaching the Glass Dish
Once the lamp base is fully assembled and painted, and the adhesive from the previous step has cured, it’s time to attach the dish. Place your glass dish upside down and use a washable marker to lightly mark the exact center. This mark will help you perfectly align the dish on top of the lamp. Apply a generous bead of E6000 adhesive around the top surface of your lamp’s column or spacer. Carefully invert the dish and position it directly over the lamp, aligning it with your center mark. Press down gently but firmly to ensure good contact. Allow the adhesive to cure completely, which can take up to 24-72 hours for maximum bond strength, especially crucial for outdoor use.
Step 6: Final Touches and Enjoyment
Once the adhesive holding the dish in place has fully cured, you can wash away any remaining washable marker residue from the dish. Your upcycled lamp is now ready for its new life in your garden! Fill the dish with fresh water to create a welcoming bird bath, or add birdseed to turn it into a charming feeder. Alternatively, leave it empty as a unique decorative table for small potted plants or garden ornaments. Place it in a visible, quiet spot in your garden where birds feel safe, away from dense foliage that could hide predators. Regularly clean the dish to prevent algae growth and ensure a healthy environment for birds.
Personalizing Your Upcycled Lamp Garden Feature
The beauty of DIY projects lies in the freedom to personalize them. Here are some ideas to make your lamp bird bath truly your own:
- Color & Finish: Experiment with vibrant colors, metallic finishes, or even a distressed, antique look using chalk paint and wax. Consider colors that complement your garden’s existing palette or stand out as a striking accent.
- Embellishments: Add mosaic tiles to the dish’s rim or the lamp’s base for a touch of sparkle. Glue decorative stones, glass gems, or even small ceramic figures around the base for extra charm.
- Different Dishes: While glass is excellent, you could use a terracotta saucer for a rustic look, or a shallow metal bowl for an industrial touch. Just ensure it’s shallow enough for birds to safely drink from.
- Solar Lights: Attach small solar-powered string lights or a single solar spotlight near the top of the lamp to illuminate it at night, creating a magical ambiance in your garden.
- Theme Integration: If your garden has a specific theme (e.g., fairy garden, zen garden), incorporate elements that fit that theme into your lamp’s design.
Care and Maintenance Tips
To ensure your upcycled lamp bird bath remains beautiful and functional for years to come, a little care goes a long way:
- Regular Cleaning: If used as a bird bath, clean the dish frequently (daily or every other day) to prevent algae buildup and the spread of bird diseases. Use a stiff brush and warm water; avoid harsh chemicals.
- Refill Water: Always keep the bird bath filled with fresh, clean water. Birds are more likely to visit if there’s a reliable water source.
- Check Stability: Periodically check that the dish is still securely attached and that the lamp base is stable, especially after strong winds or heavy rain.
- Winterizing: In colder climates, bring your bird bath indoors during freezing temperatures to prevent the dish from cracking and to protect the adhesive.
- Paint Touch-Ups: Over time, outdoor paint may fade or chip. Keep a can of your chosen spray paint handy for quick touch-ups to maintain its fresh look.
This project is a testament to the fact that creativity knows no bounds, and with a little effort, you can transform everyday items into extraordinary garden features. Not only will you have a stunning focal point, but you’ll also be providing a valuable resource for your local feathered friends. So, roll up your sleeves, unleash your inner crafter, and give that old lamp a magnificent new purpose!
*All images and the original tutorial are credited to mybloomsource via YouTube. We highly recommend visiting their channel and subscribing for more inspiring DIY projects and creative ideas!
Easy Repurposed DIY Lamp Bird Bath Tutorial: Your Guide to a Beautiful Backyard Sanctuary