
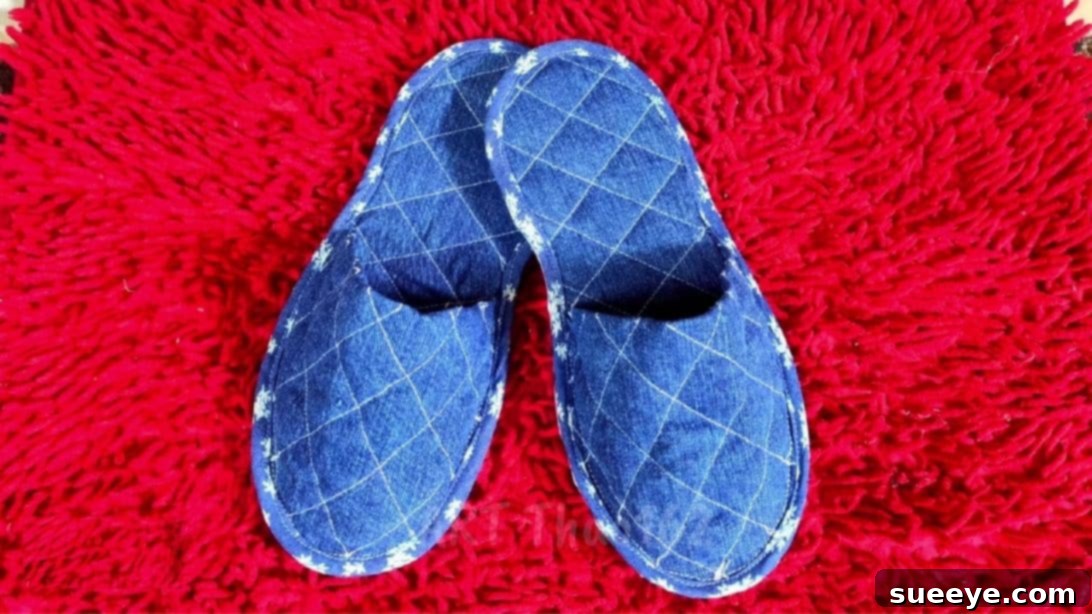
In a world increasingly focused on sustainability and personalization, DIY projects that repurpose existing materials have gained immense popularity. Among the countless creative ways to give old items a new lease on life, transforming worn-out denim into practical and stylish household items stands out. While many have explored denim crafts from bags to blankets, few are as uniquely rewarding or ingeniously simple as crafting your own comfortable slippers from old jeans. This particular project caught my attention immediately due to its clever process and the surprisingly high-quality results it delivers. After delving into the tutorial and successfully creating my very first pair of these unique DIY slippers, I can confidently say it’s a venture well worth your time and effort. If you’re seeking an engaging, low-cost, and eco-friendly craft that allows you to express your creativity, then you’ve absolutely found the perfect guide. This brilliant concept comes courtesy of ART Thao162 on YouTube, whose innovative approach makes upcycling accessible and fun for everyone.
Creating your own slippers not only provides a cozy alternative to store-bought options but also serves as an excellent way to reduce textile waste and embrace sustainable living. Imagine the satisfaction of slipping into a pair of soft, custom-made slippers, knowing they were crafted with your own hands from material that might otherwise have ended up in a landfill. This guide will walk you through each step, ensuring you have all the knowledge and tips to transform your old denim into functional footwear, combining comfort, style, and environmental consciousness.
Essential Materials for Your Denim Slipper Project
Before you embark on this exciting upcycling journey, gathering all the necessary materials is crucial. Most of these items are likely already lying around your home, making this an incredibly budget-friendly endeavor. Here’s what you’ll need to create your comfortable and stylish denim slippers:
- Old Denim: The star of our project! A pair of old jeans, a denim jacket, or any sturdy denim fabric will work perfectly. Ensure it’s clean and in good condition (no major holes or tears, unless you plan to incorporate them into the design).
- Old Padded Jacket (or similar padded fabric): This will provide the necessary cushioning for the slipper’s interior, ensuring maximum comfort. An old quilted jacket, a thick blanket, or even a piece of foam batting can serve as a suitable alternative.
- Paper: For creating your slipper patterns. Any large sheets of paper will do, such as newspaper, craft paper, or even old gift wrap.
- Mini Binder Clips: These small but mighty clips are incredibly useful for holding fabric pieces together securely before sewing or gluing, ensuring precise alignment.
- Patterned Fabric: A small piece of patterned or printed fabric (e.g., cotton, flannel) will be used to create a neat and decorative edge binding for your slippers, adding a pop of color or personality.
- Chalk (Fabric Chalk): Essential for marking outlines on your denim and padded fabric without leaving permanent marks.
- Marker Pen: For tracing your foot outline on paper and marking initial pattern lines.
- Ruler: For precise measurements and drawing straight lines.
- A Pair of Sharp Scissors: Fabric scissors are highly recommended for clean and effortless cutting through multiple layers of denim and padded fabric.
- Thick Foam Sheet: This will form the durable outer sole of your slippers, protecting them from wear and tear and providing additional cushioning and grip. Craft foam or EVA foam sheets are ideal.
- Hot Glue Gun and Hot Glue Sticks: For quick and secure initial assembly of fabric layers.
- Sewing Machine (or Needle and Thread): While a sewing machine will make the process faster and more durable, hand-sewing is entirely possible for those without a machine.
- Iron and Ironing Board: For pressing fabric to ensure crisp folds and smooth surfaces.
Step-by-Step Guide to Crafting Your Denim Slippers
Follow these detailed instructions carefully to transform your old denim into a pair of custom, cozy slippers. Precision and patience are key to achieving a professional-looking finish.
Step 1: Creating Your Slipper Patterns
The foundation of any well-fitting slipper lies in accurate patterning. Begin by placing one of your feet flat on a piece of paper. Using a marker pen, carefully trace the outline of your foot. This initial tracing will serve as your base template. To ensure a comfortable fit that allows for seam allowances and padding, you’ll need to create a slightly larger version. Mark a new outline around your initial foot tracing, extending it by approximately 1 centimeter (or about 0.4 inches) all around the perimeter. This extra margin is crucial for the slipper to accommodate padding and your foot comfortably. Once you have both outlines, carefully cut out the larger shoe pattern and set it aside. This piece will be the primary pattern for the slipper sole.
Next, take the larger shoe pattern you just cut out. To create the upper part of the slipper (the piece that covers the top of your foot), you’ll need to modify this sole pattern slightly. Fold the pattern in half lengthwise to find its center point along the top edge. Mark this center. From this center point, measure and mark a distance of 4 centimeters (approximately 1.6 inches) on each side along the top curve. Draw a smooth, curved line connecting these two 4cm marks to the top curve of the existing sole pattern, essentially creating an arc. This newly drawn shape will be your pattern for the slipper’s upper. Carefully cut out this new “upper” pattern. Now, take a section of your old denim, lay this upper pattern on top, secure it, and cut out two identical pieces (one for each slipper). Remember to orient the denim carefully if there’s a specific grain or stretch you want to consider.
Step 2: Preparing the Padded Inserts and Denim Uppers
Now it’s time to add comfort and structure to your slippers. Carefully cut open your old padded jacket and extract a section of its padded interior. This material will form the soft, cushioned inner layer of your slippers. To make it more manageable and even, press the padded fabric thoroughly with an iron on a low-to-medium heat setting. This helps to flatten it slightly and remove any creases, making it easier to work with. Take the smaller, original foot outline pattern (the one without the 1cm margin) and place it on top of the pressed padded fabric. Trace around it, and then cut out two pieces—these will be the soft insoles of your slippers.
Next, retrieve the denim fabric pieces you prepared for the upper part of the slipper in Step 1. Take one of these denim upper pieces and press it with an iron to create a crisp edge. Fold one of the long, curved sides inwards by about 0.5 cm (0.2 inches) and press it firmly. This creates a clean, finished edge that will be visible on the slipper. Now, take the larger sole pattern (the one with the 1cm margin) and place it on a new section of denim. Cut out two more pieces from the denim using this pattern; these will be the outer soles of your slippers. Additionally, cut out two more pieces of the curved upper pattern from the padded fabric – these will provide cushioning for the top of your foot. Carefully insert one of the padded upper cut-outs under the folded edge of each denim upper piece. Secure them in place using dabs of hot glue. This ensures the padding stays put. For added structural integrity and to prevent the padding from shifting, use chalk to mark crossed diagonal lines at approximately 1cm intervals across the denim upper with the padded insert. These lines will be sewn in a later step.
Step 3: Assembling the Slipper Sole and Upper
With all your pieces cut and prepared, it’s time for assembly. Using the larger shoe pattern (the one with the 1cm allowance), cut out two more sole pieces from the remaining denim; these will be the inner denim soles of your slippers. Now, take one of the padded sole inserts (from Step 2) and align it perfectly with one of the denim inner sole pieces. Secure them together with hot glue, ensuring they form a single, cushioned sole unit. Then, take one of the denim outer sole pieces (also from Step 2) and glue it on top of this padded-denim sole unit. You should now have a layered sole for one slipper: outer denim, padded layer, inner denim. Repeat for the second slipper. To enhance the stability and appearance of these layered soles, draw crossed diagonal lines across the top surface of the assembled denim sole at approximately 1cm intervals using chalk. These lines, similar to those on the upper, will be sewn to quilt the sole, preventing the layers from separating and adding a refined finish.
Now, take the curved denim upper piece (with its padded insert already glued in, from Step 2) and carefully position it onto the corresponding sole unit. The folded edge of the upper should face outwards. Align the raw edge of the upper with the raw edge of the sole, ensuring it fits snugly around the toe and sides of the sole. To hold everything precisely in place before sewing, use your mini binder clips to secure the curved upper piece to the sole. Once clipped, apply a thin line of hot glue along the raw edges where the upper meets the sole. This provides a temporary but strong bond. With the pieces securely glued and clipped, it’s time to sew. Using your sewing machine (or a strong needle and thread), carefully sew along all the chalk lines you marked on both the sole and the curved denim upper. Then, sew all around the perimeter where the curved upper meets the sole, stitching through all layers. This seam is crucial for the durability and structure of your slipper.
Step 4: Finishing Touches – Edging and Outer Sole
The final steps involve giving your slippers a polished look and adding a durable outer sole. Take your chosen patterned or printed fabric and cut a strip approximately 4 centimeters (about 1.6 inches) wide and long enough to go around the entire edge of one slipper. This fabric strip will serve as the edge binding, covering all the raw seams and giving your slippers a clean, professional finish. Fold this fabric strip in half lengthwise and press it firmly with an iron. Then, fold it in half again (so it’s now quartered in width) and press once more. This creates a neat, double-folded binding tape.
Now, carefully insert the raw edges of your slipper (where the sole and upper meet) into the fold of this prepared binding tape. Begin at the heel and work your way around, ensuring the binding evenly encases the slipper’s edge. Use your mini binder clips to hold the binding securely in place as you go. Once the entire edge is bound and clipped, take it to your sewing machine (or hand-sew) and stitch carefully along the outer edge of the binding, securing it to the slipper through all layers. This not only covers unsightly seams but also reinforces the slipper’s structure.
Finally, for the ultimate comfort and durability, take your thick foam sheet. Place the completed slipper sole on top of the foam sheet and carefully trace its exact outline. Cut out this foam sole. This foam piece will form the robust, non-slip bottom of your slipper. Attach this foam sole securely to the underside of your fabric slipper sole using a generous amount of hot glue. Press firmly and allow it to dry completely. Repeat all steps for your second slipper, and voilà! You now have a unique pair of handmade slippers, repurposed from old denim, ready to provide comfort and style around your home.
Why Upcycle Old Jeans into Slippers? The Benefits of Denim Repurposing
The act of turning old jeans into new, useful items like slippers is more than just a fun craft; it’s a statement of sustainable living and creative expression. Denim is an incredibly durable and versatile fabric, making it an ideal candidate for upcycling projects. Here are just a few reasons why repurposing old denim into slippers is such a fantastic idea:
- Environmental Sustainability: The fashion industry, particularly denim production, has a significant environmental footprint, consuming vast amounts of water and energy. By reusing old jeans, you divert textiles from landfills, reducing waste and the demand for new production. This eco-friendly approach contributes to a circular economy, where resources are kept in use for as long as possible.
- Cost-Effectiveness: This project is incredibly budget-friendly. Most of the materials—old denim, a padded jacket, paper, and basic sewing supplies—are likely items you already own. This means you can create a high-quality, personalized product without spending a fortune, saving money on store-bought slippers.
- Uniqueness and Personalization: No two pairs of DIY denim slippers will ever be exactly alike. You have the freedom to choose your denim’s wash, distressing, and even incorporate embellishments like embroidery, patches, or different patterned fabrics for the binding. This allows you to create a truly personalized item that reflects your style and personality, a luxury rarely found in mass-produced goods.
- Durability and Comfort: Denim is known for its strength and longevity. When combined with a padded interior and a foam sole, these slippers are designed to be both incredibly comfortable and long-lasting. The padding offers cushioning, while the denim provides a sturdy exterior that can withstand daily wear.
- Skill Development: Undertaking a project like this helps you develop or hone your crafting and sewing skills. From pattern making to precise cutting and stitching, each step offers an opportunity to learn and improve. The satisfaction of completing a functional item with your own hands is immensely rewarding.
- Reduces Clutter: Instead of simply discarding old jeans that no longer fit or are too worn for regular wear, you’re transforming them into something practical and beautiful, helping to manage household clutter in a creative way.
Tips for Success and Customization Ideas
To ensure your DIY denim slippers turn out perfectly and truly reflect your style, consider these additional tips and customization ideas:
- Choose Your Denim Wisely: While any old denim works, consider the weight and stretch. Thicker, stiffer denim will provide more structure, while softer, more worn denim might offer immediate comfort. Experiment with different washes (light, dark, faded) for varied aesthetics.
- Pattern Accuracy is Key: Take your time with the pattern creation. A well-fitting pattern is the secret to comfortable slippers. If you have particularly wide or narrow feet, adjust the 1cm margin accordingly.
- Fabric Prep: Always iron your fabrics before cutting and sewing. This removes wrinkles and ensures precise cuts and seams, leading to a much neater finish.
- Use Sharp Tools: Sharp fabric scissors will make cutting through multiple layers of denim and padding much easier and more accurate. A dull blade can lead to frayed edges and uneven cuts.
- Sewing Machine Settings: When sewing through denim and multiple layers, use a strong needle (denim or heavy-duty needle) and a slightly longer stitch length to prevent skipped stitches and thread breakage.
- Embellish and Personalize:
- Embroidery: Add hand-stitched details or monograms to the denim upper before assembly.
- Patches: Attach decorative patches or pieces of contrasting fabric for a unique look.
- Different Binding Fabrics: Experiment with different patterned fabrics for the edge binding—florals, plaids, or polka dots can add a fun accent.
- Non-Slip Soles: If your thick foam sheet isn’t very grippy, consider adding non-slip fabric paint dots or small rubber pieces to the bottom for extra traction.
- Lining Fabric: For an even softer interior, you could add an extra layer of flannel or fleece as a full lining before assembling the slipper.
- Gift Idea: These handmade denim slippers make thoughtful and unique gifts for friends and family, perfect for birthdays or holidays.
Creating your own denim slippers is a truly gratifying project that combines practicality, creativity, and a commitment to sustainable living. You’ll not only end up with a wonderfully comfortable and unique pair of slippers but also experience the immense satisfaction of crafting something beautiful and functional from materials you already have. So, gather your supplies, follow these detailed steps, and get ready to enjoy your custom-made, eco-friendly footwear. Happy crafting!
*Many thanks to ART Thao162 on YouTube for the inspiring tutorial and these amazing images. Be sure to subscribe to their channel for more innovative and engaging DIY projects and tutorials.