
Delightfully Easy No-Bake Pineapple Dream Dessert: Your Go-To Recipe for Effortless Sweetness
Are you searching for a dessert that combines incredible flavor with unparalleled ease? Look no further than the enchanting No-Bake Pineapple Dream Dessert! This delightful treat is a true game-changer for anyone who loves sweet indulgence without the hassle of baking. Inspired by the wonderful culinary creations from Rehana’s Kitchen Corner on YouTube, this recipe promises a refreshing, creamy, and satisfying experience with just a handful of ingredients. It’s the perfect solution for family gatherings, potlucks, or simply a sweet escape on a warm afternoon.
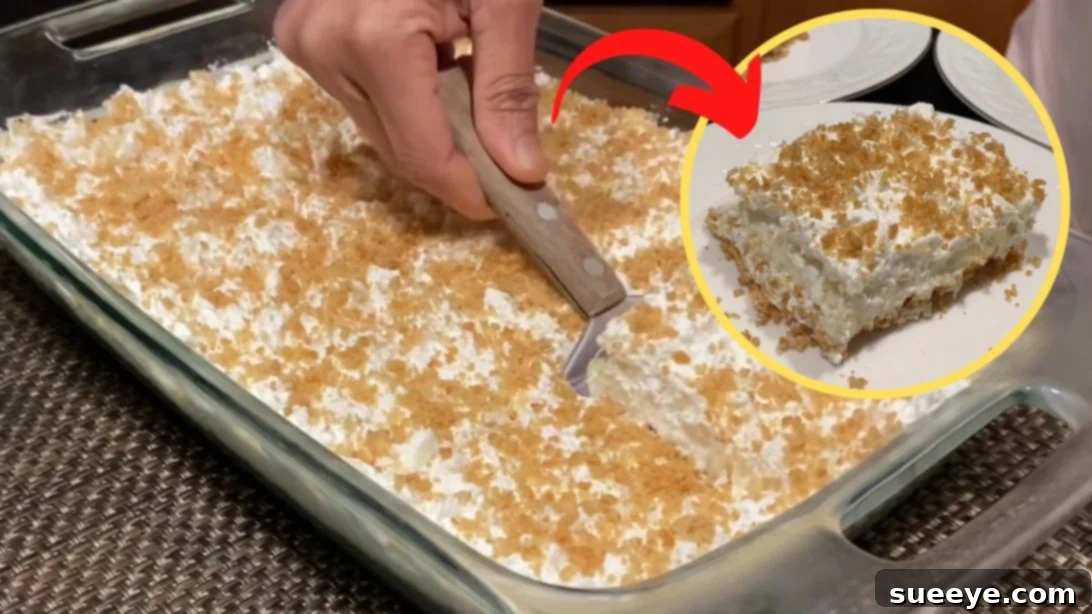
Imagine a velvety smooth cream cheese filling, bursting with the tropical tang of crushed pineapple, all nestled upon a buttery graham cracker crust and crowned with a light, airy topping. The best part? This entire masterpiece comes together without ever turning on your oven! Requiring only about six core ingredients, it’s not just simple but also incredibly economical. Whether you’re a seasoned baker or a complete novice in the kitchen, this No-Bake Pineapple Dream Dessert is designed for success. Plus, we’ll guide you through tips for customizing it to your heart’s content, making it even more special.
The Magic of No-Bake Desserts: Why This Pineapple Dream is a Must-Try
No-bake desserts hold a special place in the culinary world, offering a convenient alternative to traditional baked goods. They are particularly invaluable during warmer months when heating up the kitchen is the last thing you want to do, or when you’re pressed for time but still want to impress. This Pineapple Dream Dessert perfectly embodies the spirit of no-bake simplicity, delivering a sophisticated flavor profile with minimal effort. Its layers of creamy, fruity goodness create a harmonious balance of textures and tastes that are irresistibly refreshing. From the crisp graham cracker base to the luscious cream cheese and pineapple layers, every bite is a delightful journey. This recipe is also an excellent option for beginners looking to build confidence in the kitchen, as it requires no complex techniques or specialized equipment.
Beyond its ease, the No-Bake Pineapple Dream Dessert is a fantastic make-ahead option. Preparing it several hours or even a day in advance allows the flavors to meld beautifully, resulting in an even more profound taste experience. This makes it an ideal candidate for busy hosts or anyone who appreciates the convenience of having a show-stopping dessert ready to go. So, get ready to dive into the world of effortless deliciousness and create a dessert that will earn rave reviews every single time.
Essential Ingredients for Your Pineapple Dream
Creating this magnificent dessert begins with selecting the right ingredients. While the list is concise, each component plays a crucial role in achieving the perfect balance of flavor and texture. We’ll outline exactly what you need, along with some insightful tips for preparation.
For the Irresistible Pineapple Cream Filling:
- 2 cups of powdered sugar, meticulously sifted: Sifting is key here to prevent lumps and ensure a silky-smooth filling. Powdered sugar dissolves easily and contributes to the creamy texture.
- 8 ounces of cream cheese, perfectly softened: Opt for full-fat cream cheese for the richest flavor and best consistency. Allowing it to soften at room temperature is crucial for a lump-free, easily blendable filling.
- 8 ounces of Cool Whip, thawed: Cool Whip adds lightness and airiness to the filling, complementing the richness of the cream cheese. Ensure it’s thawed in the refrigerator before use.
- 20 ounces of crushed pineapple, thoroughly drained well: This is perhaps the most critical step for the pineapple. Excess liquid can make your dessert watery. Use a fine-mesh sieve or cheesecloth to press out as much juice as possible. The crushed form ensures even distribution throughout the filling.
For the Classic Graham Cracker Crust:
- 2½ cups of graham cracker crumbs (approximately 2 sleeves of crackers): Graham crackers provide a sweet, slightly spiced, and crunchy base that perfectly complements the creamy filling. You can buy pre-crushed crumbs or crush your own for fresher flavor.
- ½ cup of unsalted butter, gently melted: Unsalted butter allows you to control the overall saltiness of the dessert. When melted and mixed with the crumbs, it acts as a binder, creating a firm and flavorful crust.
Step-by-Step Directions to Dessert Perfection
Follow these detailed steps to construct your No-Bake Pineapple Dream Dessert with confidence and precision. Each stage is designed to be straightforward, ensuring a beautiful and delicious outcome.
Step 1: Crafting the Perfect Graham Cracker Crust
The foundation of any great no-bake dessert is a well-prepared crust. Begin by transforming your graham crackers into fine crumbs. If you have a food processor, this task is incredibly quick and easy – simply pulse the crackers until a uniform crumb forms. For those without a food processor, a simple ziplock bag and a rolling pin will do the trick. Place the graham crackers in the bag, seal it, and roll over them repeatedly until they are finely crushed. Aim for a fine, sand-like consistency for the best crust.
Next, melt your unsalted butter. A microwave is ideal for this; heat it in short bursts, stirring frequently, until fully liquid. Crucially, allow the melted butter to cool slightly before adding it to the graham cracker crumbs. Mixing hot butter with crumbs can alter their texture. Once cooled, combine the melted butter with the graham cracker crumbs in a medium bowl. Toss them together thoroughly until all the crumbs are moistened and resemble wet sand. This ensures that your crust will hold together beautifully. Be meticulous in mixing to avoid dry spots.
Now for a clever trick: reserve about half a cup of this buttery graham cracker mixture. This will be used later as a delightful topping, adding extra texture and visual appeal. Take the remaining mixture and press it firmly and evenly into the bottom of your chosen baking dish. An 8×8 or 9×13 inch pan works wonderfully. Use the bottom of a glass or your knuckles to compact the crumbs tightly, creating a solid and stable base. Once pressed, place the dish in the refrigerator and let it chill for at least 15 minutes. This chilling period is essential for the butter to firm up, setting the crust and preventing it from crumbling when sliced.
Step 2: Preparing the Creamy Pineapple Layers
While your crust is chilling, prepare the luscious filling. In a large mixing bowl, add the softened cream cheese. Begin by beating the cream cheese on its own for a minute or two until it becomes smooth and creamy, with no lumps. This initial beating is vital for achieving a consistently smooth filling. Gradually add the sifted powdered sugar, one cup at a time, beating after each addition until fully incorporated. This gradual approach prevents a cloud of sugar from forming and ensures even mixing. Continue to beat the mixture on medium-high speed for another minute or so, until it’s light, fluffy, and perfectly smooth.
Once the cream cheese mixture is ready, gently fold in about half of your thoroughly drained crushed pineapple. Use a spatula for this step, carefully incorporating the pineapple without deflating the cream cheese mixture. You want to see the pineapple evenly distributed, adding a burst of tropical flavor and texture. This mixture will form your primary pineapple cream cheese layer. Retrieve your chilled crust from the refrigerator and carefully spread this cream cheese and pineapple mixture over it, ensuring an even layer from edge to edge. Take your time to make it nice and smooth for a beautiful presentation.
For the final layer, take the remaining half of the drained crushed pineapple and gently fold it into the thawed Cool Whip. Again, use a spatula and a light hand to preserve the airy texture of the Cool Whip. This creates a lighter, fruitier topping that perfectly complements the richer cream cheese layer beneath. Carefully spread this Cool Whip and pineapple mixture evenly over the cream cheese layer. Pay attention to spreading it gently to avoid disturbing the layer below.
Step 3: The Grand Finale – Chilling and Serving
To complete your Pineapple Dream Dessert, retrieve the reserved graham cracker crumbs and generously sprinkle them all over the top. This not only adds a beautiful visual appeal but also provides an extra layer of texture that enhances every bite. Once garnished, the dessert needs ample time to set. Carefully place the baking dish back into the refrigerator and allow it to chill for at least 4 hours, or ideally, up to overnight. This extended chilling period is crucial: it allows all the layers to firm up, the flavors to fully meld and deepen, and the dessert to achieve its signature smooth, sliceable consistency. Rushing this step will result in a less structured and less flavorful dessert.
When you’re ready to serve, remove the dessert from the refrigerator. For clean slices, you can run a sharp knife under hot water and wipe it clean between each cut. This creates crisp, defined edges, making your presentation even more impressive. Slice into individual portions, serve chilled, and prepare for a chorus of compliments! Each spoonful offers a delightful medley of textures and tastes, from the crunchy crust to the creamy, fruity layers. This dessert is best enjoyed fresh but can be stored for several days.
Expert Tips for a Flawless Pineapple Dream Dessert
Achieving perfection with this No-Bake Pineapple Dream Dessert is simple when you follow a few expert tips:
- Drain Pineapple Thoroughly: This cannot be stressed enough. Liquid is the enemy of a firm no-bake dessert. Press out every last drop of juice from the crushed pineapple. You can even place the pineapple on a few layers of paper towels and gently press.
- Softened Cream Cheese is Key: Cold cream cheese will result in a lumpy filling. Ensure it’s at room temperature for at least 30-60 minutes before mixing.
- Sift Powdered Sugar: This simple step prevents lumps and ensures a smooth, velvety texture in your cream cheese layer.
- Don’t Rush the Chill Time: The minimum 4-hour chill is essential for the dessert to set properly. Overnight chilling is even better, as it allows the flavors to deepen and meld beautifully, making for an even more satisfying treat.
- Even Crust Distribution: Take the time to press the graham cracker crust firmly and evenly into the pan. A consistent base ensures every slice has the perfect crust-to-filling ratio.
- Gentle Folding: When incorporating pineapple into the cream cheese and Cool Whip, use a gentle folding motion with a spatula. This maintains the airy texture of the fillings.
Creative Variations to Customize Your Dessert
While the classic No-Bake Pineapple Dream Dessert is undeniably delicious, it’s also wonderfully versatile. Feel free to experiment with these ideas to put your unique spin on this family favorite:
- Fruit Fantasies: Instead of or in addition to pineapple, consider other well-drained canned fruits like mandarin oranges, peaches, or even mixed berries. Adjust sweetness as needed. Fresh, finely diced mango or kiwi could also work if the moisture content is managed.
- Crust Innovations: While graham crackers are traditional, crushed vanilla wafers, shortbread cookies, or even gingersnaps can create a delightful change in flavor and texture for the crust. For a gluten-free option, use gluten-free graham crackers or a nut-based crust.
- Flavor Boosts: Add a teaspoon of vanilla extract or a pinch of coconut extract to the cream cheese layer for an extra layer of aroma. A tablespoon of lime or lemon juice could also brighten the pineapple flavor.
- Topping Transformations: Beyond the reserved graham crumbs, consider toasted shredded coconut, finely chopped nuts (pecans or walnuts work well), white chocolate shavings, or a drizzle of caramel or chocolate sauce just before serving.
- Individual Servings: For elegant portion control, assemble the dessert in individual ramekins, dessert glasses, or even mason jars. This is perfect for parties and makes serving a breeze.
Storage Guidelines for Leftovers
Should you be lucky enough to have any leftovers, this No-Bake Pineapple Dream Dessert stores beautifully. Keep it covered tightly with plastic wrap or in an airtight container in the refrigerator for up to 3-4 days. While it technically can be frozen for longer storage (up to a month), the texture of the Cool Whip and cream cheese may change slightly upon thawing, becoming a bit softer. For best results, enjoy it chilled from the refrigerator.
Conclusion: Your New Favorite No-Bake Treat Awaits!
The No-Bake Pineapple Dream Dessert is more than just a recipe; it’s an invitation to create joy with minimal effort. Its delightful blend of creamy, sweet, and tangy flavors, coupled with the satisfying crunch of its graham cracker crust, makes it an undeniable crowd-pleaser. Whether you’re whipping it up for a casual weeknight treat or a special occasion, its simplicity and refreshing taste will undoubtedly make it a regular in your dessert rotation. So, gather your ingredients, follow these straightforward steps, and prepare to indulge in a truly dreamy dessert that proves deliciousness doesn’t always require an oven. Enjoy this fantastic creation, and happy dessert making!
*These amazing images are all credited to Rehana’s Kitchen Corner via YouTube. Check her other content and follow for more delicious inspiration!