
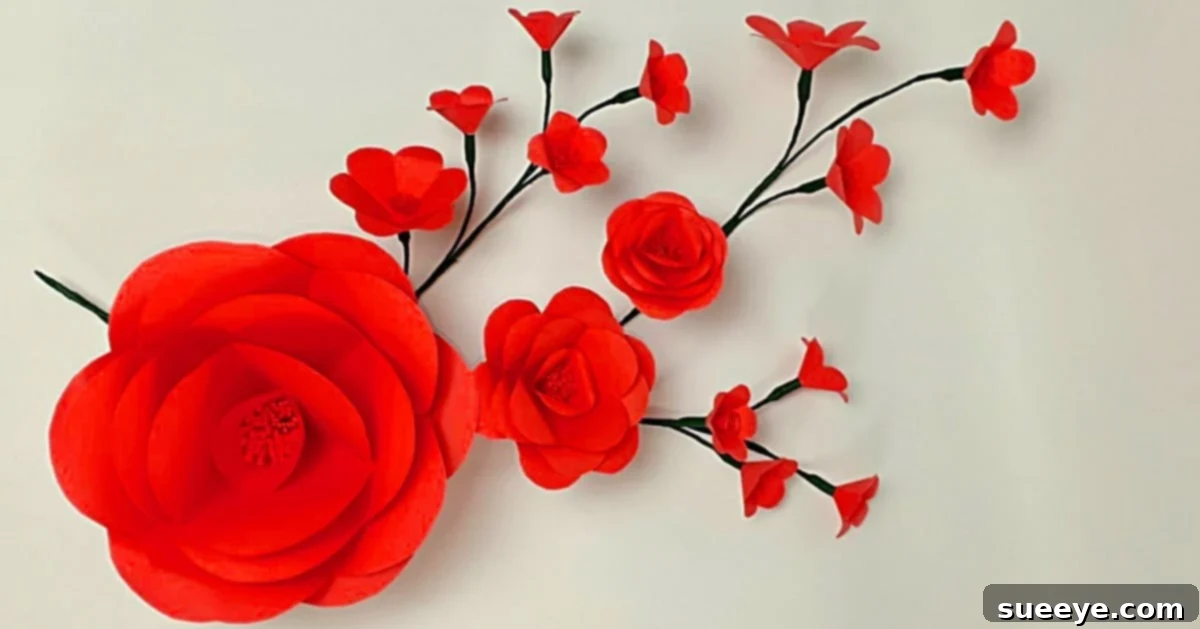
Transforming a part of my bedroom into a distinct sitting area was a goal I’d cherished for some time. My vision was to create a visually separate and inviting nook within the larger room, a space that felt uniquely defined. The power of decorative elements to achieve this transformation quickly led my thoughts to flowers. I explored various avenues: the timeless elegance of real blooms, the convenience of store-bought artificial arrangements, and the deeply personal touch of handmade floral creations. While I possessed a considerable collection of artificial flowers, patiently gathered from numerous sales at Michaels Craft Store and Joann’s Fabrics – often sweetened by my 25% off coupons from their respective apps, making them incredibly affordable and utterly delightful – I yearned for something truly unique. My primary concern was finding a DIY project that could not only complement my existing floral array but also stand out with a professional, high-quality aesthetic. The idea of crafting something myself, something that truly reflected my personal style, was incredibly appealing yet daunting. Would I find a tutorial that lived up to the beauty of my cherished artificial flowers?
My search led me to an absolutely captivating video tutorial by DIY Suka Suka on YouTube. From the moment I began watching, I was utterly mesmerized by the sheer beauty and intricate design of their handmade paper flower branches, specifically designed for wall mounting. The tutorial promised a blend of professional aesthetics with surprising ease of creation, thanks to its exceptionally descriptive, step-by-step instructions. This wasn’t just another craft project; it was an opportunity to create breathtaking floral art that looked like it belonged in a high-end boutique or an exclusive art exhibition. The excitement was immediate and overwhelming; I couldn’t wait to gather my supplies and begin crafting these magnificent paper flowers to bring my sitting area vision to life.
The Undeniable Charm of DIY Paper Flowers for Home Decor
Choosing paper flowers for home decor, especially for a feature like wall art, offers a myriad of advantages that go beyond mere aesthetics. Unlike real flowers, which demand constant care, watering, and ultimately wilt, paper flowers offer everlasting beauty. They remain vibrant and fresh-looking indefinitely, requiring only an occasional dusting to maintain their pristine appearance. This longevity makes them an incredibly cost-effective solution in the long run, eliminating the recurring expense of fresh bouquets.
Compared to store-bought artificial flowers, crafting your own paper blooms provides an unparalleled level of customization. You have complete control over every aspect: the exact shade of each petal, the specific type of flower, its size, and the overall composition of your arrangement. This freedom allows you to perfectly match your existing color scheme, introduce new accent hues, or create a truly unique piece that reflects your personality and the specific ambiance you wish to cultivate in your space. Imagine designing a cascading floral branch in your favorite pastel tones, or bold, striking blooms that make a dramatic statement – all crafted precisely to your specifications.
Furthermore, the act of creating paper flowers is an incredibly rewarding and therapeutic experience. There’s a profound sense of satisfaction that comes from transforming simple sheets of paper into intricate, lifelike floral masterpieces. Each fold, cut, and curl brings you closer to your vision, culminating in a piece of art that carries a part of your dedication and creativity. This personal investment imbues the decor with a special meaning, making your space not just beautiful, but also uniquely yours, a testament to your craft and ingenuity. The compliments you’ll receive on your “designer” wall art will only amplify the joy of having made it yourself.
Materials for Your Paper Flower Wall Art Project: Crafting Beauty from Simplicity
Embarking on this delightful paper flower project requires a few essential tools and materials, all readily available at most craft stores or online. Each item plays a crucial role in bringing your floral vision to life, from the delicate petals to the sturdy stems that will form your stunning wall arrangement. Gather these supplies, and you’ll be well on your way to creating breathtaking botanical art for your home:
- Colored Paper: This is the heart of your project. Opt for various weights and textures for different effects. Cardstock works well for sturdy petals, while lighter craft paper can create delicate, flowing forms. Experiment with a palette that complements your room’s decor, or choose contrasting colors for a vibrant pop.
- A Pair of Scissors: A sharp, precise pair of scissors is indispensable for cutting intricate petal shapes and details. Consider having a smaller pair for fine work and a larger pair for general cutting.
- Floral Wire: Essential for creating flexible yet sturdy stems and branches. Different gauges are useful – thinner wire for individual flower stems and thicker wire for creating the main branches that will hold multiple blooms.
- Floral Tape: This self-adhesive, stretchy tape is used to wrap floral wire, securing petals, and creating a realistic, smooth green finish for your stems and branches. It comes in various shades of green to mimic natural foliage.
- Wire Cutters: Necessary for cleanly cutting floral wire to your desired lengths, ensuring neat and professional-looking stems.
- A Ruler: For precise measurements when cutting paper or wire, ensuring consistency in your petal sizes and overall flower dimensions.
Directions: Bringing Your Paper Flowers to Life – A Step-by-Step Artistic Journey
The beauty of this project lies in its carefully structured approach, guiding you from simple paper to elaborate floral arrangements. As demonstrated in the inspiring tutorial, the process begins with mastering the creation of larger, foundational flowers, a surprisingly easy and incredibly rewarding first step.
Mastering the Large Flowers: The Foundation of Your Floral Display
The initial phase of this remarkable tutorial focuses on constructing the larger flowers. You will discover how simple techniques can yield stunning results, even for those new to paper crafting. The instructions typically involve:
- Petal Creation: Begin by selecting your desired colored paper. You’ll learn to trace and cut out various petal shapes, ranging from broad, sweeping outer petals to smaller, more intricate inner ones. Precision in cutting is key here to ensure a natural, organic look.
- Shaping and Curling: This is where the magic happens! Using tools like a pencil, a dowel, or even your fingers, you’ll be guided to gently curl, bend, and shape each individual petal. This step adds dimension and realism, transforming flat paper into delicate, three-dimensional forms that mimic the natural curves of real flower petals.
- Assembling the Bloom: Once shaped, the petals are carefully layered and secured. The tutorial demonstrates techniques for building the flower from its center outwards, ensuring a full, lush appearance. This usually involves using a strong adhesive or a small piece of floral wire at the base to hold everything together securely. The process is so intuitive that you’ll quickly gain confidence as your first large paper bloom takes shape.
Crafting an Array of Sizes and Assembling Dynamic Branches
Once you’ve mastered the foundational large flower, the tutorial progresses to guide you through crafting an array of flowers in diverse sizes. This variety is crucial for creating depth, texture, and visual interest in your final wall art piece. You’ll learn techniques for scaling down petal templates, ensuring each flower, regardless of its size, maintains its intricate beauty and structural integrity. The meticulous instructions reveal how to:
- Create Varied Blooms: Apply the same shaping and assembly principles to smaller petals, developing miniature flowers, buds, and mid-sized blooms. This variation will contribute significantly to the dynamic and natural appearance of your wall art.
- Form Realistic Stems: For each finished flower, you’ll attach a piece of floral wire to its base. The tutorial provides clear guidance on how to wrap this wire with floral tape. This not only secures the flower firmly but also creates a seamless, natural-looking stem that can be bent and positioned as needed.
- Build the Wall-Mountable Branches: This is perhaps the most exciting part – assembling your individual flowers into cohesive, visually appealing branches. You’ll learn how to strategically combine flowers of varying sizes, attaching them to thicker main floral wires using floral tape. The tutorial offers invaluable advice on creating natural bends, twists, and cascades in your branches, mimicking organic growth patterns. This thoughtful arrangement ensures that when mounted, your paper flowers don’t just sit on the wall but appear to gracefully emerge from it.
Mounting Your Masterpiece: Transforming Your Space
With your beautiful paper flower branches complete, the final step is to mount them to your wall, transforming your chosen space. The tutorial will likely offer suggestions for secure and aesthetically pleasing mounting techniques. Consider:
- Arrangement Planning: Before permanently attaching anything, experiment with different layouts on your wall. Use temporary adhesive or masking tape to visualize the composition, ensuring balance and flow. Think about how the different sizes and shapes interact.
- Secure Attachment: Depending on the weight and size of your branches, small, discreet nails, picture hooks, or even strong adhesive strips (like Command Strips) can be used. Ensure the mounting method is robust enough to hold your art securely without damaging your wall or the flowers.
- Creating Depth: Don’t be afraid to let some branches project slightly from the wall, adding to the three-dimensional effect and creating shadows that enhance the visual appeal.
This project is truly remarkable. The finished paper flowers possess an astonishing level of detail and sophistication, making them appear as if they were purchased from a high-end specialty boutique or discovered at an exclusive art festival. The process is not only enjoyable but culminates in a breathtaking piece of decor that will undoubtedly garner admiration and compliments. It’s a testament to how simple materials, combined with clear guidance and a touch of creativity, can yield truly extraordinary results, elevating your home decor with a personal and artistic flair.