
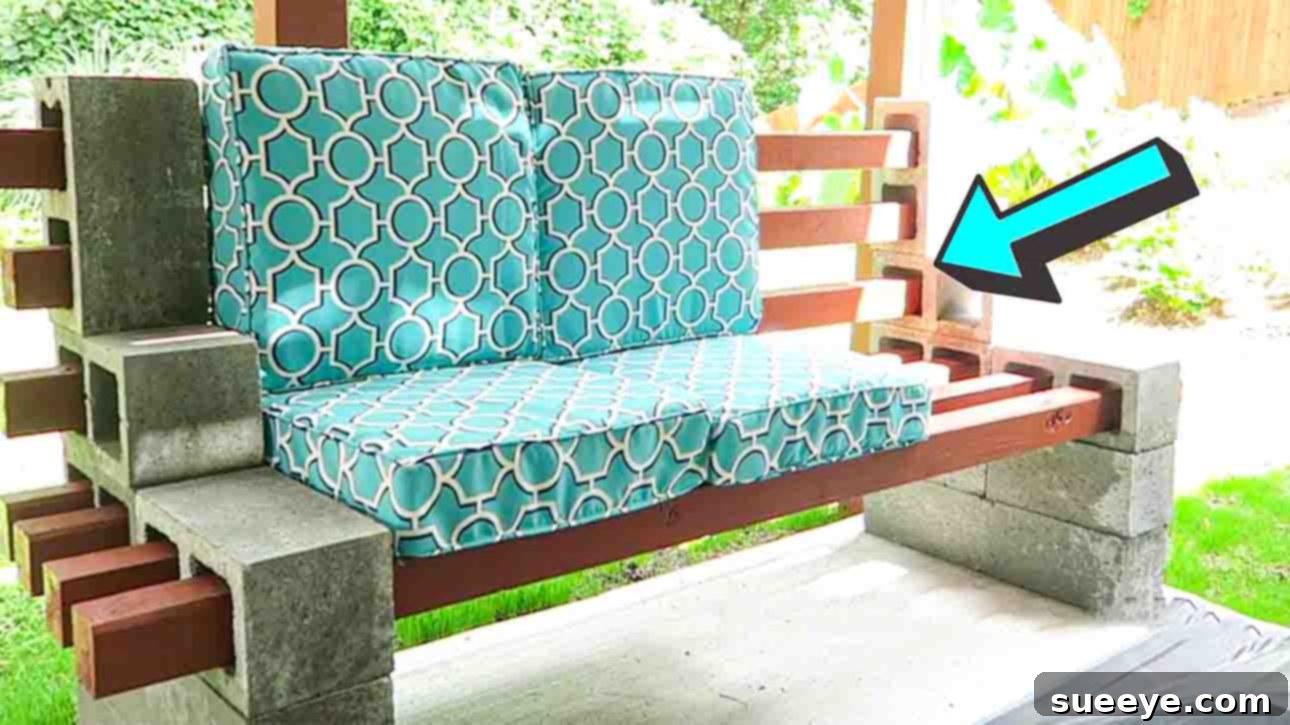
DIY Cinder Block Bench: Transform Your Patio with Chic, Affordable Seating
Are you dreaming of a beautiful, inviting outdoor living space but cringing at the price tags of stylish patio furniture? Look no further! This comprehensive guide will walk you through creating an incredibly chic and super sturdy DIY cinder block bench, a project that promises significant savings without compromising on aesthetics or durability. Inspired by the clever design from TheUnfrumpyMommyLife on YouTube, this bench is not only fast and easy to construct but also offers a modern, industrial-chic appeal that complements any outdoor decor.
Cinder blocks, often overlooked as mere construction materials, are incredibly versatile and can be transformed into stunning pieces of furniture. Their inherent strength and robust nature make them ideal for outdoor use, providing a solid foundation for comfortable seating. Paired with sturdy 4×4 posts, these humble blocks come together to form a bench that’s not just functional but a genuine statement piece. Whether you’re a seasoned DIY enthusiast or a complete beginner, this project is designed for success, requiring minimal tools and effort. Get ready to elevate your patio, deck, or garden area with a personalized touch that’s both economical and impressively stylish.
Why Choose a DIY Cinder Block Bench?
The appeal of a cinder block bench extends far beyond its low cost. These benches offer:
- Unbeatable Affordability: Compared to store-bought patio benches, the material cost for a DIY cinder block bench is remarkably low, making it an excellent option for budget-conscious homeowners.
- Exceptional Durability: Cinder blocks are built to withstand the elements, ensuring your bench will last for years with minimal maintenance.
- Modern Aesthetic: The raw, industrial look of cinder blocks combined with natural wood posts creates a contemporary, minimalist design that fits perfectly into various outdoor styles, from urban gardens to rustic retreats.
- Customization Potential: This basic design serves as a fantastic canvas for your creativity. Paint the blocks, stain the wood, add cushions, or even incorporate plants to make it uniquely yours.
- Ease of Construction: With straightforward steps and common materials, this project is accessible to almost anyone, regardless of prior building experience.
- Versatile Placement: Ideal for patios, decks, gardens, fire pit areas, or even as extra seating for outdoor gatherings.
This tutorial will guide you through each phase of construction, from gathering your materials to applying the final touches, ensuring you build a beautiful and lasting piece for your outdoor oasis. Let’s get started on this rewarding DIY adventure!
Essential Materials for Your Cinder Block Bench
Before diving into the construction, gathering all your materials is crucial. This not only streamlines the building process but also ensures you have everything you need to complete the project without interruptions. The beauty of this DIY bench lies in its simplicity and the readily available nature of its components.
- Construction Adhesive (Heavy-Duty): A high-strength, weather-resistant adhesive is vital for securely bonding the cinder blocks together. Look for products designed for concrete, masonry, or landscaping blocks. This ensures your bench is stable and durable against outdoor conditions.
- 16 pcs. Cinder Blocks (Standard Hollow Core): These are the foundational elements of your bench. Standard 8x8x16-inch hollow-core blocks are generally suitable. Consider purchasing a few extra in case of breakage or for future projects. Ensure they are clean and free from debris for optimal adhesive bonding.
- 7 pcs. 4×4 Posts (8 feet long recommended): These will serve as the comfortable seating surface of your bench. Opt for pressure-treated lumber for outdoor use, as it resists rot, decay, and insect infestation. Alternatively, cedar or redwood offer natural resistance and a beautiful aesthetic but may come at a higher cost. Ensure the posts are straight and free from significant warps. You may need to cut them to your desired length; a standard bench seat depth is usually around 18-20 inches, meaning each 8-foot post could yield multiple pieces depending on your bench’s design. For this project, assuming a bench depth of about 20-22 inches (to accommodate the block structure), you might get 4-5 seat pieces from an 8-foot 4×4, so 7 pieces implies a fairly long bench, or more typically 7 pieces are *cut* from longer stock. *Correction*: The original implies 7 pieces *are* the seat, so if the seat is 20-22 inches deep, and a 4×4 is used, then the length of the 4×4 is not specified, but the number of *individual posts* is 7. If they are intended to run *through* the bench structure, then their length would be the overall length of the bench. I will assume they are cut to be the depth of the seat *plus* some overhang. Let’s assume for expansion these are the seating slats.
Optional Materials for Enhanced Durability and Aesthetics:
- Exterior Paint or Wood Stain: For the 4×4 posts if you want to protect the wood and add color.
- Concrete/Masonry Sealer: To protect the cinder blocks from moisture, staining, and efflorescence, extending their lifespan and maintaining their appearance.
- Work Gloves: To protect your hands from rough blocks and adhesive.
- Measuring Tape and Pencil: For accurate marking and placement.
- Level: Crucial for ensuring your bench is perfectly even and stable.
- Rubber Mallet: For gentle adjustments to the blocks.
- Stiff Brush and Water: For cleaning blocks if necessary.
- Saw: If you need to cut your 4×4 posts to a specific length.
- Sandpaper: For smoothing rough edges on the wood posts.
Step-by-Step Guide to Building Your Chic Cinder Block Bench
Building this bench is a straightforward process, but paying attention to detail at each stage will ensure a stable, beautiful, and long-lasting piece of outdoor furniture. Take your time, measure twice, and enjoy the satisfaction of creating something functional with your own hands.
Step 1: Preparing Your Materials and Constructing the First Bench Support
Initial Preparations: Painting or Staining Posts
If you envision your bench with painted or stained wood posts, it’s highly recommended to complete this step *before* assembling the bench. Pre-treating the wood allows for easier and more even application, prevents paint or stain from dripping onto the cinder blocks, and ensures proper drying time. Choose an exterior-grade paint or stain that offers UV protection and moisture resistance to maximize the lifespan of your wood seating surface. Apply multiple thin coats according to the product instructions, allowing each coat to dry thoroughly.
Building the Foundation of the First Support Structure
Begin by selecting a flat, level area where your bench will reside. If your ground is uneven, consider laying a base of pavers or compacted gravel to create a stable foundation, as this is critical for the bench’s overall stability and longevity. Place two cinder blocks side-by-side on this prepared surface. Ensure the open holes of these blocks are facing upwards. These two blocks form the lowest level, serving as the primary base for one end of your bench. Use a level to confirm they are perfectly even, adjusting as necessary.
Adding the Second Layer of Blocks
Next, apply several generous beads or a zig-zag pattern of your heavy-duty construction adhesive along the top surface of the first two blocks. Then, carefully place two additional cinder blocks directly on top of the first pair, ensuring they are perfectly aligned. For this second level, the holes of these blocks should also face upwards, in the same direction as the foundational layer. This consistent orientation creates strong vertical channels within the support structure. Press firmly to ensure good adhesion, and double-check alignment with your level.
Constructing the Third Layer: Outward-Facing Holes
Once the second layer is secure, apply construction adhesive to the top surface of these two blocks. For the third level, you will again place two cinder blocks on top, but this time, the holes of these blocks will face *outwardly*. This change in orientation is crucial as it creates the horizontal channels that will eventually house your 4×4 wood posts, forming the seating area. Ensure these blocks are aligned with the layers below, forming a sturdy, integrated column. The outward-facing holes should be clearly visible from the front and back of your bench support.
The Fourth and Fifth Levels: Creating the Vertical Slot
Apply adhesive to the top of the two outward-facing blocks on the third level. The fourth level of the bench’s support structure will consist of just one single cinder block, placed centrally across the two blocks below it. The holes of this single block should also face outwardly. This block acts as a cap and provides a solid base for the final, vertically oriented block. After placing the fourth block, apply a few strong strips or a generous amount of construction adhesive on its top surface. Now, take your very last cinder block for this support structure and place it on top of the fourth level in a *standing position*, so its holes are facing out and it stands vertically rather than lies flat. This vertical placement is key, as it forms the final, deep slot through which your 4×4 posts will slide. Ensure this standing block is perfectly centered and plumb (straight up and down) for stability and aesthetics. Allow the construction adhesive to cure for the time recommended by the manufacturer before proceeding to the next step; this often takes several hours to overnight, depending on the product and environmental conditions.
Step 2: Constructing the Second Support and Integrating the Seating Posts
Building the Second Identical Support Structure
Once your first cinder block support column is securely set and the adhesive has had ample time to cure, measure the desired length of your bench. This measurement will determine the distance between your two support columns. A typical bench length might range from 4 to 6 feet, but adjust this to fit your space and needs. Now, move over to the other side of your measured bench length and precisely repeat the entire construction process from Step 1. It is absolutely critical that this second support structure is an exact mirror image of the first, with the same height, block orientation, and stability. Use your measuring tape and level frequently to ensure accuracy in placement and alignment. This symmetry is vital for the structural integrity and aesthetic balance of your finished bench.
Integrating the 4×4 Wood Posts for Seating
With both cinder block support structures firmly in place and their adhesives cured, it’s time to add the comfortable seating surface. Take your prepared (painted, stained, or natural) 4×4 posts. Carefully slide each post through the horizontal holes created by the outward-facing blocks on both support columns. You’ll thread one end of a 4×4 post into the first support, then guide it through until it emerges from the corresponding hole in the second support. Continue this process for all seven 4×4 posts, ensuring they are evenly spaced and sit snugly within the block channels.
Important Note on Adhesive for Posts:
For this part of the construction, you generally *do not* need any construction adhesive to secure the 4×4 posts. The snug fit within the cinder block holes, combined with the weight of the posts themselves and any people sitting on the bench, provides sufficient stability. This also offers a fantastic advantage: the posts can be easily removed for cleaning, maintenance, or even for storing them away during harsh weather conditions, prolonging their life and your bench’s beauty. If you find the posts are a bit too loose, you can insert small wooden shims into the cinder block holes next to the posts to tighten their fit.
Final Inspection and Readiness
Once all your 4×4 posts are in place, take a moment to step back and admire your handiwork. Gently test the bench for stability, checking for any wobbles or loose components. Make any minor adjustments needed to ensure the posts are evenly spaced and the bench feels solid. Your DIY cinder block bench is now finished and ready to be enjoyed! Add some outdoor cushions and pillows for extra comfort and a pop of color, transforming it into your favorite spot for relaxation.
Customization and Enhancing Your Urban Chic Cinder Block Bench
The beauty of this DIY project is its incredible potential for personalization. While the basic design is wonderfully functional and stylish, there are numerous ways to make your cinder block bench truly unique and even more comfortable.
- Paint the Cinder Blocks: Inject personality into your bench by painting the cinder blocks. Choose a vibrant color to make a bold statement, or opt for a neutral tone like white, gray, or black for a sophisticated, minimalist look. Use exterior-grade masonry paint that is designed for concrete surfaces to ensure longevity and weather resistance. Consider stenciling patterns or creating a two-tone effect for added flair.
- Seal the Cinder Blocks: To protect your blocks from moisture, algae growth, and efflorescence (white powdery residue), apply a clear masonry sealer. This will help maintain their appearance over time and make them easier to clean.
- Add Comfortable Cushions and Pillows: The 4×4 posts provide a solid seating surface, but for extended lounging, outdoor cushions and decorative throw pillows are a must. Choose weather-resistant fabrics that complement your outdoor decor. This instantly transforms your industrial bench into a cozy seating area.
- Incorporate Greenery: The hollow cores of the cinder blocks can serve as perfect little planters! Fill them with small succulents, herbs, or vibrant annuals to add a touch of living greenery directly to your bench. Ensure proper drainage if doing so.
- Lighting Integration: Consider subtle lighting. Solar-powered LED string lights or small solar puck lights placed around the base or even within some unused block holes can create a magical ambiance during evening hours.
- Create a Backrest (Advanced): For a more complete seating solution, you could explore adding a backrest. This might involve additional wood posts, metal brackets, or even more cinder blocks stacked in a specific way. This would be a more advanced modification.
- Extend the Design: If you have a larger space, build multiple bench sections or incorporate a cinder block table into the design, creating a cohesive outdoor lounge area.
Embrace Your Outdoor Space with DIY Charm
This “Easy Urban Chic Cinder Block Bench Tutorial” offers a fantastic opportunity to enhance your outdoor living area with a piece that is both practical and aesthetically pleasing. You’ve now learned how to transform simple, affordable materials into a durable and stylish bench that will be the envy of your neighborhood. The satisfaction of building something with your own hands, especially a piece that adds so much value and beauty to your home, is truly unparalleled.
By following these clear, step-by-step instructions, you’ve not only saved a significant amount of money compared to purchasing a ready-made bench but also created a piece of outdoor furniture that reflects your personal style and ingenuity. It’s a testament to how simple DIY projects can yield impressive results, encouraging you to explore even more creative ways to personalize your living spaces.
So, gather your materials, dedicate a weekend, and get ready to enjoy your newly crafted, super chic cinder block bench. Whether you’re sipping your morning coffee, reading a book, or entertaining friends, this durable and stylish addition will undoubtedly become a favorite spot in your outdoor sanctuary. Happy building, and enjoy your beautiful new space!