
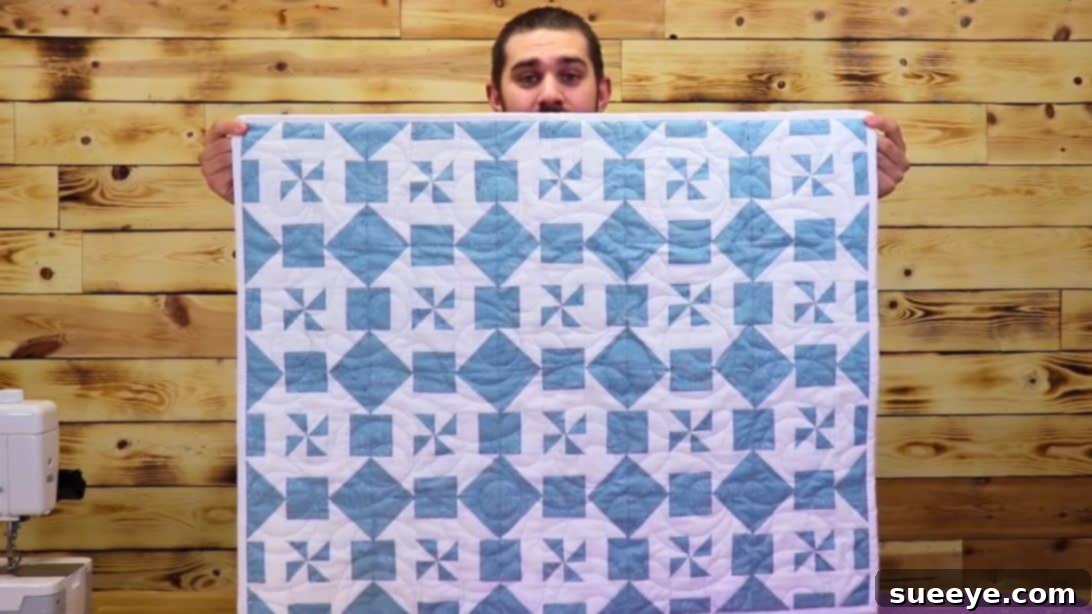
Craft a Charming Pin Dash Baby Blanket: A Step-by-Step DIY Guide
Are you searching for the perfect heartwarming gift for a new arrival, or simply looking to create something special for a little one in your life? There’s truly nothing quite as cherished as a handmade present, and this delightful Pin Dash Baby Blanket, inspired by the talented creators at Sew Yeah, is an absolute standout. It’s more than just a blanket; it’s a warm hug woven with intention and care, making it an ideal choice for celebrating new parenthood. One of the greatest appeals of this particular pattern is its surprising simplicity and speed, qualifying it as an excellent last-minute DIY gift that consistently looks intricate and lovingly crafted.
The finished blanket measures approximately 28.5 inches by 35.5 inches, a wonderfully versatile size. It’s perfect for a crib, a cozy stroller ride, or for tummy time on the floor. While designed as a charming baby blanket, the Pin Dash pattern lends itself beautifully to larger quilting projects. If your vision includes a bigger quilt, perhaps for a toddler bed or even an adult throw, expanding it is remarkably straightforward – simply increase the number of blocks in each row and column to achieve your desired dimensions. This project offers a fantastic opportunity to create a truly memorable piece, whether you’re taking your first steps into the world of quilting or are a seasoned pro.
Why a Handmade Baby Blanket is the Perfect Gift
Gifting a handmade baby blanket extends far beyond the physical item itself. It’s a profound expression of your care, effort, and affection, imbued with a personal touch that store-bought items simply cannot replicate. Here’s why a DIY baby blanket is always a cherished and meaningful choice:
- Unmatched Personalization: Each stitch and fabric choice reflects your unique thoughtfulness, making the gift one-of-a-kind and deeply personal.
- Superior Quality Control: You have complete control over the materials, allowing you to select fabrics that are not only soft and beautiful but also safe, durable, and hypoallergenic for a baby’s delicate skin.
- Creative and Cost-Effective: Crafting your own blanket can often be more economical than purchasing a high-quality, boutique-style alternative, while also allowing your creativity to flourish.
- Potential Heirloom: A lovingly made, high-quality handmade blanket has the potential to become a treasured family heirloom, passed down through generations as a symbol of familial love and craftsmanship.
- Therapeutic and Rewarding Process: The act of creating something with your hands is inherently rewarding and relaxing. It offers a wonderful way to channel your love and anticipation for the new arrival into a tangible form.
Understanding the Captivating Pin Dash Design
The Pin Dash pattern is a visually captivating variation of the timeless pinwheel block, celebrated for its dynamic movement and intriguing visual texture. The journey begins with the foundational quilting unit: the classic half-square triangle (HST). These HSTs are then expertly arranged to form a traditional pinwheel. The true genius and ‘dash’ of this design come from a clever technique: once the pinwheel is assembled, it’s strategically cut into smaller squares. By then rotating specific outer sections of these newly cut squares, a captivating ‘dash’ effect emerges within the original pinwheel structure. This transformation results in a pattern that is both playful and remarkably sophisticated, giving the blanket a modern, almost kaleidoscopic appeal perfect for stimulating a baby’s developing eyes.
Essential Materials for Your Pin Dash Baby Blanket
One of the many appealing aspects of this project is its relative simplicity in terms of material requirements. You’ll primarily need two contrasting fabrics to bring the striking Pin Dash design to vibrant life. However, choosing the right fabrics is crucial for both aesthetics and durability.
- Fabric A: 3/4 yard (Consider a lighter color, a subtle print, or a vibrant solid)
- Fabric B: 3/4 yard (Choose a darker color, a contrasting pattern, or a complementary solid to create definition)
Expert Fabric Selection Tips:
- Prioritize Quality: Always opt for high-quality, 100% cotton quilting fabric. It’s incredibly soft against sensitive skin, highly durable through countless washes, easy to cut and sew, and holds its shape beautifully – all non-negotiable qualities for baby items.
- Embrace Contrast: The visual impact of the pin dash pattern heavily relies on a clear and distinct contrast between Fabric A and Fabric B. Ensure there’s a noticeable difference in color value (light vs. dark) or print density to make the design truly pop.
- Consider Theme and Palette: Think about the nursery decor or the parents’ preferred color scheme. Pastels offer a classic baby look, vibrant colors stimulate visual development, and gender-neutral prints are always a safe and stylish choice.
- Pre-wash Your Fabrics: To prevent any potential shrinking, warping, or color bleeding in the finished blanket, always pre-wash and dry both of your fabrics before you begin cutting. This ensures your blanket remains beautiful after its first wash.
Recommended Tools for Quilting Success
While the project itself is straightforward, having the right tools at hand will significantly enhance your accuracy, efficiency, and overall enjoyment of the quilting process. These essential items will help you achieve precise and beautiful results:
- Rotary Cutter: An indispensable tool for making quick, clean, and incredibly precise fabric cuts.
- Self-Healing Cutting Mat: Provides a durable surface that protects your table and extends the life of your rotary cutter blades.
- Quilting Rulers: Essential for accurate measurements and perfectly straight cuts. A longer ruler (e.g., 6.5″ x 24″) for initial strip cuts and a square ruler (e.g., 8.5″ or 12.5″) for squaring up blocks are highly recommended.
- Sewing Machine: A reliable sewing machine equipped with a 1/4-inch piecing foot (or a clear understanding of achieving a scant 1/4-inch seam allowance) is crucial for consistent seams.
- High-Quality Thread: Use a strong, 100% cotton thread that matches or blends well with your chosen fabrics.
- Iron and Ironing Mat: An absolute must for pressing seams flat and accurately, which is vital for creating blocks that lie perfectly flat and square.
- Fabric Pins or Wonder Clips: To securely hold fabric pieces together before sewing, preventing shifting and ensuring alignment.
- Fabric Marker or Pencil: For drawing guide lines on your fabric, particularly for half-square triangles.
- Seam Ripper: Every quilter’s essential companion – it’s okay, even the pros use it!
How to Make a Baby Blanket Pin Dash Pattern: Step-by-Step Guide
With your materials and tools gathered, let’s embark on the delightful journey of creating your Pin Dash Baby Blanket. Follow these detailed instructions carefully for the best results.
Step 1: Precision Fabric Cutting
Accurate cutting is the cornerstone of any successful quilting project. Take your time with this initial step to ensure all subsequent pieces fit together perfectly:
- Begin with your Fabric A (the lighter fabric). Using your rotary cutter and ruler, cut 5 strips, each measuring 5 inches in width across the entire Width of Fabric (WOF). From these 5-inch strips, sub-cut them into 8 individual 5″ x 5″ squares. This process will yield a total of 40 squares for Fabric A.
- Repeat the identical cutting process for Fabric B (the darker, contrasting fabric). You will also produce 40 individual 5″ x 5″ squares for Fabric B.
Having precisely cut 5-inch squares is essential for creating accurate half-square triangles, which will, in turn, lead to perfectly aligned blocks in your final blanket.
Step 2: Crafting Perfect Half-Square Triangles (HSTs)
Half-Square Triangles are fundamental to countless quilt patterns, including the Pin Dash. You will be making a significant number of these, so consistency is key:
- Select one 5″ x 5″ square of Fabric A and one 5″ x 5″ square of Fabric B. Place them right sides together (RST), ensuring all edges are perfectly matched and corners align.
- On the back of the darker fabric (Fabric B), use your ruler and a fabric marker or pencil to draw a precise diagonal line from one corner to the opposite corner. This line will serve as your exact cutting guide.
- Using your sewing machine, sew a seam precisely 1/4 inch away from *both sides* of the drawn diagonal line. Maintain a consistent 1/4-inch seam allowance throughout.
- Once both seams are sewn, take your rotary cutter and carefully cut directly along the drawn diagonal line. You will now have two separate, sewn units.
- Gently press each unit open. For a flatter finish and to prevent shadows from darker fabrics showing through lighter ones, press the seam allowance towards the darker fabric. Alternatively, if you have a very accurate 1/4-inch seam and prefer less bulk, you can press the seams open. You’ve now created two beautiful half-square triangles, each measuring 4.5″ square (unfinished).
- Repeat this precise process with all remaining 39 pairs of Fabric A and Fabric B squares. You should ultimately produce a total of 80 half-square triangles. (Note: The original pattern implies 40 HSTs, but 40 pairs of squares yield 80 HSTs, which allows for 20 pinwheel blocks as needed for the final quilt layout of 5×4 blocks).
Step 3: Assembling the Pinwheel Block
Now, let’s transform those individual HSTs into the classic and charming pinwheel blocks:
- Gather four of your freshly made half-square triangles.
- Arrange these four HSTs on your work surface to form a traditional pinwheel pattern. The key is to ensure the darker fabric triangles are all pointing in the same rotational direction (either clockwise or counter-clockwise), which creates the illusion of a spinning pinwheel.
- First, sew the two HSTs in the top row together using a 1/4-inch seam. Press the seam open or towards the outer edges. Then, sew the two HSTs in the bottom row together, pressing the seam similarly.
- Next, sew the completed top row unit to the completed bottom row unit. When joining these two rows, meticulously nest your seams where the HSTs meet in the center to achieve a perfectly pointed pinwheel. Pin generously at this crucial center intersection to prevent any shifting.
- After sewing, give the entire block a thorough press to ensure it lies perfectly flat. At this stage, your assembled block will typically measure approximately 8 3/4 inches square.
- Using your square quilting ruler, carefully trim the block down to a precise 8 1/4″ x 8 1/4″ square. This crucial trimming step guarantees that all your blocks are uniform in size, which is absolutely essential for a flat, well-aligned, and professional-looking final blanket.
Step 4: The Pin Dash Transformation – Strategic Cuts
This is where the ‘dash’ element comes into play, ingeniously transforming your classic pinwheel into something unique and visually captivating. Precision in this step is paramount:
- Place your recently trimmed 8 1/4″ x 8 1/4″ pinwheel block squarely on your cutting mat. Ensure it is stable and perfectly aligned with your mat’s grid lines.
- Using your quilting ruler and rotary cutter, execute four strategic cuts across your block. These cuts will divide the pinwheel into nine smaller squares:
- First Vertical Cut: Measure exactly 2 3/4 inches from the left edge of your block and make a clean vertical cut.
- Second Vertical Cut: From the newly cut edge (or 5 1/2 inches from the original left edge), measure another 2 3/4 inches and make a second vertical cut.
- First Horizontal Cut: Measure precisely 2 3/4 inches from the bottom edge of your block and make a clean horizontal cut.
- Second Horizontal Cut: From the newly cut edge (or 5 1/2 inches from the original bottom edge), measure another 2 3/4 inches and make a second horizontal cut.
- After completing these four cuts, your single pinwheel block will now be neatly divided into nine smaller squares, each measuring 2 3/4″ x 2 3/4″.
- Crucially, do not disturb or move these squares. Keep them precisely in their cut arrangement on your cutting mat. This exact orientation is absolutely vital for the next step to work correctly.
Step 5: Forming the Pin Dash Block
Now comes the truly magical part – rotating the pieces to reveal the distinctive pin dash design:
- With your nine 2 3/4″ squares still meticulously arranged in their original grid formation, identify the eight squares that form the outside perimeter. The very center square will remain untouched.
- Carefully rotate each of these eight outside squares 90 degrees (a quarter turn). This strategic rotation will instantly create the signature ‘dash’ pattern that gives the block its name, cleverly breaking the continuous flow of the original pinwheel in an intriguing and dynamic way.
- Once all eight outer squares are rotated and you’re happy with the visual outcome, you will sew them back together. Think of the nine squares as three distinct rows of three smaller squares.
- Sew the three squares in the top row together, ensuring accurate 1/4-inch seams. Press the seams consistently (e.g., press all seams towards the right for the top row).
- Sew the three squares in the middle row together. Press the seams consistently (e.g., press all seams towards the left for the middle row, allowing them to nest perfectly with the top and bottom rows).
- Sew the three squares in the bottom row together. Press the seams consistently (e.g., press all seams towards the right for the bottom row).
- Finally, sew the three completed rows together. Take extra care to align and nest your seams where the rows meet to maintain accuracy and create crisp points.
- After sewing, give your completed Pin Dash block a final, thorough press to ensure it lies perfectly flat. It should now measure approximately 7 3/8 inches square. If necessary, use your square ruler for a final trim to square it up perfectly.
Step 6: Repeat and Multiply Your Blocks
The original blanket design calls for a total of 20 Pin Dash blocks to achieve a charming 5×4 layout. Therefore, you will need to diligently repeat the entire process outlined in steps 2 through 5 for the remaining fabric squares and HSTs until you have successfully created all 20 of your stunning Pin Dash blocks. Maintaining consistency in your cuts, seams, and pressing throughout each block will significantly contribute to the overall professional appearance and flatness of your finished blanket.
Step 7: Assembling Your Pin Dash Baby Blanket Top
Once all your individual Pin Dash blocks are completed, pressed, and accurately squared up, it’s time for the exciting step of assembling them into the beautiful blanket top:
- Layout Your Design: Arrange your 20 finished blocks into a grid of 5 rows, with 4 blocks in each row. Lay them out on a design wall, the floor, or any large flat surface where you can see the entire composition. Take a step back and examine your layout, ensuring you are completely happy with the arrangement of colors, patterns, and the overall flow of the ‘dashes’. This is your last chance to rearrange before sewing!
- Sew Blocks into Rows: Starting with the first row, carefully sew the 4 blocks together, one by one, using a consistent 1/4-inch seam allowance. After completing each row, press the seams. To facilitate nesting when you join the rows, press the seams in alternating directions for each consecutive row (e.g., press seams to the right for row 1, to the left for row 2, to the right for row 3, and so on).
- Join the Rows: Once all 5 rows are sewn and pressed, carefully align and pin the rows together. Pay close attention to matching up all the seam intersections between the blocks – this is key for a crisp and professional finish. Sew the rows together, taking extra care to maintain your precise 1/4-inch seam allowance and keep those seam intersections perfectly matched.
- Final Press: Give your completed blanket top a final, thorough press. This step will flatten all the seams, ensure the blanket lies beautifully flat, and prepare it for its final stages.
At this point, you have a gorgeous blanket top that can be used as a lightweight cover, or you can elevate it into a full, cozy quilt by adding a layer of batting and a backing fabric, then quilting it together, and finally binding the edges for a polished finish.
Additional Tips for Quilting Success
Even with a clear guide, a few extra tips can make your quilting journey smoother and more enjoyable:
- Master the Scant 1/4-inch Seam: A ‘scant’ 1/4-inch seam allowance (which is just a thread’s width less than a true 1/4-inch) is crucial in quilting. It accounts for the fabric taken up when pressing, helping your blocks consistently finish at the correct size.
- Pressing is Paramount: Think of pressing as an integral part of sewing, not just an afterthought. Pressing after each seam helps your blocks lie perfectly flat and square, which prevents distortion in the final quilt.
- Square Up Consistently: Invest in and regularly use a good quality square-up ruler. Utilize it after making your HSTs and after assembling each block to ensure uniform sizes across all your units.
- Embrace Chain Piecing: To save time and thread, particularly when making multiple identical units like HSTs, use chain piecing. This involves sewing multiple units one after another without lifting the presser foot or cutting the threads between them.
- Cultivate Patience and Enjoyment: Quilting is a creative and often meditative process. Don’t rush, and allow yourself to enjoy the journey. If you encounter a “design opportunity” (the quilter’s term for a mistake!), embrace it as a learning experience and reach for your seam ripper without fear.
Caring for Your Handmade Baby Blanket
To ensure your beautiful Pin Dash Baby Blanket remains soft, vibrant, and cuddly for many years to come, proper care is absolutely essential, especially since it’s destined for a baby:
- Washing Instructions: Machine wash the blanket on a gentle cycle using cold water. Always opt for a mild, baby-friendly, and preferably unscented detergent to protect delicate skin and preserve fabric integrity.
- Drying Methods: To prevent excessive shrinkage and maintain the fabric’s softness, tumble dry on a low heat setting. Alternatively, for the best results and longevity, air dry the blanket flat.
- Avoid Harsh Chemicals: Never use bleach or any harsh stain removers, as these can severely damage the fabric fibers and cause colors to fade prematurely.
- Ironing (If Needed): If the blanket becomes wrinkled, you can iron it on a low setting. However, typically, a good, thorough press after washing is sufficient to smooth out any creases.
Conclusion: A Gift from the Heart
Creating this Pin Dash Baby Blanket is far more than just another sewing project; it is a profound act of love, creativity, and thoughtful craftsmanship. With its inherently charming design, clear and straightforward steps, and wonderful customizable nature, it offers a wonderfully rewarding experience for quilters of all skill levels. Whether you are meticulously crafting it as a shower gift, celebrating the joyous arrival of a newborn, or simply making it ‘just because,’ this handmade blanket is unequivocally destined to become a treasured item, held close for years to come. Its unique and dynamic pin dash pattern provides captivating visual interest and promises a soft, cozy embrace for any little one.
We sincerely hope that this detailed guide empowers you to confidently approach and successfully create your very own beautiful Pin Dash Baby Blanket. We encourage you to share your finished creations with pride, experiment with different fabric combinations to make each blanket truly unique, and most importantly, savor every moment of the creative process as you bring joy through your handmade craftsmanship!