
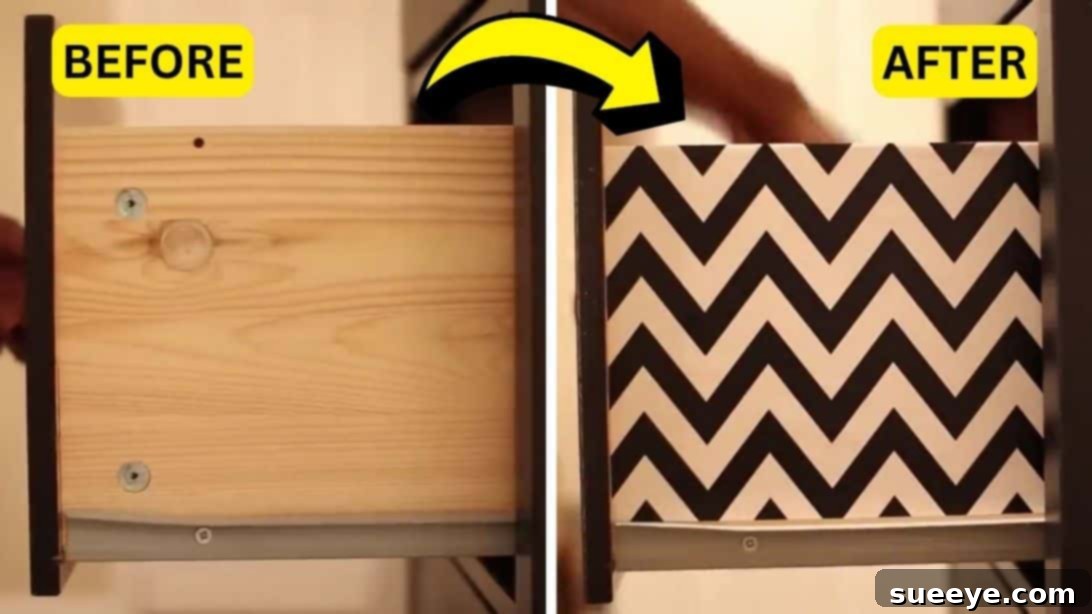
Transform Your Drawers: An Easy & Budget-Friendly DIY Patterned Makeover
Are you looking for a simple yet impactful way to refresh your living space without breaking the bank? Imagine turning mundane drawers into eye-catching focal points with just a few readily available materials. We recently stumbled upon a brilliant video tutorial by HGTV Handmade on YouTube that perfectly illustrates this concept, and we were instantly captivated. This ingenious method offers a fantastic solution for anyone wanting to inject personality and style into their furniture, making it a truly accessible and rewarding DIY project. Best of all, if you happen to have some leftover wrapping paper from holidays or previous crafts, you’re already halfway there to saving even more!
This clever idea resonated so deeply that it inspired us to transform nearly every drawer in our home, from bedroom dressers to kitchen cabinets. The results were nothing short of spectacular, proving that a little creativity can go a long way in revamping your decor. This versatile trick isn’t limited to just drawers; it can also be applied to tables, cabinets, shelves, and more, offering endless possibilities for custom home accents. Ready to discover how? Continue reading for detailed instructions and watch the inspiring video tutorial to guide you through each step.
Why This DIY Project is a Game-Changer for Home Decor
In a world where home decor trends often lean towards costly renovations, finding an affordable and impactful way to refresh your living space is a true gem. This DIY patterned drawer makeover stands out for several compelling reasons, making it a go-to project for both novice and experienced crafters alike.
Budget-Friendly Brilliance
One of the most appealing aspects of this project is its cost-effectiveness. High-end furniture with unique patterns or custom finishes can come with a hefty price tag. By utilizing inexpensive materials like wrapping paper and spray adhesive, you can achieve a similar sophisticated look for a fraction of the cost. This makes it an ideal solution for renters, students, or anyone on a tight budget looking to personalize their space without a major financial commitment. Plus, repurposing leftover wrapping paper aligns perfectly with sustainable living practices, reducing waste and giving new life to materials you already own.
Unleash Your Personal Style
The beauty of this DIY lies in its infinite customization potential. Wrapping paper comes in an astonishing array of colors, patterns, and textures – from elegant florals and geometric designs to playful polka dots and abstract art. This allows you to perfectly match your existing decor or introduce a bold new accent that truly reflects your personality. Whether you prefer a minimalist Scandinavian vibe, a vibrant bohemian aesthetic, or a classic traditional feel, there’s a wrapping paper design out there to bring your vision to life. This level of personalization is often hard to achieve with mass-produced furniture.
Beginner-Friendly & Hugely Rewarding
You don’t need to be an expert crafter to succeed with this project. The steps are straightforward, requiring minimal tools and basic techniques. It’s a fantastic entry point into the world of DIY, offering immediate gratification and a tangible sense of accomplishment. The process itself is enjoyable, and the transformation you witness, even on a small scale, can be incredibly motivating for tackling other home improvement tasks. It’s a low-risk project with high-reward aesthetics.
Sustainable & Eco-Conscious Decor
Beyond the aesthetic and financial benefits, this project also promotes sustainability. Instead of discarding old, plain, or slightly worn drawers, you’re giving them a second chance at life. This upcycling approach reduces landfill waste and minimizes the demand for new furniture production, contributing to a more eco-friendly home. It’s a small step that can make a difference, proving that beautiful decor doesn’t have to come at the environment’s expense.
RELATED: 4 Fake High-End Makeover Look For Your Home
Materials for Your DIY Drawer Transformation
Gathering the right tools and materials is the first crucial step towards a successful drawer makeover. Fortunately, this project requires only a handful of items, most of which you might already have on hand, making it incredibly convenient and cost-effective.
- Wrapping Paper: The star of our show! Choose a design that inspires you and complements your decor. Consider the paper’s thickness – thicker paper tends to be more durable and easier to work with without tearing.
- Spray Adhesive: A strong, permanent spray adhesive is essential for ensuring your wrapping paper stays securely in place. Look for one that offers a repositionable feature for a few moments, giving you time to adjust the paper perfectly before it sets permanently.
- Paper Trimmer (or Craft Knife & Cutting Mat): For clean, straight cuts that result in a professional finish. A paper trimmer is excellent for long, even edges, while a craft knife (like an X-Acto knife) on a self-healing cutting mat provides precision for intricate cuts and trimming excess paper.
- Ruler or Measuring Tape: Accuracy is key! A sturdy ruler or measuring tape will help you get precise dimensions for your drawer sides, ensuring a perfect fit for your paper.
- Marking Pen or Pencil: For marking your measurements clearly on the wrapping paper before cutting. A light pencil mark is usually best as it can be erased or will be covered by the adhesive and paper.
- Smoothing Tool (Optional but Recommended): A plastic scraper, an old credit card, or even a clean, soft cloth can be incredibly helpful for smoothing out bubbles and wrinkles, ensuring a flawless, professional-looking application.
Step-by-Step Guide to a Stunning Drawer Makeover
Transforming your drawers is a straightforward process when approached systematically. Follow these detailed steps to achieve a smooth, professional finish that will elevate your furniture’s aesthetic.
Step 1: Preparation is Key – Remove & Clean Your Drawers
Begin by completely removing the drawers from their housing or shelves. This provides easier access to all surfaces and prevents any accidental adhesive sprays on your furniture’s exterior. Next, thoroughly clean the sides of the drawers that you intend to cover. Use a damp cloth to wipe away any dust, grime, or residue, then dry them completely. A clean, smooth surface is essential for the adhesive to bond properly and for the wrapping paper to lay flat without imperfections.
Step 2: Precise Measurement & Cutting Your Wrapping Paper
Accuracy is paramount for a professional look. Using your ruler or measuring tape, carefully measure the length and width of each drawer side you wish to cover. It’s often best to measure each side individually, as drawers can sometimes have slight variations. Once you have your precise dimensions, transfer these measurements onto the back of your chosen wrapping paper using a marking pen or pencil. For optimal results, consider cutting your paper pieces about 1/8 to 1/4 inch larger than your exact measurements. This gives you a slight margin for error and allows for precise trimming later, ensuring edge-to-edge coverage.
Step 3: Flawless Adhesive Application
Working in a well-ventilated area, gently spray the adhesive evenly onto one side of the drawer you are about to cover. Hold the can approximately 6-8 inches away from the surface and apply a consistent, thin layer from edge to edge. Avoid oversaturating the surface, as this can lead to wrinkles or bubbling. If your adhesive is repositionable, you’ll have a few moments to adjust the paper. If not, precision is key for immediate placement.
Step 4: Smooth Paper Placement & Adhesion
Carefully align one edge of your pre-cut wrapping paper with the corresponding edge of the drawer side. Slowly and gently lay the paper down, working your way across the surface. As you place the paper, use a smoothing tool (like a plastic scraper, an old credit card, or even your hand covered with a clean cloth) to press out any air bubbles or wrinkles from the center outwards. Apply firm, consistent pressure to ensure complete adhesion. Take your time with this step; a smooth application is crucial for the final aesthetic.
Step 5: Trimming & Finishing Touches
Once the wrapping paper is fully adhered and smoothed, you might have a slight excess overlapping the edges. Carefully use your craft knife or a sharp blade to trim away any overhang, creating clean, crisp edges. For perfectly straight lines, use your ruler as a guide. Pay close attention to corners, making neat cuts to ensure a seamless finish. Allow the adhesive to dry completely according to the manufacturer’s instructions, which might take several hours.
Step 6: Reassembly & Enjoyment
After the adhesive has fully cured and the paper is securely in place, carefully reinsert the drawers back into their respective shelves or furniture unit. Step back and admire your handiwork! You’ve successfully transformed ordinary drawers into personalized, stylish statements that enhance your home decor.
Pro Tips for a Professional Finish
Elevate your DIY drawer makeover from good to absolutely stunning with these expert tips:
- Pre-Test Your Adhesive: Before committing to your project, always test the spray adhesive on an inconspicuous area of your drawer or a scrap piece of wood. This ensures compatibility and allows you to gauge its drying time and adhesion strength.
- Work in a Ventilated Area: Spray adhesives can produce strong fumes. Ensure you’re working in a well-ventilated space, preferably outdoors or in a garage with open windows, to protect your respiratory health.
- Consider Sealing for Durability: For high-traffic drawers or areas where the paper might be exposed to moisture or wear, consider applying a thin, even coat of a clear sealant like Mod Podge (matte or gloss finish) or a clear acrylic spray. This adds an extra layer of protection, making your makeover more durable and easier to clean. Ensure the adhesive is completely dry before applying any sealant.
- Tackle Corners and Edges with Care: For drawers with intricate edges or internal corners, make small relief cuts in the paper to allow it to conform smoothly without wrinkling. A precise craft knife is your best friend here.
- Troubleshooting Bubbles: If you spot a stubborn air bubble after the paper is laid, you can often release it by gently piercing it with a fine needle and then pressing the trapped air out with your smoothing tool.
- Patience is a Virtue: Rushing through the process is the quickest way to end up with imperfections. Take your time with each step, especially during measuring, cutting, and smoothing. A little patience goes a long way in achieving a flawless result.
Beyond Drawers: Unleashing Creativity with Wrapping Paper
The beauty of this wrapping paper technique extends far beyond just drawers. Its versatility allows you to transform various household items, injecting custom style and personality throughout your home. Here are a few inspiring ideas to get your creative juices flowing:
- Cabinet Interiors: Give your kitchen or bathroom cabinets a delightful surprise by lining the inside back panel with a cheerful pattern. Every time you open them, you’ll be greeted with a pop of color and design.
- Bookcase Backings: Plain bookshelves can feel a bit monotonous. Add depth and visual interest by adhering wrapping paper to the back panels. This creates a charming backdrop for your books and decorative items.
- Shelf Liners: Beyond cabinet interiors, use wrapping paper as stylish liners for open shelves in pantries, linen closets, or craft rooms. It not only looks good but also protects the shelves from wear and tear.
- Tabletops (with Protection): Transform an old side table or a small desk by covering its top with a beautiful wrapping paper design. To ensure durability and make it functional, overlay the paper with a custom-cut piece of glass or a sturdy clear acrylic sheet.
- Decorative Boxes & Bins: Give a drab storage box or an inexpensive cardboard bin an instant upgrade. This is a quick way to create coordinated storage solutions that double as decorative accents.
- Picture Frame Mats: Instead of traditional plain mats, use wrapping paper with a subtle pattern or complementary color to frame your photos or artwork, adding an artistic touch.
- Wall Art & Panels: For a temporary and reversible accent wall, you can adhere large panels of patterned wrapping paper to a wall. This is particularly great for renters who can’t paint.
Each of these applications provides an opportunity to personalize your space with unique designs, proving that wrapping paper is far more than just packaging material – it’s a powerful tool for affordable and stylish home decor.
Maintaining Your Newly Transformed Furniture
Once your drawers are beautifully transformed, a little care goes a long way in preserving their new look. For daily cleaning, simply wipe the papered surfaces with a dry or slightly damp cloth. Avoid harsh chemical cleaners or abrasive sponges, as these can damage the paper or lift the adhesive. If you opted for a clear sealant, your drawers will be more resilient to spills and general wear, making maintenance even easier. With proper care, your DIY patterned drawers will remain a charming and vibrant part of your home decor for a long time.
Conclusion: Embrace the Power of a Simple Makeover
This easy DIY patterned drawer makeover truly embodies the spirit of creative home decor: high impact with minimal effort and expense. What started as an intriguing tutorial from HGTV Handmade quickly became a favorite project, proving that even the simplest materials like wrapping paper can bring profound aesthetic changes to your living space. We hope this guide inspires you to look at your ordinary furniture with new eyes and discover the joy of personalized, budget-friendly design. Dive into your own drawer transformation and watch as your home takes on a fresh, vibrant, and uniquely you character!
*A special thank you to HGTV Handmade via YouTube for providing the inspiration and images for this wonderful DIY project. If you’ve enjoyed this tutorial, we highly recommend visiting and subscribing to their channel for more creative ideas and engaging video tutorials!