
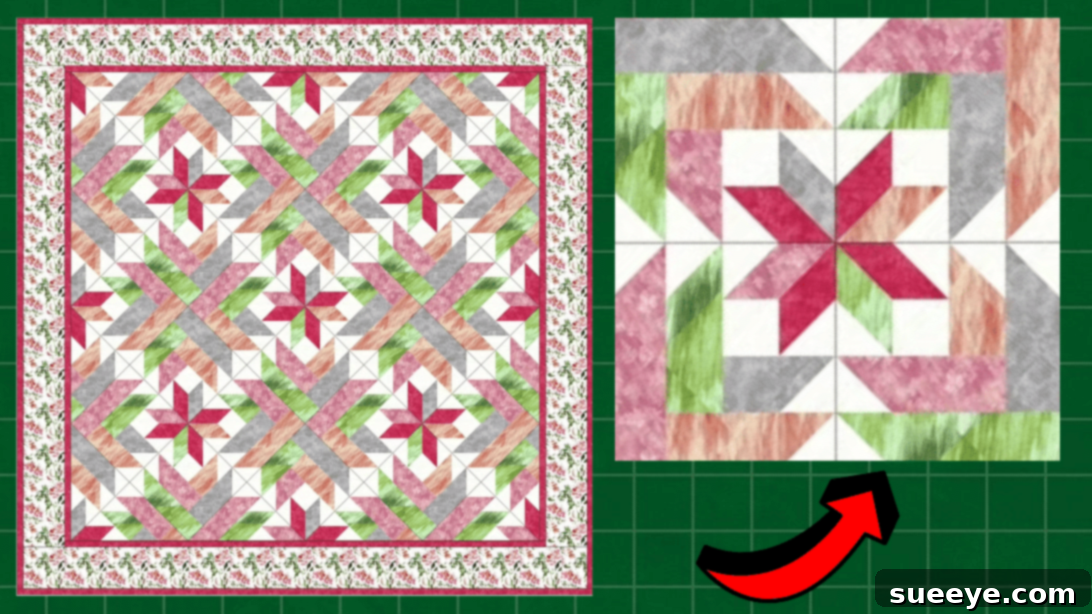
Mastering the Spring Roses Quilt Block: A Beginner-Friendly Guide to Beautiful Quilting
There’s an undeniable charm to certain quilt patterns that captivates regardless of the fabric choices. The Spring Roses quilt block by Crafts with Valerie Dawn, showcased on YouTube, is a prime example of such timeless beauty. This exquisite design, surprisingly simple yet visually striking, is crafted primarily from fundamental quilting elements: half-square triangles (HSTs) and classic log cabin strips. These techniques are incredibly accessible, making this project an absolute delight for beginners and seasoned quilters alike looking for a rewarding weekend endeavor.
This quilt block offers more than just a beautiful finished product; it’s a journey into foundational quilting skills. If you’re new to the art of quilting, this pattern provides an excellent opportunity to hone your precision, master seam allowances, and understand fabric manipulation in a structured, enjoyable way. For experienced quilters, it’s a refreshing project that can be completed quickly, yielding a charming block perfect for smaller projects or as a component of a larger, intricate quilt. The elegance of the rose motif, combined with the geometric simplicity of HSTs and log cabin construction, ensures a stunning outcome every time.
Why You’ll Love Crafting This Spring Roses Quilt Pattern
The allure of the Spring Roses Quilt Block extends beyond its pretty facade. Here’s why this pattern is poised to become your next favorite project:
- Perfect for Skill Building: Whether you’re taking your first steps into quilting or seeking to refine basic techniques, this block offers valuable practice in accurate cutting, precise stitching, and effective pressing – all crucial for successful quilting.
- Visually Stunning Results: The combination of half-square triangles and log cabin strips creates a dynamic, visually rich rose motif that will impress. The interplay of colors and shapes brings depth and texture to your fabric art.
- Versatile Design: This block is incredibly adaptable. Create a single block for a charming mini quilt, a decorative pillow, or a table runner. Assemble multiple blocks to construct a gorgeous full-sized quilt, throw, or even a unique wall hanging.
- Thoughtful Handmade Gift: A finished Spring Roses Quilt Block, or a collection of them, makes a deeply personal and cherished gift for birthdays, anniversaries, or just to show someone you care. Its classic aesthetic suits many tastes and home decor styles.
- Engaging and Enjoyable Process: The methodical nature of piecing, combined with the satisfaction of seeing the rose pattern emerge, makes this a truly meditative and enjoyable crafting experience.
If you’re seeking inspiration for your next weekend project, this Spring Roses quilt block promises both satisfaction and beauty. Dive into the simple steps below, and be sure to watch Valerie Dawn’s comprehensive video tutorial for visual guidance.
Essential Materials for Your Spring Roses Quilt Block
Gathering your materials is the first exciting step in any quilting project. For the Spring Roses Quilt Block, precise fabric choices and reliable tools are key to achieving crisp lines and vibrant roses. Here’s what you’ll need to create a block similar to the one featured, along with some guidance on selection:
- 1¼ yard of dark rose fabric: This will form the core “rose” petals. Choose a rich, saturated color that stands out.
- 1 yard of pink fabric: A lighter shade to complement the dark rose, adding dimension to the petals.
- 1 yard of green fabric: Essential for the “leaves” or background elements, providing contrast and completing the floral theme.
- 1 yard of peach fabric: Another complementary color to add warmth and softness to the overall design.
- 1 yard of gray fabric: A neutral tone to help define the shapes and provide a subtle background or border element within the block.
- 1¼ yards of floral fabric: This can be a patterned fabric to add visual interest and texture, perhaps for accent strips or sashing.
- 1½ yards of cream fabric: A versatile neutral that will often serve as the foundation for half-square triangles, allowing other colors to pop.
- Marking pen, pencil, or chalk: For accurately drawing lines on fabric. Choose a tool that is easily visible on your chosen fabrics and disappears or washes out.
- Ruler: A clear acrylic quilting ruler (at least 6×24 inches or 6×12 inches) is indispensable for precise cutting.
- Scissors or rotary cutter and a cutting mat: While scissors work, a rotary cutter with a self-healing mat offers unparalleled speed and accuracy for cutting multiple fabric layers simultaneously.
- Fabric pins: Essential for holding fabric layers together securely before stitching. Fine, sharp pins are recommended to avoid distorting fabric.
- Needle and thread: All-purpose polyester or cotton thread in a neutral color (like gray or cream) is typically best for piecing. Ensure your needle is sharp and appropriate for quilting cotton.
- Iron, for pressing: A good steam iron is critical for achieving flat, precise seams. Pressing as you go is a non-negotiable step in quilting.
- Sewing machine: A reliable sewing machine with a ¼-inch presser foot attachment will make piecing accurate and enjoyable.
- Pattern: Click here to download the pattern directly from Valerie Dawn’s site. This pattern will provide all the specific cutting dimensions and layout instructions.
Step-by-Step Guide: Crafting Your Spring Roses Quilt Block
Embarking on your Spring Roses Quilt Block journey requires a blend of patience and precision. Remember, quilting is a process of small, accurate steps that build into a beautiful whole. Don’t rush, enjoy each stage, and always press your seams!
Step 1: Preparation and Half-Square Triangle (HST) Foundations
Begin by downloading the pattern from Valerie Dawn’s website. This pattern will contain all the precise cutting instructions for each fabric. Accuracy in cutting is paramount in quilting, so take your time with this step. Using a rotary cutter, ruler, and mat will ensure straight lines and exact measurements, which are crucial for blocks to fit together perfectly.
Once your fabrics are cut, it’s time to create the half-square triangle (HST) units, which form many of the petals and leaves of your rose. Lay your cream fabric with the wrong side facing up. Using your marking pen, pencil, or chalk, draw a diagonal line from one corner to the opposite corner on each square that will form an HST. This line will serve as your guide for cutting later. Next, place this marked cream fabric square directly on top of a dark rose fabric square, ensuring their right sides are facing each other. Align the edges perfectly, then secure the layers together with fabric pins to prevent shifting during stitching. Repeat this process for all fabric pairs designated for HSTs according to your pattern.
Step 2: Constructing Perfect Half-Square Triangles
With your pinned fabric squares ready, take them to your sewing machine. Stitch along the previously drawn diagonal line. Then, using a ¼-inch seam allowance, sew another line on either side of this central diagonal line. This technique creates two HST units from one pair of squares, minimizing waste and ensuring identical units. The ¼-inch seam allowance is a standard in quilting and is critical for blocks to piece together correctly; consider using a ¼-inch presser foot for consistent results.
Once all three lines of stitching are complete, carefully trim off the excess fabric between the two outer stitching lines and the central diagonal line. This step reduces bulk. Then, using your scissors or rotary cutter, cut the unit apart along the original central diagonal line. You will now have two raw HST units. Take each unit to your ironing board and carefully press them open. You can choose to press seams to one side (typically the darker fabric) or press them open. Pressing seams open often results in a flatter block and reduces bulk, especially when many seams meet. Repeat these steps for all your designated fabric pairs until you have a stack of perfectly formed half-square triangle units.
Step 3: Assembling the Rose Motif – Inner Corners and Log Cabin Strips
With your HSTs prepared, the magic of assembly begins. Refer closely to your downloaded pattern for the specific layout of the inner corner of the quilt block. This section typically involves arranging several HSTs and perhaps some solid squares into a smaller unit that forms part of the rose. Carefully arrange these pieces on your design wall or a flat surface, ensuring all colors and orientations match the pattern’s diagram. Once satisfied with the arrangement, stitch these smaller units together in rows, then join the rows to form the complete inner corner block. After each seam, press it open or to one side as indicated by your pattern or preference, ensuring flatness and preventing bulk.
The pattern will require you to make three other variations of this inner corner block. These variations, through different color placements or rotations, contribute to the overall radial symmetry and depth of the rose design when the blocks are eventually joined. Pay close attention to the pattern for these variations.
Next, you will piece together the “log cabin” strips. The log cabin technique involves adding strips of fabric around a central square or block, building outwards in a spiral fashion. For this pattern, these strips will be added around your inner corner blocks. Starting with the first strip, align it along one edge of an inner corner block, right sides together, and stitch with a ¼-inch seam allowance. Press the seam flat after each strip is added. Continue adding strips sequentially around the block, carefully trimming ends as needed, and pressing after each addition. This meticulous pressing ensures your block remains square and flat, which is crucial for overall quilt success. The log cabin strips will gradually frame and expand your inner rose motif, creating the full Spring Roses quilt block.
Beyond the Block: Finishing Your Spring Roses Quilt
Once you’ve mastered creating the individual Spring Roses quilt blocks, your journey continues into assembling and finishing a complete quilt. While the tutorial focuses on the block, understanding the subsequent steps is vital for transforming your beautiful blocks into a cherished heirloom.
Joining Blocks and Adding Borders
After creating all the required blocks (the pattern will specify how many for a full quilt), arrange them on a design wall or floor to visualize the overall layout. Experiment with rotations to achieve different effects from your rose motifs. Once happy, stitch the blocks together into rows, pressing seams consistently. Then, join the rows to form the quilt top. Many quilters choose to add sashing (strips of fabric between blocks) or borders around the perimeter to frame the design and increase the quilt’s size. Borders can be simple solid strips or more complex pieced designs that complement your rose blocks.
Layering and Basting Your Quilt
With your quilt top complete, the next step is to create the “quilt sandwich.” This involves three layers: the quilt backing fabric (the bottom layer), the batting (the middle insulating layer), and your finished quilt top (the top layer). Lay your backing fabric wrong side up, smooth it out, then place the batting on top, followed by your quilt top, right side up. Ensure all layers are flat and wrinkle-free. Basting is the process of temporarily securing these three layers together so they don’t shift during quilting. This can be done with safety pins (pin basting), spray adhesive (spray basting), or long hand stitches (thread basting).
Quilting Techniques and Options
Quilting is the decorative stitching that passes through all three layers, holding them together and adding texture and dimension to your project. You have several options for quilting your Spring Roses quilt:
- Machine Quilting: This can range from simple straight lines (stitch-in-the-ditch along existing seams or echo quilting around motifs) to intricate free-motion quilting (drawing designs with your machine).
- Hand Quilting: For a traditional look and feel, hand quilting uses a running stitch to create beautiful patterns. It’s a slower, more meditative process but yields a unique texture.
- Quilt-as-you-go: This method involves quilting each block individually or in small sections, then joining the quilted sections together. This can be less daunting for larger quilts.
Consider the density of your quilting; more quilting makes the quilt stiffer and more durable, while less allows it to drape more softly.
Binding Your Masterpiece
The final step is to bind your quilt, which finishes the raw edges and provides a durable border. Binding typically involves cutting strips of fabric, folding them, and attaching them to the edge of the quilt, first by machine and then often hand-stitched to the back for a clean finish. Choose a binding fabric that complements your Spring Roses design and enhances its overall beauty.
Tips for Beginner Quilters
Embracing the world of quilting, especially with a charming pattern like the Spring Roses Quilt Block, is an incredibly rewarding experience. Here are some essential tips to help new quilters succeed and enjoy the process:
- Prioritize Precision: Accuracy is the cornerstone of quilting. Take your time with cutting, using a good ruler and rotary cutter. When sewing, maintain that consistent ¼-inch seam allowance. Small inaccuracies compound quickly!
- Press, Don’t Iron: There’s a difference between pressing and ironing. Ironing involves pushing the iron back and forth, which can stretch and distort fabric. Pressing involves lifting the iron, placing it down firmly, holding, and then lifting again. This sets seams flat without distorting your blocks. Always press after each seam.
- Invest in Good Tools: While you don’t need every gadget, a sharp rotary cutter, a quality self-healing mat, a clear acrylic ruler, and a reliable sewing machine with a ¼-inch foot will make your quilting journey much smoother and more enjoyable.
- Practice Makes Perfect: Don’t be discouraged if your first few blocks aren’t flawless. Quilting is a skill that improves with practice. Consider making a few practice HSTs or log cabin strips before tackling your main project.
- Pre-wash Your Fabrics: It’s generally a good idea to pre-wash and dry your fabrics before cutting, especially if they are different fiber contents or vibrant colors that might bleed. This prevents potential shrinkage and color transfer issues in your finished quilt.
- Read the Entire Pattern First: Before making your first cut, read through all the instructions. This helps you understand the overall flow of the project and anticipate steps.
- Join a Community: Connect with other quilters! Online forums, local guilds, or even YouTube comments can be great sources of inspiration, advice, and encouragement.
Caring for Your Handmade Rose Quilt
Once your Spring Roses quilt is complete, proper care will ensure its beauty lasts for generations. Most quilts made from quilting cottons can be machine washed on a gentle cycle with cold water. Use a mild detergent and avoid bleach, which can damage fibers and fade colors. For the first wash, you might add a color catcher sheet to absorb any loose dyes. Tumble dry on a low setting or, ideally, lay flat to dry to minimize shrinkage and maintain the quilt’s shape. Store your quilt folded or rolled in a breathable cotton bag or pillowcase, away from direct sunlight and extreme temperatures, to protect the fabric and batting.
The Spring Roses quilt block is a testament to the fact that beautiful quilting doesn’t have to be overly complicated. With its accessible half-square triangles and classic log cabin construction, it offers a wonderful opportunity for quilters of all levels to create something truly special. Embrace the process, enjoy the vibrant colors, and delight in the charming rose motif that blossoms under your hands. Happy quilting!
All images and the pattern are credited to Crafts with Valerie Dawn via YouTube. Give her channel a visit and subscribe for more inspiring quilting tutorials and patterns!