
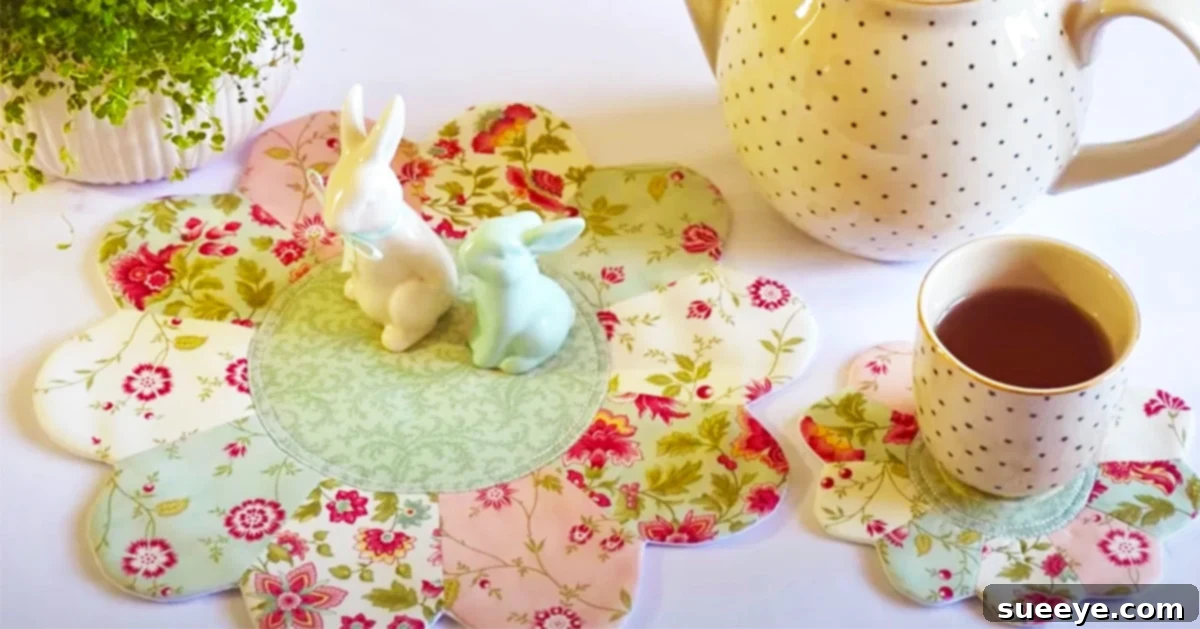
Mastering Patchwork Blooms: Your Guide to Beautiful Floral Sewing Projects
The timeless craft of sewing offers a delightful way to express creativity, transforming simple fabric into intricate works of art. Among the myriad of sewing projects, patchwork blooms stand out for their charming aesthetic and versatility. Whether you’re an experienced quilter or just starting your sewing journey, creating these lovely floral patterns can be a deeply rewarding experience. While traditional patchwork often requires meticulous measurement and cutting, innovative tools like those offered by Liza Decor simplify the process, making it accessible and enjoyable for everyone.
Embarking on a new sewing project can sometimes feel daunting, especially when aiming for precision. However, with the right guidance and tools, even complex-looking designs become achievable. Liza Decor provides excellent resources, including specialized templates designed specifically for crafting patchwork blooms. These templates are game-changers, streamlining the cutting process and ensuring accuracy, which is paramount for successful patchwork. This guide will delve into the beauty of patchwork blooms, explore how to utilize Liza Decor’s tools, and offer a comprehensive approach to creating your own stunning fabric flowers.
Why Choose Patchwork Blooms for Your Next Project?
Patchwork blooms are more than just a sewing pattern; they are a celebration of color, texture, and natural beauty. These intricate floral designs can elevate any fabric project, adding a touch of elegance and handmade charm. Here’s why they are a fantastic choice:
- Aesthetic Appeal: The visual impact of a well-executed patchwork bloom is undeniable. They bring a vibrant, organic feel to quilts, garments, and home decor items.
- Versatility: Once mastered, the patchwork bloom pattern can be incorporated into a wide array of projects. Imagine them adorning a cozy quilt, a decorative pillow, a unique tote bag, or even as an embellishment on clothing. They can transform a plain kitchen counter into a bright, cheerful space as part of a placemat or hot pad.
- Skill Development: Working with patchwork, especially intricate designs like blooms, refines your sewing skills. You’ll practice precision cutting, accurate seam allowances, and careful assembly, all of which are fundamental to advanced sewing.
- Creative Freedom: Patchwork allows for endless creativity in fabric selection. Mix and match different prints, colors, and textures to create unique blooms that reflect your personal style.
- Rewarding Experience: There’s immense satisfaction in creating something beautiful with your own hands. Each finished bloom is a testament to your patience and skill.
Simplifying the Process with Liza Decor Patchwork Bloom Templates
One of the biggest hurdles in patchwork is achieving precise cuts. Even a millimeter off can throw an entire pattern out of alignment. This is where Liza Decor’s patchwork bloom templates come into play. These specialized tools are designed to take the guesswork out of cutting, allowing sewers of all levels to create perfect pieces every time. Using templates offers several distinct advantages:
- Unmatched Accuracy: Templates ensure that every piece is cut to the exact size and shape required, leading to perfectly matching seams and a professional finish.
- Time-Saving: Manual measuring and marking each piece can be time-consuming. Templates allow for faster, more efficient cutting, letting you get to the exciting part of sewing much quicker.
- Consistency: If you’re creating multiple blooms for a larger project, templates guarantee uniformity across all your units, resulting in a cohesive and harmonious design.
- Ease of Use: Even beginners will find templates straightforward to use. Simply place the template on your fabric, align it, and cut around its edges.
- Reduced Fabric Waste: With precise cutting, you minimize mistakes and fabric waste, making your crafting more economical and sustainable.
Liza Decor has specifically designed templates for various patchwork bloom sizes and styles, ensuring that you have the right tool for any project you envision. These tools are an investment that pays dividends in both project quality and sewing enjoyment.
Visual Learning: Following Liza Decor’s Silent Video Tutorial
While written instructions are invaluable, visual aids often provide the clearest path to understanding a new technique. Liza Decor offers a fantastic resource in the form of a video tutorial demonstrating how to sew patchwork blooms. What makes this tutorial unique is its silent approach, placing full emphasis on the visual steps. This style encourages careful observation and active learning, allowing you to focus purely on the movements and techniques being demonstrated.
Tips for Maximizing Your Learning from a Silent Tutorial:
- Watch First, Then Do: Before picking up your needle and fabric, watch the entire tutorial once or twice without trying to follow along. This will give you an overall understanding of the process.
- Pause and Rewind Liberally: Don’t hesitate to pause the video at each critical step. Rewind and rewatch any segment that seems unclear until you fully grasp the action.
- Observe Hand Placement and Angles: Pay close attention to how the demonstrator holds the fabric, manipulates the sewing machine, and presses the seams. These small details can significantly impact your results.
- Focus on Precision: The lack of verbal instruction highlights the importance of visual accuracy. Notice the seam allowances, the way pieces are aligned, and the final appearance of each step.
- Take Notes (Optional): If you find it helpful, jot down key steps or challenging areas as you watch, creating your own personalized guide.
Step-by-Step Guide to Sewing Patchwork Blooms
Based on the principles of patchwork and the visual cues from Liza Decor’s tutorials, here’s a detailed, expanded guide to help you create your beautiful patchwork blooms:
Directions:
Step 1: Gather Your Materials
Before you begin, ensure you have all the necessary supplies. A well-prepared workspace makes the entire process smoother and more enjoyable. You will need:
- Fabric: Choose a variety of cotton quilting fabrics in complementary colors and patterns. Scraps are perfect for patchwork blooms! Consider a central fabric for the bloom’s core, and several others for the petals.
- Liza Decor Patchwork Bloom Templates: Select the template size appropriate for your project.
- Cutting Tools: A rotary cutter with a sharp blade, a self-healing cutting mat, and clear acrylic rulers are highly recommended for precision. Sharp fabric scissors can also be used.
- Sewing Machine (or Hand Sewing Needle): A sewing machine with a quarter-inch foot is ideal for consistent seam allowances. If hand sewing, use a sharp needle suitable for quilting.
- Thread: High-quality cotton or polyester thread that matches or blends with your fabric colors.
- Pins: Fine, sharp quilting pins for holding fabric pieces together.
- Iron and Ironing Board: Essential for pressing seams flat, which contributes significantly to a professional finish.
- Seam Ripper: For those inevitable little mistakes!
Step 2: Prepare Your Fabric
Pre-washing your fabric is often recommended to prevent shrinkage after your project is complete and to remove any excess dye. Once washed and dried, press all your fabrics thoroughly to ensure they are crisp and wrinkle-free. This makes cutting and sewing much easier and more accurate.
Step 3: Cutting the Patchwork Pieces
This is where your Liza Decor templates shine.
- Place your chosen fabric, right side up, on your cutting mat.
- Carefully position the appropriate Liza Decor template over the fabric. Ensure the fabric grain is aligned if that’s important for your design.
- Hold the template firmly in place or use template weights.
- Using your rotary cutter, carefully cut around the edges of the template. For curves, take slow, deliberate passes. If using scissors, trace the template onto the fabric with a fine chalk pencil or fabric marker first, then cut precisely along the lines.
- Repeat this process for all the pieces required for one bloom (e.g., center piece and several petal pieces). Refer to the Liza Decor tutorial or pattern instructions for the exact number of pieces needed.
Step 4: Assembling the Bloom’s Petals
The construction of the patchwork bloom typically involves sewing individual petal units first, then joining them around a central piece.
- Lay out your cut pieces according to your desired design. This helps visualize the final bloom and ensures you’re picking up the correct pieces.
- Take two adjacent petal pieces. Place them right sides together, aligning their edges carefully.
- Pin the pieces together along the edge you intend to sew.
- Using your sewing machine (with a ¼-inch seam allowance foot is highly recommended) or hand needle, sew along the pinned edge. Backstitch at the beginning and end to secure the stitches.
- Repeat this process, adding one petal piece at a time, until you have formed a ring or segment of your bloom.
Step 5: Pressing Seams
Pressing is arguably as important as sewing in patchwork. Proper pressing ensures flat, crisp seams and a professional finish.
- After sewing each seam or joining a few pieces, take your work to the ironing board.
- Gently press the seam towards one side (usually the darker fabric) or press it open, depending on the pattern’s requirements or your preference. Pressing open can reduce bulk but might make quilting more challenging later. Pressing to one side often creates a stronger seam.
- Be careful not to stretch the fabric as you press. Use an up-and-down motion rather than sliding the iron.
Step 6: Joining the Petals to the Center and Finishing the Bloom
Once your petal units are formed, it’s time to assemble the complete bloom.
- Take your central bloom piece and carefully align the assembled petal units around its edge, right sides together. Pins are crucial here for holding everything in place, especially around curves.
- Sew the petal units to the central piece with your ¼-inch seam allowance. Take your time, especially on curves, to ensure a smooth, rounded finish.
- Once all pieces are sewn, press the seams flat again, either towards the center or out towards the petals, as desired.
- Carefully trim any excess threads and square up your finished patchwork bloom, if necessary, using a ruler and rotary cutter.
The beauty of the Liza Decor system is how effortlessly these patches come together, transforming individual fabric pieces into a cohesive and charming floral design.
Creative Applications for Your Patchwork Blooms
Now that you’ve mastered sewing patchwork blooms, the possibilities for incorporating them into your life are endless. Beyond the simple joy of creating, these handmade flowers can become cherished items or thoughtful gifts. Here are a few ideas:
- Quilts and Quilted Items: Integrate your blooms into larger quilt blocks, borders, or as standalone embellishments on a child’s quilt or a decorative throw.
- Home Decor Accents: Turn them into decorative pillow covers, unique placemats or table runners, wall hangings, or framed fabric art. Imagine a vibrant bloom adding a pop of color to your kitchen countertop!
- Wearable Art: Embellish denim jackets, tote bags, or even make them into brooches or hair accessories for a personalized touch.
- Practical Everyday Items: Create charming potholders, mug rugs, or small pouches that showcase your beautiful floral patterns.
- Thoughtful Gifts: A handmade item infused with love and effort makes for an incredibly special gift. A set of patchwork bloom coasters or a small decorative wall hanging would delight any recipient.
My mom, for example, adores flowers and finds immense joy in sewing. Patchwork blooms would be an absolute hit with her, easily finding a place among her cherished handmade items, perhaps as a centerpiece on her kitchen table or a vibrant addition to her sewing room decor. The personal touch of a handmade item truly makes a house a home.
Tips for Success in Your Patchwork Journey
- Patience is Key: Sewing, especially patchwork, is a journey. Don’t rush, and enjoy each step of the process.
- Practice Makes Perfect: The more you sew, the more confident and skilled you’ll become. Start with simpler projects before tackling more complex ones.
- Invest in Good Tools: Quality fabric, sharp needles, and precise cutting tools like Liza Decor templates make a significant difference in your results and overall enjoyment.
- Press, Press, Press: We can’t emphasize this enough. Proper pressing makes your blocks lie flat and look professional.
- Embrace Imperfection: Hand-sewn items have character. Don’t strive for machine-like perfection; rather, celebrate the unique charm of your handmade creations.
- Join a Community: Connect with other sewers online or in person. Sharing tips, inspiration, and encouragement can enhance your crafting experience.
Conclusion: Cultivate Your Creativity with Patchwork Blooms
Sewing patchwork blooms is a fulfilling endeavor that combines the precision of measurement with the artistic flair of fabric selection. Thanks to innovative resources like Liza Decor’s templates and their informative video tutorials, creating these delightful floral patterns is more accessible than ever. Whether you’re making a gift for a loved one, adding a touch of handmade elegance to your home, or simply indulging in a rewarding hobby, the process of bringing these fabric flowers to life is truly special. So, gather your materials, observe the precise steps, and prepare to cultivate your creativity with the charming art of patchwork blooms!