
Crafting the Perfect Patriotic Centerpiece for Your 4th of July Celebration
As Independence Day approaches, the air fills with excitement, anticipation, and the vibrant spirit of patriotism. It’s a time for gathering with loved ones, celebrating freedom, and adorning our spaces with festive red, white, and blue decor. If you’re planning a memorable party, a cozy family barbecue, or a lively get-together, a stunning centerpiece can elevate your celebration from ordinary to extraordinary.
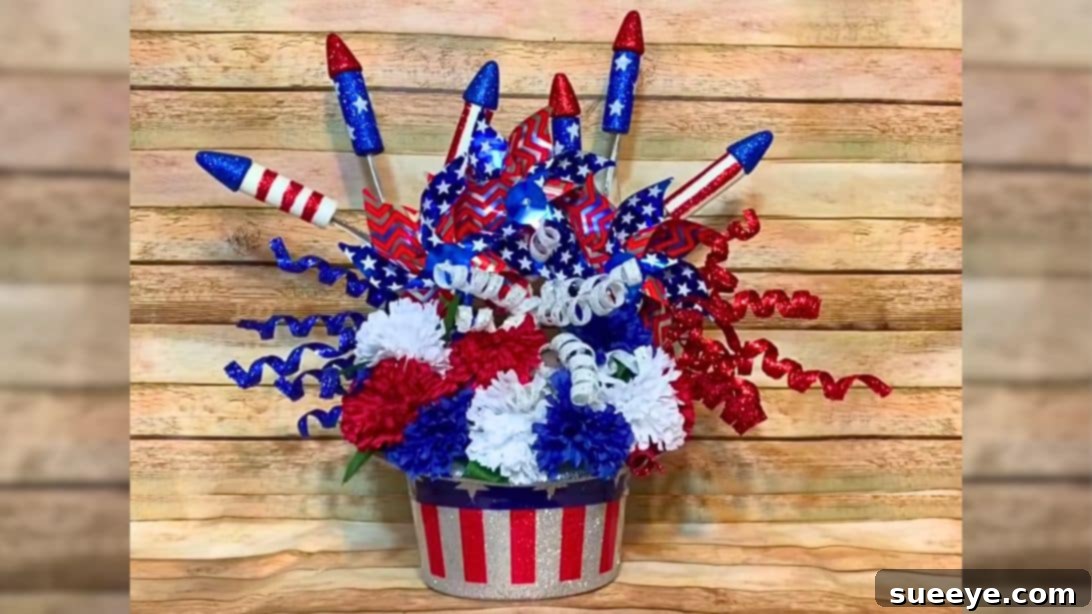
We’re thrilled to share an incredibly simple yet impactful DIY project that promises to be the focal point of your holiday decor: a beautiful top hat centerpiece. This brilliant idea, inspired by the creative minds at This Southern Girl Can on YouTube, offers an effortless way to infuse your home with patriotic charm. Whether placed proudly on your dining table, a mantelpiece, or an entryway console, this versatile decoration is sure to impress.
One of the best aspects of this DIY centerpiece is its accessibility. You don’t need to be an experienced crafter to bring this vision to life. The assembly process is straightforward and fun, making it a perfect project for crafters of all skill levels. Plus, you can easily source all the necessary materials from your local craft store or even a budget-friendly Dollar store, proving that spectacular decorations don’t have to break the bank. Follow our comprehensive guide below, and don’t forget to check out the accompanying video tutorial for visual assistance. Get ready to create a truly special piece that celebrates the spirit of the 4th of July!
Why DIY Your 4th of July Decorations?
There’s a unique satisfaction that comes with creating your own holiday decorations. DIY projects for the 4th of July offer numerous benefits beyond just saving money. They allow you to infuse your personal style into your celebration, ensuring your decor is truly one-of-a-kind. Handmade items often carry a warmth and charm that mass-produced decorations simply can’t replicate. Engaging in a craft project can also be a wonderful way to de-stress and unleash your creativity, or even to spend quality time with family, making memories as you craft together.
A homemade patriotic centerpiece, like this top hat design, not only adds a personal touch but also becomes a conversation starter. It reflects your effort and enthusiasm for the holiday, making your guests feel even more welcomed and immersed in the festive atmosphere. Plus, the ability to customize colors, textures, and elements means your centerpiece can perfectly match your existing party theme or personal aesthetic, ensuring a cohesive and thoughtfully designed celebration.
Essential Materials for Your Patriotic Top Hat Centerpiece
Gathering your materials is the first exciting step in any DIY project. For this easy 4th of July centerpiece, we focus on affordability and availability, ensuring you can find everything you need without hassle. Here’s a detailed look at each component:
- Red, White, and Blue Top Hat: This serves as the foundation and primary visual element of your centerpiece. You can find festive plastic, felt, or even mini top hats at party supply stores, craft shops, or dollar stores, especially around patriotic holidays. Choose one that suits the scale of your intended display.
- Floral Foam Block: Essential for anchoring your floral and decorative elements. Floral foam, available in green (for fresh flowers, though dry foam works best for artificial) or white (dry foam for silk flowers and crafts), provides a sturdy base. Select a block that fits snugly within the opening of your top hat.
- Red, White, and Blue Flowers: The cornerstone of your centerpiece’s vibrancy. Opt for artificial silk flowers for longevity and easy arrangement. A mix of different flower types and shades in patriotic colors will add texture and depth. Think daisies, roses, or hydrangeas in varying sizes.
- Dollar Tree Rocks or Decorative Stones: These are crucial for adding weight to the base of your top hat, preventing it from tipping over, especially if it’s placed outdoors or in a high-traffic area. Small river rocks, decorative pebbles, or even sand can work as alternatives.
- Sparkly Embellishments: To add a touch of sparkle and festive flair. Consider glittery star picks, metallic ribbons, sequined accents, or even a can of glitter spray to enhance other elements. These details catch the light and add to the celebratory feel.
- Firecrackers Decor: These are purely decorative and perfectly safe, mimicking the excitement of real fireworks without any danger. Look for faux firecracker bundles, individual sticks, or even small rocket-shaped ornaments in patriotic colors.
- Pinwheel Decor: A whimsical addition that evokes a sense of childhood wonder and summer fun. Pinwheels come in various sizes and colors; choose ones that complement your red, white, and blue theme. They add movement and an extra dimension to your display.
- Solar Light (Optional): For an enchanting evening glow. A small, inexpensive solar light can be incorporated into the centerpiece, making it visible and magical after dusk, perfect for outdoor gatherings. Ensure it’s small enough to fit discreetly among your other decorations.
- Hot Glue Gun and Glue Sticks or Adhesive (Optional): While much of this project involves simply sticking items into foam, a hot glue gun provides extra security for elements that need to be firmly attached, such as the foam block to the hat, or heavier embellishments.
Step-by-Step Guide to Assembling Your Festive Centerpiece
Now that you have all your materials, let’s dive into the fun part: assembling your patriotic masterpiece. This process is designed to be quick, easy, and enjoyable!
Step 1: Preparing Your Top Hat Base
Begin by taking your red, white, and blue top hat and laying it upside down. This creates a stable base for your arrangement. Carefully pour the entire bag of Dollar Tree rocks or decorative stones into the bottom of the hat. These stones are essential for adding substantial weight, which will prevent your completed centerpiece from toppling over, especially if it’s top-heavy with decorations. Once the rocks are in place, gently insert your floral foam block into the center of the hat, resting it firmly on top of the stones. You may need to press it down slightly to ensure it’s secure. If you prefer extra stability, a dab of hot glue between the foam and the hat’s interior, or between the foam and the rocks, can secure it further, though it’s often not strictly necessary.
Step 2: Arranging Your Patriotic Floral Display
With your base prepared, it’s time to add the beautiful flowers. Take your red, white, and blue artificial flowers. Depending on their original length, you’ll likely need to cut their stems shorter using wire cutters or sturdy scissors. Aim for lengths that allow the flower heads to sit nicely above the top hat brim, creating a full and vibrant dome shape. Begin inserting the flowers into the floral foam block, starting with the larger blooms to establish your main shape, then filling in with smaller flowers and greenery. Distribute the colors evenly to achieve a balanced patriotic look. Don’t be afraid to experiment with placement until you’re happy with the arrangement’s fullness and visual appeal.
Step 3: Integrating Festive Embellishments
Now for the fun part – adding all the festive details! Take your faux firecrackers, pinwheels, and any other sparkly embellishments you’ve chosen. Similar to the flowers, you might need to trim the stems or bases of these items to suit your desired height. Begin inserting these decorative elements into the floral foam, strategically placing them among the flowers. The firecrackers can create an exciting “burst” effect, while pinwheels add a charming, playful touch. Distribute your embellishments around the centerpiece, ensuring they are visible from all angles. If any embellishments feel loose, a small amount of hot glue can help secure them firmly in place.
Step 4: Adding the Optional Solar Light
If you’ve opted to include a solar light for an extra magical touch, this is the perfect time to integrate it. Find a central or prominent spot within your arrangement where the solar panel of the light can still receive adequate sunlight during the day. Carefully push the stake of the solar light into the floral foam block. Ensure it stands upright and is securely positioned. When evening falls, your centerpiece will beautifully illuminate, adding a soft, patriotic glow to your celebrations.
Step 5: Final Touches and Display
Take a step back and admire your handiwork! Look at your centerpiece from all angles, making any minor adjustments to the flowers or embellishments to achieve perfect balance and symmetry. Fluff up any flattened flowers, adjust heights, and ensure everything is securely in place. Once you’re satisfied with your creation, your beautiful, festive 4th of July top hat centerpiece is ready to be proudly displayed! Place it on your dining table, a buffet, an outdoor patio table, or anywhere you want to add a vibrant touch of patriotism.
Creative Customization Ideas for Your Centerpiece
While the basic design is wonderfully charming, there are countless ways to customize your 4th of July top hat centerpiece to perfectly match your personal style or party theme. Consider adding small American flags on sticks for a more traditional look, or incorporate patriotic ribbons tied into bows around the base of the top hat. You could also experiment with different shades of red, white, and blue, perhaps opting for softer pastel tones or bolder, deeper hues. Tiny battery-operated fairy lights woven through the flowers can offer an alternative to a solar light, perfect for indoor evening displays. For a rustic touch, use burlap or twine in your embellishments. Don’t hesitate to include other small themed items like miniature statues of liberty or eagle figurines for a truly unique expression of patriotism.
Where to Showcase Your Beautiful 4th of July Centerpiece
The beauty of this top hat centerpiece lies in its versatility. Its compact yet striking design makes it suitable for various locations within your home or party venue. The most obvious choice is the dining table, where it serves as an inviting focal point for meals and conversations. However, its charm extends far beyond that. Consider placing it on a mantelpiece to brighten up your living room, on an entryway table to greet guests with festive cheer, or even on a outdoor patio table to enhance your backyard barbecue. For buffet tables, multiple smaller centerpieces can create an impressive spread. Ensure the chosen spot allows the centerpiece to be admired without obstructing views or traffic flow, and if using a solar light, position it where it can charge effectively during the day.
Safety Tips for Your DIY Craft Project
While this project is relatively simple, it’s always important to keep safety in mind, especially when crafting. If using a hot glue gun, exercise extreme caution to avoid burns; keep children supervised if they are helping. When cutting flower stems or other materials, use appropriate tools and ensure your hands are clear of the cutting path. Always check that all decorative elements, especially “firecracker” decor, are purely ornamental and pose no fire risk. If you’re placing the centerpiece outdoors, ensure it’s stable and won’t be easily knocked over by wind or accidental bumps. If crafting with children, opt for craft-friendly adhesives and blunt-nosed scissors to ensure a safe and enjoyable experience for everyone.
Conclusion: Celebrate with Handmade Patriotism
There you have it! A wonderfully festive and incredibly easy 4th of July top hat centerpiece, ready to bring patriotic joy to your Independence Day celebrations. This DIY project is a testament to how simple materials and a little creativity can result in a truly dazzling decoration. Whether you’re hosting a grand party or enjoying a quiet family gathering, this handmade piece will undoubtedly add a special touch to your festivities, making your celebration even more memorable.
We hope you’ve enjoyed this crafting journey as much as we have. Creating something beautiful with your own hands is a rewarding experience, and this patriotic centerpiece is a fantastic way to express your holiday spirit. So, gather your materials, follow these steps, and get ready to display a magnificent symbol of freedom and celebration.
Happy 4th of July!
*A special thank you to This Southern Girl Can via YouTube for the inspiring original idea and all images used here. If you enjoyed this DIY project, we highly recommend visiting her amazing channel for more creative video tutorials and don’t forget to subscribe for endless crafting inspiration!