
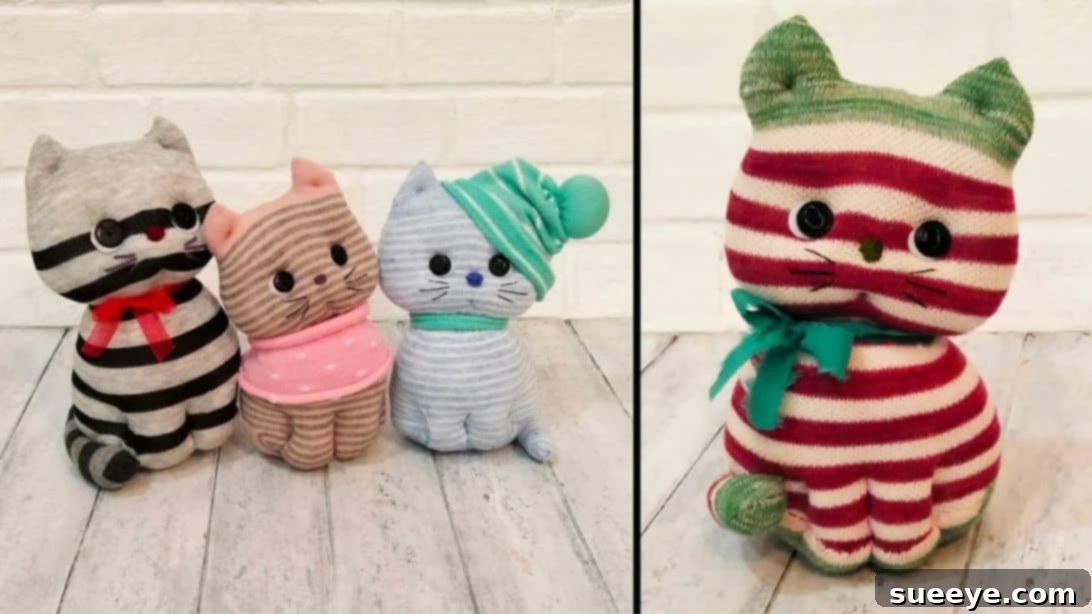
DIY Sock Kitten Tutorial: Craft Your Own Adorable Stuffed Animal
Unleash your creativity and transform a simple sock into an irresistibly cute stuffed kitten! This delightful DIY project is perfect for crafters of all skill levels, especially beginners looking for a rewarding and easy sewing experience. Not only is it a fantastic way to repurpose old socks, giving them a new lease on life, but it also results in a charming, custom-made plush toy that makes for a wonderful gift or a lovely addition to your home decor. Say goodbye to complicated patterns and intricate stitches; with this comprehensive guide, you’ll discover just how simple it is to bring your very own unique sock kitten to life.
Our detailed tutorial breaks down each step with clear, concise instructions, ensuring a smooth and enjoyable crafting journey from start to finish. We’re inspired by the brilliant idea and original tutorial shared by Moth Art on YouTube, whose creative vision sparked this wonderful project. While we’ll guide you through the process here with extensive written details, you can also watch their video for excellent visual demonstrations and additional insights.
Whether you’re crafting a unique, personalized present for a loved one, looking for a fun and educational activity to do with kids, or simply want to indulge in a relaxing creative session, this DIY sock kitten promises a fulfilling experience. This project requires minimal materials, most of which you likely already have around the house, making it an incredibly accessible and budget-friendly endeavor. Let’s gather our supplies and embark on this charming adventure!
Materials You’ll Need to Create Your Sock Kitten
Gathering your supplies is the first exciting step in creating your cuddly companion. Most of these items are likely already in your home, making this an incredibly budget-friendly craft. Here’s a detailed list of what you’ll need:
- One Clean Sock: The star of our show! Choose a sock that’s clean and preferably new or in good condition without significant wear or holes. An ankle-length or crew-length sock is ideal, as it provides enough fabric for the kitten’s body and ears. Consider patterned socks for unique designs, striped socks for a playful look, or solid colors if you prefer a classic aesthetic or wish to add your own embroidery details.
- Sharp Scissors: A good pair of fabric scissors will make cutting easier and more precise, helping to prevent frayed edges and ensuring clean lines for your kitten’s shape. Regular sharp scissors can also work in a pinch.
- Soft Filling Material: Polyester fiberfill (often simply called poly-fill) is excellent for its loft, softness, and resilience, giving your kitten a huggable quality. Alternatively, you can use cotton batting, shredded fabric scraps, or even dried beans or rice for a weighted effect (ensure they are securely enclosed in a separate pouch if using for a child’s toy to prevent spills).
- Fabric Marker or Chalk: Essential for drawing your cutting and sewing lines onto the sock. A washable fabric marker or tailor’s chalk is best, as it allows you to mark clearly and the lines will either disappear or be hidden once the project is complete.
- Strong Thread: All-purpose sewing thread in a color that matches or complements your sock is ideal. Opt for a good quality, strong thread to ensure durability, especially for areas like the neck definition and securing the limbs, which will hold the stuffing in place.
- Hand-Sewing Needle: A standard hand-sewing needle will suffice. Ensure it’s sharp enough to pass through the sock fabric easily and has an eye large enough for your chosen thread.
- Decorative Ribbon: For tying around the kitten’s neck, adding a charming finishing touch and a splash of color. Choose a ribbon with a width and pattern that complements your kitten’s “fur” color and your personal style.
- Two Black Beads (for eyes): Small black beads, typically about 4-6mm in diameter, work wonderfully for creating expressive eyes. Important safety note: If the stuffed kitten is intended for a baby or a very young child, it is highly recommended to embroider the eyes with black thread instead of using beads, as beads can pose a choking hazard.
- Embroidery Floss or Thin Yarn: A small length of black, pink, or light brown embroidery floss or thin yarn will be used for crafting the kitten’s adorable nose and delicate whiskers, bringing its face to life.
Detailed Step-by-Step Instructions: Crafting Your Sock Kitten
Follow these carefully detailed steps to transform your humble sock into an adorable feline friend. Take your time with each stage, and don’t be afraid to add your personal touch to make your kitten truly unique!
Step 1: Prepare Your Sock for Shaping
Begin by turning your chosen sock completely inside out. This crucial step ensures that all your stitch lines and raw edges will be hidden within the kitten, resulting in a neat and professional finish. Once inside out, carefully flatten the sock, smoothing out any wrinkles. Now, take the heel part of the sock and fold it flat towards the bottom edge (the cuff opening), aligning it neatly so that the heel forms a flat, somewhat rectangular shape. Secure this folded section with a few pins. This initial fold serves a dual purpose: it helps create a stable base for the kitten’s body and ensures the heel fabric becomes an integrated part of the main body structure, providing a slightly wider, more stable base for the finished toy.
Step 2: Marking and Cutting the Kitten’s Basic Form
With your sock still inside out and securely pinned, it’s time to define the kitten’s primary shapes. Using your fabric marker or tailor’s chalk, draw a distinct trapezoid shape on the toe part of the sock. This trapezoid will form the kitten’s ears once cut and turned. Position it so the wider base of the trapezoid is closer to the main body, and the narrower top forms the tip of the ear. Next, just above where the folded heel section begins (closer to the open cuff of the sock), draw two horizontal lines. These lines will delineate the top of the body and create the initial space for the neck. Carefully sew along these drawn lines using your needle and thread. A simple running stitch or a slightly more secure backstitch will work well. Once sewn, precisely cut out the trapezoid shape for the ears, making sure to cut just above your stitch line. This prevents fraying of the fabric and ensures a clean, crisp edge when the sock is turned right-side out.
Step 3: Creating and Shaping the Kitten’s Head
Now it’s time to give your kitten its adorable, distinct head! Turn the entire sock right side out. Carefully insert your chosen filling material into the toe portion of the sock, specifically designated for the head area. Don’t overstuff; aim for a firm yet soft and squeezable head shape. Gently mold the filling with your fingers to create a round, appealing head for your kitten. Once you’re satisfied with the head’s size and shape, retrieve your strong thread and needle. Sew a running stitch around the sock at the point where the head filling ends, essentially creating a “neckline.” Pull the thread tightly to gather the fabric and define the neck, separating the head from the body. Secure this gathered section with a strong, double knot to ensure it holds its shape. This step truly brings the kitten’s initial form to life.
Step 4: Filling and Sealing the Kitten’s Body
With the head beautifully defined, proceed to fill the remaining body section of the sock with your stuffing material. Distribute the filling evenly throughout the body to create a plump, cuddly, and shapely form. Take your time to ensure there are no lumpy areas and that the kitten feels consistently soft and huggable. The amount of filling will determine how firm or squishy your kitten is – adjust to your preference. Once the body is adequately filled and shaped, neatly sew the open end of the sock closed. For a clean, almost invisible finish, you can use a ladder stitch (also known as a blind stitch or invisible stitch). If you’re a beginner or don’t mind a visible seam, a simple whipstitch will also work effectively. This final stitching seals the body, completing the main structure of your adorable stuffed kitten.
Step 5: Defining the Kitten’s Legs and Paws
This step adds charming definition and character to your kitten by creating the illusion of legs or paws. Using your needle and strong thread (matching the sock color is best for invisibility), you’ll indent the lower body to sculpt these features. Pass your needle through three distinct points on the lower body of the kitten, on one side. Imagine drawing a small triangle on the underside: insert the needle at one corner, pull it through the body, exit at a second corner, and then re-enter to exit at the third corner. Gently pull the thread to gather and indent the fabric, creating soft, defined divisions for the legs. Secure the thread tightly with a knot to maintain the leg shape. Repeat this exact process on the opposite side of the kitten’s body to create a symmetrical pair of legs. This technique gives your sock kitten a more sculpted, charming, and realistic appearance, making it look as though it’s ready to pounce!
Step 6: Attaching the Expressive Eyes
Now it’s time to give your kitten its personality and gaze through its eyes. Take your two small black beads. For a more finished look, sew each bead onto a tiny circular piece of plain white fabric, leaving a small allowance of white fabric around the bead. This white allowance will serve as the kitten’s “eyelids” or the white of its eyes, giving them a more natural and expressive appearance. Once both eyes are prepared, carefully position them on the kitten’s face, ensuring they are symmetrical and convey the desired expression. To attach them cleanly without visible threads on the back of the head, pass your needle all the way through the kitten’s neck from one eye to the other, securing the stitches deeply within the stuffing. This clever technique hides all knots and loose threads, ensuring a neat and professional finish for your kitten’s face. As a crucial safety reminder: for kittens intended for babies or very young children, please prioritize safety by embroidering the eyes directly onto the sock with thread instead of using small beads, which can be a choking hazard.
Step 7: Adding the Charming Nose and Whiskers
Every kitten needs a cute nose and delicate whiskers to complete its adorable face! Using your chosen embroidery floss or yarn and a needle, carefully sew a small triangular or inverted “Y” shape for the nose in the center of the face, positioned just below the eyes. Take your time to make it neat and symmetrical. Once the nose is complete, extend several straight stitches outwards from the sides of the nose to create the whiskers. Aim for symmetry and a natural, even spread. You can make them long or short, thick or thin, depending on the character and breed you envision for your particular kitten. This small but significant detail adds immense charm, realism, and undeniable cuteness to your stuffed friend, truly bringing its face to life.
Step 8: Crafting and Attaching the Tail
No kitten is complete without a fluffy, playful tail! Find a spare piece of sock fabric – you might have some remnants from the initial cuts, or you can use a matching sock if available. Turn this fabric wrong side out. Using your fabric marker, draw a gentle, curved tail shape. Make it as long or short, plump or slender as you desire. Carefully sew along your drawn line, but remember to leave a small opening—about an inch—at the base of the tail. This opening is crucial for turning the tail right side out and for neatly stuffing it. Carefully cut out the tail shape just above your stitch line. Turn the tail right side out, gently stuff it with a small amount of filling to give it volume and shape, and then sew the opening closed with a neat stitch. Finally, hand-stitch the finished tail securely to the back of your kitten’s body, using a ladder stitch for an invisible and strong attachment. Ensure it’s firmly attached so it won’t come off with play.
Step 9: The Final Touch: A Festive Ribbon
To add a final flourish of undeniable cuteness and personality, gently wrap a decorative ribbon around your kitten’s neck. You can tie it into a neat bow, a simple knot, or even a small ascot. This small accessory adds character and makes your handmade kitten even more adorable and personalized. Feel free to choose ribbons with different patterns, textures, or colors to complement your kitten’s “fur” and to further personalize your unique creation. This step truly completes your masterpiece, making it ready for display, gifting, or cuddling.
Tips for a Perfect Sock Kitten: Enhance Your Crafting Experience
To ensure your DIY sock kitten project is a resounding success and you achieve the best possible results, consider these helpful tips:
- Choose the Right Sock: The type, size, and material of your sock greatly influence the final look and feel. Crew socks or ankle socks generally work best due to their shape. Patterned socks can add unique character and reduce the need for embellishments, while plain socks offer a blank canvas for intricate embroidery or even fabric paint. Always ensure the sock is clean and free of holes or excessive wear.
- Stuffing Consistency is Key: Pay attention to how much filling you use. Don’t under-stuff, as this leads to a flimsy, shapeless toy. Conversely, over-stuffing can make your kitten hard and less cuddly. Aim for a firm yet squishy and huggable feel. Use small pieces of fiberfill to avoid lumps and achieve smoother results.
- Safety First, Always: If the stuffed kitten is intended for a baby or a very young child, always prioritize their safety. Embroider facial features (eyes, nose, mouth) with thread instead of using small beads or buttons, which can pose a significant choking hazard. Double-check that all stitches, especially those securing the head and tail, are extremely strong and secure.
- Practice Basic Stitches: If you’re new to hand sewing, it’s a good idea to practice basic stitches on a scrap piece of fabric first. A simple running stitch is excellent for gathering and initial seams, while a ladder stitch (or invisible stitch) is invaluable for closing openings neatly and invisibly.
- Personalize Your Kitten: Don’t hesitate to get creative and make your kitten truly your own! Add small felt ears on top of the sock ears, embroider delicate paw pads on the legs, attach a tiny bell collar, or even create miniature fabric clothing. Each thoughtful addition makes your kitten unique and full of character.
- Take Your Time and Enjoy: Crafting should be a relaxing and enjoyable experience. Rushing can lead to mistakes and frustration. Take your time with each step, enjoy the process of creation, and take breaks if you feel overwhelmed. The journey is as rewarding as the final product.
Why Craft a Sock Kitten? The Many Benefits of DIY Stuffed Animals
Beyond the simple joy of creating something adorable with your own hands, crafting a DIY sock kitten offers numerous advantages and benefits that extend beyond the finished product:
- Eco-Friendly & Sustainable: This project is a fantastic way to upcycle old, mismatched, or worn socks that might otherwise end up in a landfill. Giving new life to discarded items promotes sustainability and reduces waste, making it an environmentally conscious craft.
- Incredibly Budget-Friendly: With most of the necessary materials likely already present in your home, this is an incredibly inexpensive craft. There’s no need to purchase costly specialty supplies, making it accessible to virtually everyone.
- Unique & Personalized Gifts: A handmade sock kitten makes a thoughtful, heartwarming, and truly unique gift for birthdays, baby showers, holidays, or just because. The recipient will undoubtedly appreciate the effort, care, and personal touch that went into creating something special just for them.
- Develops Fine Motor Skills: The intricate actions involved in cutting, sewing, stuffing, and detailing the kitten help enhance and refine fine motor skills, hand-eye coordination, and dexterity. This makes it a great educational activity for children (with appropriate supervision) and beneficial for adults as well.
- Stress Relief & Mindfulness: Engaging in creative activities like hand sewing can be incredibly therapeutic and meditative. It provides a focused outlet that helps reduce stress, promotes mindfulness, and allows for a peaceful escape from daily routines. It’s a wonderful way to unwind and de-stress.
- Fosters a Sense of Accomplishment: There’s an immense sense of satisfaction and pride that comes from seeing your project come to life, transforming simple materials into a cherished item. This boosts confidence and encourages further creative endeavors.
- Encourages Creativity: This project serves as a fantastic springboard for further creativity, allowing you to experiment with different sock patterns, colors, embellishments, and even other animal designs.
Final Thoughts and Inspiration
Congratulations on crafting your very own adorable stuffed kitten from a simple sock! We hope you found this comprehensive tutorial both easy to follow and incredibly rewarding. This project beautifully demonstrates that you don’t need extensive sewing skills, a large budget, or expensive materials to create something truly special, heartwarming, and full of character.
Your handmade sock kitten is more than just a toy; it’s a testament to your creativity, ingenuity, and the joy of making. Display it proudly as a charming piece of handmade decor, gift it with love to someone special, or simply enjoy its comforting presence as a unique companion. We wholeheartedly encourage you to continue experimenting with different sock patterns, colors, embellishments, and even variations in animal types to create a whole family of unique, cuddly, and personalized stuffed friends.
Thank you for joining us on this fun and fulfilling crafting journey. Don’t forget to share your wonderful creations with us and inspire others to try this delightful DIY project. Happy crafting!