
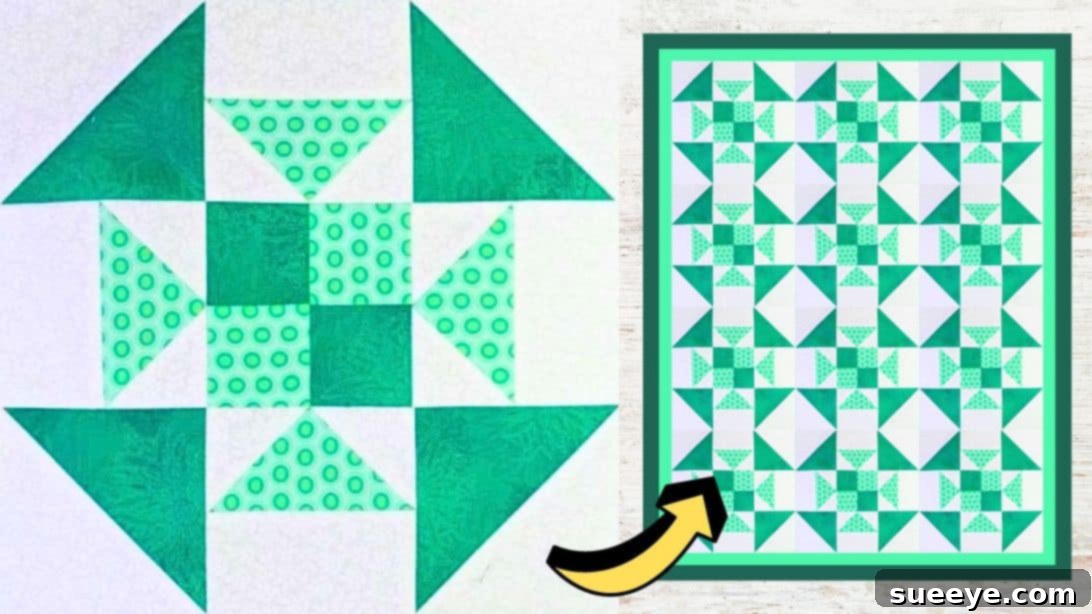
Simple Monkey Wrench Variation Quilt Block Tutorial (with Free Pattern)
Embark on a delightful quilting journey with this simple yet striking Monkey Wrench Quilt Block variation, thoughtfully presented by acclaimed quilter Carol Thelen. Whether you’re a seasoned quilter looking for a fresh challenge or a beginner eager to dive into the world of fabric artistry, this tutorial is designed to guide you through every stitch. While the intricate design of the Monkey Wrench block might initially appear complex, Carol’s clear instructions and the included free pattern make it surprisingly easy to master. Get ready to transform your fabric scraps into a beautiful, geometric masterpiece that will be a cherished addition to any quilt project.
The Monkey Wrench quilt block, also known by names such as “Churn Dash” or “Broken Dishes,” is a timeless classic in the quilting community. Its versatile design allows for endless creativity in fabric placement and color schemes, making each block a unique work of art. This particular variation offers a refreshing twist on the traditional pattern, promising a rewarding and engaging sewing experience. We’ll walk you through each step, ensuring you gain confidence and skill while creating a stunning block that lays the foundation for a magnificent quilt.
Precision is key in quilting, and with this tutorial, you’ll learn essential techniques that will elevate your craftsmanship. From accurate cutting to perfect pressing, every detail matters. But don’t let that intimidate you! Quilting is also about enjoyment and the satisfaction of creating something beautiful with your own hands. So, gather your materials, prepare your sewing machine, and let’s start creating a beautiful Monkey Wrench Quilt Block together!
Materials for Your Monkey Wrench Quilt Block
Before you begin sewing, ensure you have all the necessary tools and fabrics. Having everything organized will make your quilting process smooth and enjoyable. We’ve compiled a comprehensive list to get you started:
- Light Print Fabric: Choose a light-colored fabric with a subtle pattern. This will create contrast and highlight the block’s design.
- Dark Print Fabric: Select a darker fabric, also with a print, to complement your light fabric. The interplay of light and dark is crucial for defining the Monkey Wrench pattern.
- Background Fabric: A solid or subtly textured fabric that provides a neutral backdrop, allowing your printed fabrics to pop. Often, a cream or white fabric is chosen for this purpose.
- Marking Pen, Pencil, or Chalk: Essential for drawing precise lines on your fabric, especially for half-square triangles. Make sure it’s erasable or disappears upon ironing.
- Ruler: A clear acrylic quilting ruler is indispensable for accurate measuring and cutting.
- Scissors or Rotary Cutter and a Cutting Mat: A rotary cutter provides precise and quick cuts, while a cutting mat protects your work surface. Sharp scissors are also useful for trimming threads and smaller pieces.
- Needle and Thread: High-quality cotton thread that matches your fabrics or a neutral color like white or gray.
- Iron, for pressing: A well-heated iron is critical for flattening seams and ensuring your blocks lie perfectly flat.
- Sewing Machine: A reliable sewing machine with a good quarter-inch foot attachment will make stitching accurate seams much easier.
- Pattern:Click here to download your free pattern! This essential guide provides all the cutting dimensions and layout specifics you’ll need.
Step-by-Step Directions: Crafting Your Monkey Wrench Quilt Block
Follow these detailed instructions carefully to construct your stunning Monkey Wrench Quilt Block. Remember to take your time and enjoy the process!
Step 1: Creating Your Half-Square Triangle (HST) Units
Begin by precisely cutting all your fabrics according to the dimensions provided in the free pattern. Accuracy at this stage is paramount for a successful block. Select one large dark print square and one large background square. On the wrong side (back) of the lighter background fabric, use your marking pen or pencil to draw a diagonal line from one corner to the opposite corner. This line will serve as your cutting guide.
Next, place these two squares right sides together, aligning all edges perfectly. It’s often helpful to pin them to prevent shifting during stitching. Using your sewing machine, stitch a straight seam on each side of the drawn diagonal line, maintaining a consistent quarter-inch seam allowance. Once stitched, carefully cut the two squares apart along the drawn line. You will now have two raw half-square triangle (HST) units.
Gently press the seams open for each HST unit. Pressing seams open helps to reduce bulk, ensuring your finished block lies flatter and looks more professional. Finally, trim off any small “nubs” or dog ears that extend beyond the square edges. This step squares up your HSTs, making them ready for the next stage of assembly.
Step 2: Assembling the Four-Patch Units
Repeat the process from Step 1 with the remaining large dark print and background squares to create two more HST units. Now, for your four-patch units, gather the two smaller dark print squares and the two smaller light print squares. Arrange these four squares into a 4-patch block layout on your work surface, making sure to alternate the colors (e.g., dark, light, dark, light in a checkerboard pattern). This visual layout helps confirm your design before sewing.
First, sew the top two pieces together with a quarter-inch seam, then sew the bottom two pieces together. Press the seams open as you go. Consistent pressing after each seam is crucial for achieving flat and accurate blocks. Finally, sew these two newly formed rows together, again using a quarter-inch seam. Once sewn, give the entire 4-patch unit a thorough press, ensuring all seams are flat and the unit is square.
Step 3: Constructing the First Set of Flying Geese Units
Now, take the large light print square that will form the central part of your “flying geese” units, along with four small background squares. On the back of each small background square, draw a diagonal line from corner to corner. This is a crucial step for accurate placement.
Place two of these marked background squares onto opposite corners of the large light print square. Ensure that the raw edges of the small squares are matched nicely with the raw edges of the large square, and verify that the drawn diagonal lines are perfectly lined up, running towards the center of the large square. Stitch them together on each side of the drawn line, maintaining your quarter-inch seam allowance. After stitching, carefully cut along the drawn diagonal line, separating the units.
These pieces are the beginning of your flying geese units, a classic quilting element that adds dynamic movement to any block. Precise placement and stitching here will ensure your geese fly straight!
Step 4: Completing and Squaring Up the Flying Geese Units
After cutting, press the seams open on the two units you just created. This prepares them for the next addition. Rotate one of the units so that the empty corner is facing you. Take another small background square (with a diagonal line drawn on its back) and place it on this empty corner. It’s very important to double-check that the diagonal line is oriented correctly, pointing towards the corner where it will be stitched and cut. Stitch along both sides of this line, then cut them apart along the drawn line. Press the seams open once more.
Repeat these exact steps with the remaining unit and the last background square. Once both units are complete, carefully trim off any “nubs” or small triangles of fabric extending beyond the edges, just as you did with the HSTs. This helps to square up the units. Now, you’ll likely find your flying geese units are not perfectly square yet; they are rectangular. To square them up for the Monkey Wrench block, you will stitch a background rectangle onto each flying geese unit. This final piece will complete their square shape, providing the correct dimensions for assembly. Press these new seams open as well.
Step 5: Final Block Assembly and Finishing Touches
With all your individual units prepared – the HSTs, the four-patch, and the flying geese – it’s time to bring them all together to form the complete Monkey Wrench Quilt Block. Refer to Carol Thelen’s video tutorial and the provided pattern for the precise layout. The pattern will visually demonstrate how each unit fits into the larger block design. Lay out all your units on your work surface according to the pattern to ensure correct placement before stitching.
Begin by stitching the units together per row, typically working from left to right. Once each row is sewn, press the seams open. This continuous pressing after each seam is vital for maintaining accuracy and achieving a flat block. After all three rows are complete and pressed, carefully stitch the rows to each other, aligning your seams as precisely as possible. Nesting seams (if you pressed alternate seams in opposite directions) or carefully pinning open seams can help in matching points.
Once the entire block is sewn together, give it a final, thorough press. Lay the block flat and press it from the center outwards, ensuring all seams are flat and crisp. Congratulations! Your Monkey Wrench Quilt Block is now complete. You can now use this block as a standalone decorative piece, or better yet, make several more to create a stunning quilt, a charming table runner, or any other quilting project your heart desires. The possibilities are endless, and with each block you create, your skills and confidence will grow!
Tips for Quilting Success
To ensure the best results for your Monkey Wrench Quilt Block and future quilting projects, keep these valuable tips in mind:
- Consistent Seam Allowance: The quarter-inch seam allowance is crucial in quilting. Using a specialized quarter-inch presser foot can significantly improve your accuracy.
- Pressing is Key: Never underestimate the power of a good iron. Pressing after each seam helps your blocks lie flat, makes them easier to assemble, and prevents distortion.
- Accurate Cutting: “Measure twice, cut once” is a quilter’s mantra. Use a sharp rotary cutter blade, a non-slip ruler, and a reliable cutting mat for precise cuts. Even slight inaccuracies can compound and affect the final block size.
- Test Your Stitches: Before sewing your actual fabric, do a quick test stitch on a scrap piece to ensure your tension is correct and your machine is stitching smoothly.
- Patience and Enjoyment: Quilting is a journey, not a race. Take your time, enjoy the process of watching your fabric pieces transform, and don’t be afraid to unpick and re-sew if needed. Every stitch is a step towards mastery!
This Monkey Wrench Quilt Block is a fantastic project that combines classic quilting techniques with a refreshing variation. With the detailed instructions and the free pattern, you’re well on your way to creating a beautiful and functional piece of textile art. We encourage you to explore different fabric combinations and make this design truly your own. Happy quilting!
*All image credit belongs to Carol Thelen via YouTube. We highly recommend following and subscribing to her channel for more inspiring quilting tutorials and creative projects!