
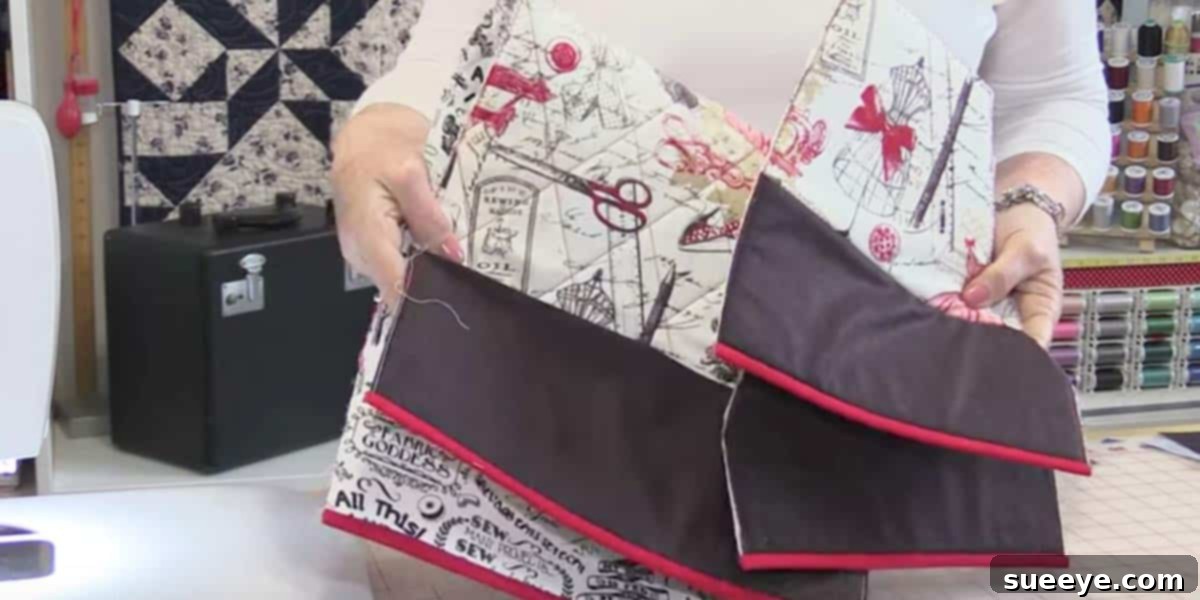
Sew Your Own Essential Sewing Machine Cover: A Beginner-Friendly Project
Are you new to the wonderful world of sewing, or perhaps searching for a straightforward project to brush up on your skills? It’s common for many online sewing patterns, projects, and blogs to appear quite daunting at first glance. They often showcase intricate designs or advanced techniques that can intimidate a budding enthusiast. But don’t let that deter you! This guide will introduce you to an incredibly easy and immensely practical sewing project that will help you build your sewing confidence and get your foot comfortably acquainted with the sewing machine pedal. Let’s make something truly useful: a custom sewing machine cover!
The Indispensable Need for a Sewing Machine Cover
Whether you’ve just invested in the latest cutting-edge sewing machine or cherish a beloved vintage model, every sewing machine, without exception, requires adequate protection. It’s a fundamental aspect of machine care that is often overlooked but critical for longevity and optimal performance. Dust, lint, pet hair, and even stray threads can be surprisingly destructive. These seemingly innocuous particles have a knack for infiltrating the delicate internal mechanisms of your machine, causing friction, gumming up gears, and potentially leading to costly repairs or a shortened lifespan.
While many sewing machines come equipped with a basic plastic dust cover, these often fall short of providing robust protection or aesthetic appeal. They can be flimsy, prone to cracking, and rarely offer a snug fit, leaving parts of your valuable machine exposed. Furthermore, they seldom enhance the look of your creative space. This is precisely where a handmade sewing machine cover becomes not just a practical item but a personalized statement, offering superior safeguarding and a touch of charm.
Hidden Threats: Why Protection Matters
- Dust and Lint Accumulation: Fine dust particles and fabric lint can settle into moving parts, creating abrasive friction and hindering smooth operation.
- Pet Hair Invasion: For homes with furry friends, pet hair is an omnipresent challenge that readily finds its way into the crevices of your machine, potentially causing blockages or overheating.
- Accidental Spills: A knocked-over coffee cup or a splash of water can lead to electrical damage or rust, severely compromising your machine.
- Minor Bumps and Scratches: Everyday activity around your sewing area can lead to accidental knocks that scratch the machine’s finish or, worse, misalign internal components.
- Light Exposure: Prolonged exposure to sunlight can fade your machine’s plastic components or even affect lubricants over time.
Unlocking Creativity: The Benefits of a DIY Sewing Machine Cover
Crafting your own sewing machine cover is far more than a simple chore; it’s a deeply satisfying project that yields multiple advantages. It empowers you with complete control over design and functionality, making it a perfect exercise for beginner sewers and a delightful endeavor for experienced crafters.
Perfect Fit, Every Time: Tailored to Your Machine
One of the most compelling reasons to sew your own cover is the ability to achieve a custom fit. Unlike generic covers that might be too large, too small, or simply the wrong shape, your handmade version can be precisely dimensioned to your specific machine. Whether you own a compact travel machine, a heavy-duty industrial model, a specialized embroidery machine, or a serger, you can ensure every contour is covered, providing maximum protection without unnecessary bulk.
A Canvas for Your Style: Personalization and Aesthetics
Why settle for mundane plastic when your sewing machine can be adorned in a cover that truly reflects your unique style and complements your craft space? With a DIY approach, you are the designer. Choose fabrics that resonate with your aesthetic – perhaps a vibrant floral print, a sophisticated geometric pattern, or a calming solid color. Beyond fabric selection, you can incorporate creative elements such as quilting for added texture and padding, intricate embroidery, charming appliques, decorative piping, or elegant trims. Your machine cover can become an extension of your artistic expression.
Enhanced Functionality: Smart Storage Solutions
A thoughtfully designed sewing machine cover can transcend its protective role to become a practical storage solution. Imagine custom-built pockets integrated directly into the cover! These can be invaluable for organizing essential sewing notions like extra bobbins, your trusty seam ripper, a pair of small scissors, a tape measure, or even a selection of your frequently used needles. Some clever designs include larger pockets capable of holding a foot pedal, power cord, or a small pattern book, keeping all your necessities neatly tucked away and easily accessible for your next project.
Cost-Effective and Confidence-Boosting for Beginners
Opting to sew your own cover is often significantly more economical than purchasing specialized covers, especially for vintage or unique machines where off-the-shelf options are scarce or expensive. Moreover, this project is remarkably beginner-friendly. The construction typically involves straightforward cuts and basic straight stitching, providing an excellent opportunity to practice fundamental sewing techniques without feeling overwhelmed. It’s a fantastic way to build confidence, yielding a tangible, useful item that you can proudly say you made yourself.
Planning Your Custom Sewing Machine Cover: The Foundation for Success
Before you even consider cutting a single piece of fabric, meticulous planning is paramount. Taking accurate measurements and making deliberate fabric choices are critical steps that will ensure your project proceeds smoothly and results in a perfectly fitting, durable cover.
Step 1: Precision Measurements
This is arguably the most crucial phase of the project. Arm yourself with a flexible tape measure and carefully record the dimensions of your sewing machine. You will need:
- Length: Measure the machine from its farthest point on one side to the farthest point on the other, ensuring you capture any protruding parts.
- Width: Measure from the front edge to the back edge, including any handles or knobs that extend beyond the main body.
- Height: Measure from the base of the machine to its absolute highest point, which could be a thread spindle, handle, or a light fixture. Ensure you account for any part that rises above the main structure.
- Consider Unique Features: If your machine has an unusual shape, a prominent accessory holder, or an ergonomic curve, factor these into your design. You might need to add extra allowances or create a more contoured pattern piece to ensure complete coverage.
Once you have your core measurements, remember to add generous seam allowances (typically 1/2 inch to 5/8 inch) to all edges that will be sewn. It’s also wise to add an additional 1 to 2 inches to the height and length for a relaxed fit, allowing the cover to slip on and off easily without struggling.
Step 2: Thoughtful Fabric Selection
The choice of fabric will profoundly influence your cover’s durability, appearance, and how easily it is to sew. Here are some popular and effective options:
- Quilting Cotton: This is a favorite due to its vast array of prints, ease of handling, and washability. For added structure and protection, it can be fused with interfacing or quilted with batting.
- Canvas or Duck Cloth: These heavier-weight fabrics provide excellent structure and durability, offering superior protection against bumps and tears. They can be a bit more challenging for beginners due to their thickness, requiring a heavy-duty needle.
- Denim: A robust and stylish option, denim offers a casual yet resilient look. Like canvas, it’s durable but can create bulkier seams.
- Home Decor Fabric: Often wider and more structured than quilting cotton, these fabrics are available in beautiful textures and sophisticated patterns, specifically designed for durability and wear.
- Vinyl or Laminated Cotton: If water resistance is a priority, these materials are an excellent choice. They typically require a specialized needle (e.g., leather or microtex) and sometimes a walking foot or Teflon foot for smooth feeding under the presser foot.
- Lining Fabric (Optional but Recommended): A lining adds a professional finish, extra padding, and helps the cover maintain its shape. Flannel provides a soft, cushioning interior, while basic quilting cotton offers a clean, neat finish.
Consider the environment where your machine resides. If it’s in a high-traffic area, prioritize a more durable, tear-resistant fabric. If it’s primarily for dust protection in a quiet corner, a lighter, more decorative cotton might be perfectly suitable.
A General Blueprint for Constructing Your Sewing Machine Cover
While specific patterns can vary in detail, the fundamental steps for sewing a basic sewing machine cover are remarkably consistent and straightforward. This general outline will provide a clear understanding of the construction process.
For visual learners, numerous excellent video tutorials are available, such as those often produced by Laura at Sew Very Easy. These offer professional, step-by-step guidance, which can be invaluable for demystifying techniques like attaching pockets, handling corners, or applying bias binding. Watching a reputable tutorial can provide the confidence and visual cues needed to tackle each stage effectively.
Fundamental Construction Steps:
- Cut Your Fabric Pieces: Based on your precise measurements and chosen design, cut out the main body piece (which typically drapes over the top and two sides) and the two distinct side panels. If you plan to add pockets, cut these pieces now as well.
- Prepare and Attach Pockets (Optional): If adding pockets, first hem the top edge of each pocket piece. Then, press under the remaining raw edges to create crisp, finished sides and bottom. Position and stitch the prepared pockets onto the main body piece or side panels *before* assembling the primary cover structure.
- Assemble the Main Body: If your main body piece consists of multiple fabric sections (e.g., if you’re doing a patchwork design), sew these together now to form the complete main panel.
- Attach Side Panels: Carefully pin the two side panels to the raw edges of the main body piece, aligning edges precisely. Stitch these seams to form a basic box shape. Pay close attention to the corners, ensuring they are neat and square. Clipping curves or notching seam allowances can help seams lie flat and reduce bulk, especially in thicker fabrics.
- Construct and Attach Lining (Optional but Recommended): If using a lining, construct it in the exact same manner as your outer cover. Once both are complete, place the outer cover inside the lining, with right sides facing each other. Stitch around the bottom raw edge, leaving a small opening (typically 4-6 inches) unstitched. This opening will be used to turn the cover right side out.
- Turn, Press, and Finish Lining: Carefully turn the entire cover right side out through the opening. Gently push out the corners to create crisp points. Press the bottom edge thoroughly, ensuring the unstitched opening is neatly folded under. Finally, topstitch closely along the entire bottom edge to close the opening and provide a clean, professional finish.
- Hem the Bottom Edge (if not lining): If you choose not to line your cover, create a neat double-fold hem along the bottom raw edge of your cover. Press the raw edge up by 1/2 inch, then press it up again by another 1/2 inch or 1 inch, concealing the raw edge. Stitch close to the folded edge.
- Add Finishing Touches: Give your entire cover a final press to smooth out any wrinkles and crisp up the seams. Now is the time to add any final decorative elements, such as decorative topstitching, additional trim, or a last piece of embroidery.
Expert Tips for a Professional Finish and Enhanced Durability
Achieving a polished, long-lasting sewing machine cover is within reach with these helpful tips:
- Pressing is Your Best Friend: Never underestimate the power of pressing. Pressing your fabric thoroughly before cutting ensures accuracy, and pressing every seam as you sew makes an enormous difference in the neatness and professionalism of your finished project.
- Utilize the Right Tools: Always use a sharp needle appropriate for your chosen fabric type (e.g., a universal needle for cotton, a denim needle for heavy fabrics, or a microtex needle for laminated fabrics). Pair it with good quality, all-purpose polyester thread for strong, reliable stitches that won’t easily break.
- Consider a Walking Foot: If you’re quilting your cover, working with multiple layers, or sewing with challenging fabrics like vinyl, a walking foot is invaluable. It helps feed all layers of fabric evenly through your machine, preventing shifting, puckering, and uneven stitches.
- Integrate Interfacing for Structure: For lighter-weight fabrics like quilting cotton, adding a medium-weight fusible interfacing to the main pieces of your cover can provide significant body and structure. This makes the cover more protective, helps it stand up nicely, and prevents it from looking flimsy.
- Reinforce High-Stress Areas: If you’re adding functional elements like sturdy handles for portability or large, heavy-duty pockets, reinforce these areas. Use extra lines of stitching, backstitch at the beginning and end, or stitch a small rectangle with an ‘X’ inside to ensure they can withstand regular use without tearing.
- Explore Bias Binding: As an alternative to a traditional hem, especially if your design incorporates curved edges, bias binding offers a wonderfully clean, durable, and decorative finish. It adds a pop of color and can truly elevate the handmade look.
Beyond the Basic: Creative Customization Ideas
Once you’ve successfully created your first basic sewing machine cover, there are endless possibilities to unleash your creativity and make truly unique pieces.
- The Quilted Masterpiece: Elevate your cover by adding a layer of batting between your outer fabric and lining. Then, quilt intricate or simple patterns across the surface. This not only adds stunning visual appeal but also provides superior padding and protection.
- Patchwork Perfection: Utilize your collection of fabric scraps to construct a beautiful patchwork design for your cover. It’s a fantastic way to honor cherished fabrics and create a true work of textile art.
- Themed Covers for Every Occasion: Create a collection of covers to match different seasons or holidays. Imagine a cozy autumn-themed cover, a festive Christmas design, or a bright, cheerful spring cover to invigorate your sewing space.
- Personalized Embroidery or Monograms: Add a deeply personal touch by embroidering your initials, a favorite sewing quote, or a charming sewing-related motif onto the cover. This makes it uniquely yours or a truly special gift.
- Functional Add-ons: Think beyond basic pockets. Integrate a small pincushion directly onto the cover, or add loops for hanging small rulers or cutting tools.
- Create a Matching Sewing Set: Extend your creative endeavors by crafting matching accessories for your sewing space. A coordinated pincushion, a handy thread catcher, or even a dust cover for your serger or embroidery machine can create a cohesive and stylish look.
Your Ultimate Sewing Machine Companion
A thoughtfully designed and well-sewn sewing machine cover is far more than just an accessory; it represents a smart investment in the longevity, performance, and aesthetic appeal of your cherished machine. It acts as a shield, an organizer, and a beautifier for your sewing space, all rolled into one rewarding project. Whether you are crafting this for your own use or as a heartfelt, handmade gift for a fellow crafting enthusiast, this easy sewing project promises immense satisfaction and undeniable practical value.
So, clear your workspace, gather your favorite fabrics, and prepare to embark on a delightful creative journey. Dive into the fulfilling world of DIY sewing and discover the profound joy of crafting a personalized sewing machine cover that not only protects your valuable equipment but also truly reflects your individual style and unwavering dedication to your craft. Happy sewing!