
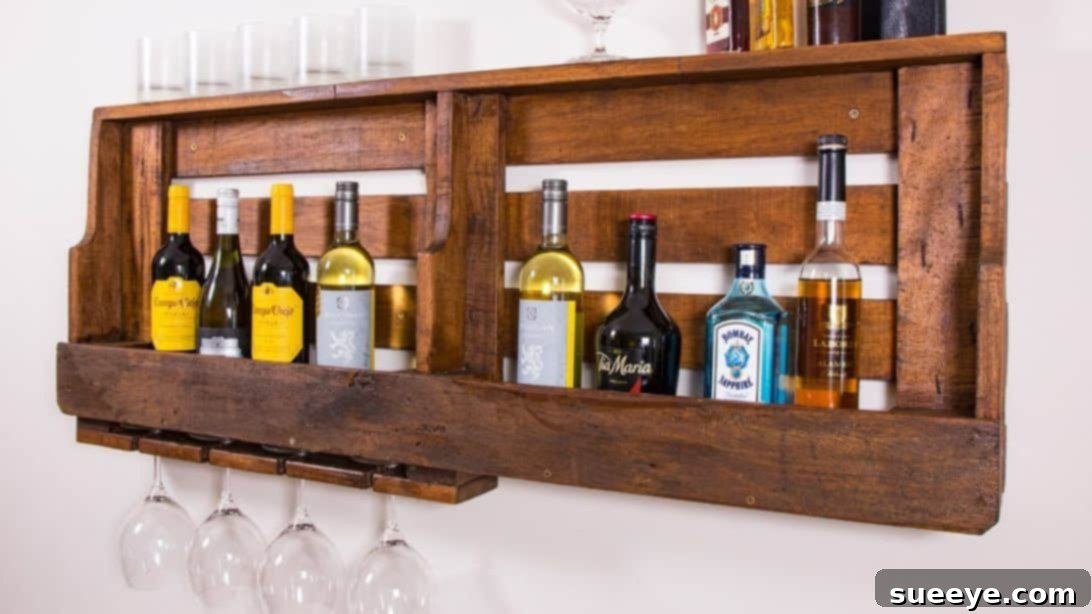
Are you looking for a creative, eco-friendly, and budget-conscious way to store your favorite wines and display your elegant stemware? Look no further! This ultimate guide will walk you through crafting your very own DIY pallet wine rack with a built-in glass holder, inspired by the innovative tutorial from Warren Nash on YouTube. This project is a fantastic opportunity to breathe new life into discarded pallets, transforming them from potential waste into a beautiful and functional piece of rustic home decor. Not only does it offer a stylish storage solution for wine enthusiasts, but it also embodies the satisfaction of creating something unique with your own hands. With clear, easy-to-follow instructions, this engaging woodworking activity is perfect for anyone looking to add a personalized touch to their living space. Get ready to embark on a rewarding journey of craftsmanship as we dive into the detailed steps below.
Essential Materials for Your Pallet Wine Rack Project
Before you begin, gathering all the necessary tools and materials will ensure a smooth and efficient building process. Most of these items are readily available at local hardware stores, and many can be sourced from your existing workshop. Remember, safety first!
- Pallet: The star of our project! Look for a clean, untreated pallet in good condition. Heat-treated (HT) pallets are preferable to chemically treated ones. Ensure it’s sturdy and free from significant damage.
- Saw: A handsaw, circular saw, or jigsaw will be essential for making precise cuts. Choose the saw that you are most comfortable and proficient with for safety and accuracy.
- Dowels: These wooden rods are crucial for creating strong, concealed joints, adding structural integrity to your wine rack. Select dowels with an appropriate diameter for your wood thickness.
- Measuring Tape/Meter Tape: Accuracy is paramount in woodworking. A reliable measuring tape will ensure all your cuts and marks are precise.
- Drill/Driller: A power drill is indispensable for creating pilot holes, drilling for dowels, and screwing components together. A cordless drill offers greater flexibility.
- Screws: Wood screws of various lengths will be needed to secure the different sections of your wine rack, ensuring maximum stability. Consider screws with a countersink head for a flush finish.
- Sandpaper or Sander: To achieve a smooth, splinter-free finish, sanding is vital. A power sander (orbital or belt) will speed up the process, but sandpaper (various grits) can be used by hand for smaller details.
- Stain (optional): For enhancing the wood grain, protecting the surface, and matching your home decor, wood stain or paint is a great option. Choose a color that complements your aesthetic.
- Countersink Bit (recommended): This drill bit creates a conical hole, allowing screw heads to sit flush with the wood surface for a professional look.
- Coping Saw (for curved edges, optional): If you plan to add decorative curves, a coping saw will allow for intricate cuts.
Step-by-Step Guide to Building Your Pallet Wine Rack
Step 1: Preparing and Cutting the Main Rack Frame
Begin your project by carefully selecting the best sections of your pallet. Lay the chosen pallet flat on the ground or on a stable workbench. This initial step involves defining the overall height of your wine rack. Consider the typical height of wine bottles you intend to store, ensuring there’s ample clearance for easy access and removal. Mark your desired height on the three primary vertical planks of the pallet – usually two outer planks and one central plank. Use a measuring tape for precision, then double-check your marks. Once satisfied, use your saw to carefully cut along these marks, creating the foundational structure for your wine rack. Always prioritize safety when operating power tools, wearing appropriate eye and hand protection.
Step 2: Crafting the Bottle Support Shelves
With the main frame cut, turn your attention to creating the internal shelves that will securely hold your wine bottles. Measure the inner space between the vertical planks where the bottles will rest. Using the remaining scrap wood from your pallet, cut pieces to these precise dimensions. These pieces will serve as horizontal supports, preventing bottles from rolling out or falling. It’s crucial that these pieces fit snugly but not too tightly; a perfect fit ensures stability without putting undue stress on the frame. Create at least two such support pieces, one for each side of where the bottles will be cradled, ensuring a robust and secure enclosure for your wine collection.
Step 3: Attaching the Internal Bottle Support Shelves
Now, it’s time to integrate the bottle support shelves into your main frame. Measure the width of the shelf pieces you just cut – for example, if they are 0.4 inches wide, you’ll need to account for this. Mark the precise locations on the front vertical planks of your wine rack where these shelves will be attached. To achieve a professional, flush finish and prevent screw heads from protruding, use a countersink bit to create preliminary drill holes. This allows the screws to sit level with the wood surface. Drive screws into these prepared holes, securing the shelves firmly in place. Given that your rack will bear the weight of multiple wine bottles, it’s vital to use several screws across the front and back of each shelf connection point to ensure maximum load-bearing capacity and structural integrity.
Step 4: Installing the Vertical Supports with Dowels
To enhance the stability and aesthetic appeal of your wine rack, you’ll add three vertical support planks running up the back. These supports will connect the main planks, reinforcing the entire structure. Measure the exact length of the three main vertical planks (the two sides and the middle) on your wine rack. Cut three corresponding pieces from your scrap pallet wood to these dimensions. Before permanent attachment, dry-fit them to ensure a perfect match. For a strong and clean joinery technique, we’ll use dowels. First, mark the center point at each end of your support planks. Next, transfer these marks to the corresponding positions on the back of your wine rack where the supports will sit. Using a drill bit with the same diameter as your dowels, drill downwards into the marks on the wine rack to a depth approximately half the length of a dowel. Gently insert one end of a dowel into each hole. Then, carefully align the support plank and drill into the marks on the support plank to a depth slightly more than half the dowel’s length. Apply a small amount of wood glue (optional, but highly recommended for strength) and firmly attach the support planks by gently hammering them down onto the dowels. Repeat this process for all three supports, ensuring they are perfectly aligned and securely fastened.
Step 5: Reinforcing the Vertical Supports with Screws
While dowels provide excellent shear strength and prevent rotational movement, adding screws offers additional pull-out resistance and overall rigidity. Once the dowel joints are secure, find the midpoint at the top of the back of each vertical support. Ensure that each support plank is perfectly straight and plumb before proceeding. Make preliminary drill holes (and countersink them for a clean finish) from the back of the wine rack into the top section of each support. Drive screws through these holes, further anchoring the three vertical supports into place. This combination of dowels and screws creates a robust and reliable frame, ensuring your wine rack can safely hold your entire collection without any wobbling or structural compromise.
Step 6: Constructing and Customizing the Top Shelf
The top shelf not only completes the aesthetic of your wine rack but also offers an additional surface for displaying decor or other small items. Measure the exact dimensions for your top shelf, aiming for a piece that extends slightly beyond the frame for a finished look. If you don’t have a single piece of pallet wood wide enough, you can join multiple smaller pieces using dowels or wood glue and clamps to create the desired width. Once assembled (if necessary), attach the top shelf to the wine rack using screws from underneath, ensuring a seamless top surface. You might notice that the vertical supports extend beyond the top shelf, depending on the width of your chosen planks. This presents an opportunity for customization. You can either cut the supports flush with the top shelf for a clean, minimalist look, or you can cut them partially and then introduce a decorative curve using a coping saw. A coping saw, with its thin blade, is ideal for making intricate curved cuts, allowing you to add a unique, artisanal touch to your wine rack’s upper edges.
Step 7: Designing and Attaching the Wine Glass Holder
A wine rack isn’t complete without a dedicated spot for your stemware. This step focuses on creating the ingenious wine glass holder. Select a suitable scrap piece of pallet wood, ensuring it’s long enough to accommodate your desired number of wine glasses and wide enough for stability. Mark the precise locations where you’d like your wine glasses to hang, ensuring ample room between each slot and sufficient space at either end for attachment supports. Draw a center line down the length of this plank. On this center line, mark several points that will serve as the centers for your drilled holes. Using a drill bit that is slightly thicker than the stems of your wine glasses, drill a hole at each marked center point along the plank. Next, from the edge of the plank, draw a straight line to each edge of the holes you just drilled. Using a saw (a jigsaw or coping saw works well here), carefully cut along these lines until you reach the drilled holes. These cuts will form the slots that your wine glass stems will slide into, allowing the glasses to hang upside down. Make any minor adjustments as needed to ensure a smooth fit for your glasses. Finally, using smaller scrap wood pieces, create two robust supports to attach this newly crafted glass holder securely to the bottom of your wine rack. Screw these supports into both the glass holder and the main wine rack frame, ensuring it’s perfectly level and strong enough to bear the weight of your stemware.
Step 8: Final Touches, Sanding, Staining, and Installation
With all structural elements in place, it’s time for the finishing touches. Begin by thoroughly sanding every surface of your wine rack. Start with a coarser grit sandpaper to remove any rough edges, splinters, or imperfections, then progressively move to finer grits (e.g., 120-grit, then 220-grit) to achieve a beautifully smooth and tactile finish. This step is crucial for both aesthetics and safety. Once sanded, wipe away all dust. Now, you can choose to apply a wood stain or paint to protect the wood and enhance its natural beauty or match your existing decor. Apply your chosen finish according to the product’s instructions, allowing adequate drying time between coats. Finally, prepare your wine rack for wall mounting. Drill several holes strategically placed along the back supports of the rack. These holes will be used to secure the rack to your wall studs (always recommended for heavy items like a filled wine rack) using appropriate screws and anchors. Before mounting, give your creation a final inspection to ensure that your rack is structurally sound, stable, and ready to proudly display your wine and glasses for years to come.
Your Custom DIY Pallet Wine Rack with a Glass Holder Awaits!
Congratulations! You’ve successfully transformed ordinary reclaimed pallet wood into an extraordinary and functional piece of home decor. This DIY pallet wine rack, complete with an integrated glass holder, is not just a storage solution; it’s a statement piece that reflects your creativity and commitment to sustainable living. Imagine showcasing your favorite vintages and elegant stemware in this rustic yet refined creation. This project not only saves money but also contributes to reducing waste, offering an eco-friendly alternative to mass-produced furniture. Whether it’s for your kitchen, dining room, or a cozy home bar, this handmade wine rack will undoubtedly become a focal point and a conversation starter. Enjoy your beautifully crafted wine display, and toast to your woodworking success!