
Ultimate Guide to Safely Cleaning Battery Corrosion on Electronics
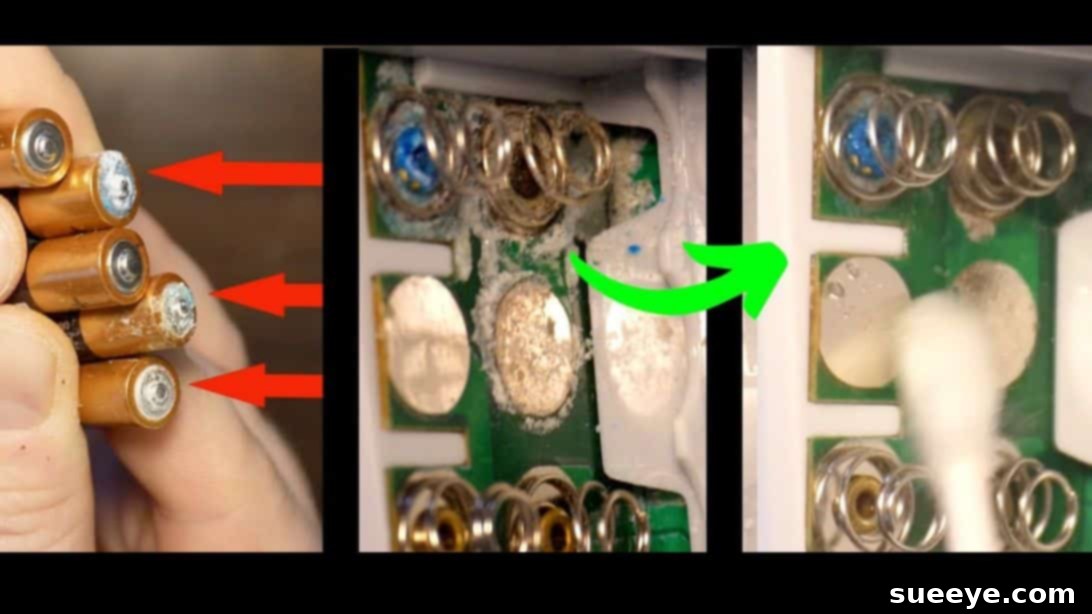
Have you ever reached for your trusty remote control or an electronic gadget only to find it unresponsive? Upon opening the battery compartment, you might be greeted by an unpleasant sight: a white, powdery, or sometimes greenish-blue crust around the battery terminals. This unsightly residue is battery corrosion, a common problem that can render your beloved electronics useless and even pose a risk to your health. Often, this happens when old batteries are left inside devices for extended periods, slowly leaking their corrosive contents. But don’t despair! This comprehensive guide will walk you through the process of safely and effectively cleaning battery corrosion, potentially saving your devices from an early demise. We’ll leverage simple household items and techniques, much like the practical advice shared by experts such as Handyman Hertz.
RELATED: 9 Tips on How to Clean Your TV Screen Properly
Understanding Battery Corrosion: What It Is and Why It Happens
Battery corrosion isn’t just an aesthetic problem; it’s a chemical reaction that can severely damage your electronics. Most common household batteries are alkaline batteries, which contain potassium hydroxide, a corrosive alkaline electrolyte. When these batteries leak, this electrolyte reacts with the air and often the metal contacts of your device, forming a white crystalline substance – that’s the corrosion you see. Sometimes, especially with carbon-zinc batteries, you might see greenish or bluish crystals, indicating the presence of copper corrosion from the device’s terminals.
Common Causes of Battery Leakage:
- Over-discharging: When a battery completely drains, internal chemical reactions can reverse, leading to gas buildup and eventual leakage.
- Leaving Old Batteries in Devices: This is arguably the most frequent cause. Over time, battery seals can degrade, or batteries left in a device for years can slowly lose their charge and begin to leak.
- Temperature Fluctuations: Extreme heat or cold can put stress on battery casings, potentially causing them to crack or expand, leading to leaks.
- Mixing Battery Types: Using different brands, types (e.g., alkaline and rechargeable), or ages of batteries together can cause uneven discharge rates and increase the risk of leakage.
- Manufacturing Defects: Although less common with reputable brands, a faulty seal or internal defect can lead to premature leakage.
The Dangers of Battery Corrosion and Why Safety Is Paramount
It’s crucial to understand that the white powder from battery corrosion isn’t harmless. The potassium hydroxide present in alkaline battery leaks is a caustic substance. Direct contact with your skin can cause irritation, burns, and rashes. If it gets into your eyes, it can cause severe damage. Inhaling the dust can also irritate your respiratory system. Beyond personal safety, the corrosion itself can:
- Damage Electronic Components: The corrosive substance can eat away at the delicate metal contacts, springs, and circuit board traces inside your device, leading to permanent malfunction.
- Create Electrical Shorts: The conductive nature of some corrosive residues can create unintended electrical pathways, short-circuiting components and further damaging the device.
- Prevent Electrical Flow: Even minor corrosion can create an insulating barrier, preventing the battery from making proper contact and powering the device.
For these reasons, taking proper safety precautions is not optional—it’s essential. Always wear protective gloves and safety glasses before you begin cleaning. Never touch battery corrosion with bare hands or allow it to contact your eyes or mouth.
Essential Tools and Materials for Battery Corrosion Cleanup
Gathering the right tools before you start will make the cleaning process smooth and efficient. Most of these items are likely already in your home:
- White Vinegar or Lemon Juice: These acidic substances are key because they effectively neutralize the alkaline potassium hydroxide found in most battery leaks. Vinegar is generally preferred due to its milder scent and common availability.
- Isopropyl Alcohol (Rubbing Alcohol): Used to clean away the residue left by the vinegar and help dry the area quickly, preventing further moisture-related issues. Alcohol also helps to dissolve any remaining grease or grime.
- Q-Tips (Cotton Swabs): Indispensable for precise application of cleaning solutions and reaching into small, intricate spaces without saturating the entire component. Have a generous supply on hand.
- Flat-Head Screwdriver (Small): Useful for gently scraping away stubborn, caked-on corrosion that Q-tips alone can’t handle. Choose a small one appropriate for delicate electronics.
- Protective Gloves: Essential for preventing direct skin contact with the corrosive material. Nitrile or latex gloves are ideal.
- Safety Glasses: Crucial for protecting your eyes from splashes, dust, or accidental contact with corrosive substances.
- Old Toothbrush (Optional): Can be helpful for scrubbing larger areas of corrosion on more robust contacts.
- Paper Towels or Old Cloth: For wiping up spills and drying surfaces.
- Tweezers (Optional): Useful for removing small, detached pieces of corrosion or for handling small parts.
- Well-Ventilated Area: Work in a space with good airflow to minimize inhalation of fumes or dust.
Step-by-Step Guide: How to Clean Battery Corrosion Safely and Effectively
With your safety gear on and materials ready, you’re prepared to tackle the corrosion. Remember to work carefully and patiently.
Step 1: Prepare for Cleaning and Remove Loose Debris
Before touching anything, ensure you are wearing your protective gloves and safety glasses. This cannot be stressed enough – your safety is the top priority. Never use your bare hands to handle corroded batteries or their residue, as it can cause skin irritation or chemical burns. Carefully remove the corroded batteries from the device. If they are stuck, gently pry them out with the flat-head screwdriver, taking care not to damage the battery casing further. Once the batteries are out, hold the device upside down over a trash can and gently tap it to dislodge any loose pieces of corrosion or battery debris. This initial step helps to remove the bulk of the material, making the subsequent cleaning steps more effective and less messy.
Step 2: Neutralize the Corrosion with Vinegar or Lemon Juice
Now, it’s time to neutralize the corrosive alkaline residue. Grab a fresh Q-tip and dip one end into a small amount of white vinegar or lemon juice. Make sure it’s damp, but not dripping wet. Lightly dab the dampened Q-tip directly onto the corroded areas within the battery compartment and on the metal contacts. You might hear a faint fizzing sound; this is completely normal and indicates that the acid (vinegar/lemon juice) is reacting with and neutralizing the alkaline corrosion. Continue to dab and gently wipe the affected areas, working slowly and meticulously. Be very careful to prevent any liquid from seeping into the internal wiring or delicate electronic components of the device. If the corrosion is extensive, you may need to use several Q-tips, redipping them as they become soiled. The goal here is to dissolve and lift the corrosion rather than just spread it around.
For particularly tough or caked-on patches of corrosion, you can carefully use the flat-head screwdriver. Gently scrape the corroded material off the metal contacts. The key word here is “gently” – apply minimal pressure and avoid digging into the metal. The aim is to remove the corrosion, not to scratch or damage the underlying contact points. If you have an old toothbrush, it can also be useful for lightly scrubbing larger, more resilient areas of corrosion, especially on springs or robust metal plates. After scraping, reapply a little vinegar with a Q-tip to ensure full neutralization.
Step 3: Clean and Dry with Isopropyl Alcohol
Once you’re satisfied that the corrosion has been neutralized and mostly removed, it’s time for the final cleaning step. Take a brand new, clean Q-tip and dip it into isopropyl alcohol. Again, ensure it’s damp but not dripping. Use this alcohol-dampened Q-tip to wipe away any lingering residue from the vinegar and dissolved corrosion. Isopropyl alcohol is excellent for this purpose because it cleans effectively and evaporates quickly, leaving minimal moisture behind. Thoroughly clean all the areas you treated with vinegar, paying close attention to the battery contacts and any adjacent surfaces. Repeat with fresh Q-tips until no more residue comes off. After cleaning, allow the device to air dry completely for at least an hour, or even longer if you suspect any liquid might have seeped deeper. You can gently blow on the area or use a small fan to aid in drying, but avoid using a heat gun or hair dryer, as excessive heat can damage electronic components. Ensure every part is completely dry before reinserting batteries or attempting to power on the device.
Preventing Future Battery Corrosion: Proactive Measures
Cleaning corrosion is a reactive solution. To avoid this problem altogether and extend the life of your electronics, adopt these proactive habits:
- Remove Batteries from Unused Devices: If you’re storing a device for an extended period (more than a few weeks), always remove the batteries. This is the most effective way to prevent leakage.
- Check Batteries Regularly: Periodically inspect the battery compartments of frequently used devices for any signs of swelling, leakage, or corrosion.
- Store Batteries Properly: Keep batteries in a cool, dry place at room temperature. Avoid storing them in extreme hot or cold conditions, and never store them loose where they can short-circuit or come into contact with metal objects.
- Use Reputable Brands: High-quality batteries from trusted manufacturers are less prone to leakage. While they might cost a bit more upfront, they can save you from costly repairs or replacements in the long run.
- Avoid Mixing Batteries: Do not mix old and new batteries, or different brands and types of batteries within the same device. This can lead to uneven discharge and increase the risk of leakage.
- Replace Batteries Promptly: Don’t wait for batteries to be completely dead before replacing them. Replace them when the device starts to show signs of low power.
When to Consider Replacement Over Repair
While DIY cleaning can save many devices, there are limits to what can be repaired. If the corrosion is extremely severe, has spread deep into the device’s internal circuitry beyond the battery compartment, or has completely eaten through battery contacts, springs, or delicate solder joints, then the damage might be irreversible. In such cases, attempting further repair could cause more harm or simply be a waste of time. It’s often more practical and cost-effective to consider replacing the electronic device or consulting a professional repair service, especially for high-value items.
Conclusion: A Clean Solution for Your Electronics
Battery corrosion can be a nuisance, but as this guide demonstrates, it’s often a fixable problem with a little patience and the right approach. By understanding why corrosion occurs, prioritizing safety, and following these step-by-step instructions, you can effectively clean your corroded electronics and bring them back to life. More importantly, by adopting preventative measures, you can safeguard your devices from future damage, ensuring they remain functional for years to come. Don’t let a little white powder signal the end of your favorite gadgets; arm yourself with knowledge and keep your electronics running smoothly.