
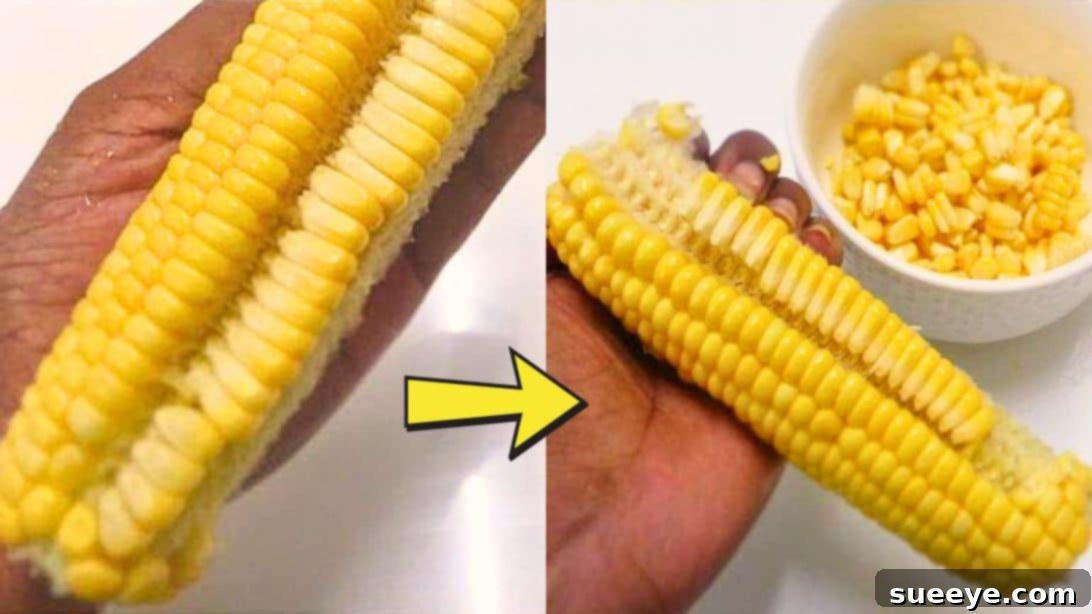
For many home cooks and culinary enthusiasts, the joy of fresh corn on the cob often comes with a bit of a dilemma: how to efficiently and cleanly remove those delicious kernels. If you’ve ever found yourself struggling with a knife, trying to slice kernels off the cob, you’re not alone. This traditional method, while common, is far from ideal. It frequently results in incomplete kernels, leaving behind small, valuable portions of corn still clinging to the cob. Worse, cutting too close can scrape off tough, woody bits from the cob itself, potentially ruining the texture and taste of your dish. And let’s not forget the mess! Kernels flying across the kitchen counter, making cleanup a significant chore. There has to be a better, less frustrating way to enjoy fresh corn without the hassle, right?
Absolutely! The quest for a superior method has led us to discover a brilliant kitchen hack that promises to revolutionize your corn preparation experience. This innovative technique, championed by culinary creators like COOK WITH D, utilizes a single, humble kitchen utensil – a spoon – to make corn kernel removal incredibly easy, fast, and remarkably mess-free. Forget the frustrating knife method; this simple spoon technique ensures you get perfectly whole, intact kernels every single time, ready to be incorporated into your favorite salads, salsas, stir-fries, or side dishes. Whether you’re working with raw corn that’s just been shucked or perfectly cooked cobs, this versatile method works flawlessly, making it a must-try for anyone who loves fresh corn.
This method isn’t just about speed; it’s profoundly about preserving the quality of your corn. When kernels are cleanly removed from the cob, they retain their natural sweetness, crisp texture, and vibrant color, significantly elevating any dish they’re added to. Imagine crafting a vibrant corn salsa with perfectly uniform kernels, or a creamy corn chowder where each individual kernel bursts with flavor – all thanks to a straightforward technique that eliminates the common pitfalls of traditional shucking. It’s a true game-changer that will have you eagerly looking forward to preparing fresh corn rather than dreading the messy aftermath.
Before we dive into the step-by-step guide for removing kernels, you might also be interested in mastering another common corn-related kitchen challenge: removing corn silk. Just as removing kernels can be vexing, dealing with stubborn corn silk can be equally frustrating. For an incredibly useful guide on this topic, check out: Quick Way to Remove Corn Silk. Mastering both these essential techniques will undoubtedly transform you into a true corn preparation master, capable of tackling any fresh corn challenge with ease and confidence.
Once you’ve effortlessly removed your corn kernels using our recommended spoon method, a vast and delicious world of culinary possibilities opens up before you. Fresh corn is an incredibly versatile ingredient, capable of being incorporated into countless recipes across various cuisines. To inspire your next meal, here are some fantastic recipes that beautifully showcase the vibrant flavor and appealing texture of fresh corn kernels. These dishes are perfect for family meals, potlucks, summer barbecues, or simply enjoying the seasonal bounty:
- Chipotle Corn Salsa Copycat Recipe: A zesty, flavorful salsa bursting with fresh ingredients, perfect for topping tacos, pairing with crispy tortilla chips, or serving as a vibrant side dish alongside grilled meats.
- Smoked Street Corn Dip Recipe: A rich, creamy, and irresistibly smoky dip that captures the essence of popular street food. It’s an absolute crowd-pleaser for any gathering.
- Easy Wingstop Copycat Cajun Fried Corn Recipe: A spicy and savory twist on traditional corn, offering a unique and flavorful side dish that’s sure to impress with its bold Cajun seasoning.
These delectable recipes are, of course, just a starting point. Fresh corn kernels can also be elegantly incorporated into refreshing summer salads, dynamic stir-fries, comforting soups, hearty stews, baked casseroles, or simply sautéed with a knob of butter and fresh herbs for a quick, wholesome, and delicious side. The fundamental key to preparing all these wonderful dishes successfully lies in having those perfect, whole, and cleanly removed kernels ready to go, and that’s precisely what our efficient spoon method reliably delivers.
The Essential Tools: What You Need for Easy Corn Kernel Removal From the Cob
One of the most appealing and practical aspects of this corn kernel removal method is its sheer simplicity and the absolute minimum number of tools required. You won’t need to invest in any specialized gadgets, bulky electric shuckers, or obscure culinary equipment. In fact, it’s highly probable that you already have everything you need conveniently located within your kitchen drawer. This inherent accessibility makes it an incredibly practical, budget-friendly, and universally applicable technique for anyone, regardless of their kitchen setup or culinary experience.
- A Sturdy Spoon: While almost any kitchen spoon can be pressed into service, you’ll find that a spoon with a slightly rounded yet firm edge, such as a common tablespoon or a sturdy dessert spoon, tends to be the most effective. It offers the right balance of rigidity and curvature to get under the kernels without bending or breaking. It’s best to avoid spoons with very sharp edges, as they might cut and damage the kernels rather than cleanly scooping them, and extremely flimsy spoons might bend under the necessary pressure, making the task more difficult.
- A Large Plate or Shallow Bowl: This item is absolutely crucial for containing the kernels as they come off the cob. A wide, shallow surface area will efficiently catch any errant kernels that might otherwise fly off, helping to significantly minimize mess and making your post-preparation cleanup much quicker and easier.
- A Fresh or Cooked Corn Cob: Naturally, the star of our show! This remarkable method is wonderfully adaptable for both raw corn (which can sometimes be a bit firmer and require slightly more initial pressure) and cooked corn (which is often softer, making it generally easier to work with).
That’s it! Just these few, simple, everyday items are all you require to fundamentally transform your corn preparation experience from a cumbersome chore into a quick, satisfying, and mess-free task. Now, let’s delve into the precise, step-by-step process of mastering this incredibly efficient and ingenious spoon method for perfectly removed corn kernels.
Mastering the Spoon Method: Your Step-by-Step Guide to Easy Corn Kernel Removal
This clever technique is surprisingly intuitive to learn once you understand the basic mechanics, and it promises to save you considerable time and effort in the kitchen. By following these detailed steps carefully, you’ll soon be enjoying beautifully shucked corn with minimal fuss, ready for any recipe.
Step 1: Creating the Initial Gap – The Foundation for Seamless Success
The first step in this method is arguably the most crucial, as it strategically sets the stage for the smooth, clean, and efficient removal of all subsequent rows of kernels. Your primary goal here is to carefully create a clean, accessible gap along one entire row of the corn cob. This strategically created empty groove will provide the necessary leverage and space for the rest of the kernels to come off cleanly and effortlessly.
Begin by thoroughly preparing your workspace for efficiency. Place a large plate or a wide, shallow bowl on a stable, non-slip surface – your kitchen counter or a sturdy cutting board works perfectly. This chosen plate or bowl will serve as your essential kernel catchment, ensuring that all the delicious, sweet corn kernels are collected neatly and don’t end up scattered all over your meticulously clean kitchen. Now, firmly hold the corn cob with one hand. It is paramount to maintain a secure, stable grip to prevent the cob from rolling, slipping, or moving unexpectedly during this initial, critical step.
With your other hand, confidently take your chosen sturdy spoon. Now, carefully and deliberately insert the edge of the spoon between two adjacent rows of corn kernels. Aim to do this close to the top (which is typically the wider end) of the cob. The fundamental idea here is to gently but firmly wedge the edge of the spoon underneath the very first row of kernels that you intend to remove. Apply steady, consistent, and gentle pressure, angling the spoon slightly downwards and inwards towards the cob’s central core. Begin to scoop outwards and upwards, initiating the process of lifting this initial row of kernels away from the cob. It’s perfectly normal if this very first row is a bit messy and some kernels appear to be splitting or mashing slightly; that is completely acceptable for this stage. The primary and sole objective here is not perfection in individual kernels, but rather to successfully create that initial, clean “track” or an empty groove along the cob. This single empty row is your indispensable starting point, which will make all the subsequent kernel removal steps significantly easier, cleaner, and more precise. Do not worry about achieving perfectly intact kernels just yet; those will come effortlessly and beautifully in the subsequent stages of this brilliant technique.
Step 2: Effortless Kernel Removal – Harnessing the Power of Your Thumb
With the crucial first row successfully removed and your indispensable “starting track” firmly established, you are now perfectly ready for the most satisfying and efficient part of the entire process – effortlessly removing the remaining corn kernels in perfectly intact rows. This ingenious step masterfully leverages the clean gap you’ve painstakingly created, allowing for a remarkably clean, complete, and highly efficient separation of the corn kernels from their core cob.
Once again, ensure you hold the corn cob firmly and securely with one hand. Position the cob so that the newly created empty row is conveniently facing upwards or angled slightly towards you, making it exceptionally easy to access with your other hand. Now, using your free hand, specifically your strong thumb, place it at the very top (the wider end) of the cob. Position your thumb directly above a full, untouched row of kernels that is immediately adjacent to the empty track you just created. The ingenious trick here is to effectively use your thumb as a natural, powerful lever. Gently but firmly push the corn kernels downwards, away from the wider end of the cob, and directly towards the empty row you so carefully established in Step 1. The strategic pressure from your thumb, combined with the ideal leverage provided by the adjacent empty space, will cause the entire row of kernels to gracefully and cleanly pop off the cob. They should separate beautifully, coming off cleanly and completely, falling neatly and satisfyingly onto your waiting plate or into your designated bowl.
You’ll immediately observe how significantly easier and cleaner this step is compared to the initial effort. The kernels will separate wonderfully, meticulously retaining their full shape, minimizing any unsightly waste, and dramatically reducing any potential mess. Repeat this simple yet incredibly effective motion for each subsequent row. Simply reposition your thumb at the top of the next full row and push downwards into the newly empty space created by the previous row. You’ll very quickly develop a smooth, efficient rhythm, and in what seems like no time at all, you’ll find yourself efficiently clearing the entire cob of its golden, delicious treasures in just a matter of moments. This remarkable technique is not only incredibly satisfying to execute but consistently yields beautifully whole, perfect kernels, making them ideal for virtually any culinary application you envision.
Bonus Tips for Perfect Corn Kernel Removal Every Time
While the spoon method for removing corn kernels is remarkably straightforward and intuitive, a few additional tips and tricks can help you achieve even better results, making the process even smoother, faster, and more enjoyable:
- Choosing the Optimal Spoon: As previously mentioned, a sturdy tablespoon or a spoon with a slightly curved, non-sharp edge consistently works best. Avoid using very thin or overly flexible spoons, as they might bend under pressure, making the task cumbersome. Similarly, overly sharp spoons could inadvertently damage the kernels, reducing their aesthetic appeal and texture.
- Ensure a Secure Cob Grip: A firm and stable grip on the corn cob is absolutely essential for control and safety. If you find the cob slippery, especially if it’s freshly cooked and still warm, you can use a clean kitchen towel, a paper towel, or even a piece of parchment paper to enhance your grip and provide better leverage.
- Work Over a Large, Strategic Container: While a plate certainly works for catching kernels, a larger, shallow bowl with slightly higher sides can provide even better containment, minimizing any stray pieces from escaping your workspace. For an even more ingenious setup, some culinary enthusiasts prefer working over a bundt pan. The corn cob can be stood upright in the bundt pan’s central hole, allowing the perfectly separated kernels to fall neatly and directly into the surrounding pan, ensuring minimal mess.
- Adapting for Raw vs. Cooked Corn: The beauty of this method lies in its versatility, working effectively for both raw and cooked corn. Raw corn might require a bit more initial pressure in Step 1 due to its firmer, more resilient texture. Conversely, cooked corn will typically be softer and often even easier to shuck using this precise spoon technique, gliding off the cob with minimal effort.
- Embrace Practice for Perfection: Like any new skill, a little bit of practice goes a remarkably long way. Don’t be discouraged if your very first attempt isn’t absolutely flawless. After just a few cobs, you’ll quickly develop the necessary feel, rhythm, and confidence, becoming an absolute pro at this highly efficient and satisfying method.
- Don’t Waste the Flavorful Cob: After you’ve meticulously removed all the precious kernels, remember that the corn cobs themselves still hold a remarkable amount of delicious, sweet flavor. These stripped cobs can be repurposed to make a fantastic homemade corn stock, which serves as an excellent, flavorful base for a myriad of dishes, including soups, creamy chowders, risottos, or even sauces. To prepare, simply simmer the stripped cobs in water with some aromatic additions (like onion peels, garlic cloves, a bay leaf, or a few sprigs of parsley) for approximately 30-45 minutes. Strain, and you’ll have a delightful, golden corn stock ready to elevate your cooking.
Embracing this innovative spoon method for removing corn kernels not only significantly streamlines your kitchen preparation time but also profoundly enhances the overall quality and presentation of your ingredients. By consistently yielding perfectly whole, undamaged kernels, you ensure that every single bite of your corn-infused dishes is as flavorful, texturally appealing, and visually attractive as possible. Gone are the frustrating days of struggling with unwieldy knives, creating a monumental, messy kitchen, and inevitably leaving precious corn behind on the cob. This simple yet truly ingenious kitchen hack, requiring nothing more than a common, everyday spoon, fundamentally transforms a formerly tedious and often dreaded task into a quick, clean, and immensely satisfying part of your regular cooking routine.
We enthusiastically encourage you to try this transformative method the very next time you bring fresh corn home from the market. Experience the unprecedented ease and efficiency for yourself, and we are confident that you’ll wonder how you ever managed without this brilliant technique. Feel free to share your success stories, your newly discovered favorite corn recipes, or any additional tips and tricks you uncover along your culinary journey! Happy cooking, and prepare to truly savor the pure, unadulterated goodness of fresh corn kernels, effortlessly removed and perfectly ready for all your exciting culinary creations.