
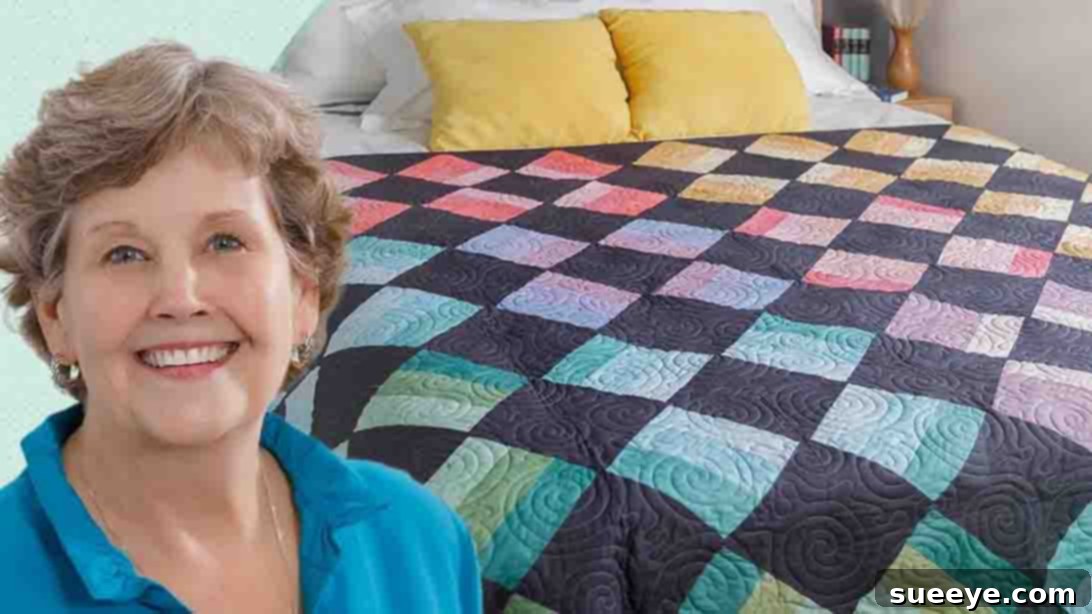
Are you searching for your next captivating quilt project that promises both visual intrigue and a straightforward making process? Look no further! The enchanting Missouri Star Quilt Company, led by the beloved Jenny Doan, presents the perfect pattern: the Shadow Play Quilt. This design, despite its seemingly intricate appearance, is surprisingly easy to construct, making it an ideal choice for quilters of all skill levels, from absolute beginners to seasoned artisans.
Imagine creating a beautiful throw quilt that adds a touch of sophistication and handmade charm to your living area, all within a weekend. This project is not only fun and rewarding but also offers a wonderful opportunity to practice fundamental quilting techniques while yielding a stunning finished product. Whether you’re looking to unwind with a creative endeavor or desire a fresh addition to your home decor, the Shadow Play Quilt is an excellent choice.
RELATED: Easy Summer Squares Quilt With Jenny Doan
One of the most appealing aspects of this project is its simplicity in material requirements. You’ll primarily need a single jelly roll, complemented by some background and binding fabric to bring this gorgeous quilt to life. If you’ve been on the hunt for a distinctive quilt pattern that doesn’t overwhelm with complexity, your search ends here. Dive into the detailed video tutorial below to grasp each step with clarity and confidence. Our sincere thanks go to Jenny Doan and the entire team at Missouri Star for sharing this fantastic quilt project. Be sure to explore their channel for an abundance of inspiring quilt tutorials just like this one!
Why Choose the Shadow Play Quilt Project?
The Shadow Play Quilt stands out for several compelling reasons. Its unique design creates an illusion of depth and movement, giving the quilt a sophisticated, three-dimensional effect without requiring advanced techniques. This optical trick is achieved through a clever arrangement of light, medium, and dark fabric strips, creating what appears to be shadows and highlights across the surface.
- **Beginner-Friendly:** Despite its intricate look, the construction involves straightforward strip piecing and basic block assembly, making it highly accessible for those new to quilting.
- **Jelly Roll Friendly:** This project is specifically designed around the convenience of a jelly roll, a pre-cut fabric bundle of 2 1/2-inch strips. This saves significant time on cutting, allowing you to jump straight into sewing.
- **Visually Stunning:** The interplay of colors and values creates a dynamic visual texture that is sure to draw compliments and add a focal point to any room.
- **Customizable:** While the core pattern is simple, the choice of jelly roll fabrics allows for endless personalization. From vibrant and bold to subtle and serene, you can tailor the quilt to your personal style and home decor.
- **Quick to Finish:** Many quilters find they can complete the quilt top for this project in a single weekend, offering immense satisfaction and a relatively quick turnaround for a finished item.
Essential Materials and Tools for Your Shadow Play Quilt
Before you begin your quilting journey, gathering all your materials and tools is crucial for a smooth and enjoyable experience. The Shadow Play Quilt is designed to be efficient with fabric, making excellent use of a standard jelly roll.
Materials:
- **1 Jelly Roll (one roll of 2 1/2″ strips):** This is the star of the show! A jelly roll typically contains 40 strips of coordinating fabrics, perfect for creating the diverse color palette needed for the “shadow play” effect. Choose a roll with a good mix of light, medium, and dark values for the best results.
- **3 5/8 yards of Background Fabric:** This fabric will frame your pieced blocks and help to emphasize the shadow effect. A solid or subtle print in a neutral color (like white, cream, light grey, or a very light coordinating color) works best to let your jelly roll fabrics shine.
- **5/8 yard of Binding Fabric:** The binding is the finished edge of your quilt. You can choose a fabric that perfectly matches your background, or a contrasting color to create a bold border.
- **4 1/4 yards of Backing Fabric (or wide backing fabric):** This forms the back of your quilt. You can piece together standard width fabric or opt for a “wide back” fabric which comes in larger widths, minimizing seams on the back.
Recommended Tools:
- **Sewing Machine:** A reliable machine with a 1/4-inch piecing foot is highly recommended for accurate seams.
- **Rotary Cutter:** A sharp rotary cutter (45mm or 60mm) will ensure clean, precise cuts.
- **Cutting Mat:** Protect your work surface and facilitate accurate cutting with a self-healing cutting mat.
- **Quilting Rulers:** A long ruler (e.g., 6″ x 24″) and a square ruler (e.g., 6.5″ x 6.5″ or 12.5″ x 12.5″) will be invaluable for cutting and squaring up your blocks.
- **Iron and Ironing Board:** Pressing is just as important as sewing in quilting! A good iron helps flatten seams and keep your blocks accurate.
- **Fabric Scissors:** For snipping threads and other small cuts.
- **Pins or Fabric Clips:** To hold fabric pieces together securely before sewing.
- **Seam Ripper:** An essential tool for correcting any mistakes (every quilter needs one!).
Step-by-Step Guide to Crafting Your Shadow Play Quilt Blocks
The magic of the Shadow Play Quilt begins with creating its unique blocks. Follow these instructions carefully for a precise and beautiful outcome.
Step 1: Preparing Your Fabric Strips and Creating the Main Blocks
Begin by organizing your jelly roll strips. Divide them into sets of three, aiming for a distinct contrast within each set: one light strip, one medium strip, and one dark strip. This thoughtful grouping is key to achieving the desired “shadow” effect in your finished quilt. Once your sets are arranged, take each trio of strips and sew them together along their long edges, using a consistent 1/4-inch seam allowance. For optimal results, press your seams open. This technique helps to reduce bulk, ensuring your blocks lie flatter and nest together more easily later on. After pressing, take these newly pieced strip sets and subcut them into 6 1/2-inch squares. Precision here is paramount, so use your rotary cutter and a square ruler to ensure all cuts are accurate.
Next, you’ll prepare your background squares. For each 6 1/2-inch pieced square, you will need a corresponding background square that is 1 inch larger, meaning a 7 1/2-inch square. Cut each of these 7 1/2-inch background squares diagonally from corner to corner in both directions, creating four triangles. These triangles will form the “shadow” corners of your main block. Carefully place one background triangle onto each of the four sides of your 6 1/2-inch pieced square. Start by sewing the top and bottom triangles first, aligning the raw edges and using your 1/4-inch seam allowance. Press these seams open. Then, attach the remaining two background triangles to the left and right sides of the block, again pressing the seams open once sewn. This method helps to maintain the squareness of your block. Repeat these steps diligently until you have created a sufficient number of these striking blocks to form your entire quilt top. Remember, consistency in your seam allowance and pressing will greatly impact the final appearance of your quilt.
Step 2: Assembling Your Quilt Top with Ease
Once you have meticulously crafted all your individual Shadow Play Quilt blocks, the exciting process of assembling them into your complete quilt top begins. The design calls for arranging these blocks into “four patches,” which means combining four individual blocks to create a larger square unit. This step is where the visual magic truly comes together, allowing the “shadow” effect to emerge.
Carefully lay out your completed quilt blocks on a flat surface, such as a design wall or the floor, to visualize your quilt top. The recommended layout for this particular pattern is typically a 4 across by 4 down arrangement, forming a balanced and symmetrical grid. As you lay out your blocks, experiment with rotating them to observe how the “shadows” shift and interact, creating different patterns and movements across the quilt. This exploratory phase is crucial for achieving your desired aesthetic. Once you are satisfied with the arrangement, begin to sew the four patches together to form individual rows. Use your consistent 1/4-inch seam allowance and remember to press your seams as you go – either open or to one side, depending on your preference for reducing bulk. Once all your rows are complete, carefully sew these rows together, matching up seams precisely to ensure a smooth and continuous design. Press the final row seams open to reduce bulk and create a beautiful, flat quilt top. This systematic approach will help you complete your quilt top efficiently and with professional-looking results.
Beyond the Quilt Top: Finishing Your Masterpiece
Once your quilt top is beautifully assembled, the next steps involve turning it into a complete, functional quilt. This involves three main components: basting, quilting, and binding.
- **Basting:** This process secures the three layers of your quilt – the top, the batting (the soft inner layer), and the backing fabric – together. You can baste with pins, spray adhesive, or hand basting stitches.
- **Quilting:** This is where you stitch through all three layers to hold them together permanently and add texture. For a Shadow Play Quilt, simple “stitch-in-the-ditch” (quilting along the seam lines) can be very effective, or you can explore free-motion quilting for more elaborate designs.
- **Binding:** The final touch! The binding fabric is sewn around the perimeter of the quilt, neatly encasing the raw edges and providing a durable, decorative finish.
Tips for a Flawless Shadow Play Quilt
To ensure your Shadow Play Quilt is as perfect as possible, consider these valuable quilting tips:
- **Accuracy is Key:** A precise 1/4-inch seam allowance is critical in quilting. Invest in a 1/4-inch foot for your sewing machine, if you don’t have one, and practice maintaining consistency. Even slight variations can accumulate and throw off your block measurements.
- **Pressing Matters:** How you press your seams significantly impacts the flatness and accuracy of your blocks. Experiment with pressing seams open or to one side, but always be consistent within a block or section. Use a hot iron with steam to achieve crisp, flat seams.
- **Organize Your Fabrics:** Before you even start cutting, sort your jelly roll strips into clear light, medium, and dark categories. This foresight will make assembling your trios much quicker and ensure a balanced “shadow” effect.
- **Chain Piecing:** To save time and thread, sew your strips together using chain piecing. This involves feeding one set of strips through your machine, then immediately feeding the next set without lifting the presser foot or cutting the thread in between.
- **Square Up Blocks:** After each major piecing step, especially after adding the background triangles, take the time to square up your blocks. This ensures they are all the same size and perfectly square, which makes assembling the quilt top much easier.
- **Don’t Rush the Layout:** Before sewing rows and columns, spend ample time arranging your blocks on a design wall or the floor. Step back and look at the overall effect. Rotate blocks to create different patterns and ensure the “shadows” flow as you envision.
Caring for Your Handmade Quilt
Once your beautiful Shadow Play Quilt is complete, proper care will ensure it lasts for generations. Generally, quilts can be machine washed on a gentle cycle with cold water and a mild detergent. Avoid harsh chemicals or bleach. Tumble dry on low heat or, ideally, air dry flat to prevent stretching and preserve the integrity of your stitches. Regular gentle cleaning will keep your quilt looking fresh and vibrant for years to come.
Unleash Your Creativity with the Shadow Play Quilt
The Shadow Play Quilt is more than just a sewing project; it’s an opportunity to create a stunning piece of textile art that reflects your personal style. With its clever design and beginner-friendly construction, you’ll be amazed at the sophisticated results you can achieve with just a jelly roll and some basic quilting skills. So, gather your materials, watch Jenny Doan’s inspiring tutorial from Missouri Star, and embark on this rewarding quilting adventure. Your next favorite quilt is just a few stitches away!