
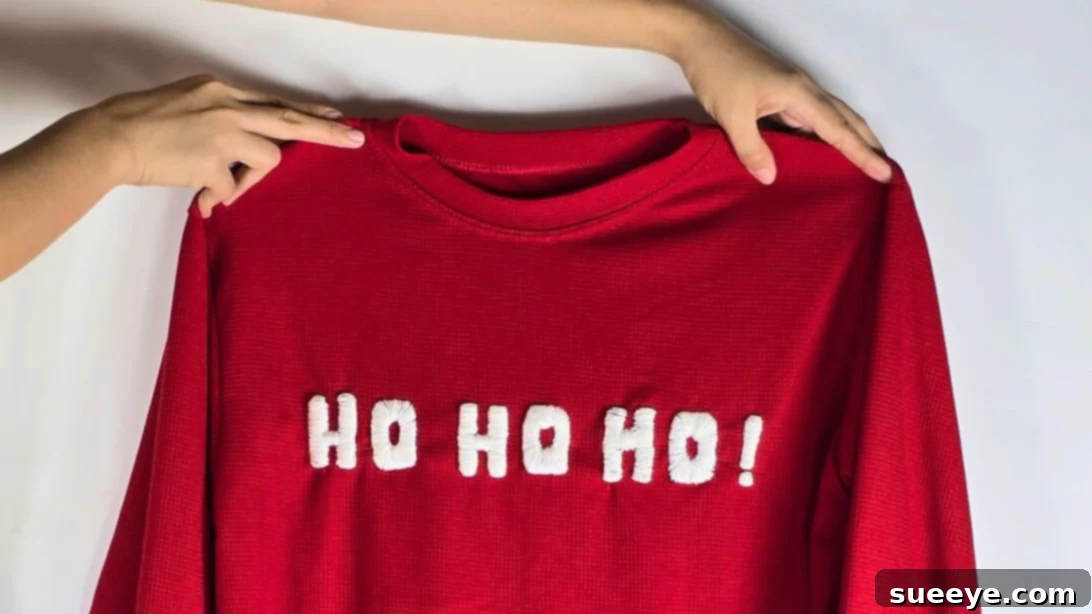
DIY Christmas Sweater Embroidery: Create Unique Holiday Style with a Hot Glue Hack
The holiday season is a time for warmth, joy, and expressing your unique style. What better way to embody the festive spirit than by transforming a plain sweater into a personalized, show-stopping piece of wearable art? Our beginner-friendly guide to Christmas sweater embroidery makes it incredibly easy to bring your creative visions to life, even if you’ve never picked up a needle before. Imagine adorning your favorite knit with custom names, heartfelt holiday greetings, or playful motifs that truly reflect the magic of the season. Unlike generic store-bought options, an embroidered sweater carries a special touch – a story, a memory, and a piece of your own creativity. With just a few simple materials and a dash of patience, any ordinary knit can become a cherished item, perfect for holiday gatherings, cozy winter evenings, or as a thoughtful, handmade gift.
The Secret Weapon: Hot Glue for Embossed Embroidery
Prepare to revolutionize your embroidery game with a hack so ingenious, it will elevate your designs to an entirely new level. This tutorial introduces a brilliant technique using hot glue to create the illusion of sophisticated, embossed letters without the tedious effort of layering multiple strands of thread. The result is a stunning, dimensional effect that looks incredibly professional and complex, yet remains surprisingly simple to achieve. This method is not only practical and visually appealing but also remarkably sturdy. Unlike some delicate embroidery styles, the stitches crafted with this hot glue foundation remain impeccably intact, even after numerous washes. This durability ensures your festive creations will last for many holiday seasons to come. It’s an easy sewing idea that truly anyone can master, offering a gateway into the rewarding world of personalized textile crafts for even the most hesitant beginner.
RELATED: Looking for more creative embroidery inspiration? Check out our Easy T-Shirt Name Embroidery Hack for another simple yet impactful project!
Why Create Your Own Embroidered Holiday Sweater?
Beyond the simple joy of crafting, there are countless reasons to embrace the DIY spirit this festive season and embark on your own embroidered holiday sweater project:
- Unmatched Personalization: Express your unique style. Whether it’s your name, a witty holiday slogan, a cherished family phrase, or a special motif, you have complete creative control.
- Perfect, Heartfelt Gifts: Handmade gifts carry immense sentimental value. An embroidered sweater shows thought, effort, and love, making it an unforgettable present for friends and family.
- Cost-Effective Holiday Fashion: Skip the expensive boutique sweaters. By repurposing an existing sweater or finding an affordable new one, you can create high-end looking apparel for a fraction of the cost.
- A Fun Family Activity: This project is simple enough to involve older children or make it a fun craft night with friends. Creating matching embroidered sweaters or shirts for a group photos will create lasting memories.
- Sustainable Style: Give new life to an old sweater, reducing waste and promoting eco-friendly fashion choices.
- Boost Your Creativity: Learning a new skill, even a simple one like this embroidery hack, can be incredibly satisfying and open doors to further crafting adventures.
I confidently guarantee that regardless of your prior experience, this Christmas sweater embroidery tutorial is designed for ease and success. You’ll likely master the technique on your very first attempt, making it an ideal project for beginners. If you’re still searching for that perfect unique gift or simply want to add a distinctive touch to your own wardrobe this Christmas, this DIY is a must-try. Get ready to unleash your inner artisan and craft something truly special. For a visual guide and more detailed instructions, be sure to watch the full video tutorial available on our platforms.
What You’ll Need for Your Christmas Sweater Embroidery Project
Gathering your materials is the first exciting step in any creative endeavor. For this easy DIY embroidered Christmas sweater project, you won’t need an extensive toolkit, just a few essentials:
Materials
- Sweater: Choose a knit sweater that is not too thin or delicate. Cotton, wool, or acrylic blends work well. Lighter colors make tracing easier, but dark colors can also be used with specific transfer methods.
- Paper (optional but recommended): For sketching your design or printing out a template.
- Pencil or Erasable Fabric Marker: To draw or trace your design onto the paper and then onto the fabric.
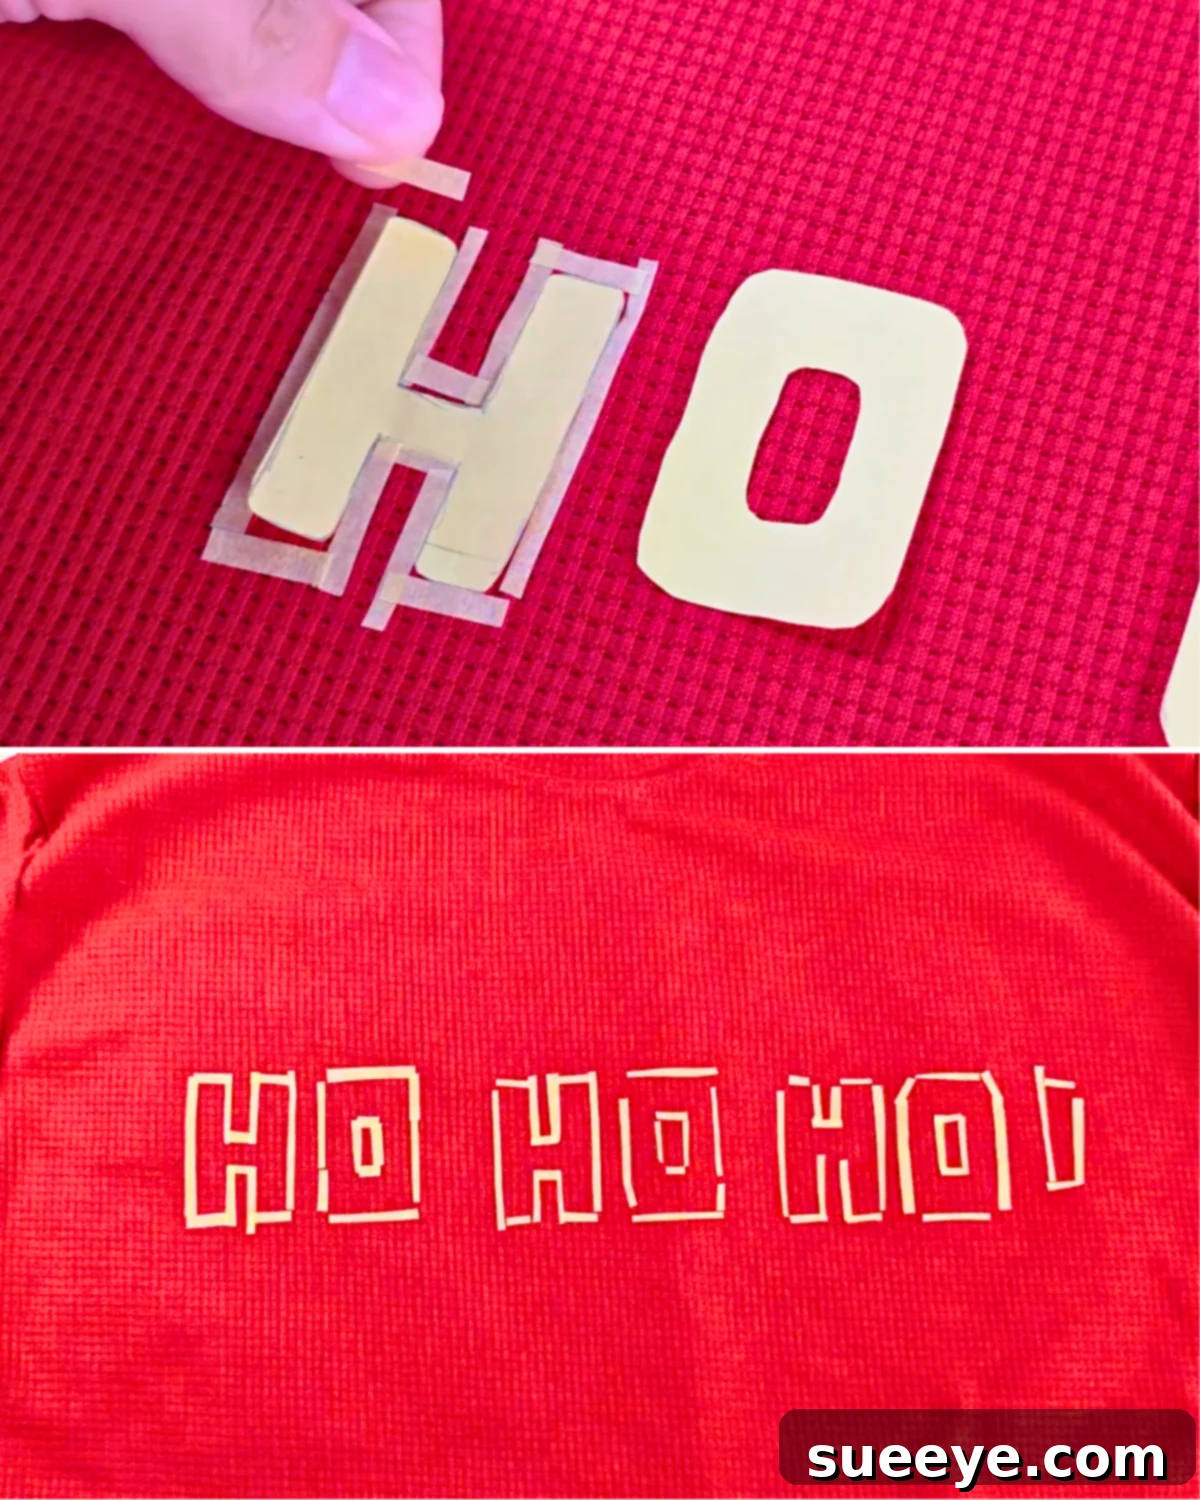
- Tape (optional): Useful for securing templates or outlining letters on dark fabrics where tracing isn’t visible. Painter’s tape or masking tape works well.
- Embroidery Thread: Select colors that complement your sweater and design. Regular cotton embroidery floss is versatile and comes in a wide array of colors. Consider using a few strands for a fuller look.
- Embroidery Needle: A sharp, medium-sized embroidery needle with an eye large enough for your chosen thread thickness.
- Scissors: Small, sharp embroidery scissors are ideal for clean cuts of thread.
- Hot Glue Gun and Glue Sticks: The star of our hack! Ensure your glue gun is in good working order and have extra glue sticks on hand.
- Embroidery Hoop (optional but helpful): A hoop can help keep your fabric taut and prevent puckering, especially for larger designs or more delicate knits.
How to Make an Embroidered Christmas Sweater: Step-by-Step Guide
Follow these detailed steps to create your own festive and unique embroidered Christmas sweater using our clever hot glue hack. Remember, practice makes perfect, but this method is forgiving and fun!
-
Step 1: Design and Prepare Your Word Template

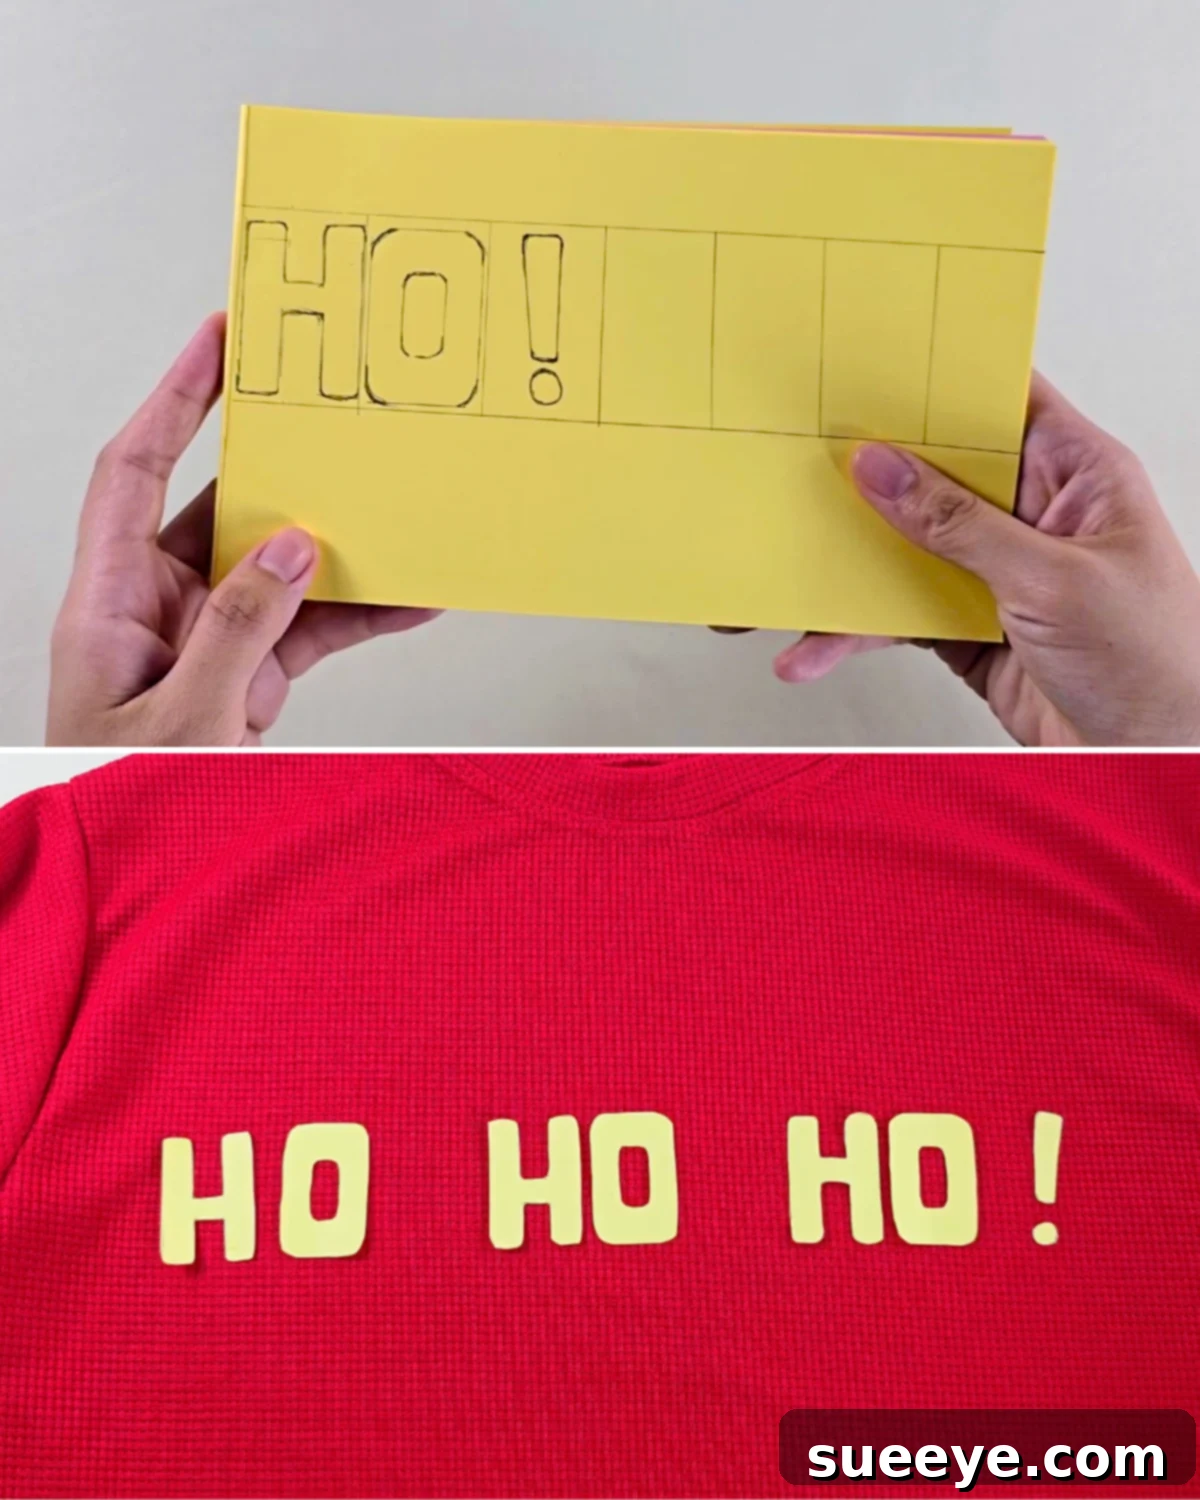
Begin by determining the word or phrase you wish to embroider for your Christmas design. On a piece of paper, write out your chosen word in the desired font and size. It’s crucial to ensure that all letters are consistent in length and height, aiming for a neat, balanced appearance. A clear, bold font will be much easier to trace accurately onto your sweater later. Consider the placement on your sweater – will it be centered, off-set, or across the chest? Once satisfied, cut out your template or keep it ready for tracing. -
Step 2: Trace Your Design onto the Sweater
Carefully position your paper template onto the sweater exactly where you want the embroidery to appear. Using a pencil or an erasable fabric marker, gently trace the outline of your word onto the fabric. Take your time to ensure precision.Pro Tip: If your sweater is a dark color like red, navy, or forest green, traditional tracing might not be clearly visible. In such cases, a simple alternative is to use painter’s tape to outline each letter on the sweater. You can press the tape down to form the letter shapes directly onto the fabric, creating clear boundaries for your next step. Alternatively, a white chalk pencil or a fabric transfer pen designed for dark fabrics can also be very effective.
-
Step 3: Outline and Fill the Letters with Hot Glue
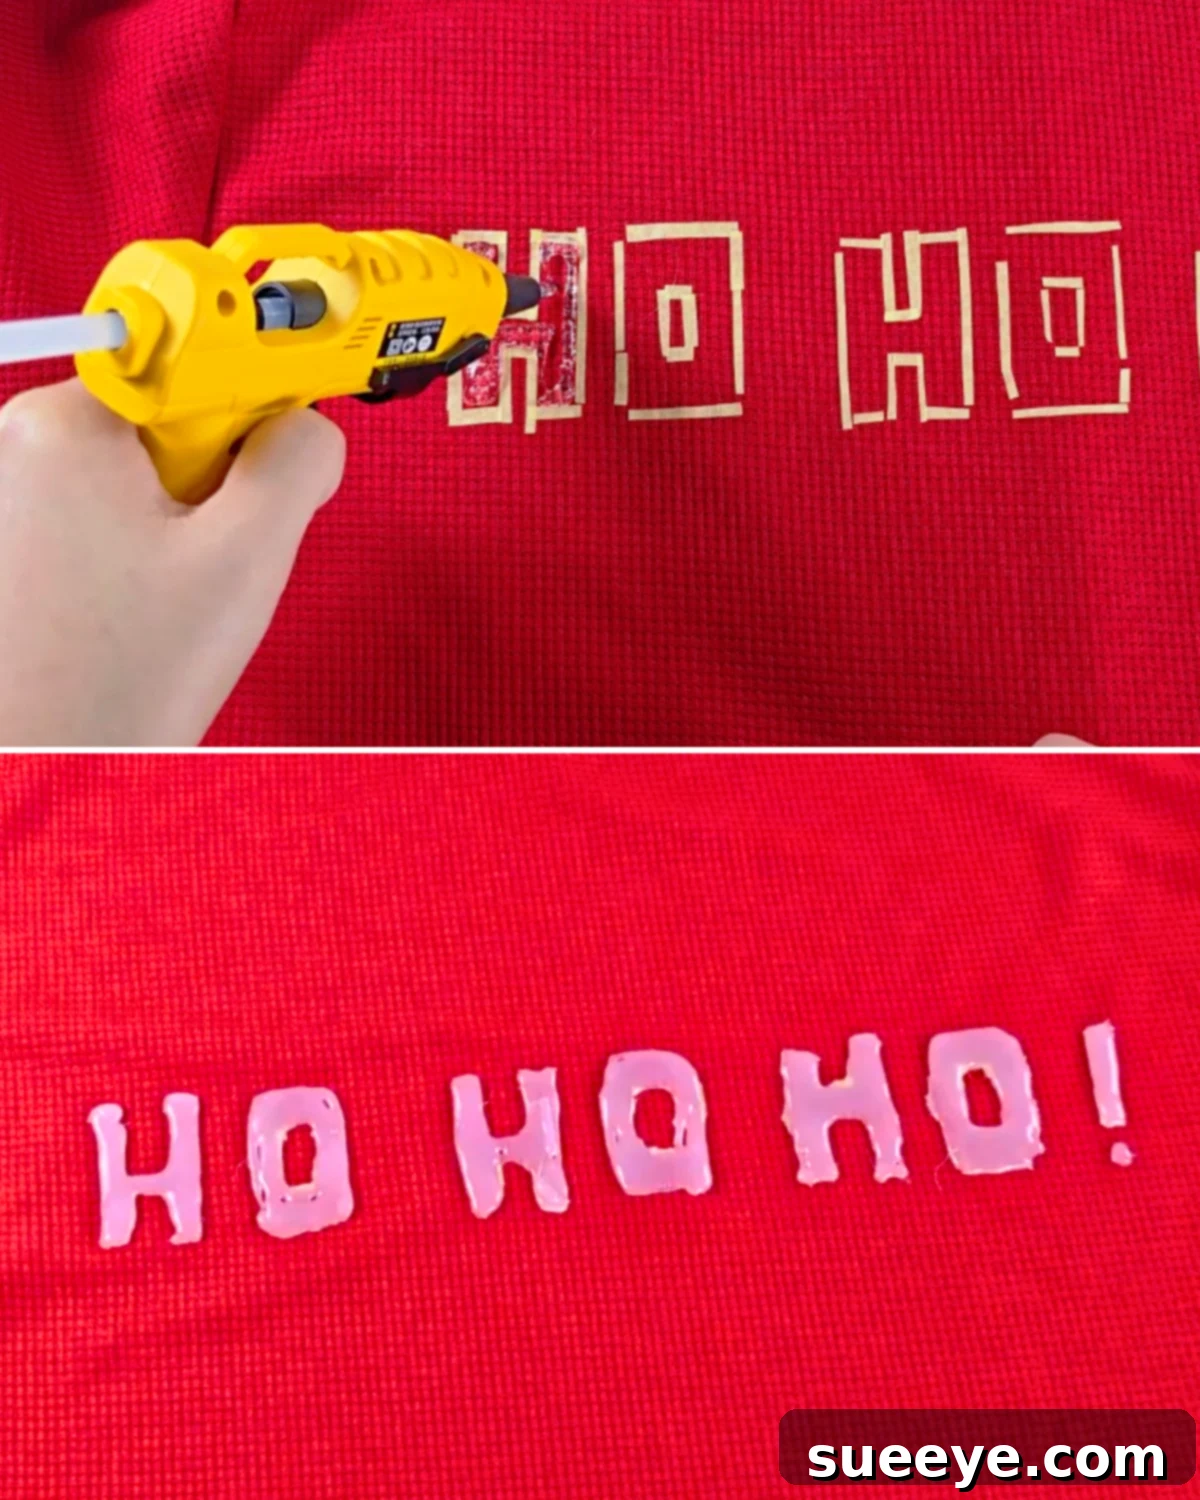
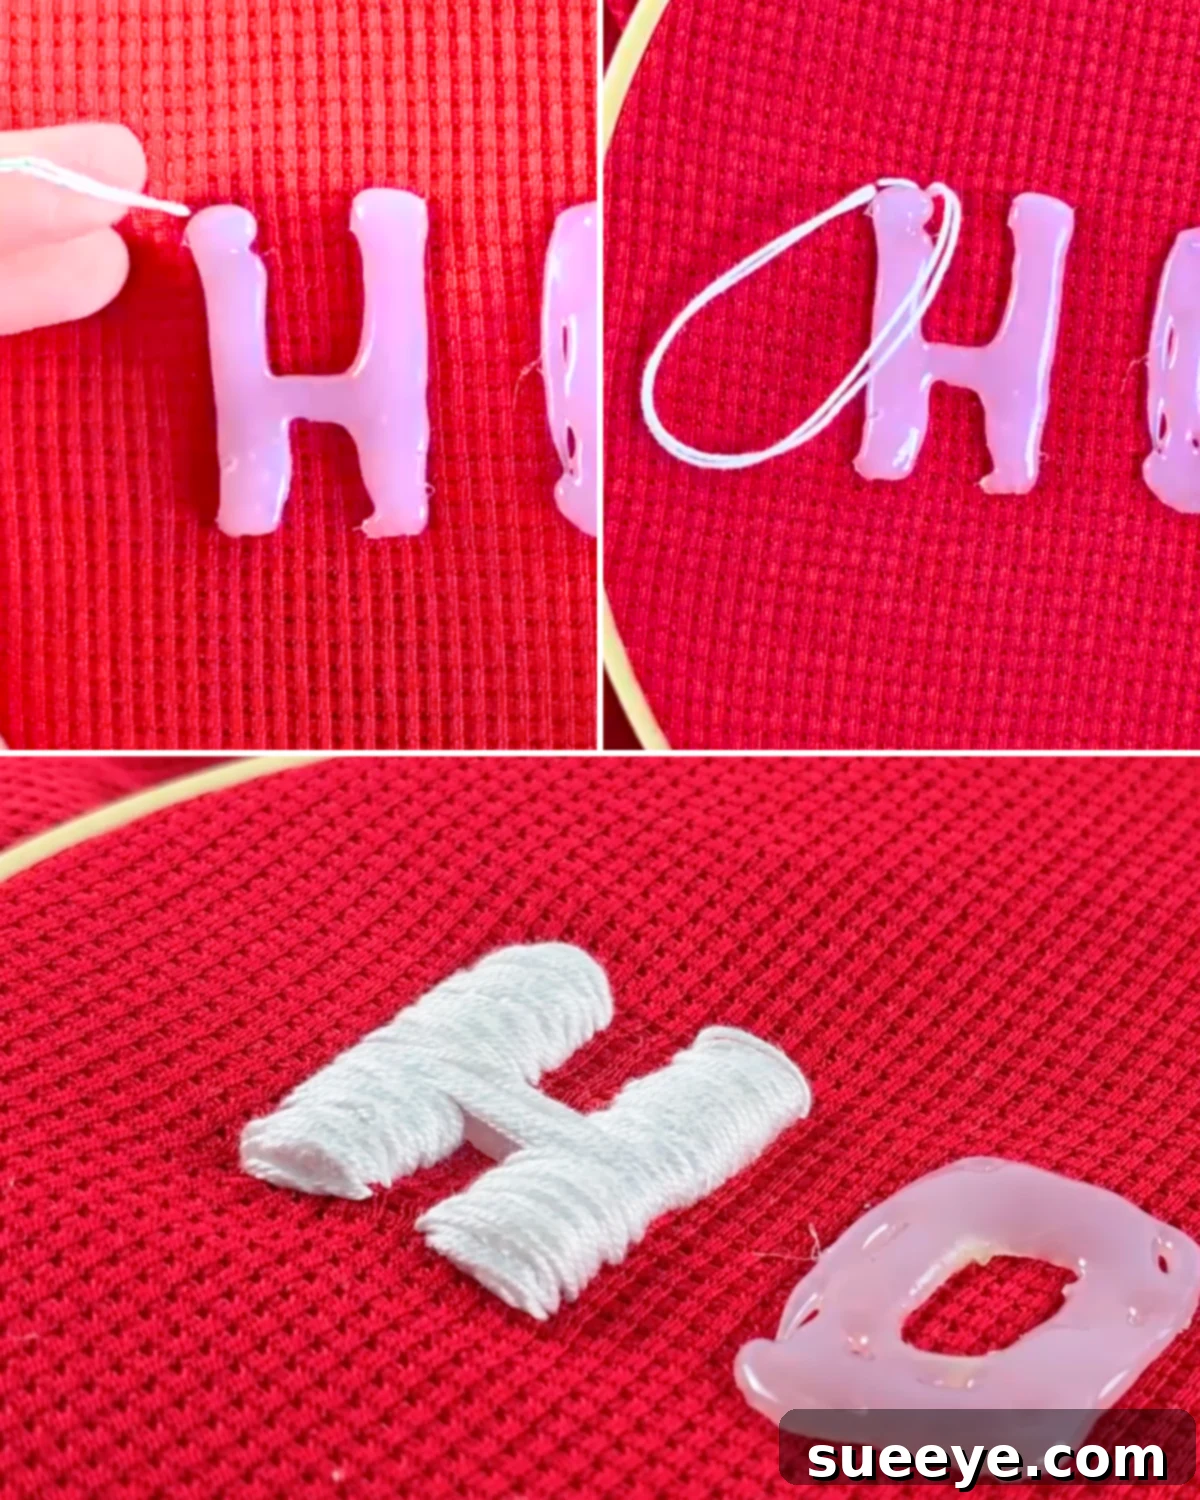
This is where the magic happens! With your hot glue gun, carefully outline the traced letters on your sweater. Then, gently fill in the inside of these outlined letters with a thin, even layer of hot glue. The goal is to create a slightly raised, dimensional surface for your stitches. Be mindful not to apply too much glue, as this can make stitching difficult. Work slowly and steadily for a smooth finish. Once you’ve applied the glue, allow it to dry and harden completely. This typically takes only a few minutes, but ensure it’s fully set before proceeding. If you used tape for outlining, you can now carefully peel it away. -
Step 4: Begin Stitching Your First Letter
Thread your needle with your chosen embroidery floss (typically 2-3 strands for good coverage). Start from the back of the sweater, bringing the needle up at a discrete starting point just at the edge of the hot glue outline – for example, the upper-right tip of the letter “H.” Insert the needle down on the opposite point of the hot glue outline, making a stitch that covers a portion of the raised glue. Bring the needle back up near your starting point (or just beside where you brought it down), and continue stitching along the outline, covering the hot glue. The hot glue provides a firm, raised base, making it easy to create even, full stitches. Ensure your stitches are close together and follow the contours of the letter for a neat, polished finish. This technique is similar to a satin stitch, but the glue provides the underlying volume. Secure your thread ends on the back of the sweater with a small knot. -
Step 5: Complete the Remaining Letters and Finish Your Design
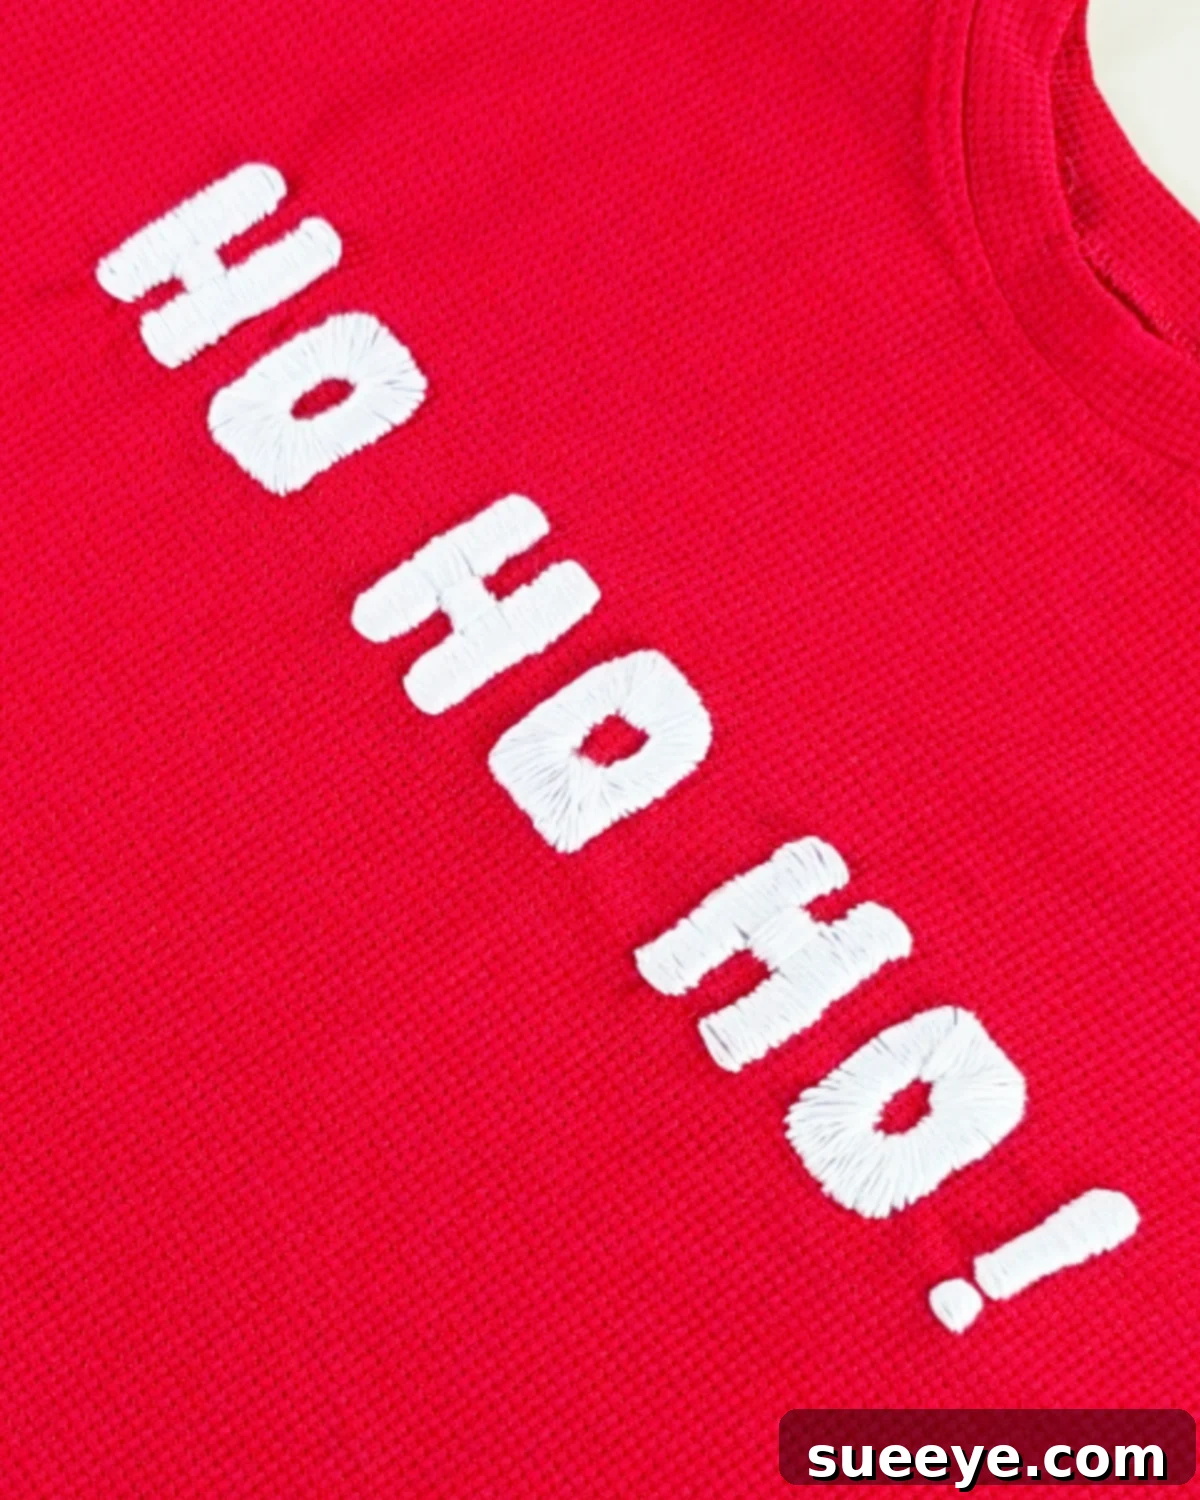
Repeat the same detailed stitching process for all the remaining letters in your word or phrase. Maintain consistency in your stitch length, tension, and direction to ensure a uniform and professional look across your entire design. If you’re using multiple thread colors, ensure clean transitions between them. Once all letters are fully embroidered, double-check the back of your sweater to make sure all thread ends are neatly secured to prevent unraveling. Take a moment to admire your handiwork – you’ve just created a beautifully embossed and personalized Christmas sweater!
Beyond Words: Expanding Your Design Horizons
While words and phrases make fantastic designs, don’t limit your creativity! This hot glue embroidery hack is also perfect for small motifs and festive symbols. Imagine tiny snowflakes, mini Christmas trees, Santa hats, reindeer silhouettes, or even simple geometric patterns that add a subtle touch of holiday cheer. You can also experiment with different thread types – metallic threads for a bit of sparkle, or even thicker perle cotton for a more pronounced texture. Consider adding small beads or sequins *after* your embroidery is complete for an extra festive flourish. The possibilities are truly endless, allowing you to continually personalize your holiday wardrobe year after year.
Tips and Troubleshooting for Beginner Embroiderers
Even with this easy hack, a few tips can ensure your project goes smoothly:
- Practice First: If you’re nervous, try the hot glue and embroidery technique on a scrap piece of similar fabric before working on your actual sweater.
- Even Glue Application: The key to smooth, even stitches is an even layer of hot glue. Avoid lumps or thin spots.
- Thread Tension: Keep your thread tension consistent. Too tight and it will pucker the fabric; too loose and it will look messy.
- Securing Threads: Always start and end your threads with a small, secure knot on the back of the fabric to prevent unraveling.
- Ironing: After completing your embroidery, you might gently press the back of the design with a warm iron (using a pressing cloth) to help flatten the fabric around the stitches, but be cautious with direct heat on glue.
Caring for Your Embroidered Sweater
To ensure your beautiful, custom-embroidered Christmas sweater lasts for many holiday seasons, proper care is essential. The hot glue hack provides durable stitches, but gentle washing will preserve both the embroidery and the sweater fabric:
- Hand Wash Recommended: For best results, hand wash your sweater in cool water with a mild detergent. Gently swirl the sweater in the water and avoid harsh scrubbing directly on the embroidery.
- Machine Washing (with caution): If you must machine wash, turn the sweater inside out, place it in a mesh laundry bag, and use a delicate cycle with cold water.
- Avoid Bleach: Bleach can damage both the embroidery thread colors and the sweater fabric.
- Drying: Gently squeeze out excess water (do not wring!). Lay the sweater flat on a clean towel to air dry, reshaping it if necessary. Avoid hanging wet embroidered sweaters, as the weight can stretch the fabric and distort the design.
- Ironing: If ironing is needed, turn the sweater inside out and iron on a low setting, placing a clean cloth between the iron and the fabric to protect the embroidery. Avoid direct heat on the hot glue areas.
Frequently Asked Questions About Christmas Sweater Embroidery
Here are some common questions you might have as you embark on your DIY embroidery journey:
- Q: What types of sweaters are best for this project?
- A: Sweaters with a relatively smooth knit are ideal. Cotton, acrylic, or wool blends work well. Avoid very loose knits or heavily textured sweaters, as the hot glue might not adhere as effectively, and the stitches can get lost.
- Q: Can I wash the sweater after applying hot glue and embroidering?
- A: Yes! The beauty of this hack is its durability. Once the glue is fully cured and the embroidery is complete, the sweater can be washed. We recommend hand washing or using a delicate cycle for longevity, as detailed in the “Caring for Your Embroidered Sweater” section above.
- Q: What if I make a mistake with the hot glue? Can I remove it?
- A: Hot glue, once dry, can be tricky to remove from fabric without potentially damaging it. It’s best to work slowly and carefully during Step 3. If you make a small error, you might be able to gently pick at it with tweezers once dry, but precision is key to avoid mistakes.
- Q: How long does this project typically take?
- A: The time will vary depending on the complexity of your design and your familiarity with embroidery. A simple word might take 1-2 hours for a beginner, including drying time for the glue. More intricate designs will naturally take longer.
- Q: Can I use other types of glue instead of hot glue?
- A: The hot glue is crucial for this specific “embossed” effect due to its quick drying time and ability to create a raised, firm base. Other liquid glues might bleed into the fabric, dry too slowly, or not provide the necessary dimension and durability. We highly recommend sticking with hot glue for the best results with this hack.
Creating your own easy Christmas sweater embroidery is more than just a craft; it’s an opportunity to infuse your wardrobe with personality and holiday cheer. With our ingenious hot glue hack, even beginners can achieve impressive, durable, and truly unique designs. So grab your sweater, thread, and glue gun, and start stitching some festive magic! We can’t wait to see your creations. Happy crafting!
*If you love this craft and want more creative inspiration, then visit our official website, follow our Facebook page, and subscribe to our YouTube channel for more amazing DIY projects and tutorials!