
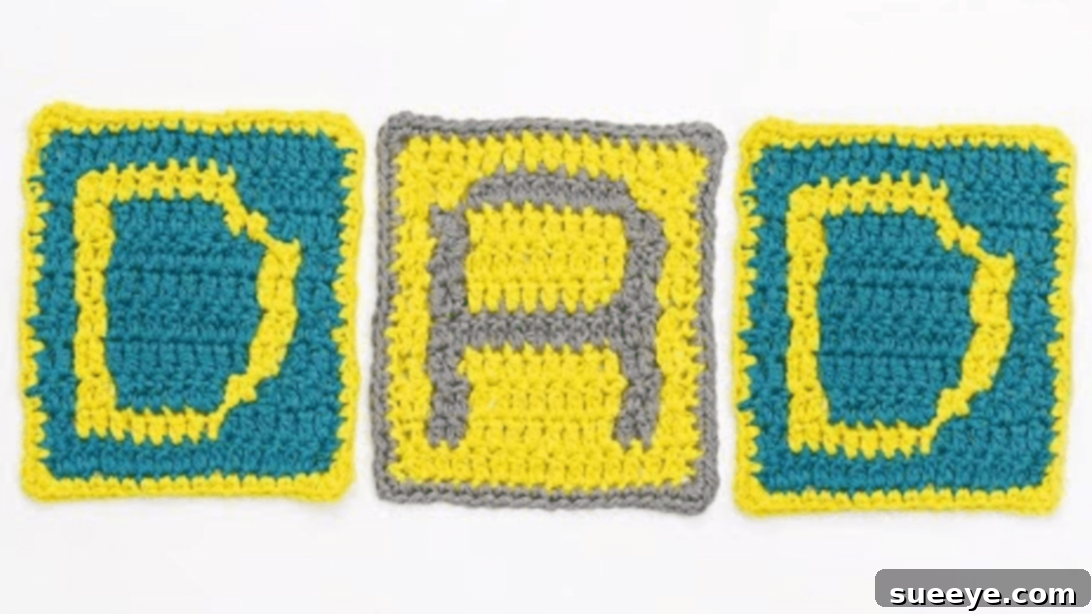
Craft Personalized Gifts: Easy Monogram Crochet Coaster Tutorial
Are you searching for the perfect gift for a special man in your life, perhaps your Dad, husband, or a dear friend? Instead of a generic store-bought item, why not pour your heart into creating something truly unique and memorable? Handmade gifts carry a warmth and personal touch that mass-produced items simply cannot match. If you’ve always enjoyed the art of crocheting, or are keen to learn a new skill, then you’ve found the ideal project!
This tutorial will guide you through making adorable and practical monogram crochet coasters. What makes them truly special is the ability to personalize them with initials and a custom color palette. Imagine crafting a set in your Dad’s favorite colors, perhaps featuring his first initial, or a design that complements your home decor. This thoughtful gesture is sure to be cherished for years to come.
Dive into the world of creative gifting. Learn how to transform simple yarn into a beautiful, functional keepsake by following this comprehensive guide, inspired by the wonderful video tutorial from One Little Project on YouTube. Get ready to crochet a gift that truly stands out!
Why Choose Monogram Crochet Coasters as a Gift?
Handmade gifts, especially those as charming and practical as monogrammed coasters, offer a multitude of benefits:
- Unmatched Personalization: Unlike mass-produced items, you can infuse your personality and the recipient’s preferences into every stitch. Choose their favorite colors, their initial, or even a symbolic design. This level of customization shows genuine thought and effort.
- Thoughtful and Sentimental Value: A gift made by hand speaks volumes. It conveys dedication, love, and time spent specifically for the recipient. These coasters won’t just protect surfaces; they’ll serve as a constant reminder of your affection.
- Practicality Meets Style: Coasters are an everyday essential, protecting furniture from unsightly water rings and heat damage. When they’re also beautiful and personalized, they add a touch of charm and elegance to any living space, turning a utilitarian item into a decorative accent.
- Affordable & Rewarding: Crafting your own gifts can often be more cost-effective than buying them, especially if you already have some yarn on hand. Beyond the financial aspect, the process of creating something beautiful with your own hands is incredibly rewarding and therapeutic.
- Versatile for Any Occasion: While perfect for Father’s Day, these monogram coasters are also fantastic for birthdays, anniversaries, housewarming gifts, holiday presents, or even as a personalized touch for your own home decor.
Ready to start creating a gift that combines utility, beauty, and heartfelt sentiment? Let’s gather our supplies and begin this exciting crochet journey.
Essential Materials for Your Monogram Crochet Coasters
Before you begin crocheting, it’s crucial to gather all your materials. Having everything at hand will ensure a smooth and enjoyable crafting experience. Here’s a detailed look at what you’ll need:
- Cotton Yarn: For coasters, cotton yarn is the absolute best choice. It’s highly absorbent, durable, heat-resistant, and easy to wash, making it perfect for protecting surfaces from spills and hot drinks. Consider using two contrasting colors for your monogram design – one for the background and one for the initial. Explore different yarn weights; a worsted-weight (medium) cotton yarn is typically recommended for this type of project as it creates a sturdy coaster.
- 4mm Crochet Hook: The size of your crochet hook is important as it dictates the density and size of your stitches. A 4mm hook (often referred to as a G/6 hook in the US) is ideal for achieving a firm, flat fabric with worsted-weight cotton yarn, which is essential for a functional coaster. If your stitches are too loose, the coaster might be floppy; if too tight, it might curl.
- Scissors: A sharp pair of craft scissors is necessary for cutting yarn cleanly at the start, when changing colors, and at the end of your project.
- Yarn Needle (or Tapestry Needle): This blunt-tipped needle is invaluable for weaving in all your loose yarn ends discreetly. Proper weaving ensures your coasters look professional and won’t unravel with use.
-
The Monogram Pattern: This is the blueprint for your design! You’ll need a specific chart or diagram that shows which stitches to make in which color to form your desired letter.
Click here to find and download the pattern directly from One Little Project. Make sure to print it out for easy reference during the crocheting process.
Having these materials ready will set you up for success in creating your personalized crochet coasters.
How to Make Personalized Monogram Crochet Coasters: A Step-by-Step Guide
Creating these monogram crochet coasters involves a technique similar to tapestry crochet, where you carry or switch yarn colors to create a design. Follow these detailed steps to bring your personalized gift to life.
Step 1: Preparation and Starting Your Foundation Chain
Begin by setting up your workspace and understanding the pattern. This initial phase is crucial for ensuring your coaster’s dimensions and design come out correctly.
- Prepare Your Pattern: Print out the downloadable monogram pattern. This chart is your visual guide. Each square on the grid typically represents a stitch, or in this case, a pair of stitches (two double crochets). Familiarize yourself with the symbol for your chosen initial and the overall layout.
- Divide Your Yarn: If you are working with multiple colors for your monogram (which you will be!), it’s often helpful to divide each color into smaller bundles or bobbins. This prevents tangling and makes color changes smoother, especially for intricate designs.
- Create a Slip Knot: Take your main background color yarn. Make a slip knot and secure it onto your 4mm crochet hook. This is the very first step in starting any crochet project and forms the initial loop.
- Chain 18: From your slip knot, chain 18 stitches. This forms your foundation chain, which will determine the width of your coaster. Ensure your chains are not too tight or too loose, as this can affect the overall shape of your work. Consistent tension is key.
- Understand the Template: The pattern will guide you meticulously. In this project, each square of the grid on your printed template represents two double crochets (dc). You will be working back-and-forth in rows, building up the height. After completing each row, you will flip your work to continue in the opposite direction.
Step 2: Crocheting Your First Rows and Managing Color Changes
This step focuses on establishing the base rows and introducing the technique for seamlessly changing yarn colors to form your monogram design.
- First Row Execution: Begin your first row by making your first double crochet (dc) in the 3rd chain from your hook. The two skipped chains will count as your very first double crochet of the row, providing the necessary height. Continue making double crochets across the foundation chain until you reach the end.
- Consistent Stitch Count: Each row of your coaster will consist of 16 double crochets in total. Maintaining this count consistently is vital for keeping your edges straight and ensuring your coaster remains square or rectangular. If you find your stitch count changing, gently unravel back to the mistake and correct it.
- Turning Your Work: At the end of each completed row, flip over your work completely. This prepares you to crochet back along the previous row, working into the tops of the stitches you just made. This creates the typical flat fabric seen in most crochet projects.
- Starting Each New Row: To maintain the correct height and perfectly straight edges, chain 2 at the start of every new row before making your first actual double crochet stitch. These two chains will count as the first double crochet of that row.
- Following the Template for Design: Continue to follow your printed template meticulously, row by row. Each square of the template indicates where to place your two double crochets for either the background color or the monogram color. When you encounter a section of the grid that is “filled in” (indicating the monogram letter), you will need to switch yarn colors.
- Seamless Color Changes: When switching yarn colors, typically you’ll insert your hook into the last stitch of the old color, yarn over, and pull through two loops (you’ll have two loops on your hook). Then, drop the old color, pick up the new color, and yarn over with the new color to pull through the remaining two loops on your hook, completing the stitch in the new color. This creates a clean and almost invisible transition. Remember to leave the unused yarn attached if you’ll be using it again shortly in the same row or the next.
Step 3: Completing Your Coaster and Adding the Finishing Touches
The final stage involves completing the monogram design, securely fastening off your work, and adding an elegant border for a polished and durable finish.
- Strategic Yarn Management: As you work your double crochets and change colors according to the template, you’ll need to decide whether to cut the yarn or “carry” it. If the template shows adjacent squares (or squares within a few stitches) that you will be returning to later with the same color, it’s often best to leave the yarn uncut and carry it loosely along the back of your work, hidden within the stitches of the next color. This saves time and avoids an excessive number of ends to weave in. If the color won’t be used again for a longer stretch, cut it, leaving a tail long enough to weave in later.
- Continuous Pattern Following: Remain diligent in following the template until the entire monogram design and background are completed, covering all the specified rows. Consistency in stitch tension and color placement is key to a crisp, clear letter.
- Securing Your Work (Fasten Off): Once you’ve completed all the rows for your coaster, you need to “lock” the last strand. This is also known as fastening off. Cut your working yarn, leaving about a 6-inch tail. Yarn over your hook, pull the tail completely through the loop that is currently on your hook, and pull firmly to create a secure knot. This prevents your work from unraveling.
- Adding a Decorative Border: A border not only adds a professional, finished look to your coaster but also helps to square it up and give it more stability and a neat edge. You can add a border of your choice, but a simple single crochet (sc) border is highly effective and easy to execute.
- Border Execution: Starting with a new yarn (you can use one of your existing colors or a new contrasting one), attach it to any stitch along the edge of your coaster. Work 1 single crochet into each stitch along the sides and top/bottom edges of the coaster. When you reach a corner, insert 3 single crochets into the same corner stitch. This technique helps the border turn smoothly without curling and creates a nice, crisp corner.
- Finishing the Border: Once you’ve crocheted all around the perimeter of your coaster, finish the border by making a slip stitch into the very first single crochet you made at the beginning of the border round. This joins the round seamlessly.
- Weave in Ends: Using your yarn needle, carefully weave in all loose ends from your color changes, starting tails, and ending tails. Thread each yarn tail onto the needle and weave it through several stitches on the wrong side of your work, changing direction a couple of times to secure it firmly. Trim any excess yarn close to the fabric. This step is essential for a clean, professional, and durable finish that won’t unravel with use.
Congratulations, your personalized monogram crochet coaster is now complete and ready to be proudly gifted or displayed!
Caring for Your Handmade Crochet Coasters
To ensure your beautiful handmade coasters last for many years, proper care is important. Since these are made with cotton yarn, they are generally quite durable and easy to maintain:
- Washing: Most cotton yarns are machine washable. For best results, use a gentle cycle with cold water and a mild detergent. To prevent any stretching or damage, especially with delicate stitches, you might consider handwashing them in cool water with a gentle soap.
- Drying: After washing, gently squeeze out excess water (do not wring). Lay your coasters flat on a clean towel to air dry. Reshape them gently while damp to ensure they retain their square or circular form. Avoid hanging them to dry as this can cause stretching or distortion. Tumble drying on a low heat setting is also an option for many cotton yarns, but air drying is always the safest bet for longevity.
- Stain Removal: For spills, try to blot them immediately with a clean cloth, rather than rubbing, which can spread the stain. For tougher stains, a spot treatment with a gentle stain remover designed for fabrics can be used, followed by a gentle wash. Always test any stain remover on an inconspicuous area first.
With a little care, your personalized crochet coasters will continue to protect surfaces and add a charming touch to any setting for a long time.
Beyond Coasters: Expanding Your Crochet Horizons
Once you’ve mastered the art of creating these delightful monogram coasters, you’ll find that the techniques learned here can be applied to a wide array of other personalized crochet projects. The ability to incorporate color changes and follow a grid pattern opens up a world of creative possibilities:
- Personalized Mug Rugs: Slightly larger than a coaster, a mug rug can accommodate a mug and a small snack. You can incorporate more intricate designs, longer names, or even small quotes.
- Custom Dishcloths or Washcloths: A set of personalized dishcloths makes a thoughtful housewarming or hostess gift. Using absorbent cotton, you can easily crochet an initial or a simple motif into each one.
- Bookmarks: For the avid reader, a slim crochet bookmark with their initial, a small symbol, or a favorite color scheme is a quick and charming project that uses similar colorwork principles.
- Small Wall Hangings: Utilize tapestry crochet techniques to create small decorative wall hangings featuring initials, simple images, or geometric patterns that add a unique touch to any room.
- Appliques: Create small monogrammed appliques that can be sewn onto bags, blankets, hats, scarves, or clothing for an extra touch of personalization and handmade flair.
The journey of crochet is one of continuous learning and creativity. Don’t hesitate to explore new patterns, experiment with different yarn types, and personalize your projects to truly make them your own. Each new item you create builds on your skills and confidence, leading to even more impressive handmade treasures.
We hope this comprehensive tutorial inspires you to pick up your hook and yarn and create something beautiful and meaningful. There’s immense joy in crafting, and even greater joy in gifting a piece of your creativity that is sure to be appreciated.
*All image credits and inspiration for this tutorial belong to One Little Project via YouTube. We highly recommend following and subscribing to her channel for more fantastic DIY and crochet ideas!
Happy Crocheting!