
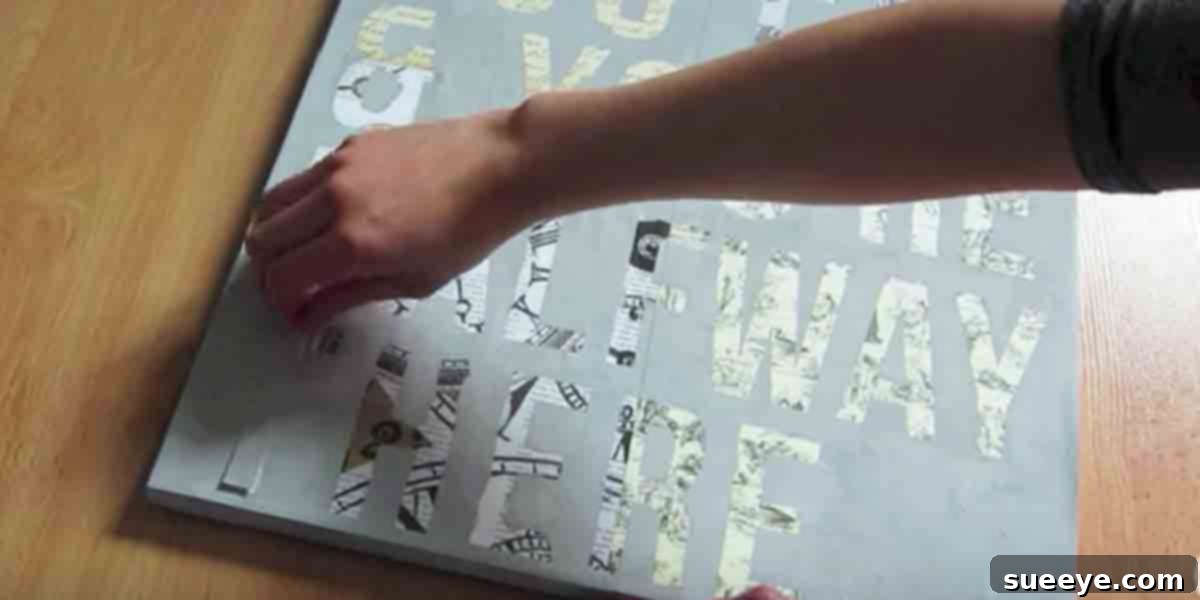
Transform Your Walls: The Ultimate Guide to DIY Letter Art with Scrapbook Paper & Paint
In the vibrant world of home decor, personalized touches reign supreme. Among the myriad ways to infuse character and charm into your living space, letter art stands out as a particularly popular and versatile trend. It’s more than just putting letters on a wall; it’s about crafting a statement, telling a story, or simply adding an artistic focal point that truly reflects your style. While many forms of letter art exist, one technique, in particular, has captured the imagination of DIY enthusiasts everywhere: combining the subtle textures of scrapbook paper with the bold impact of paint on canvas. This method promises not only a visually stunning result but also a deeply satisfying creative journey.
Imagine a piece of art where custom-cut letters reveal intricate patterns and colors beneath a beautifully painted surface. This ingenious technique involves layering precisely cut letters over vibrant scrapbook paper on a canvas, painting over the entire surface, and then carefully peeling away the letters to expose the captivating designs hidden beneath. The effect is simply mesmerizing – a clean, crisp outline of your chosen words or initials, framed by a striking painted background, with the unique patterns of scrapbook paper shining through. It’s a brilliant fusion of mixed media that yields professional-looking results with a surprisingly straightforward process, making it an accessible project for crafters of all skill levels.
Unveiling the Magic: What Makes This Letter Art Technique So Special?
The beauty of this particular letter art method lies in its clever simplicity and the dramatic reveal. Unlike traditional stenciling or adhesive vinyl applications, this technique creates a dynamic interplay between positive and negative space. The letters themselves aren’t merely applied; they become a window into another layer of design, offering depth and visual intrigue. The process itself is incredibly engaging, building anticipation as you meticulously prepare your canvas, apply the paint, and finally, uncover the hidden beauty. It’s an act of creation that feels genuinely magical, transforming simple materials into a unique piece of personalized decor.
For someone like me, with a preference for neutral tones and contemporary designs, this project presented a perfect opportunity to add a clean, artistic statement to my living room. The ability to choose specific scrapbook papers meant I could select patterns and colors that complemented my existing decor flawlessly, creating a harmonious yet striking addition. The finished piece looks incredibly intentional and sophisticated, instantly elevating the aesthetic of the room. Hung within a curated grouping of art, it truly anchors the space, proving that handmade doesn’t mean sacrificing elegance or style.
Your Creative Retreat: A Perfect Project for Any Afternoon
Looking for a fulfilling activity to brighten a leisurely afternoon? This DIY letter art project is an excellent choice. It offers a wonderful escape, allowing you to immerse yourself in the creative process. There’s a profound sense of accomplishment that comes with bringing a vision to life with your own hands, especially when the final product is as beautiful and impactful as this canvas art. The satisfaction of stepping back and admiring your finished work is truly immeasurable, making it a rewarding endeavor that boosts your confidence and creative spirit.
One aspect that many crafters might initially find daunting is achieving the perfect size and style of lettering for their canvas. As someone who leans more towards the creative than the technical, I certainly faced this hurdle. However, with a bit of experimentation and some resourceful approaches, it’s entirely manageable. Whether you opt for hand-cutting, utilizing a digital cutting machine, or even printing and tracing, there are various ways to ensure your letters are just right. Don’t let perceived technical limitations hold you back; the beauty of DIY is in finding solutions and celebrating your unique process. Overcoming these small challenges only adds to the sense of triumph when your masterpiece is complete!
Beyond Your Walls: Thoughtful Gifts That Speak Volumes
Once you’ve experienced the joy of creating one of these stunning letter art pieces for your own home, you’ll undoubtedly feel inspired to make more. This project is not just for personal decor; it’s an exceptional idea for personalized gifts. Imagine the delight of friends or family receiving a custom piece of art, tailored specifically to them. Whether it’s their initials, a significant date, a cherished family name, or an inspiring word, a handmade letter art canvas carries a unique sentimental value that mass-produced items simply cannot match.
They make particularly wonderful housewarming gifts, offering a truly bespoke item for new homeowners to personalize their space. They’re also fantastic for birthdays, weddings, baby showers, or anniversaries, commemorating special occasions with a thoughtful, handcrafted touch. Keep this versatile project in mind for any future gift-giving needs; it’s a surefire way to impress and show you care with a truly unique present.
Getting Started: Your Essential Material Checklist
Before diving into the creative process, gathering the right materials is key to a smooth and enjoyable experience. Here’s what you’ll need:
- Canvas: Choose a size that suits your space and design. Stretched canvases are ideal.
- Scrapbook Paper: A selection of patterns and colors that complement your aesthetic. Consider how the patterns will look when revealed.
- Adhesive Vinyl or Cardstock: For cutting your letters. Vinyl is excellent for sharp edges and easy removal; cardstock can also work if securely adhered.
- Acrylic Craft Paint: Select a color that contrasts beautifully with your scrapbook paper and works with your decor.
- Craft Knife or Digital Cutting Machine (e.g., Cricut, Silhouette): For precise letter cutting.
- Self-Healing Cutting Mat: Essential if using a craft knife.
- Paint Brushes or Foam Rollers: For even paint application.
- Pencil and Ruler: For measuring and marking.
- Optional: Mod Podge or clear sealer for a protective finish.
Your Step-by-Step Guide to Crafting Stunning Letter Art
Ready to bring your vision to life? Follow these detailed steps to create your own captivating letter art:
1. Design Your Vision
Begin by deciding on the word, phrase, or initials you want to feature. Consider the font style carefully – a bold, sans-serif font often works best for a clean reveal, but don’t be afraid to experiment. Use a word processing program or design software to size your letters appropriately for your canvas. Print them out, or prepare your file for your cutting machine.
2. Prepare Your Canvas Base
While optional, applying a base coat of gesso or a light, neutral paint to your canvas can create a smoother surface for your scrapbook paper and paint layers. Ensure it’s completely dry before proceeding.
3. Select and Arrange Scrapbook Papers
Cut your chosen scrapbook papers to slightly larger than the area your letters will cover. Experiment with arranging them on your canvas, overlapping or placing them side-by-side, to create an interesting background of patterns and textures. Secure them gently to the canvas using a temporary adhesive or painter’s tape to prevent shifting while you work on the letters.
4. Craft Your Letters with Precision
This is where your chosen method for cutting letters comes in. If using a digital cutting machine, load your vinyl or cardstock and let the machine do the work. If hand-cutting, carefully trace your printed letters onto your chosen material (vinyl works best here for ease of cutting and removal) and use a sharp craft knife on a cutting mat for clean edges. Precision here will contribute significantly to the final crispness of your art.
5. Strategically Place and Adhere Your Letters
Once your letters are cut, carefully peel off their backing (if using vinyl) or apply a temporary adhesive to the back of cardstock letters. Position them precisely over the scrapbook paper arrangement on your canvas. Ensure they are firmly adhered, paying close attention to the edges, to prevent paint from bleeding underneath. This secure adhesion is crucial for that clean, sharp reveal.
6. The Painting Process: A Layer of Transformation
Now, for the transformative step! Using your chosen acrylic paint and brush or foam roller, apply a consistent, even coat over the entire canvas, including over your adhered letters and the visible scrapbook paper. You may need two thin coats for opaque coverage, allowing each layer to dry thoroughly. The goal is to completely obscure the letters and scrapbook paper beneath the paint. For a more textured look, you could experiment with different painting techniques, but for a clean reveal, smooth, even strokes are recommended.
7. The Grand Reveal: Peeling Back the Layers
Once your final paint coat is completely dry to the touch (allow ample drying time, perhaps a few hours or even overnight), it’s time for the most exciting part! Carefully and slowly peel away the letters. Start from an edge and gently pull, revealing the beautiful scrapbook paper designs underneath. If any paint has bled slightly, a fine-tipped craft knife can be used to meticulously clean up the edges, though proper adhesion in step 5 should minimize this.
8. Finishing Touches and Protection
To protect your artwork and give it a polished finish, consider applying a coat of clear acrylic sealer or Mod Podge. This will help preserve the colors and textures and make your canvas more durable. Once dry, your personalized letter art is ready to be admired and displayed!
Beyond the Basics: Customization and Personalization
The beauty of this project lies in its endless possibilities for customization. Don’t limit yourself to basic words and colors:
- Color Palettes: Experiment with ombre effects in your background paint, or use multiple paint colors for a striped effect.
- Font Fusion: Combine different font styles for a dynamic look, perhaps a script font for a name and a block font for a date.
- Mixed Media: Before applying your letters, consider adding subtle textures or metallic accents to your scrapbook paper background for an even richer appearance.
- Embellishments: After the reveal, you can add small embellishments around the letters, such as glitter, tiny beads, or even hand-drawn details, to further enhance your piece.
Integrating Your Letter Art into Your Home Decor
Your finished letter art piece is a versatile decor item. Here are some ideas for placement:
- Focal Point: A large canvas featuring a single initial or family name can serve as a stunning focal point in a living room or entryway.
- Gallery Wall: Integrate smaller letter art canvases into a gallery wall arrangement, mixing them with photos, prints, and other artistic pieces for a curated look.
- Nursery Charm: Create a baby’s initial or name for a whimsical and personalized touch in a nursery or child’s room.
- Office Inspiration: Display an empowering word or phrase in your home office for daily motivation.
- Bedroom Serenity: A calming word or a loved one’s initial can add a personal, serene touch to a bedroom.
The Joy of Creation: A Rewarding Journey
Ultimately, engaging in DIY projects like this letter art technique offers more than just a beautiful end product. It provides a valuable opportunity for creative expression, stress relief, and a tangible sense of accomplishment. The pride you’ll feel when you complete your canvas, knowing you’ve crafted something truly unique and beautiful, is a powerful motivator to continue exploring your artistic side.
So, gather your materials, choose your favorite scrapbook papers, and prepare to be amazed by what you can create. This project isn’t just about making art; it’s about making memories, discovering new skills, and adding a truly personal touch to your world. Unleash your inner artist and start crafting your masterpiece today!