
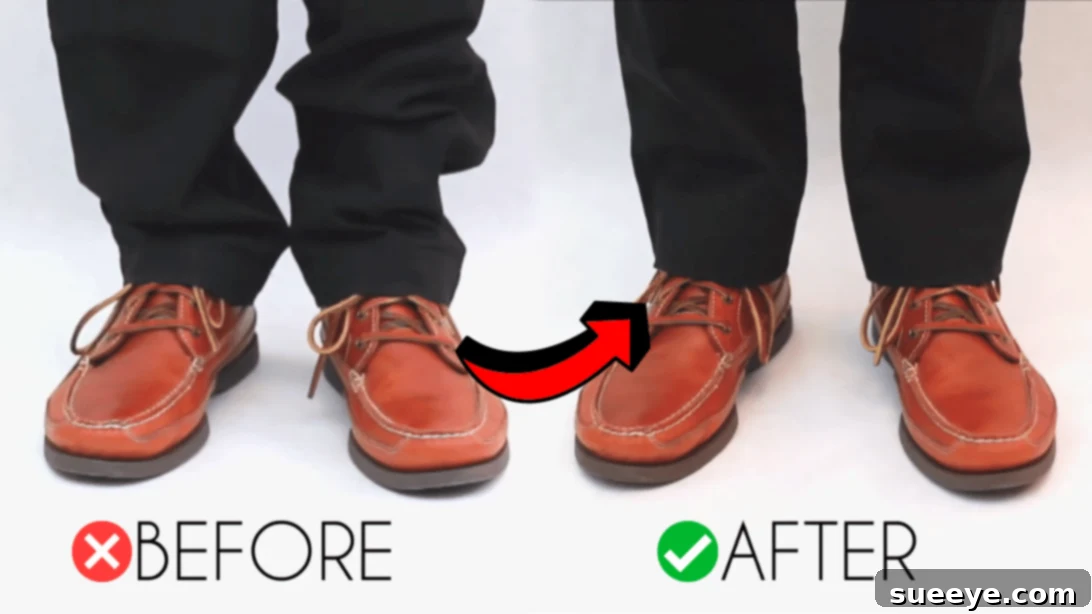
Master the No-Sew Hem: Easily Shorten Pants with Fusible Tape for a Perfect Fit
Are your favorite pants just a touch too long, dragging on the ground, or looking unkempt and unprofessional? Do you find yourself wishing for a quick fix but lack the time, the necessary sewing skills, or even the desire to tackle a sewing machine? You are certainly not alone! Many people struggle with finding the perfect pant length, and the thought of traditional hemming can be daunting, often leading to unworn garments or expensive trips to the tailor. But what if we told you there’s an incredibly simple, fast, and budget-friendly solution that requires absolutely no needle or thread?
Prepare to transform your wardrobe with the magic of the no-sew hem – a true game-changer for anyone wanting to achieve a polished, tailored look in mere minutes. This comprehensive guide, inspired by the brilliant technique shared by HGTV Handmade on YouTube, will walk you through everything you need to know about hemming pants without sewing. Forget complicated stitches, intricate patterns, and the frustration of a bobbin tangling. With just a few common household items and about 10 minutes of your time, you can achieve a professional-looking hem that will make your pants fit like they were custom-made. Whether it’s a casual pair of jeans, sharp dress trousers, or comfortable everyday slacks, this method is so quick and convenient, you might wonder why you ever considered any other way. Let’s dive in and discover the secret to perfectly fitting pants!
Why Choose the No-Sew Hem: A Modern Solution for Perfectly Fitting Pants
In today’s fast-paced world, efficiency and convenience are highly valued, and clothing alterations are certainly no exception. The no-sew hemming method offers a myriad of compelling benefits that make it an attractive and practical alternative to traditional sewing:
- Unmatched Speed and Simplicity: The most apparent advantage is how incredibly fast and easy this method is. You don’t need to learn complex sewing techniques, master a sewing machine, or even thread a needle. The entire process for a pair of pants can often be completed in less than 15 minutes, making it ideal for last-minute adjustments before an important event or just to refresh your everyday wear.
- Remarkably Budget-Friendly: Say goodbye to expensive tailor bills that quickly add up, especially if you have multiple pairs of pants needing adjustment. The materials required for a no-sew hem are inexpensive and widely available at most craft or department stores, offering significant long-term savings.
- Accessible for All Skill Levels: Whether you’re a complete beginner with no prior crafting experience or an experienced DIY enthusiast looking for a quick and effective fix, this method is accessible to everyone. There’s no steep learning curve, making it perfect for those who are intimidated by traditional sewing machines or intricate hand stitching.
- Impressive Versatility: This technique works wonders on a wide variety of fabrics, from sturdy denim and durable cotton twill to softer wool blends, delicate rayons, and various synthetic materials. It’s suitable for almost any pant style, including skinny jeans, bootcut trousers, wide-leg pants, and even skirts or curtains!
- Temporary or Semi-Permanent: While designed for durability, fusible hem tape can often be carefully removed with heat if you decide you want to lengthen your pants again in the future (though this depends on the tape quality and fabric type). This offers a degree of flexibility and reversibility that traditional sewn hems don’t always provide.
- Achieve a Clean, Professional Finish: When executed correctly, a no-sew hem looks just as neat, crisp, and professional as a traditionally sewn hem. The invisible bond created by the heat-activated hem tape ensures a smooth, seamless finish that enhances the overall look of your garment.
Embracing the no-sew hem means taking control of your wardrobe and ensuring every pair of pants fits you flawlessly. This not only enhances your comfort but also boosts your confidence, allowing you to present a more polished and put-together image effortlessly.
Essential Materials for Hemming Pants Without Sewing:
Gathering all your tools beforehand is a crucial step that ensures the hemming process is smooth, efficient, and hassle-free. Here’s a detailed look at what you’ll need for this simple yet effective pant alteration:
- Fabric Pins: These are indispensable for temporarily holding your desired hem length in place before you iron. Opt for sharp, fine pins that will penetrate the fabric easily without snagging or leaving noticeable marks. A good quantity will allow you to secure the hem evenly.
- Fusible Hem Tape: This is the absolute star of our no-sew show! This specialized heat-activated adhesive tape creates a strong, durable, and lasting bond between fabric layers. It’s available in various widths (commonly 1/2 inch to 1 inch wide); choose one appropriate for the depth of your hem. Popular and reliable brands include Dritz Hem Tape, HeatnBond, and Stitch Witchery, all readily available at craft stores.
- Iron: A good quality iron is absolutely essential to activate the fusible tape effectively. Ensure your iron produces consistent heat and ideally has a steam function (though steam isn’t always strictly necessary, it can help create a stronger bond and crisper crease for many fabrics).
- Ironing Board: Provides a stable, flat, and heat-resistant surface that is crucial for pressing your hems evenly and safely. Working on an ironing board ensures consistent pressure and a professional finish.
- Pinking Shears: These unique scissors have distinct serrated or zig-zag blades. Their primary function is to cut fabric edges in a way that significantly reduces fraying. While regular sharp scissors can cut the fabric, pinking shears add a professional touch and enhance the durability of your no-sew hem by preventing the raw edge from unraveling over time.
- Sharp Scissors: A standard pair of sharp fabric scissors will be useful for precise cutting of the fusible tape and any initial trimming of excess fabric if you don’t use pinking shears for the main cut.
How to Hem Pants Without Sewing: A Step-by-Step Guide
Achieving a perfect no-sew hem is much simpler than you might imagine. By following these detailed, easy-to-understand steps, you’ll be able to create a flawless, durable finish every time:
Step 1: Determine the Ideal Length with Precision
This initial measuring step is arguably the most crucial for a successful and aesthetically pleasing hem. Begin by putting on the specific pants you intend to alter. Critically, also wear the exact shoes you plan to pair with them most often. The heel height and style of your footwear—whether it’s high heels, flats, sneakers, or boots—will significantly impact the ideal pant length. Stand up straight with a relaxed posture, ensuring your weight is evenly distributed on both feet. For the most accurate measurement, it is highly recommended to have a friend or family member assist you with this part, as bending over to measure yourself can distort the fabric and lead to an uneven or incorrect length.
Instruct your helper to carefully fold the pant cuff inwards to your desired length. For a classic, polished look, the hem should just “kiss” the top of your shoe at the front, gracefully covering about half to two-thirds of the shoe’s upper, and fall to about 1/4 to 1/2 inch from the floor at the back, just above the heel. Ensure the fabric hangs smoothly without any bunching, sagging, or dragging on the ground. Once you’ve collaboratively found that sweet spot, your helper should carefully place several fabric pins horizontally around the folded cuff to securely hold the new hemline in place. Use a generous number of pins for each leg, spacing them every few inches, to maintain an even, consistent fold around the entire circumference of the pant leg.
Step 2: Set the Crease and Prepare for Taping
With the pins firmly holding your desired hemline, carefully remove the pants without disturbing the folds. Move over to your ironing board, ensuring it’s ready for use. To make the next step easier and to guarantee a crisp, straight hem, you’ll want to iron a strong, sharp crease. Insert your hand or arm into the pant leg. Starting from the bottom, carefully remove the external pins one by one. As you remove each pin, immediately re-pin it *inside* the newly formed fold, securing the two fabric layers together along the crease. This clever technique helps to smooth out any wrinkles or unevenness in the fabric and creates a clean, defined edge while keeping the fold stable and ready for pressing. Once all the pins are moved to the inside of the fold, place the pant leg flat on the ironing board, ensuring the folded hem is neatly aligned. Using your iron on the appropriate heat setting for your specific fabric (usually medium to high heat with a bit of steam for most cottons, denim, and synthetics), press firmly and slowly along the entire length of the folded hem. This step is absolutely vital as it sets a sharp, permanent crease, which will serve as a precise guide for where your fusible hem tape will be applied, ultimately ensuring an even and professional-looking finish.
Step 3: Secure the Hem with Fusible Tape
Now, for the main event – securing your perfect hem! Carefully turn the pants completely inside out. This allows you to work on the raw edge of the fabric discreetly, ensuring the finished hem looks clean from the outside. Remove all the internal pins that were holding the fold. Next, take your pinking shears and carefully trim any excess fabric, leaving approximately 1 to 1.5 inches of fabric above your freshly ironed crease. The pinking shears are an excellent tool here because their unique serrated edges help significantly prevent the raw fabric edge from fraying over time, which adds considerable durability and a cleaner internal finish to your no-sew hem.
Unroll your fusible hem tape and cut a length that matches the circumference of your hem, adding an extra half-inch or so for a slight overlap. Carefully place the hem tape *underneath* the folded hem, aligning one edge of the tape with the raw, pinked edge of the fabric you just cut. Ensure the tape is fully tucked inside the fold and is not peeking out from the bottom edge. Starting at one point, press down firmly with your hot iron for a full 60 seconds (or as directed by your specific hem tape’s instructions, as timing can vary) on each section of the hem. Apply steady, even pressure and slightly overlap your iron placements to ensure the entire tape area is thoroughly activated and bonded. For wider hems or for extra security and longevity, you can add a second strip of hem tape just above the first, ensuring a strong, lasting bond across the entire hem. Repeat this entire process meticulously for the other pant leg, taking great care to match the length and finish precisely. Once both legs are completely finished, allow the pants to cool completely on a flat surface for at least 30 minutes before handling them or trying them on. This crucial cooling period is essential for the adhesive to fully set and create a strong, durable bond. Finally, turn your pants right side out, and admire your perfectly tailored, no-sew hem!
Pro Tips for a Flawless No-Sew Hem
While the basic steps for a no-sew hem are straightforward, incorporating a few expert tips can significantly enhance your results, elevating your hemming game and ensuring the best possible outcome:
- Always Pre-Wash Your Pants: Before you even think about hemming, always wash and dry your pants according to their care instructions. This step is absolutely crucial because most fabrics can shrink, sometimes unpredictably. Hemming after washing ensures that your altered length will remain accurate and consistent after future washes, preventing any unwanted shortening down the line.
- Test on Scrap Fabric or Inconspicuous Area: If you’re new to using fusible hem tape or working with a new, unfamiliar fabric, it’s an excellent idea to test a small piece of tape on an inconspicuous area of the garment (like an inside seam) or, even better, on a scrap piece of similar fabric. This allows you to safely check the ideal iron temperature, evaluate the bond strength, and observe how the tape interacts with the fabric without risking your actual pants.
- Utilize a Damp Press Cloth for Protection: For delicate fabrics, those prone to scorching, or if you’re simply worried about direct heat, place a thin, damp press cloth between the iron and your fabric. This protective layer shields the material from direct heat while still allowing enough warmth to penetrate and effectively activate the adhesive, preventing shine marks or damage.
- Mind the Fabric Type for Best Results: Fusible hem tape works exceptionally well on a wide range of common fabrics, including most cottons, denim, linen, and many synthetic blends. However, exercise caution with very thick fabrics (like heavy canvas or upholstery fabrics), as the tape might struggle to create a strong, lasting bond through multiple layers. Similarly, be careful with extremely delicate or textured fabrics (like silk, chiffon, velvet, or heavily embroidered materials), as the heat or adhesive might cause damage or alter the fabric’s drape. Always test first!
- Ensure Tape Overlap for Continuous Bond: When applying the hem tape, especially on circular hems like pant cuffs, make sure to slightly overlap the ends of the tape by about half an inch. This small detail ensures a continuous, strong bond around the entire circumference of the hem and prevents any weak spots where the hem might otherwise start to come undone.
- Allow for Complete Cooling – Patience is Key!: After ironing the hem tape, resist the urge to immediately handle, move, or wear your pants. The adhesive needs sufficient time to cool down and fully cure to achieve maximum strength and durability. Let them lie completely flat and undisturbed for at least 30 minutes, or even a few hours, for the strongest and most lasting bond.
- Follow Gentle Care Instructions for Longevity: Most garments with a no-sew hem can withstand regular washing and drying. However, to prolong the life of the adhesive, it’s often recommended to wash these garments inside out on a gentle cycle. Additionally, avoid harsh scrubbing directly on the hem and try to use a lower heat setting in the dryer or air dry, as excessive high heat can sometimes weaken the adhesive bond over time.
Troubleshooting Common No-Sew Hem Issues
Even with the best intentions and careful execution, you might occasionally encounter a minor hiccup with your no-sew hem. Here’s how to address common problems effectively:
- The Tape Isn’t Sticking Properly: This is one of the most frequent issues and is usually due to insufficient heat, inadequate pressure, or a fabric that isn’t entirely clean. Your solution: Re-iron the hem, applying more consistent, firm heat and pressure for the recommended duration. Double-check that the fabric is free of any fabric softener residue, lint, or dirt, which can interfere with the adhesive.
- The Hem Appears Uneven: An uneven hem typically stems from inconsistent measuring in Step 1 or uneven pressing when setting the crease in Step 2. If the unevenness is minor, you might be able to carefully re-press the affected section to adjust it. For more significant issues, you might need to carefully remove the tape (which is sometimes possible by applying heat and gently peeling) and restart the process, paying extra attention to precision.
- The Hem Starts Coming Undone: If your hem begins to detach, it could be an indication that the tape wasn’t fully activated during ironing, you used the wrong type of tape for the fabric, or the garment has been subjected to excessive washing or drying on high heat. The fix: Re-apply new tape, ensuring proper heat and pressure application, and be sure to follow the recommended care instructions going forward.
- The Fabric Is Bunching or Puckering: This can occur if the original fold wasn’t perfectly smooth, if the tape was applied unevenly, or if the fabric wasn’t lying perfectly flat during the ironing process. To avoid this, ensure the fabric lies perfectly flat and smooth, with no excess material or wrinkles, before you begin ironing the tape.
The Lasting Impact of a Perfectly Hemmed Pant
Beyond the practical and immediate benefits of a quick fix, achieving a perfectly hemmed pant can significantly impact your overall appearance, comfort, and confidence. Pants that are too long can make you look shorter and less put-together, create a sloppy impression, and even pose a tripping hazard. A well-fitting hem, on the other hand, creates a clean, streamlined silhouette, visually elongates your legs, and conveys a sense of polish, professionalism, and meticulous attention to detail. This incredibly simple yet effective no-sew technique empowers you to take control of your wardrobe, ensuring that every pair of pants you own fits you just right, regardless of your prior sewing experience.
Embrace the ease, the speed, and the consistently professional results of the no-sew hem, and step out with confidence every single day, knowing your attire is perfectly tailored to you.
Ready to give it a try and see this magic in action? Watch the full video tutorial from HGTV Handmade for a clear visual guide and even more helpful tips to master your no-sew hemming skills!
*All image credit belongs to HGTV Handmade via YouTube. Be sure to follow and subscribe to their channel for more inspiring DIY projects, creative crafts, and helpful home improvement ideas!
RELATED: Always looking for clever clothing hacks and DIY solutions? Don’t stop here! Check out our detailed guide on How to Lengthen Jeans That Are Too Short for even more ingenious wardrobe solutions and textile tricks.