
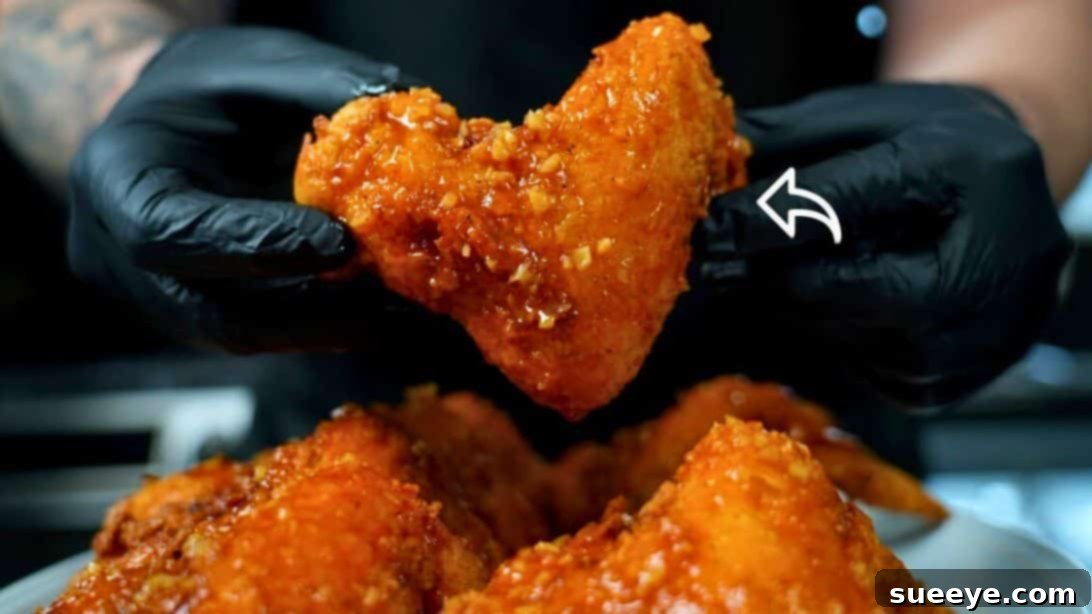
Achieve Unbelievably Crispy Fried Chicken Wings: The Ultimate Buttermilk Brine Recipe
Have you ever painstakingly prepared fried chicken, only to find it turns out soggy, lacking that desired crunch? The quest for perfectly crispy, juicy fried chicken wings often feels like an elusive culinary challenge. Many home cooks struggle to replicate the magic of their favorite restaurant-style wings. But what if we told you there’s a secret, surprisingly easy method to achieve those super crispy, incredibly flavorful chicken wings you’ve been craving? We’re about to unveil the expert technique, inspired by the renowned Mr. Make It Happen, that will revolutionize your homemade fried chicken experience.
This isn’t just another recipe; it’s a game-changer. The foundation of its success lies in a powerful, tangy buttermilk brine that not only tenderizes the chicken but also infuses it with deep, complex flavors. This critical first step sets the stage for a truly superior fried chicken. Coupled with an ingeniously seasoned breading and the precise frying method, you’ll unlock an unparalleled crispness that audibly shatters with every bite. The results are so exceptional, you might find yourself declaring it the best fried chicken you’ve ever tasted at home – even surpassing those from your favorite fast-food establishments. Prepare to impress everyone with these unbelievably delicious wings, especially when served with the optional, yet highly recommended, hot honey garlic sauce!
RELATED: Enhance Your Meal with Our Easy Loaded Smashed Mashed Potatoes Recipe
Why This Buttermilk Brined Fried Chicken Wing Recipe is a Must-Try
So, what exactly elevates this specific fried chicken wing recipe above the rest? It’s a masterful blend of technique and thoughtful ingredient selection. The core of its brilliance is the buttermilk brine. Beyond just adding a creamy tang, buttermilk contains lactic acid, a natural tenderizer that breaks down the chicken’s muscle fibers without making it tough, resulting in incredibly juicy and succulent meat. This tenderizing process, combined with a carefully curated blend of seasonings, creates a flavor profile that permeates the chicken from the inside out, ensuring every morsel is packed with taste.
Furthermore, the breading mixture is engineered for maximum crispness. By incorporating cornstarch alongside all-purpose flour, we achieve a lighter, airier coating that fries up with an extraordinary crunch. This isn’t just a textural bonus; it’s a testament to the recipe’s dedication to perfection. And for those who love an extra kick, the homemade hot honey garlic sauce adds another layer of sweet, spicy, and savory complexity, making these wings utterly irresistible. This comprehensive approach guarantees a restaurant-quality fried chicken experience right in your kitchen, making it a recipe you’ll return to again and again.
Essential Ingredients for Your Crispy Chicken Wings Masterpiece
Crafting these perfectly crispy fried chicken wings begins with assembling the right ingredients. Each component plays a vital role in achieving the desired texture and flavor. Pay close attention to the details of each section, from the foundational brine to the magical breading, to ensure a truly outstanding result.
For the Flavor-Infusing Buttermilk Brine & Chicken Preparation:
This brine is the secret weapon, ensuring your chicken is tender, moist, and flavorful before it even hits the oil. High-quality ingredients here make a noticeable difference.
- Chicken Wings: Approximately 3-4 pounds (about 12-16 whole wings), separated into flats and drumettes for even cooking and easier handling.
- 1 Quart Buttermilk: The cornerstone for tenderization and rich, tangy flavor.
- 1/4 Cup Hot Sauce: (e.g., Frank’s RedHot) Provides a subtle background heat and an acidic boost to the brine.
- 1 Tablespoon Lemon Juice or Pickle Juice: Further enhances acidity, contributing to tenderness and brightening the overall flavor.
- 1 Packet Sazón (with annatto): Adds a vibrant color and a savory, earthy, and umami-rich depth.
- 1 Teaspoon Chicken Bouillon Powder: Intensifies the chicken’s natural savory flavors, giving it a more profound taste.
- Original All-Purpose Seasoning: Your preferred blend of all-purpose spices for a foundational layer of flavor.
- Hot All-Purpose Seasoning: An optional addition for those who desire an extra layer of heat directly in the chicken itself.
- 1 Large Egg: Acts as a binder, helping the brine mixture adhere better to the chicken, which in turn helps the breading stick later.
For the Irresistible Hot Honey Garlic Sauce (Highly Recommended):
This sauce takes these crispy wings to an elevated level, balancing sweet, spicy, and savory notes perfectly. It’s simple to prepare and incredibly addictive.
- 3 to 4 Tablespoons Unsalted Butter: Melted, forms a rich, smooth base for the sauce.
- 1/4 Cup Honey: Provides natural sweetness and creates a desirable glaze texture.
- 1 1/2 Cups Hot Sauce: (e.g., Frank’s RedHot, Crystal) The main source of heat and tangy flavor. Adjust amount to your spice preference.
- 3 to 4 Cloves Fresh Garlic: Minced, for a pungent, aromatic kick that complements the other flavors beautifully.
For the Perfectly Crispy Breading Mixture:
The secret to that audibly crisp crust lies in this specially formulated breading. Each ingredient plays a crucial role in achieving the ultimate crunch and flavor.
- 3 Cups All-Purpose Flour: The primary structural component of the coating.
- 1/2 Cup Corn Starch: (Optional, but highly recommended) This is the key ingredient for achieving that extra, shatteringly crisp texture.
- All-Purpose Seasoning: To ensure the breading itself is flavorful and complements the brined chicken.
- Old Bay Seasoning: Adds a unique, savory, and slightly spicy blend of herbs and spices that elevates the taste.
- Sazón: Reinforces the savory and earthy notes introduced in the brine, contributing to a cohesive flavor profile.
- Chicken Bouillon Powder: Boosts the umami flavor in the breading, creating a more intensely savory crust.
- Freshly Ground Black Pepper: To taste, for a sharp, aromatic finish.
- Salt: To taste. Remember to consider the sodium content of your other seasonings.
How to Make Perfectly Crispy Fried Chicken Wings: A Detailed Step-by-Step Guide
Follow these meticulously detailed steps to ensure every batch of your homemade fried chicken wings is an undeniable success. Precision and patience are your best allies in achieving culinary perfection.
Step 1: The Buttermilk Brine – Infusing Flavor and Tenderness
Begin by thoroughly cleaning your chicken wings and patting them completely dry with paper towels. Place the prepared chicken into a large, non-reactive mixing bowl. Now, add all the brine ingredients: the full quart of buttermilk, 1/4 cup hot sauce, 1 tablespoon of lemon juice or pickle juice, 1 packet of sazon, 1 teaspoon of chicken bouillon powder, your original all-purpose seasoning, and a dash of hot all-purpose seasoning for an extra kick (adjust to your heat preference). Finally, crack in the large egg. Using your hands or a large spoon, mix all these ingredients exceptionally well, ensuring every single piece of chicken is fully submerged and coated. This thorough coating is vital for maximum flavor penetration and tenderization. Once mixed, cover the bowl tightly with plastic wrap and place it in the refrigerator. Allow the chicken to brine for a minimum of 2 hours, but for the most profound flavor development and unparalleled tenderness, aim for 12 to 24 hours. This extended brining period is a cornerstone for superior results and is highly recommended.
Step 2: Crafting the Irresistible Hot Honey Garlic Sauce
While your chicken is brining, or as you approach frying time, prepare your sensational hot honey garlic sauce. In a small skillet or saucepan, melt 3 to 4 tablespoons of unsalted butter over medium-low heat. Once the butter is fully melted and shimmering, add your finely minced garlic. Sauté the garlic for approximately 1 minute, stirring constantly, until it becomes wonderfully fragrant but without allowing it to brown, which can lead to a bitter taste. Immediately stir in the 1/4 cup of honey and 1 1/2 cups of hot sauce. Mix all ingredients continuously until they are thoroughly combined and the sauce is gently warmed through. Remove the saucepan from the heat and set the sauce aside. This versatile sauce can be made ahead of time and gently reheated when you’re ready to toss your freshly fried wings.
Step 3: Preparing the Ultimate Crispy Breading Mixture
In a separate large, shallow bowl or a wide, deep pan (ideal for dredging), combine all your breading ingredients: 3 cups of all-purpose flour, the crucial 1/2 cup of cornstarch (for that ultimate shatteringly crisp texture), all-purpose seasoning, Old Bay seasoning, sazon, and chicken bouillon powder. Add a generous amount of salt and freshly ground black pepper to taste. Using a whisk or a fork, thoroughly mix these dry ingredients together, ensuring an even distribution of all the spices. This seasoned flour mixture is what will create that incredibly flavorful and irresistibly crispy crust on your chicken wings.
Step 4: Breading the Chicken – The Foundation of a Flawless Crust
After the designated brining period, remove the chicken from the refrigerator. Working in small batches to avoid clumping, take each chicken wing piece from the buttermilk brine, allowing any significant excess liquid to drip off naturally. You want the chicken to be well-coated with brine, but not overly wet. Immediately transfer the brined chicken piece into the prepared breading mixture. Generously coat the chicken on all sides, gently pressing the flour mixture onto the surface to ensure it adheres firmly. Shake off any substantial excess flour; a light, even coating is what you’re aiming for. Place the breaded chicken on a clean baking sheet lined with foil or parchment paper. Repeat this precise process with all remaining chicken pieces. Once all wings are breaded, allow them to rest on the baking sheet for at least 10 minutes, and ideally up to 30 minutes, at room temperature. This crucial resting period allows the moisture from the chicken to hydrate the breading, helping it adhere firmly to the chicken and significantly preventing it from falling off during frying, which is key to achieving a consistently superior, crispy crust.
Step 5: Frying to Golden, Crispy Perfection
This is the moment your crispy chicken dreams come to life! In a large, heavy-bottomed pot, Dutch oven, or a dedicated deep fryer, add a generous amount of high-smoke point oil (such as vegetable, canola, or peanut oil) to fill it about 2-3 inches deep. Attach a reliable deep-fry thermometer to the side of the pot and heat the oil over medium-high heat until it reaches a stable temperature of 350°F (175°C). Maintaining this exact temperature is paramount for even cooking, preventing sogginess, and ensuring optimal crispness. Carefully lower a few pieces of breaded chicken into the hot oil, ensuring not to overcrowd the pot. Overcrowding will drastically lower the oil temperature, leading to greasy, undercooked, and ultimately soggy chicken. Fry the chicken for approximately 6-8 minutes per batch, or until it’s a beautiful deep golden brown and wonderfully crispy. Make sure to flip the chicken periodically to ensure even cooking and browning on all sides. For food safety and optimal tenderness, the internal temperature of the chicken should reach between 165°F (74°C) and 175°F (79°C). Once cooked to perfection, use tongs to carefully remove the chicken from the hot oil and immediately place it on a wire rack set over a baking sheet. This essential step allows excess oil to drain away and, crucially, prevents the bottom of the chicken from becoming soggy, preserving its exquisite crispness. Repeat with the remaining chicken, allowing the oil to return to 350°F between each batch.
Step 6: Sauce, Serve, and Savor Every Crispy Bite!
Once all your perfectly crispy fried chicken wings are cooked and draining on the wire rack, it’s time for the delicious final touch. You have two mouth-watering options: serve them as they are, allowing the pure, seasoned crispness of the crust to shine through, or toss them generously in the warm hot honey garlic sauce. For the sauced version, place the cooked wings into a large mixing bowl, pour the prepared sauce over them, and gently toss until each wing is beautifully and evenly coated. Serve immediately to ensure optimal crispness and warmth. These wings are best enjoyed fresh, hot, and with plenty of napkins on hand. Get ready for an explosion of flavor and texture that will make this recipe an instant favorite!
Expert Tips for Unbeatable Crispy Fried Chicken Every Time
While the step-by-step guide is comprehensive, understanding the nuances of frying can elevate your chicken from good to absolutely legendary. Here are some expert tips to guarantee consistently perfect, crispy fried chicken:
- Don’t Rush the Brine: The buttermilk brine is foundational. For truly tender and flavorful chicken, commit to the 12-24 hour brining period. It’s where the magic starts.
- Maintain Oil Temperature: This is arguably the most critical factor. Invest in a reliable deep-fry thermometer and keep the oil at a steady 350°F (175°C). Too low, and your chicken will be greasy and soggy; too high, and it will burn before cooking through.
- Never Overcrowd the Pot: Frying in small batches is essential. Overcrowding drastically drops the oil temperature, leading to inferior, soggy results. Give your chicken room to fry properly.
- The Power of Resting (After Breading): The 10-30 minute rest after breading is not optional. It allows the breading to hydrate and adhere firmly to the chicken, preventing it from flaking off during frying and ensuring a uniform, extra-crispy crust.
- Drain on a Wire Rack, Not Paper Towels: Always place freshly fried chicken on a wire rack set over a baking sheet. This allows air to circulate around the chicken, preventing steam from building up and making the bottom soggy.
- Season Liberally and in Layers: Don’t be shy with seasonings! Layering flavors in both the brine and the breading ensures a profound and satisfying taste in every bite.
- Choose the Right Oil: Use oils with a high smoke point like vegetable, canola, peanut, or grapeseed oil. These oils can withstand the high temperatures required for frying without breaking down or imparting off-flavors.
- Pat Chicken Dry Before Brining: Even though it’s going into liquid, patting raw chicken wings dry initially helps the brine adhere more effectively to the surface, setting the stage for better flavor infusion and breading adhesion.
- Internal Temperature is Key: Always use a meat thermometer to ensure the chicken reaches a safe internal temperature of 165°F (74°C) while maintaining its juiciness.
Serving Suggestions and Perfect Pairings for Your Crispy Wings
These crispy fried chicken wings are undoubtedly a star on their own, but they truly shine when accompanied by thoughtfully chosen side dishes. Whether you lean towards classic comfort food or crave something fresh and tangy, there’s a perfect pairing for these flavorful wings.
- Classic Southern Comfort: For an ultimate feast, pair your wings with creamy potato salad, rich and cheesy oven-baked mac and cheese, and fluffy, slightly sweet cornbread. These sides offer a wonderful textural and flavor contrast.
- Crispy Companions: Complement the crunch with a side of golden French fries (homemade or frozen), crispy onion rings, or even seasoned sweet potato fries for a different twist.
- Fresh & Light Balance: To cut through the richness of the fried chicken, offer a vibrant coleslaw with a creamy or vinaigrette dressing, or a simple green salad tossed in a tangy lemon vinaigrette.
- Hearty Additions: Consider serving with a hearty macaroni salad, or for an unexpected yet delicious pairing, a flavorful fried rice.
- Beverage Pairings: Quench your thirst with a frosty cold beer (lager or pale ale), sweet iced tea, or refreshing homemade lemonade. These beverages provide a pleasant counterpoint to the rich, savory flavors.
Variations and Customizations: Explore New Flavors
While the hot honey garlic sauce is a phenomenal choice, these versatile crispy wings are an excellent canvas for other flavor explorations. Don’t hesitate to experiment with different glazes and seasonings to suit your palate:
- Classic Buffalo Wings: After frying, simply toss the hot wings in a mixture of melted butter and your favorite classic buffalo hot sauce for a timeless, tangy, and spicy treat.
- Sweet & Smoky BBQ: Glaze your freshly fried wings with a high-quality barbecue sauce. For an extra layer of depth, add a tiny dash of liquid smoke to the sauce before tossing.
- Asian-Inspired Glaze: Create a sticky, umami-rich glaze using soy sauce, ginger, garlic, sesame oil, and a touch of honey or brown sugar. For a spicy version, incorporate gochujang or sriracha.
- Lemon Pepper Perfection: For a non-sauced alternative, immediately after frying, toss the hot wings with a generous amount of good quality lemon pepper seasoning.
- Herb & Parmesan: For a sophisticated twist, sprinkle with finely chopped fresh parsley, chives, and grated Parmesan cheese right after frying.
Storage and Reheating Tips for Crispy Leftovers
Should you be fortunate enough to have any leftovers of these incredible wings, store them in an airtight container in the refrigerator for up to 3-4 days. To best preserve their exquisite crispness when reheating, avoid the microwave at all costs, as it will inevitably make them soggy. Instead, preheat your conventional oven to 375°F (190°C) or an air fryer to 350°F (175°C). Spread the wings in a single layer on a baking sheet or in the air fryer basket and reheat for 10-15 minutes, or until they are thoroughly heated through and have regained much of their original crisp texture. This method ensures a delightful, crispy experience even the next day.
The Secret Unlocked: Your Journey to Crispy Fried Chicken Perfection
The quest for perfectly crispy, incredibly flavorful fried chicken wings ends here. With Mr. Make It Happen’s expert techniques and the detailed, comprehensive guide outlined above, you now possess all the knowledge and confidence required to create a culinary masterpiece in your own kitchen. Say goodbye to soggy regrets and bland bites; say hello to pure, unadulterated fried chicken bliss. The extended buttermilk brine is your foundational secret, the perfectly seasoned breading your armor against oil, and the precisely heated oil your magic cauldron. Embrace the process, savor the tantalizing aroma filling your kitchen, and delight in the unparalleled taste and texture of truly exceptional homemade fried chicken wings. Get ready to impress your taste buds, earn rave reviews from everyone who tries this incredible recipe, and solidify your reputation as a master of crispy fried chicken!
So, what are you waiting for? Grab your apron, gather your ingredients, and head to the kitchen. Your ultimate crispy fried chicken experience awaits!