
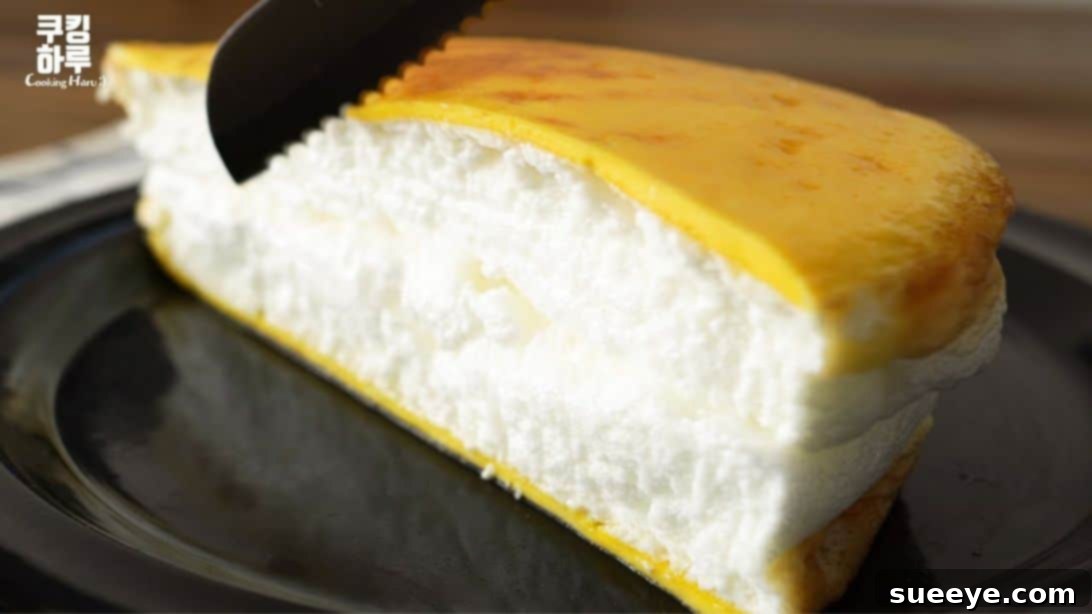
Easy & Fluffy Egg Cloud Cake Recipe: Your Next Favorite Snack!
Prepare to be amazed by this incredible Easy Egg Cloud Cake recipe! This delightful culinary discovery, inspired by the talented 쿠킹하루 Cooking Haru 🙂, is taking the internet by storm for its sheer simplicity and unbelievably fluffy texture. Forget complicated baking projects; this recipe proves that extraordinary taste can come from minimal effort and humble ingredients. When I first tried it, I was genuinely surprised at how light, airy, and utterly delicious it turned out to be – a true cloud of eggy perfection!
What makes this Egg Cloud Cake truly remarkable is its accessibility. You only need five basic ingredients, most of which you likely already have stocked in your pantry: eggs, salt, sugar, butter, and vegetable oil. That’s right, just eggs and butter are the only two items you might need to pick up from the store! This makes it an ideal choice for a spontaneous treat, a quick breakfast, a unique brunch item, or even a light dessert. Its versatility is another major highlight; enjoy it simply, or elevate it with your favorite sweet or savory toppings. Imagine drizzling it with honey or maple syrup for a delightful dessert, or pairing it with a savory sauce for a satisfying meal. Get ready to add this to your collection of go-to recipes!
Essential Ingredients for Your Fluffy Cloud Cake
Gathering your ingredients is the first step towards creating this magical egg cloud cake. While the list is short, each component plays a crucial role in achieving that signature light and airy texture.
- 5 Large Eggs: The star of our show! Eggs provide the structure and the incredible fluffiness. Ensure they are fresh for the best results, and ideally, use them at room temperature for easier separation and meringue whipping.
- Salt: A pinch of salt enhances the flavor of both the yolks and helps stabilize the egg white meringue, allowing it to reach its full, lofty potential.
- Granulated Sugar: Essential for both flavor and structure. A small amount goes into the egg yolks to balance their richness, while a larger portion is key to creating a stable, glossy meringue.
- Unsalted Butter: Adds a rich, delectable flavor to the cooked egg yolk base and helps create a beautiful golden crust. It also assists in preventing sticking.
- Vegetable Oil: Used to lightly grease the pan, ensuring your egg cloud cake slides out effortlessly once cooked. Any neutral-flavored oil will work.
That’s all you need! With these simple items, you’re just a few steps away from a culinary experience that tastes far more complex than it actually is.
Recommended Kitchen Equipment
Having the right tools can make all the difference in ensuring a smooth and successful cooking process. For this egg cloud cake, you’ll need a few common kitchen items:
- Two Medium Mixing Bowls: One for the egg yolks and one for the egg whites. It’s crucial that the bowl for the egg whites is perfectly clean and grease-free.
- Hand Mixer or Stand Mixer with Whisk Attachment: Absolutely essential for whisking the egg whites into a stiff, stable meringue. While possible by hand, a mixer makes this step much easier and ensures consistent results.
- Non-Stick Frying Pan with a Lid: A good quality non-stick pan (around 8-10 inches in diameter) is vital to prevent sticking. The lid is necessary to create steam, which helps the meringue cook through and puff up evenly.
- Rubber Spatula: For gently folding and spreading the meringue without deflating it.
- Two Thin Spatulas or Flat Servers: Useful for carefully transferring the delicate cooked cake from the pan to a plate.
- Whisk or Fork: For beating the egg yolks.
Step-by-Step Guide to Your Fluffy Cloud Cake
Follow these detailed steps closely, and you’ll be enjoying your homemade egg cloud cake in no time!
Step 1: Preparing the Egg Yolks and Whites
The foundation of this cake lies in the careful separation of your eggs. Gently crack each of the five eggs and separate the yolks from the whites. It is paramount that no trace of egg yolk mixes with the whites, as even a tiny amount of fat can prevent the whites from whipping up properly. Place the yolks into one clean mixing bowl and the whites into another, impeccably clean and grease-free bowl.
To the bowl containing the egg yolks, add a small pinch of salt and 1 teaspoon of granulated sugar. Using a whisk or fork, beat the yolk mixture thoroughly until it is well combined and slightly lighter in color. The consistency should be smooth and uniform. Set this aside.
Step 2: Crafting the Perfect Meringue
This is where the magic happens! To the bowl of egg whites, add a small pinch of salt. Now, let’s prepare the sugar: you’ll need approximately 2.5 tablespoons of granulated sugar for five eggs (this is based on the recommendation of 1/2 tablespoon of sugar per egg). Begin whisking the egg whites with your hand mixer on medium-low speed. As they start to become frothy, gradually increase the speed to medium-high. Slowly, in several small additions, start incorporating the granulated sugar into the whisking egg whites.
Continue whisking until the egg whites form stiff, glossy peaks. This means when you lift the whisk, the peaks should stand upright firmly without drooping. The meringue should be smooth, shiny, and look like a fluffy white cloud. This process might take 5-7 minutes, depending on your mixer and egg freshness. Achieving a stable meringue is crucial for the cake’s height and airy texture.
**Pro Tip:** Ensure your mixing bowl and whisk attachment are completely clean and free of any grease. Any fat residue can prevent the egg whites from whipping up properly. Using room temperature eggs can also help achieve a better meringue.
Step 3: Gently Cooking the Yolk Base
Place a non-stick frying pan over low heat. Add about 1-2 teaspoons of vegetable oil to the pan and spread it evenly to coat the entire surface. Once the pan is lightly warmed, carefully pour the beaten egg yolk mixture into the center of the pan. Allow the yolk to cook gently. You’ll notice the edges starting to set and the color becoming opaque. When it’s lightly cooked – meaning the bottom is set but the top is still slightly moist – gently lift one edge of the yolk base with a spatula.
Carefully slide 1-2 tablespoons of unsalted butter underneath the partially cooked yolk. The butter will melt and infuse the egg base with rich flavor while also preventing it from sticking. Continue to cook over low heat until the yolk base is fully set but still tender, with a beautiful golden-brown underside. Be mindful not to overcook, as this can make it tough.
Step 4: The Meringue Transformation – Puffing to Perfection
Once your egg yolk base is set, it’s time to add the star attraction: the whipped egg whites. Gently spoon and spread the stiff meringue evenly over the entire surface of the cooked egg yolks in the pan. Use a rubber spatula to carefully flatten the meringue into a smooth, even layer, being careful not to deflate the air you’ve worked so hard to incorporate. The meringue should form a thick, cloud-like layer on top.
Immediately cover the pan with its lid and continue to cook over very low heat for approximately 5 minutes. The lid traps steam, which helps the meringue to cook through gently and expand beautifully, creating that signature “cloud” effect. Keep an eye on it; you’ll observe the meringue puffing up and the edges becoming lightly browned and golden. The top should be set and springy to the touch. The cooking time might vary slightly depending on your stove and pan, so adjust as needed.
**Visual Cue:** The meringue should appear cooked through, slightly jiggly in the center but firm to the touch, with beautifully browned sides. If it looks too pale, you can cook it for another minute or two, ensuring the heat remains low.
Step 5: Plating Your Beautiful Cloud Cake
Once the egg cloud cake is perfectly cooked, it’s time for the delicate transfer. Carefully remove the lid from the pan. Using two wide, thin spatulas or flat servers, gently lift the entire egg cloud cake from the pan and transfer it onto a serving plate. Its light and airy structure can be quite fragile, so handle it with care to maintain its impressive volume.
For serving, slice the large cloud cake in half across the middle. Then, carefully place one half directly on top of the other, creating a stacked, impressive presentation that truly showcases its height and fluffiness. This also makes it easier to cut into individual portions.
Step 6: Creative Serving Suggestions & Flavor Pairings
The beauty of this Easy Egg Cloud Cake lies in its incredible versatility. It serves as a fantastic blank canvas for both sweet and savory flavors, making it suitable for any meal or craving.
Savory Options:
- Classic Omelet Style: Top with a sprinkle of freshly chopped chives, parsley, or green onions.
- Hearty Breakfast: Serve alongside crispy bacon, sausages, or sautéed mushrooms.
- Sauce Pairings: Drizzle with a light soy sauce, a dash of sriracha for a kick, a savory mushroom sauce, or even a classic Hollandaise sauce for a luxurious touch. You could also try a simple black pepper gravy or a light cheese sauce.
- Korean Inspired: For a twist, try it with a drizzle of gochujang sauce (diluted slightly) or a sprinkle of toasted sesame seeds.
Sweet Options:
- Simple Sweetness: The most popular choice is a generous drizzle of honey or maple syrup. These golden liquids perfectly complement the light egg flavor.
- Fruity Delight: Top with fresh berries (strawberries, blueberries, raspberries), sliced bananas, or a compote made from your favorite fruits.
- Creamy Indulgence: A dollop of whipped cream, a scoop of vanilla ice cream, or a dusting of powdered sugar can transform it into an elegant dessert.
- Chocolate Lover’s Dream: A light chocolate sauce or a sprinkle of chocolate shavings makes for an irresistible treat.
- Cinnamon Sugar: A simple sprinkle of cinnamon sugar mixture before serving adds warmth and spice.
Once you’ve chosen your desired toppings, slice the stacked cloud cake into smaller, individual pieces. Serve immediately and enjoy the incredible fluffy texture and delightful flavors! Whether you prefer it sweet or savory, this easy egg cloud cake is sure to become a beloved addition to your recipe repertoire.
Why You’ll Love This Easy Egg Cloud Cake
This recipe isn’t just about making a delicious dish; it’s about experiencing a simple joy in cooking. Its minimal ingredient list, straightforward steps, and surprisingly impressive outcome make it a winner for home cooks of all skill levels. It’s perfect for those mornings when you want something special without the fuss, or an afternoon pick-me-up that feels indulgent yet light. The unique texture, a cross between a fluffy omelet and a delicate soufflé, offers a delightful mouthfeel that will leave you craving more. Give it a try, experiment with your favorite toppings, and share this wonderful discovery with your friends and family!
Frequently Asked Questions (FAQs) About Egg Cloud Cake
Here are some common questions you might have when trying this viral egg cloud cake recipe:
Q: Can I make this recipe with fewer or more eggs? How do I adjust the ingredients?
A: Yes, you can absolutely scale this recipe! The general rule for sugar in the meringue is about 1/2 tablespoon per egg. So, if you use 3 eggs, you’d need 1.5 tablespoons of sugar for the whites, and 1/2-3/4 teaspoon for the yolks. Adjust salt to taste. For butter and oil, you’ll still need enough to coat the pan, so those quantities might not change drastically unless you’re using a much smaller or larger pan. Be aware that changing the egg count will affect the size and thickness of your cake, and potentially the cooking time.
Q: What if my meringue doesn’t stiffen?
A: Several factors can prevent meringue from stiffening. Ensure your mixing bowl and whisk attachment are perfectly clean and grease-free; even a tiny speck of fat can ruin the meringue. Use fresh, room-temperature eggs, as they whip up better. Make sure no egg yolk accidentally gets into the whites. Finally, ensure you are whisking for long enough at the correct speed and adding the sugar gradually. If it’s still not stiffening, sometimes adding a tiny pinch of cream of tartar or a few drops of lemon juice can help stabilize it.
Q: Can I bake this instead of pan-frying?
A: While the traditional method for this specific “cloud cake” is pan-frying with a lid to create steam, you can certainly bake egg whites and yolks separately (like cloud eggs) or attempt a soufflé-style baked version. However, the texture and cooking method would be different from this pan-fried recipe, which relies on the enclosed steam to achieve its unique fluffy rise. If you’re looking for a similar baked item, you might want to explore specific soufflé or baked cloud egg recipes.
Q: Is this similar to Japanese Souffle Pancakes?
A: They share some similarities in their incredibly fluffy, airy texture and the use of stiffly beaten egg whites (meringue). However, Japanese Souffle Pancakes typically include flour, milk, baking powder, and often cream cheese, resulting in a cake-like batter that is cooked slowly in rings. This Egg Cloud Cake is much simpler, primarily egg-based with no flour, offering a more delicate, omelet-soufflé hybrid texture that’s even lighter. Both are delightful, but they are distinct in composition and preparation.
Q: Can I prepare the egg whites ahead of time?
A: For the best results and maximum fluffiness, it’s highly recommended to whip the egg whites right before you’re ready to cook. Meringue can start to deflate over time, especially if not perfectly stable, losing its air and therefore the desired volume for your cloud cake. Freshly whipped meringue yields the best rise and texture.