
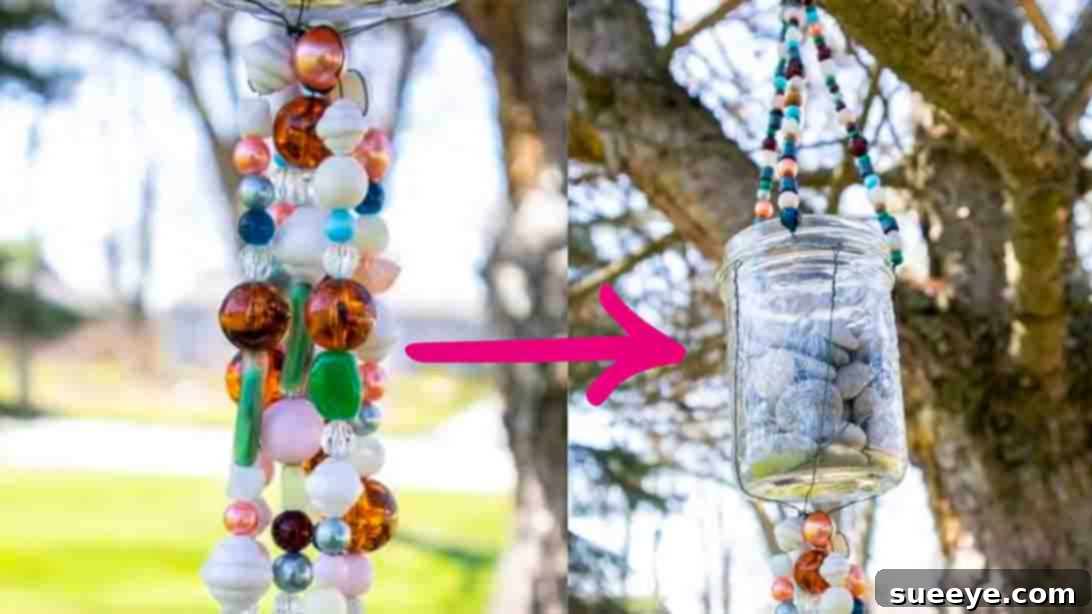
Are you searching for a delightful and rewarding weekend project that you can easily tackle with friends or family? Look no further! This enchanting DIY glass bead wind chime, inspired by Sustain My Craft Habit on YouTube, offers an accessible and incredibly satisfying crafting experience. All you need are a few inexpensive supplies, primarily a mason jar and a collection of vibrant glass beads, which can often be found at dollar stores. This project is not only surprisingly simple to assemble but also yields a finished product that is undeniably pretty and adds a touch of whimsical beauty to any space. Imagine the gentle clinking sounds and the dazzling play of light as sunlight catches the colorful beads – a truly captivating addition to your porch, patio, or garden.
I’ve personally crafted several of these mesmerizing wind chimes and hung them on our porch, and the compliments haven’t stopped! They look absolutely stunning, especially when illuminated by the sun, creating a mesmerizing sparkle that brightens any day. Beyond their aesthetic appeal, one of the greatest advantages of this project is its incredible affordability. Utilizing readily available and budget-friendly materials means you can create multiple chimes without breaking the bank. In fact, these charming creations are so appealing and cost-effective to make that they could even become a popular item to sell at local craft fairs or markets, making them a fantastic opportunity for a small side hustle. Why not give this wonderful craft a try today and experience the joy of creating something beautiful with your own hands? Follow our detailed step-by-step instructions below to bring your own glass bead wind chime to life.
Why Craft Your Own Glass Bead Wind Chime?
There’s something uniquely satisfying about a handmade item, especially one that brings both visual beauty and soothing sounds into your home environment. Wind chimes have long been cherished for their melodic qualities and their ability to add a serene atmosphere to outdoor spaces. A DIY glass bead wind chime takes this concept a step further by allowing for complete personalization and a truly unique aesthetic. Unlike mass-produced chimes, your homemade creation will reflect your personal style, color preferences, and creative flair. The vibrant glass beads catch and refract light in a way that creates a stunning visual display, transforming sunlight into a dazzling array of colors dancing on your porch or patio. Furthermore, the gentle clinking of glass beads produces a delicate, almost ethereal sound that differs from traditional metal chimes, offering a soft, tranquil backdrop to your outdoor moments. It’s a wonderful way to recycle or upcycle materials, contribute to sustainable living, and connect with your inner artist.
Essential Materials for Your DIY Glass Bead Wind Chime
Gathering your supplies is the first exciting step in any crafting adventure. For this glass bead wind chime, you’ll be pleased to find that the materials are minimal, affordable, and easy to source. Here’s a comprehensive list of what you’ll need, along with some tips for selecting the best components:
- Floral Wires: You’ll need two different gauges of floral wire. A lighter gauge (around 22-26 gauge) is perfect for stringing your beads, as it’s pliable and easy to work with. A slightly heavier gauge (18-20 gauge) will be essential for the main support structure of your wind chime, providing the necessary strength to hold the bead strands and the mason jar securely. Look for green or silver-colored wire, or even colored wires to match your beads, at craft stores or gardening centers.
- Glass Beads: This is where the fun truly begins! The beauty of your wind chime largely depends on your bead selection. Dollar stores are excellent for finding inexpensive glass beads in various colors, shapes, and sizes. However, don’t limit yourself – explore craft stores for more unique options like faceted beads, frosted beads, or even small glass pendants. Consider a mix of sizes and shapes to add visual interest and varying sounds. For instance, larger beads can anchor strands, while smaller beads create a delicate sparkle.
- Mason Jar: The centerpiece of your wind chime! A standard-sized mason jar (pint or quart) works perfectly. You can use a new one, or upcycle an old jar from your pantry. Ensure it’s clean and free of labels. The jar will act as a decorative element and can be filled with additional items to enhance the chime’s aesthetics or even add a subtle clinking sound.
- Scissors/Wire Cutters: While regular scissors might work for lighter floral wire, a dedicated pair of wire cutters will make the task much easier, especially for cutting the heavier gauge wire. These tools ensure clean cuts and prevent damage to your scissors.
- Optional Embellishments:
- Pebbles, Small Stones, or Sea Glass: For filling the mason jar, adding weight, texture, and a unique sound element.
- Small LED Fairy Lights: To illuminate your wind chime at night, creating a magical glow. Battery-operated string lights are ideal.
- Acrylic Paints: To decorate the mason jar itself, adding patterns or solid colors that complement your beads.
- Charms or Pendants: For an extra personal touch, consider incorporating small metal or glass charms onto some bead strands.
- Fishing Line or Clear Thread: If you prefer a “floating” bead look, you can use these for stringing, though floral wire offers more rigidity.
Step-by-Step Directions: Crafting Your Glass Bead Wind Chime
Step 1: Preparing the Bead Strands and Hangers
This initial step focuses on creating the beautiful beaded strands that will form the core of your wind chime. Precision here ensures a balanced and visually appealing final product.
- Cut the Long Bead Strands: Begin by cutting six pieces of your lighter floral wire, each approximately 20 inches (50 cm) long. These will be your main, longer decorative strands.
- Secure the First Bead: For each of these six wires, take one large glass bead and secure it at one end. To do this, thread the wire through the bead, then loop the wire back through itself or twist it tightly around the bead several times to create a secure knot or stopper. This prevents the subsequent beads from sliding off.
- Thread the Beads for Long Strands: Now, begin threading your chosen glass beads onto each of the six wires. Continue adding beads until each strand measures about 10 to 12 inches (25-30 cm) in length, leaving a tail of wire at the top for attachment. Once you’ve reached your desired length, secure the last bead in place by twisting the wire tightly around it, just as you did with the first bead. This prevents your carefully arranged beads from falling off.
- Tip for Visual Appeal: Don’t be afraid to experiment with your bead selection! Using a variety of colors, sizes, and even shapes within your strands can significantly enhance the wind chime’s aesthetic. Consider creating a gradient of colors, alternating large and small beads, or even following a specific color theme (e.g., ocean blues and greens, sunset reds and oranges, or a rainbow spectrum). The more diverse your beads, the more enchanting the visual effect will be when light passes through them.
- Cut and Thread the Hanger Strands: Next, cut three shorter pieces of the same lighter floral wire, each about 14 inches (35 cm) long. These will serve as the hanger strands that suspend your wind chime. Repeat the same bead-threading process for these shorter wires, but use smaller beads if you wish, or keep them simpler as they are primarily functional. Secure the beads at both ends to create three beaded hanger strands.
Step 2: Assembly and Finishing the Wind Chime
Now that your beautiful bead strands are ready, it’s time to assemble them onto the mason jar and create the hanger for your wind chime.
- Prepare the Main Support Wire: Take your heavier gauge wire and cut an 18-inch (45 cm) piece. This robust piece of wire will serve as the primary support ring from which all your bead strands will hang.
- Attach the Strands to the Support Wire:
- Start by taking one of your shorter, beaded hanger strands. Hook its top loop around the heavier wire.
- Next, evenly space two of your longer, more decorative bead strands on either side of the short hanger. Ensure that the spacing is consistent to create a balanced look.
- Continue this pattern: a short hanger strand, followed by two long decorative strands, until all your strands are attached to the heavier wire. You should have three short hanger strands and six long decorative strands, evenly distributed.
- Secure the Support Ring to the Mason Jar: Carefully gather the ends of the heavy wire together. Wrap this heavy wire twice securely around the neck of your mason jar, just under the lip. Once wrapped, twist the ends of the heavy wire tightly together to form a sturdy ring that fits snugly around the jar’s neck. This forms the foundational support for your entire wind chime.
- Evenly Space and Secure Bead Strands: Once the main support ring is secured to the jar, gently adjust the bead strands so they are evenly spaced around the mason jar. This ensures a harmonious look and prevents the strands from tangling. For extra security and to maintain this even spacing, you can use small pieces of lighter floral wire to individually secure the top of each bead strand to the heavier support wire, twisting them into place.
- Create the Main Hanging Loop: Take the top tails of your three shorter hanger strands. Gather them together above the jar. Thread these combined tails through one large, decorative bead (this can be the same type of bead you used for the strands, or something unique). After threading, wrap these tails together to form a strong loop. Twist the wire tails tightly to secure the loop. This loop will be what you use to hang your finished wind chime.
- Unify the Longer Strands (Optional but Recommended): For a more cohesive look and to encourage gentle clinking sounds, gather the longer decorative strands together at their lowest points. Use a small piece of lighter floral wire to gently wrap them together, creating a slight “bundle” effect. This helps prevent them from flying wildly in strong winds and brings them closer to the jar for potential sound interaction.
- Personalize the Mason Jar (Optional): Now for the final touch! Fill the mason jar with your chosen optional elements.
- Pebbles or Sea Glass: These add a lovely weight, create a gentle rattling sound when the wind blows, and look beautiful through the glass.
- Small Flowers or Artificial Foliage: For a decorative, natural touch that can be changed seasonally.
- Battery-Operated LED Fairy Lights: To transform your wind chime into a glowing lantern at night, casting a magical ambiance.
- Hang Your Creation: Your beautiful glass bead wind chime is now complete! Hang it on your porch, patio, garden hook, or even near a window where it can catch the light and the breeze.
Customization and Personalization Ideas
The beauty of DIY projects lies in the freedom to make them uniquely yours. Here are some ideas to customize your glass bead wind chime and truly make it shine:
- Thematic Designs: Choose beads and jar fillings that reflect a specific theme. Think “ocean breeze” with blue and green beads and sea glass, a “forest glade” with earthy tones and tiny twigs inside the jar, or a “fiesta” theme with bright, multi-colored beads.
- Painted Jars: Use glass paint or acrylic paint (sealed with a clear coat) to decorate your mason jar. You could paint abstract patterns, polka dots, stripes, or even simple silhouettes. Frosted spray paint can also give the jar a soft, ethereal glow.
- Found Objects: Incorporate small, lightweight found objects into your bead strands, such as shells, interesting pebbles, vintage buttons, or even small metal charms. Ensure they have holes for threading or can be securely attached with wire.
- Varying Strand Lengths: Instead of uniformly long strands, create strands of varying lengths to add visual dynamism and a more organic feel. This can also alter the sound profile of your chime.
- Ribbons and Tassels: Tie colorful ribbons or handmade tassels to the main hanging loop or directly to the heavy support wire for added texture and movement.
- Engraving or Decals: For a truly personalized touch, consider etching designs onto the mason jar or applying vinyl decals with quotes or monograms.
Care and Maintenance for Your DIY Wind Chime
To ensure your beautiful glass bead wind chime continues to bring joy for years to come, a little care goes a long way. Periodically check the wire connections, especially after strong winds, to make sure everything remains securely twisted and attached. If your chime is exposed to direct sunlight for extended periods, some bead colors might fade over time, particularly if they are painted or dyed rather than solid glass. You can gently wipe the beads and jar with a damp cloth to remove dust or grime, restoring their sparkle. For winter months in harsh climates, consider bringing your wind chime indoors to protect it from freezing temperatures and heavy snow, which can stress the wires and glass.
Conclusion: Enjoy Your Homemade Masterpiece!
Crafting this DIY glass bead wind chime is more than just a project; it’s an opportunity to create something truly special and infuse your living space with a touch of personal charm. From the satisfying process of stringing beads to the delight of seeing your creation sparkle in the sunlight and hear its gentle music, every step is a rewarding experience. It’s a testament to how simple materials can be transformed into a stunning piece of home decor, proving that creativity doesn’t have to be expensive. Whether you hang it on your porch to welcome guests, in your garden for a whimsical touch, or even indoors near a window to catch the light, this homemade wind chime is sure to bring a smile to your face and a sense of accomplishment. So gather your materials, follow these steps, and prepare to be enchanted by your very own handcrafted glass bead wind chime!
Don’t forget to share your creations with us, and happy crafting!