
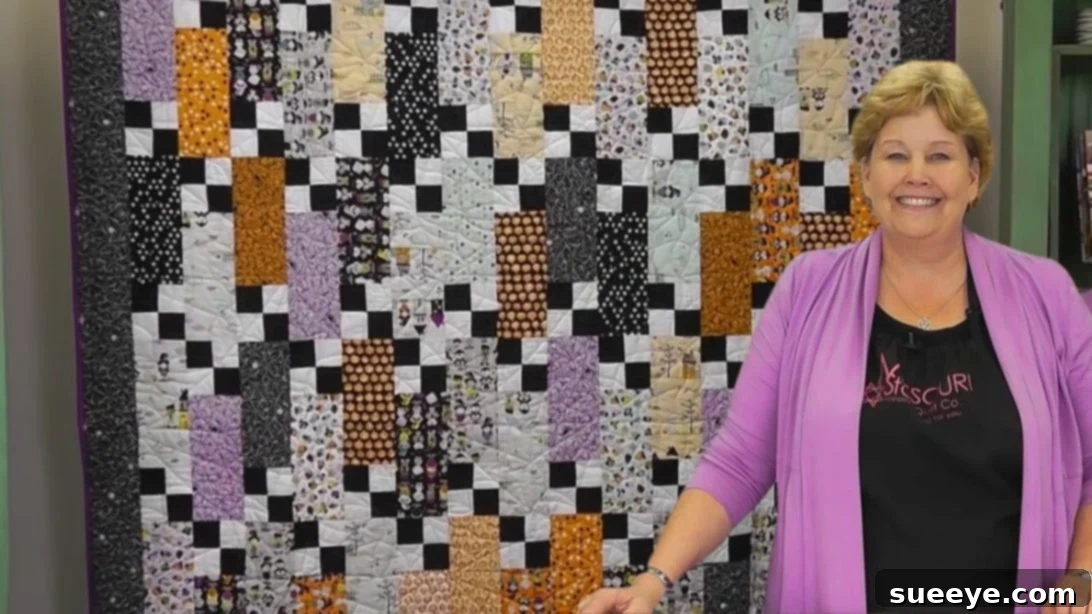
Master the Four Patch Frenzy Quilt: An Easy Weekend Project with Missouri Star’s Jenny Doan
Are you searching for a captivating quilting project that delivers stunning results without overwhelming complexity? Look no further than the Four Patch Frenzy Quilt, a delightful design brought to life by the renowned Missouri Star Quilt Company and presented by the beloved Jenny Doan. As its name beautifully suggests, this quilt centers around the dynamic combination of classic four-patch units and simple rectangles, creating a mesmerizing pattern that’s surprisingly straightforward to construct.
Perfect for quilters of all skill levels, especially those new to the craft or seeking a quick and satisfying make, the Four Patch Frenzy quilt stands out for its elegant simplicity and rapid assembly. Imagine completing a beautiful, full-sized quilt top in just one weekend! This tutorial will guide you through every step, ensuring you gain confidence and produce a professional-looking quilt that you’ll be proud to display or gift. We’ll delve into the precise techniques, useful tips, and the ‘why’ behind each action, transforming raw fabric into a cherished textile.
Materials and Essential Tools for Your Four Patch Frenzy Quilt
Gathering your materials before you begin is crucial for a smooth and enjoyable quilting experience. The Four Patch Frenzy Quilt is wonderfully adaptable, making it an excellent choice for using pre-cuts like 10-inch squares, often known as “layer cakes.” Here’s what you’ll need, along with some essential tools that will make your quilting journey much easier:
- 42 pieces of 10-inch squares: These pre-cut fabric squares are the heart of your quilt. They typically come in coordinated bundles, which takes the guesswork out of fabric selection and ensures a cohesive look. Choosing a variety of prints and colors will enhance the “frenzy” effect of the pattern.
- 3/4 yards of black fabric: This contrasting fabric is vital for creating the four-patch units. A solid black offers a bold frame and helps the colorful 10-inch squares truly pop.
- 3/4 yards of white fabric: Complementing the black, the white fabric will also be used in your four-patch units, providing another layer of contrast and visual interest.
- 1 1/2 yards of border fabric: This fabric will frame your quilt top, adding a finishing touch and increasing the overall size. Choose a fabric that harmonizes with your 10-inch squares, or opt for a contrasting solid to make a statement.
Essential Quilting Tools You’ll Need:
Beyond the fabrics, having the right tools on hand will significantly improve your accuracy and efficiency:
- Sewing Machine: A reliable machine with a good 1/4-inch seam foot is indispensable.
- Rotary Cutter: A sharp rotary cutter (45mm or 60mm) will ensure precise and clean cuts.
- Self-Healing Cutting Mat: Protect your work surface and your rotary cutter blade with a quality cutting mat.
- Quilting Rulers: A long ruler (e.g., 6″ x 24″) for cutting strips and a square-up ruler (e.g., 6.5″ or 12.5″) for trimming blocks are highly recommended for accuracy.
- Iron and Ironing Board: Proper pressing is as important as accurate sewing in quilting.
- Fabric Pins or Clips: To hold fabric layers together securely before sewing.
- Thread: High-quality polyester or cotton thread that matches or blends with your fabrics.
- Seam Ripper: Every quilter needs one for occasional corrections!
Detailed Instructions: Crafting Your Four Patch Frenzy Quilt
Now that your materials are ready, let’s dive into the creation process. Follow these detailed steps carefully to build your beautiful Four Patch Frenzy Quilt. Accuracy in cutting and sewing, along with consistent pressing, are the keys to a successful finish.
Step 1: Constructing the Perfect Four-Patch Units
The four-patch unit is a cornerstone of this quilt, and Jenny Doan’s method makes it incredibly easy and efficient using strip piecing. You’ll need a total of 75 four-patch units for this quilt, so mastering this step is essential.
- Prepare Your Strips: Begin by taking your 3/4 yards of black and 3/4 yards of white fabric. From each, carefully cut 9 strips, each measuring 2 1/2 inches wide. Accuracy here is paramount, so use your rotary cutter and a long ruler to ensure straight and consistent strips.
- Sew the Strip Sets: Take one 2 1/2-inch black strip and one 2 1/2-inch white strip. Place them right sides together, aligning the raw edges perfectly. Sew them along one long side using a precise 1/4-inch seam allowance. This measurement is critical in quilting; a consistent 1/4-inch seam ensures your blocks will finish at the correct size. Repeat this process with all your black and white strips, creating sets of two-color sewn strips.
- Pressing for Success: Once sewn, take your strip sets to the ironing board. First, “set the seams” by pressing the sewn strips flat as they came off the machine. This helps meld the stitches into the fabric. Then, carefully press the seam allowance open. While many quilters press to one side, pressing seams open for four-patch units helps reduce bulk and allows for “nesting” in the next step, resulting in flatter and more accurate blocks. Make sure the darker fabric (black) is facing up as you press to avoid shadow-through.
- Cut the Sub-Units: From these pressed strip sets, cut them into 2 1/2-inch units. You’ll now have small two-patch blocks, each measuring 2 1/2″ x 4 1/2″ (including seam allowances).
- Assemble the Four-Patch: To create a complete four-patch unit, take two of these 2 1/2″ x 4 1/2″ sub-units. Place them right sides together, ensuring the colors are opposite each other at the center seam (e.g., black over white, white over black). Align the center seams perfectly. This is where pressing the seams open earlier pays off, as the open seams allow the fabrics to “nest” together, making alignment easier and the resulting intersection flatter. Sew these two sub-units together with a 1/4-inch seam allowance.
- Final Press and Trim: Press these completed four-patch units open. Each finished four-patch block should measure 4 1/2 inches square. Use your square-up ruler to trim any slight inaccuracies, ensuring each block is perfectly square. This step is crucial for the overall success of your quilt, as it ensures all blocks will fit together seamlessly. Remember, you need 75 of these precise 4 1/2-inch square four-patch units.
Step 2: Preparing the Rectangular Units from 10-inch Squares
The second main component of our quilt block is the rectangle, derived from your colorful 10-inch squares (layer cakes). These rectangles provide the larger, varied splashes of color in your design.
- Cut Your 10-inch Squares: Take your 42 pieces of 10-inch squares. From each 10-inch square, you will cut strips that are 4 1/2 inches wide. Using your rotary cutter and a long ruler, make two cuts across each 10-inch square to yield two 4 1/2-inch wide strips. This will leave a small strip of waste fabric (about 1 inch wide) from each 10-inch square, which is normal for this cutting method.
- Precision is Key: Just like with the four-patch units, consistent and accurate cutting here is vital. Each rectangle should measure 4 1/2 inches by 10 inches. The goal is uniformity so that all your blocks will align perfectly when assembled.
Step 3: Assembling the Individual Quilt Blocks
Now it’s time to bring your four-patch units and rectangles together to form the core quilt blocks. The “frenzy” effect truly starts to take shape in this step.
- Pairing Units: Take one of your 4 1/2″ x 10″ rectangles and one of your 4 1/2″ square four-patch units.
- Sewing the Blocks: Place the four-patch unit at one of the short ends of the rectangle, right sides together. Align the raw edges and sew with a 1/4-inch seam allowance.
- Consistency in Direction: This is a crucial design element for the “frenzy” look. As you attach four-patch units to your rectangles, ensure that all your four-patch units are oriented in the same direction relative to the rectangle. For example, if you place the black square of the four-patch in the top-left corner of the rectangle for the first block, maintain this orientation for all subsequent blocks. This consistency will create a harmonious flow when the blocks are arranged in the next step.
- Repeat for All Blocks: Continue this process until you have sewn one four-patch unit to one end of each rectangle. Each finished piece will be a rectangle with a four-patch attached, measuring 4 1/2 inches wide by approximately 14 inches long (including seam allowances). Press your seams open or towards the rectangle for a flatter finish.
Step 4: Arranging and Assembling the Quilt Top
This is where your quilt truly comes to life! The arrangement of the blocks is what gives the Four Patch Frenzy its unique visual appeal. Taking your time with this step will ensure a striking final design.
- Lay Out Your Blocks: Find a large, flat surface—a clean floor or a design wall if you have one—to lay out all your assembled blocks. This allows you to visualize the pattern and make adjustments before sewing.
- The Alternating Pattern: The key to the “frenzy” is the alternating direction of your blocks. For your first block in a row, place it with the four-patch unit at the bottom (or top). For the next block, rotate it 180 degrees so the four-patch unit is at the opposite end. Continue this alternating pattern across the row: one four-patch down, one four-patch up, and so on. This creates a beautiful, dynamic flow.
- Forming Rows: You will need 15 blocks across for each row of this quilt. Carefully arrange 15 blocks in this alternating pattern. Once satisfied with the arrangement (checking colors and orientations), sew these 15 blocks together, end to end, using a 1/4-inch seam allowance.
- Pressing Row Seams: After sewing a row, press the seams. For easier joining of rows later, press the seams of one row in one direction (e.g., to the left) and the seams of the next row in the opposite direction (e.g., to the right). This allows the seams to “nest” when you sew the rows together, helping you match points and create flat intersections.
- Repeat for All Rows: You will need a total of 5 rows for this quilt. Repeat the block arrangement and sewing process until you have 5 completed rows, each with 15 alternating blocks.
- Sewing the Rows Together: Now, carefully sew your 5 rows together, one by one. Place two rows right sides together, aligning all the seams and raw edges. Pin generously, especially at the seam intersections, to ensure everything matches up. Sew with a 1/4-inch seam allowance. Continue until all 5 rows are joined, forming your complete quilt top. Press the final horizontal seams open or to one side, whichever you prefer and whichever creates the least bulk.
- Adding the Border: Once your quilt top is assembled, it’s time to add the finishing border. From your 1 1/2 yards of border fabric, cut strips that are 4 inches wide (or your desired border width). Measure the length of your quilt top in the center and cut two border strips to that exact length. Attach these to the sides of the quilt. Then, measure the new width of your quilt top (including the side borders) and cut two more border strips to that length. Attach these to the top and bottom. This method (measuring the quilt rather than pre-cutting fixed lengths) helps prevent wavy borders. Press all border seams.
Beyond the Quilt Top: Finishing Your Four Patch Frenzy
Congratulations! You’ve successfully completed the beautiful Four Patch Frenzy quilt top. But the quilting journey doesn’t end there. To transform your quilt top into a cozy, finished quilt, you’ll need to complete the following steps:
- Basting: This involves layering your quilt top, a layer of batting (the fluffy insulation), and a backing fabric. These layers are temporarily secured together using pins, spray adhesive, or long basting stitches.
- Quilting: This is the process of stitching through all three layers to hold them together and add texture and durability. You can choose from various quilting methods:
- Straight-line quilting: Simple lines sewn with your sewing machine, often following the seams or a grid pattern.
- Free-motion quilting: Allows for more intricate designs and motifs, guided by your hands.
- Longarm quilting: Professional service where your quilt is quilted on a large machine.
- Binding: The final step, where fabric strips are sewn around the edges of the quilt to enclose the raw edges and provide a neat, durable finish. This can be done by machine or by hand for a classic look.
Tips for Success with the Four Patch Frenzy Quilt
- Accuracy is Key: In quilting, a little precision goes a long way. Take your time with cutting and sewing your 1/4-inch seams.
- Pressing Matters: Don’t underestimate the power of a good press. It helps your seams lay flat and your blocks fit together accurately.
- Chain Piecing: To speed up the process for the four-patch units, use chain piecing. Sew multiple units consecutively without cutting the thread between them, then snip them apart later.
- Listen to Jenny Doan: Missouri Star Quilt Company tutorials are a treasure trove of wisdom. Watch the video (linked at the beginning) to see Jenny’s expert tips in action.
- Have Fun: Quilting should be an enjoyable creative outlet. Don’t stress over perfection; embrace the process and the joy of creating something with your own hands.
Your Beautiful Four Patch Frenzy Quilt Awaits!
The Four Patch Frenzy Quilt, championed by Jenny Doan of Missouri Star, is more than just a pattern; it’s an invitation to experience the satisfaction of quilting without intimidation. Its elegant design, achieved through simple repeating units and clever arrangement, makes it an ideal project for a rewarding weekend of crafting. By following these detailed instructions, focusing on accuracy, and enjoying the process, you’ll soon have a stunning, finished quilt that showcases your creativity and skill. Happy quilting!