
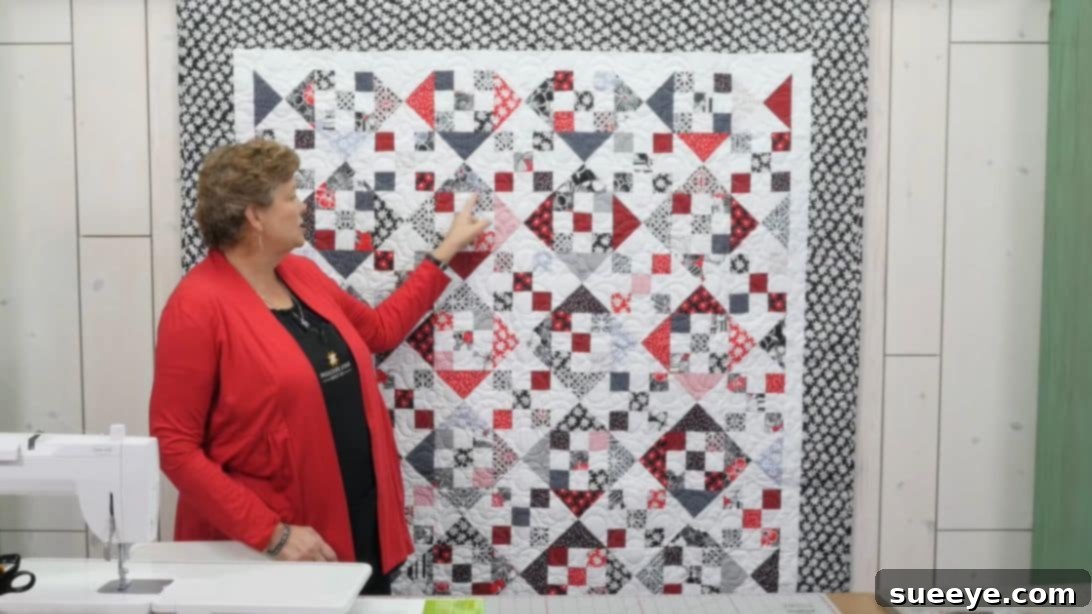
Master the Art of Quilting: Easy Nine Patch and Hourglass Quilt Pattern for Beginners
Discover the timeless joy of quilting with a project that perfectly blends simplicity with stunning visual impact. The Nine Patch and Hourglass quilt pattern is a cherished choice among quilters of all skill levels, offering a rewarding experience for both novices eager to learn and seasoned stitchers seeking a quick, satisfying make. This comprehensive guide, inspired by the expert techniques of Missouri Star, will walk you through every step of creating a beautiful quilt top that looks far more intricate than it actually is.
Whether you’re looking to create a cozy throw for your home, a thoughtful handmade gift, or simply want to practice your piecing skills, this pattern is an excellent starting point. It harnesses the power of two fundamental quilt blocks – the classic Nine Patch and the versatile Hourglass – and combines them in a clever layout to produce a mesmerizing secondary design. You’ll learn efficient cutting methods using 10-inch fabric squares, precise piecing techniques, and how to assemble your blocks into a captivating quilt top.
Why Choose the Nine Patch and Hourglass Quilt?
The enduring popularity of the Nine Patch and Hourglass quilt stems from several compelling factors. Firstly, it builds confidence by focusing on basic quilt blocks that are straightforward to construct. Mastering these foundational units opens the door to countless other quilting designs. Secondly, this specific pattern brilliantly utilizes alternating and rotating these simple blocks to generate an exciting secondary design of interlocking squares, adding depth and visual interest without adding complexity to the piecing process.
This pattern is also incredibly adaptable. You can achieve vastly different looks by simply changing your fabric choices – from vibrant and playful to elegant and subdued. It’s an excellent way to use up a favorite fabric collection, precut 10-inch squares (often called ‘layer cakes’), or even coordinate scraps for a truly unique creation. Moreover, the process is designed for efficiency, meaning you can often complete the quilt top over a dedicated weekend, making it perfect for a satisfying sewing getaway.
RELATED: Easy Disappearing Hourglass Quilt Block Tutorial
Essential Materials for Your Nine Patch and Hourglass Quilt
Gathering your materials is the exciting first step in any quilting adventure. For this striking Nine Patch and Hourglass quilt, selecting your fabrics wisely will set the tone for your finished project. Here’s a detailed list of what you’ll need:
- 1 Pack of 10-inch Print Squares: Also known as ‘layer cakes,’ these pre-cut fabric bundles offer convenience and a beautifully coordinated selection of prints, saving you valuable cutting time.
- 1 3/4 Yards of Background Fabric: Choose a solid or tone-on-tone fabric that contrasts well with your print squares. A lighter background often helps your patterned blocks to truly pop.
- 1/2 Yard of Inner Border Fabric: This narrower border helps frame your quilt top and can provide a subtle transition between your pieced blocks and the wider outer border.
- 1 1/4 Yards of Outer Border Fabric: The outer border adds a substantial frame, contributing to the overall size and aesthetic of your quilt.
- 3/4 Yards of Binding Fabric: This fabric will be used to create the durable strip that finishes the raw edges of your quilt, giving it a clean and professional look.
- 4 1/2 Yards of Backing Fabric: The backing forms the underside of your quilt sandwich. You can choose a coordinating print, a solid that matches your background, or even piece together larger fabric remnants.
Step-by-Step Guide: Crafting Your Nine Patch and Hourglass Quilt
Follow these detailed instructions to construct your individual blocks and assemble them into a stunning quilt top. Precision in cutting and sewing is key to a beautiful finish.
Step 1: Efficient Cutting from 10-Inch Squares
The foundation of any successful quilt lies in precise cutting. This method leverages 10-inch fabric squares, a popular precut size, to efficiently create both your 2 1/2-inch squares for the Nine Patch blocks and the larger units needed for your Hourglass components. To begin, take one colored print 10-inch square and one background 10-inch square. Line them up perfectly, placing them right sides together for stability, or wrong sides together if preferred for cutting. From one side, carefully cut a 2 1/2-inch strip using your rotary cutter and ruler. Rotate your layered squares 90 degrees and cut another 2 1/2-inch strip from an adjacent side. Now, take these two 2 1/2-inch strips, stack them, and cut them into individual 2 1/2-inch squares. These smaller squares will be the building blocks for your Nine Patch units. The remaining larger fabric sections, now measuring approximately 7 1/2 inches square, will be specifically used to construct your Hourglass units. Repeat this process for all your 10-inch squares until you have all the necessary 2 1/2-inch and 7 1/2-inch units.
Step 2: Creating the Hourglass Units (Half-Square Triangles)
For this quilt pattern, the ‘hourglass’ effect is achieved using Half-Square Triangles (HSTs). Accuracy in this step is crucial for crisp points and neat intersections. Take two 7 1/2-inch squares remaining from Step 1 – typically one print and one background fabric. Place them right sides together, ensuring all edges are perfectly aligned. Using a ruler and a fabric marker or pencil, draw a single diagonal line from one corner to the opposite corner. This line will serve as your cutting guide. Next, using your sewing machine, stitch a precise 1/4-inch seam allowance along *both* sides of this drawn line. Once stitched, take your rotary cutter and ruler, and carefully cut directly along the drawn diagonal line. You will now have two separate units. Press the seams open for a flatter finish, or, more commonly, press them towards the darker fabric to minimize bulk and prevent ‘shadowing’ when the quilt is assembled. Finally, using a square-up ruler, carefully trim each of these half-square triangle units to a precise 6 1/2 inches square. The meticulous trimming step is vital to ensure your blocks will fit together perfectly later on. Repeat this process with all your remaining 7 1/2-inch print and background square pairs until you have a sufficient number of these 6 1/2-inch ‘hourglass’ components.
Step 3: Assembling the Classic Nine Patch Blocks
The Nine Patch block is one of the most fundamental and satisfying quilt blocks to construct, forming a 3×3 grid of smaller squares. To begin, gather nine pieces of your 2 1/2-inch squares. Strategically arrange them into a block, making sure to alternate your colored print squares and background squares to achieve the desired checkerboard effect. A common arrangement uses five squares of one fabric (e.g., print) and four squares of the other (e.g., background) to create a clear pattern. Lay out your nine squares in three distinct rows of three on your design surface. Once you’re satisfied with your arrangement, it’s time to sew them together. Start by sewing the squares within each row. For the first and third rows, press your seams in one consistent direction (e.g., to the right). For the middle row, press your seams in the opposite direction (e.g., to the left). This ‘nesting’ of seams is a crucial technique that allows the seams of adjacent rows to interlock perfectly when you sew the rows together, resulting in flat, precise joins and minimizing bulk. Finally, sew your three prepared rows together, matching up all your seam intersections carefully. You should now have a perfectly formed Nine Patch block, which should also measure 6 1/2 inches square, matching the size of your hourglass units.
Step 4: Assembling Your Quilt Top – The Mesmerizing Layout
With your collection of precisely pieced Nine Patch blocks and Hourglass units ready, the exciting phase of assembling your quilt top begins. This pattern creates its captivating design by alternating these two distinct blocks and strategically rotating the Hourglass units. Start by laying out your blocks on a design wall, the floor, or any large flat surface where you can see the entire layout. For the first row, alternate a Nine Patch block with an Hourglass unit, making sure to orient the Hourglass unit ‘sideways’ (with the seam running horizontally across the block). For the second row, you’ll start with an Hourglass unit, this time oriented ‘up and down’ (with the seam running vertically through the block), followed by a Nine Patch block, and continue alternating. This thoughtful rotation of the Hourglass blocks is what generates the beautiful secondary ‘interlocking square’ design that makes this quilt so visually appealing and unique. Continue this alternating and rotating pattern for all subsequent rows until your entire quilt top is laid out exactly as desired. Take the time to step back and check your layout for any misplaced blocks or incorrect rotations before you begin sewing. Once satisfied, sew the blocks within each row together, pressing seams as you go, and then join the rows to complete your stunning Nine Patch and Hourglass quilt top.
Beyond the Quilt Top: Finishing Your Project with Professional Flair
Completing the quilt top is a major accomplishment, but the journey doesn’t end there! To transform your pieced top into a functional, durable, and beautiful quilt, you’ll need to add borders, layer it, quilt it, and bind it. These steps elevate your project from a fabric arrangement to a cozy heirloom.
Adding Your Borders
Once your quilt top is meticulously assembled, it’s time to add the borders. Borders serve several crucial purposes: they frame your design, add visual interest, and help to square up your quilt top before the quilting process. For this pattern, you’ll be adding an inner border first, followed by a wider outer border. The inner border, often a narrower strip, helps to create a visual transition between the intricate pieced center and the expansive outer border. To ensure accuracy, measure your quilt top through the center, both horizontally and vertically, to determine the precise length needed for your border strips. Cut your border strips according to these measurements, then attach the side borders first, pressing seams towards the border. Next, attach the top and bottom borders, again pressing seams towards the border. Repeat this entire process for the outer border, always ensuring consistent measurements for a perfectly squared quilt.
Layering and Basting Your Quilt Sandwich
With your quilt top beautifully framed, the next step is to prepare your ‘quilt sandwich’ – the top, batting, and backing. This vital process is known as basting, and it holds all three layers securely together during quilting. First, lay your backing fabric wrong side up on a large, clean, flat surface, smoothing out all wrinkles and securing it tautly with painter’s tape or pins. Next, gently place your batting evenly on top of the backing, again ensuring it’s smooth and wrinkle-free. Finally, carefully center your quilt top right side up on top of the batting. Make sure all three layers are taut and free of puckers. Baste the layers together using your preferred method – safety pins placed approximately every 4-6 inches across the entire quilt, basting spray, or long hand-basting stitches. Proper basting is absolutely essential for preventing shifting, puckering, and tucks during the quilting process.
Quilting Your Project
Now for the quilting itself! This is where you stitch through all three layers of your quilt sandwich to add texture, warmth, and durability. You have several options for quilting: you can hand quilt for a traditional, heirloom feel, machine quilt on a domestic machine with simple straight lines, meandering stipples, or more elaborate free-motion designs, or send it to a professional longarmer for intricate custom quilting. For a beginner-friendly project like the Nine Patch and Hourglass, simple straight-line quilting that follows the block seams (often called “stitch-in-the-ditch”) or echoes the block patterns is a fantastic choice. Experiment with different thread colors to see what complements your fabrics best. The quilting adds the final dimension to your project, transforming it from a mere fabric sandwich into a true, cherished quilt.
Finishing with Binding
The final step to complete your Nine Patch and Hourglass quilt is adding the binding. The binding is a narrow strip of fabric that encases the raw edges of your quilt, providing a clean, professional, and durable finish. Cut your binding strips, typically 2 1/2 inches wide, and join them together to create one continuous strip long enough to go around the entire perimeter of your quilt, plus an extra 10-12 inches for joining. Fold the binding strip in half lengthwise, wrong sides together, and press firmly. Attach the raw edge of the folded binding to the raw edge of the quilt top, either by machine or hand, mitering the corners for a crisp, professional look. Once sewn to the front, flip the binding to the back of the quilt and hand-stitch or machine-stitch it down to secure it. This meticulous final touch truly completes your beautiful handmade quilt, ready for snuggling or display.
Your Beautiful Nine Patch and Hourglass Quilt Awaits!
Congratulations! You’ve successfully navigated the steps to create a stunning Nine Patch and Hourglass quilt. This project is a wonderful testament to the beauty that can be achieved by combining simple, fundamental blocks into an intricate-looking design. It’s not just a beautiful textile; it’s a piece of art made with your own hands, infused with your effort and creativity. Perfect for cozying up on a chilly evening, adding a touch of handmade charm to your home decor, or gifting to a loved one, your new quilt is sure to be cherished.
We hope this comprehensive guide has inspired you and equipped you with the skills and confidence to delve deeper into the wonderful world of quilting. Every stitch tells a story, and now you’ve added another beautiful chapter to your quilting journey. Happy stitching!