
Easy No-Bake Martha Washington Candy Recipe: A Timeless Homemade Treat
The holiday season, or really any time of year, often sparks a craving for homemade sweets and the joy of sharing delicious treats with loved ones. While the idea of baking elaborate desserts can sometimes feel overwhelming amidst countless other preparations, there’s a certain magic in discovering recipes that deliver exceptional taste with minimal effort. As someone who loves to prepare delightful confections for family gatherings, I’ve often found myself seeking simple yet impressive options.
Traditionally, my go-to involved intricate chocolate-dipped candies, prepared days in advance. However, the sheer volume of guests and the extensive menu to manage occasionally left me longing for a less demanding alternative. That’s when I stumbled upon a true gem – a no-bake chocolate candy recipe that requires no oven, no complex tempering of chocolates, and yet yields an incredibly rich and satisfying result. This recipe, graciously shared by The Hillbilly Kitchen – Down Home Country Cooking, quickly became my new favorite.
What makes this particular recipe so remarkable is its straightforward procedure, making it an ideal candidate for preparing even the day before an event. It relies on inexpensive, readily available ingredients, yet produces a generous batch of delectable candies. This versatility makes it perfect for a multitude of occasions – not just Christmas, but also for Halloween trick-or-treats, Easter baskets, Valentine’s Day gifts, or even as a delightful item to sell. Get ready to embark on a sweet journey; you’ll undoubtedly enjoy making these candies as much as I do.
Why No-Bake Candies Are a Holiday Lifesaver
In today’s fast-paced world, finding time for elaborate culinary projects can be a challenge. This is precisely where no-bake candy recipes shine. They offer a fantastic solution for anyone wanting to create impressive homemade treats without the stress and time commitment associated with traditional baking. Here’s why embracing no-bake options, especially for confections like this Martha Washington Candy, can truly be a game-changer:
- Time-Saving: Eliminate the need for preheating ovens, waiting for baked goods to cool, and managing multiple baking sheets. The process is streamlined, allowing you to create delicious results in a fraction of the time.
- Simplicity for All Skill Levels: Whether you’re a seasoned chef or a kitchen novice, no-bake recipes are inherently forgiving. There’s no risk of under-baking or over-baking, making them perfect for beginners or for involving children in the cooking process.
- Reduced Kitchen Heat: Especially during warmer months or when your oven is occupied with other dishes, a no-bake recipe keeps your kitchen cooler and less cluttered.
- Focus on Flavor and Texture: These recipes often highlight the natural flavors of their ingredients, combining them in ways that create unique textures and taste profiles. This Martha Washington Candy, with its rich coconut and pecan core, enveloped in chocolate, is a prime example.
- Versatility for Gifting and Events: No-bake candies are incredibly portable and make wonderful gifts. Their robust nature means they travel well, making them ideal for potlucks, party favors, or simply sharing with neighbors.
Embracing the no-bake philosophy doesn’t mean sacrificing quality or taste; it simply means choosing a smarter, easier path to deliciousness. This Martha Washington Candy embodies all these benefits, offering a rich, satisfying confection without the fuss.
A Timeless Classic: The Story of Martha Washington Candy
The “Martha Washington Candy” holds a special place in the hearts of many, evoking a sense of nostalgia and homespun tradition. While its exact origins are somewhat debated, the recipe is believed to have roots dating back over a century, a testament to its enduring appeal. Often associated with Southern American cuisine and often referred to as a “hundred-year-old recipe,” it’s a candy that has graced countless family tables and holiday platters across generations.
The allure of Martha Washington Candy lies in its simple yet profoundly satisfying combination of flavors and textures. It typically features a creamy, sweet filling made with coconut and pecans, enrobed in a smooth layer of chocolate. The name itself suggests a connection to early American history, though whether it was truly a favorite of the first First Lady, Martha Washington, remains a charming culinary myth rather than a documented fact. Regardless of its historical accuracy, the name lends an air of traditional elegance to this humble yet delicious confection.
What has allowed this particular candy to remain popular for so long is its ability to deliver a luxurious, homemade taste without demanding extensive culinary skills or exotic ingredients. It’s a recipe passed down through families, cherished for its ease and delightful outcome. Every bite offers a perfect balance of chewiness from the coconut, crunch from the pecans, and the comforting sweetness of chocolate – a combination that consistently brings smiles and satisfies sweet cravings. This recipe from The Hillbilly Kitchen beautifully captures the essence of this beloved classic, ensuring its tradition continues for new generations to enjoy.
Ingredients for Your No-Bake Chocolate Pecan Delight
Gathering your ingredients is the first step towards creating these irresistible no-bake chocolate candies. This recipe calls for a straightforward list of items, most of which you likely already have in your pantry. The beauty of these ingredients is their simplicity and the incredible flavor they produce when combined. For best results, ensure your ingredients are fresh and measured accurately.
- 3 cups Sweetened shredded coconut
- 14 oz Sweetened condensed milk
- 4 cups Powdered sugar (also known as confectioners’ sugar)
- 1 cup Unsalted butter, softened
- 2 cups Pecans, finely chopped
- 1-2 tsp Pure vanilla extract
- 1 cup Semi-sweet chocolate chips
- 1 cup Milk chocolate chips
- 2 tbsp Coconut oil (refined or unrefined, depending on your preference for coconut flavor)
Ingredient Notes: While the recipe calls for specific chocolate chips, feel free to experiment with dark chocolate for a richer flavor, or even white chocolate for a different aesthetic. Ensure your butter is softened to room temperature for easier mixing, and chop your pecans to a consistent size for better texture in the candy base.
Step-by-Step Directions: Crafting Your Martha Washington Candies
Follow these simple instructions to create your batch of delicious, no-bake Martha Washington Candies. This two-part process ensures a perfect balance of flavor and texture, from the creamy pecan-coconut center to the glossy chocolate coating.
Step 1: Preparing the Irresistible Candy Base
Begin by setting up your chocolate for dipping. In a small crockpot or a double boiler, combine your semi-sweet chocolate chips and milk chocolate chips. Gently melt them, stirring occasionally until the mixture is completely smooth and free of lumps. The crockpot is an excellent choice as it keeps the chocolate warm and perfectly dippable throughout the process. Once melted, stir in the coconut oil. This addition is crucial; it not only imparts a beautiful, tempered-like shine to your chocolate coating but also aids in hardening the chocolate more quickly and smoothly once dipped. Keep this chocolate mixture warm and ready.
Next, grab a large mixing bowl – one that can accommodate all your candy base ingredients. Into this bowl, add the sweetened shredded coconut, powdered sugar, and the finely chopped pecans. Take a moment to mix these dry ingredients thoroughly. This initial mix ensures that the coconut and pecans are evenly distributed throughout the candy, preventing clumps and ensuring every bite is consistently delicious. After the dry ingredients are well combined, add the sweetened condensed milk, the softened butter, and the vanilla extract. Now, it’s time to get mixing! Stir and combine all the ingredients until everything is perfectly homogenous and forms a thick, dough-like consistency. You’ll know it’s ready when the mixture pulls away from the sides of the bowl and holds its shape.
Step 2: Shaping, Dipping, and Finishing Your Candies
Once your candy base is perfectly mixed, it’s time to shape them. Line a cookie sheet with parchment paper; this will prevent sticking and make for easy removal later. Using a small ice cream scoop or a spoon, scoop portions of the mixture and place them onto the prepared cookie sheet. Try to make each scoop roughly the same size for uniform candies. Once all the candy base portions are on the sheet, transfer them to the refrigerator for approximately one hour. This chilling period is crucial as it allows the mixture to firm up, making it much easier to handle and shape without it sticking to your hands or becoming too soft when dipped in warm chocolate.
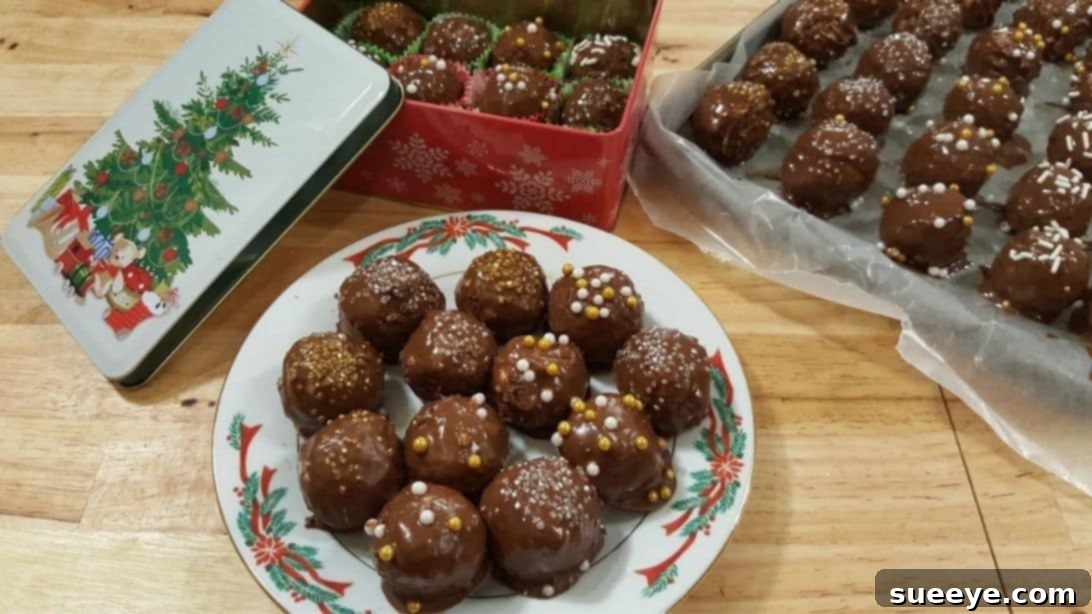
After an hour, retrieve the chilled candy pieces. You can now take each piece and gently roll or smoothen it out with your hands to achieve your desired shape – typically a small, slightly flattened ball or an oval. Now comes the fun part: dipping! Carefully immerse each shaped candy piece into your warm, melted chocolate mixture, ensuring it is completely covered. Use a fork or a dipping tool to gently lift the candy, allowing any excess chocolate to drip off back into the crockpot. This helps achieve a thin, even coating. Once coated, place each dipped candy into small cupcake paper cups (miniature ones work best for individual servings) on another parchment-lined tray. While the chocolate is still wet, feel free to sprinkle them with decorations of your choice – chopped nuts, festive sprinkles, or a contrasting chocolate drizzle can add a beautiful touch.
Finally, return the decorated candies to the refrigerator for another 30 minutes. This final chill will allow the chocolate coating to fully harden and set, giving them that satisfying snap. Once firm, transfer your beautiful Martha Washington Candies into an airtight container. They can be stored in the refrigerator for several days or even frozen for longer enjoyment. Serve them chilled and watch them disappear!
Tips for Perfection and Customization
While this Martha Washington Candy recipe is delightfully simple, a few extra tips can elevate your homemade treats to confectionary perfection. Moreover, don’t hesitate to customize them to suit your taste or the occasion!
- Quality Ingredients Matter: Since there’s no baking involved, the flavor of your ingredients truly shines through. Opt for good quality chocolate chips and fresh, aromatic pecans. This will make a noticeable difference in the final taste.
- Consistent Chilling: Don’t rush the chilling steps. A well-chilled candy base is easier to shape and dip, and a final chill ensures a firm, non-sticky chocolate coating.
- Temperature of Dipping Chocolate: Keep your melted chocolate warm but not hot. If it’s too hot, it can melt the candy base. If it’s too cool, it will be thick and difficult to get an even, thin coating. A crockpot on a low setting is ideal for maintaining the perfect temperature.
- Flavor Variations:
- Extracts: Beyond vanilla, try a hint of almond extract for a marzipan-like nuance, or a drop of peppermint extract for a festive twist. Lemon or orange zest can also add a bright counterpoint.
- Nut Alternatives: If pecans aren’t your favorite or you have allergies, walnuts or almonds are excellent substitutes. For a nut-free version, simply omit them and perhaps add some extra shredded coconut or mini chocolate chips to the base.
- Chocolate Coating Alternatives:
- White Chocolate: Dip some candies in melted white chocolate for a beautiful contrast. You can even drizzle dark chocolate over them for an elegant finish.
- Dark Chocolate: For those who prefer less sweetness, a higher percentage dark chocolate for dipping will provide a delightful bittersweet contrast to the sweet coconut filling.
- Creative Decorations: Once dipped, before the chocolate sets, you have a blank canvas for decoration. Try a sprinkle of sea salt flakes for a gourmet touch, colorful sprinkles for birthdays, or a different color chocolate drizzle for artistic flair.
- Storage: Store your finished Martha Washington Candies in an airtight container in the refrigerator. They typically last well for up to 1-2 weeks. For longer storage, they can be frozen for up to a month; just thaw in the refrigerator before serving.
- Gifting: These candies make wonderful homemade gifts. Arrange them in small decorative boxes or bags, tied with a ribbon, for a thoughtful and delicious present during the holidays or any special occasion.
By keeping these tips in mind, you can ensure every batch of your Martha Washington Candies is a resounding success, perfectly tailored to your preferences and ready to impress.
These amazing images and the inspiration for this delightful recipe are all thanks to The Hillbilly Kitchen – Down Home Country Cooking on YouTube. Make sure to visit their channel for more incredible, easy-to-follow recipes like this one.
Indulge in the Sweet Simplicity
There’s an undeniable charm to creating something truly special with your own hands, especially when it involves delicious food. This no-bake Martha Washington Candy recipe offers that very satisfaction, combining simplicity with an explosion of classic flavors. It’s a testament to the fact that some of the most cherished treats don’t require hours in the kitchen or complicated techniques. Instead, they rely on wholesome ingredients and a touch of heartfelt effort.
Whether you’re preparing for a festive holiday celebration, looking for a unique homemade gift, or simply craving a sweet escape, these chocolate-dipped pecan and coconut candies are guaranteed to impress. They bring a touch of old-fashioned charm and comfort to any occasion, reminding us of the timeless joy that simple, delicious food can bring.
So, gather your ingredients, follow these easy steps, and prepare to be delighted by the rich, creamy, and wonderfully textured Martha Washington Candies. They are more than just a dessert; they are a delightful tradition waiting to be made and shared.