
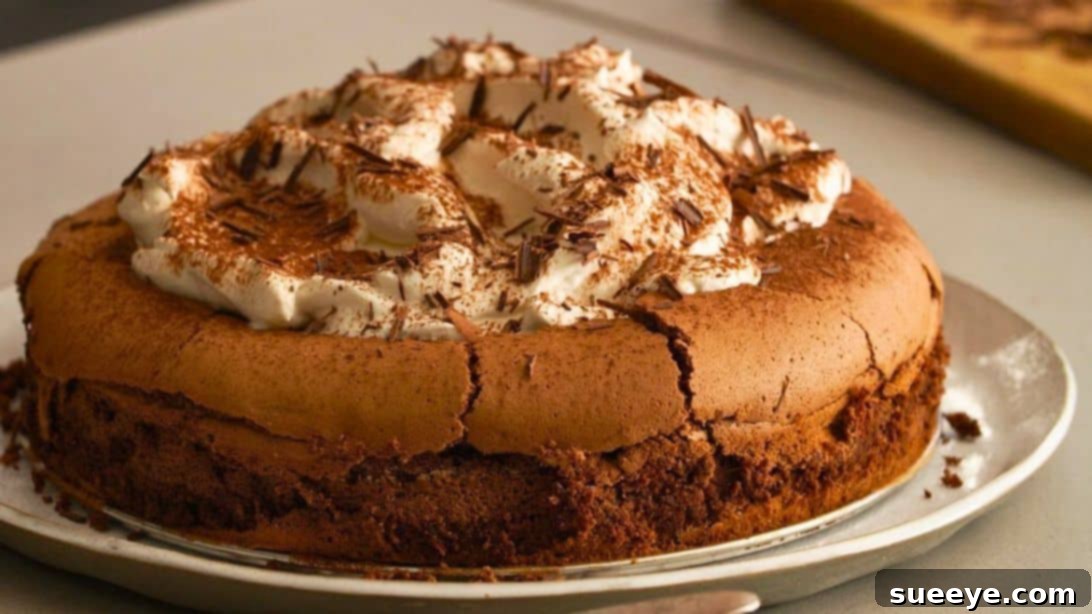
Decadent Chocolate Cloud Cake Recipe: Your Guide to a Light and Irresistible Dessert
Are you a devoted fan of baking, constantly searching for that next show-stopping dessert that promises both an incredible taste and a uniquely delightful experience? If so, prepare to be captivated by the extraordinary Chocolate Cloud Cake recipe, famously shared by Food52. This isn’t just another chocolate cake; it’s a culinary masterpiece that lives up to its name, offering a rich, intensely chocolatey flavor wrapped in a texture so soft and ethereal, it truly feels like biting into a cloud. It’s the perfect sweet escape, designed to satisfy even your deepest chocolate cravings with elegance and ease.
The allure of this cake lies not only in its exquisite taste but also in its distinctive preparation method, which sets it apart from conventional cake recipes. Unlike standard cakes where all ingredients are typically combined at once, this recipe employs a technique reminiscent of delicate soufflé pancakes, where egg whites are meticulously beaten to stiff peaks and then gently folded into the chocolate batter. This careful process is what imparts the cake with its signature airy, yet deeply flavorful, consistency.
One of the most charming characteristics of the Chocolate Cloud Cake is its perfectly imperfect appearance. As it cools, the center of the cake is designed to gracefully sink, creating a natural crater. This indentation is not a flaw, but rather an anticipated feature that signals you’ve successfully executed the recipe. It’s this unique characteristic that gives the cake its rustic elegance and provides the ideal cavity for a generous dollop of velvety whipped cream. Embrace this natural dip; it’s a sign that your cloud cake is just right.
Whether you’re an experienced baker or just embarking on your culinary journey, this Chocolate Cloud Cake recipe promises a rewarding experience. It’s a dessert that impresses without intimidation, offering a sophisticated flavor profile with steps that are straightforward and enjoyable to follow. Prepare to delight your family and friends with this unforgettable treat.
Understanding the Unique Appeal of Chocolate Cloud Cake
What makes the Chocolate Cloud Cake a standout? It begins with its core philosophy: achieving an unparalleled lightness while maximizing rich chocolate flavor. This delicate balance is achieved through a combination of high-quality ingredients and a specific technique focusing on aeration. The method of beating egg whites separately and then folding them into the batter is crucial. This creates a meringue-like base that, when baked, expands beautifully, trapping air and resulting in the cake’s characteristic fluffy texture. This approach is fundamental to many ethereal desserts, ensuring a texture that is simultaneously moist and incredibly light.
The choice of bittersweet chocolate is another key player in its rich flavor profile. Unlike milk chocolate, bittersweet chocolate offers a deeper, more complex cocoa taste without excessive sweetness, allowing the pure essence of chocolate to shine through. When combined with other carefully selected ingredients, each component plays a vital role in crafting this delightful dessert. The optional additions of cognac or Grand Marnier and orange zest introduce subtle layers of sophistication, elevating the overall taste experience from merely delicious to truly gourmet.
Essential Tools for Baking Success
To embark on your Chocolate Cloud Cake adventure, having the right tools on hand will streamline the process and ensure the best results. You’ll need an 8-inch springform pan, which is essential for easily releasing the delicate cake after baking. A double boiler setup (either a dedicated one or a heatproof bowl set over a saucepan of simmering water) is critical for melting chocolate smoothly without scorching. A handheld or stand mixer will be indispensable for achieving perfectly foamy and glossy egg whites. Additionally, standard baking equipment like mixing bowls, whisks, and a rubber spatula for gentle folding will be needed. Preparing your workspace with these items beforehand will make the baking process a joy.
Gather Your Ingredients for Decadence
The success of your Chocolate Cloud Cake begins with selecting the finest ingredients. Quality truly makes a difference in a recipe like this, where the flavors are intended to be pure and pronounced.
For the Chocolate Cloud Cake:
- 8 oz of best-quality bittersweet chocolate (coarsely chopped): Opt for a chocolate with a cocoa content of 60-70% for the best balance of bitterness and sweetness. High-quality chocolate melts smoother and contributes a more profound flavor.
- 1/2 cup of room-temperature unsalted butter (cut into 1 tablespoon pieces): Using unsalted butter allows you to control the salt content in the recipe. Room temperature butter will incorporate seamlessly into the melted chocolate, creating a smooth, emulsified mixture.
- 6 large eggs: These are the structural heroes of the cake. The yolks contribute richness and moisture, while the whites, when whipped, provide the “cloud” like lift and texture.
- 1 cup of sugar: Granulated sugar is used here, split between the chocolate batter and the egg whites. It provides sweetness and helps stabilize the whipped egg whites.
- 2 tablespoons of cognac or Grand Marnier (optional): These spirits add a wonderful depth and a subtle hint of warmth, complementing the chocolate flavor beautifully. Feel free to omit if you prefer to keep the cake alcohol-free, or substitute with a tablespoon of vanilla extract for a different aromatic note.
- 1 orange (1 tablespoon of finely grated zest; optional): Orange zest provides a bright, fragrant counterpoint to the rich chocolate, adding a sophisticated citrus aroma that truly elevates the cake. Ensure you only grate the orange part of the peel, avoiding the bitter white pith.
For the Luxurious Whipped Cream Topping:
- 1 1/2 cups of heavy cream (very cold): Cold cream whips up faster and achieves stiffer peaks. Ensure it’s straight from the refrigerator for optimal results.
- 3 tablespoons of confectioners’ sugar: Also known as icing sugar, this finely milled sugar dissolves easily, ensuring a smooth, lump-free whipped cream. It adds just the right amount of sweetness.
- 1 teaspoon of pure vanilla extract: Vanilla is a classic pairing with chocolate and enhances the overall flavor of the whipped cream, adding a warm, aromatic note.
- Unsweetened cocoa powder: For dusting. This final flourish not only adds to the cake’s visual appeal but also provides a slight bitter contrast that perfectly complements the sweetness of the cake and cream.
How to Make Chocolate Cloud Cake: A Step-by-Step Guide
Crafting this cloud-like dessert is a delightful process. Follow these steps carefully to achieve a truly magnificent cake.
Step 1: Preparing Your Oven and Pan
Begin by preheating your oven to 350°F (175°C) and ensuring the oven rack is positioned in the center. This even heat distribution is vital for proper baking. Next, take an 8-inch springform pan. Line the bottom of the pan with parchment paper. It’s crucial not to butter the sides of the pan or the parchment paper, as the cake needs to cling to the sides to rise properly. A greased pan would prevent it from climbing, leading to a denser texture.
Step 2: Mastering the Melt: Chocolate and Butter
Utilize the double boiler method to gently melt your coarsely chopped bittersweet chocolate. Place the chocolate in a heatproof bowl set over a saucepan containing about an inch of simmering water, ensuring the bowl does not touch the water. Stir occasionally until the chocolate is smooth and fully melted. Once melted, remove the bowl from the heat and whisk in the room-temperature unsalted butter, piece by piece, until the mixture is completely smooth and glossy. The warmth of the chocolate will melt the butter effortlessly, creating a rich, uniform base.
Step 3: The Art of Egg Separation
Carefully separate the yolks and whites of 4 large eggs into two separate small bowls. Be extremely meticulous to ensure no speck of yolk contaminates the egg whites, as even a tiny amount of fat can prevent the whites from whipping up properly. The remaining 2 large eggs will be used whole.
Step 4: Crafting the Rich Chocolate Base
In a large mixing bowl, combine the remaining 2 whole eggs, the 4 separated egg yolks, and half a cup of granulated sugar. Whisk these ingredients together until they are just combined and slightly pale. Slowly and steadily, whisk in the warm chocolate-butter mixture. Continue to whisk until everything is thoroughly incorporated and smooth. If using, now is the time to whisk in the cognac or Grand Marnier and the finely grated orange zest. These additions infuse the batter with subtle notes of warmth and citrus, enhancing the overall chocolate experience.
Step 5: Whipping the Cloud into Formation: Egg Whites
In a clean, dry bowl (preferably a metal or glass bowl, as plastic can retain traces of fat), pour the separated egg whites. Using a handheld mixer or a stand mixer with the whisk attachment, begin to beat the egg whites on medium speed until they become foamy, which typically takes about 2 minutes. Once foamy, gradually add the remaining half cup of sugar, a tablespoon at a time, while continuing to beat the mixture. Increase the speed to medium-high and beat until the egg whites become glossy and form soft peaks. This usually takes about 5 minutes. The mixture should hold its shape but still be pliable, not stiff and dry.
Step 6: The Gentle Fold: Merging Flavors and Textures
This step is critical for maintaining the cake’s airy texture. Gently fold about one-quarter of the beaten egg whites into the rich chocolate mixture using a rubber spatula. This initial incorporation lightens the chocolate batter, making it easier to fold in the remaining whites without deflating them. Once the first portion is partially combined, gently fold in the remaining beaten egg whites. Use a careful, upward motion, cutting through the center and folding over, rotating the bowl as you go. Be patient and gentle, ensuring no streaks of white remain, but also avoid overmixing, which can cause the precious air to escape.
Step 7: The Transformative Bake and Cool
Pour the prepared batter into the parchment-lined springform pan. Place the pan on a rimmed baking sheet—this helps catch any potential drips and makes it easier to transfer the cake in and out of the oven. Bake for approximately 35 to 40 minutes, or until the top of the cake is beautifully puffed and shows visible cracks. The center should no longer be wobbly when gently jiggled, indicating it’s cooked through. Once baked, remove the cake from the oven and let it cool completely in the pan on a wire rack. As it cools, the center will naturally sink, creating that signature crater. This is completely normal and expected, so don’t be alarmed! Allow the chocolate cake to cool entirely on the rack before proceeding.
Step 8: Preparing the Velvety Whipped Cream
While your cake is cooling, prepare the perfect accompaniment: fresh whipped cream. In a large, chilled bowl, combine the very cold heavy cream, confectioners’ sugar, and pure vanilla extract. Using a handheld or stand mixer, whip the mixture on medium-high speed until soft peaks form. The cream should be thick and hold its shape, but still have a light, airy consistency. Be careful not to over-whip, which can turn it grainy.
Step 9: The Grand Finale: Assembly and Garnish
Once the chocolate cake has cooled completely and its center has sunken, it’s time for assembly. Generously fill the sunken center of the cake with your freshly whipped cream, creating a beautiful contrast against the dark chocolate. For an elegant finish, dust the entire top, including the whipped cream, with a fine layer of unsweetened cocoa powder using a sieve. Finally, run the tip of a thin knife around the edge of the cake to loosen it from the springform pan, then carefully remove the sides of the pan. Your magnificent Chocolate Cloud Cake is now ready to be served and enjoyed!
Chocolate Cloud Cake: Tips for a Flawless Experience
To ensure your Chocolate Cloud Cake turns out perfectly every time, here are a few expert tips:
- Ingredient Temperature Matters: Ensure butter is at room temperature and heavy cream is very cold. This impacts how well they combine and whip.
- Cleanliness for Egg Whites: Any trace of fat (from yolks, oily bowls, or spatulas) will prevent egg whites from whipping properly. Use meticulously clean, dry bowls and beaters.
- Don’t Overmix the Batter: After folding in the egg whites, stop as soon as no streaks remain. Overmixing will deflate the batter and lead to a dense cake.
- The Sink is a Feature: Remember, the sunken center is part of this cake’s charm. It’s a sign of a perfectly baked cloud cake, not a mistake!
- Storage: Store the cake, covered, in the refrigerator for up to 3-4 days. It tastes even better the next day as the flavors meld.
- Variations: Experiment with different liqueurs like Kahlua or rum, or add a pinch of espresso powder to the chocolate for an even deeper flavor. For an extra touch of decadence, consider sprinkling chocolate shavings on top of the cocoa powder.
This Chocolate Cloud Cake is more than just a dessert; it’s an experience. Its delicate texture and intense chocolate flavor make it suitable for a sophisticated dinner party, a cozy family gathering, or simply as a luxurious personal treat. The beauty of its simplicity, combined with the depth of its taste, ensures it will become a cherished recipe in your baking repertoire.
We are confident that once you try this recipe, you’ll understand why it’s celebrated for its unique charm and unforgettable flavor. Dive into the world of light, airy, and intensely chocolatey goodness with your very own homemade Chocolate Cloud Cake!
Looking for more delightful cake recipes to expand your baking skills? Check out these fantastic options:
RELATED: Easy Gluten-Free Chocolate Cake Recipe – A delicious alternative for those with dietary restrictions, without compromising on flavor.
RELATED: Easy Air Fryer Blueberry Yogurt Cake Recipe – A quick and convenient way to bake a fruity, moist cake using your air fryer.