
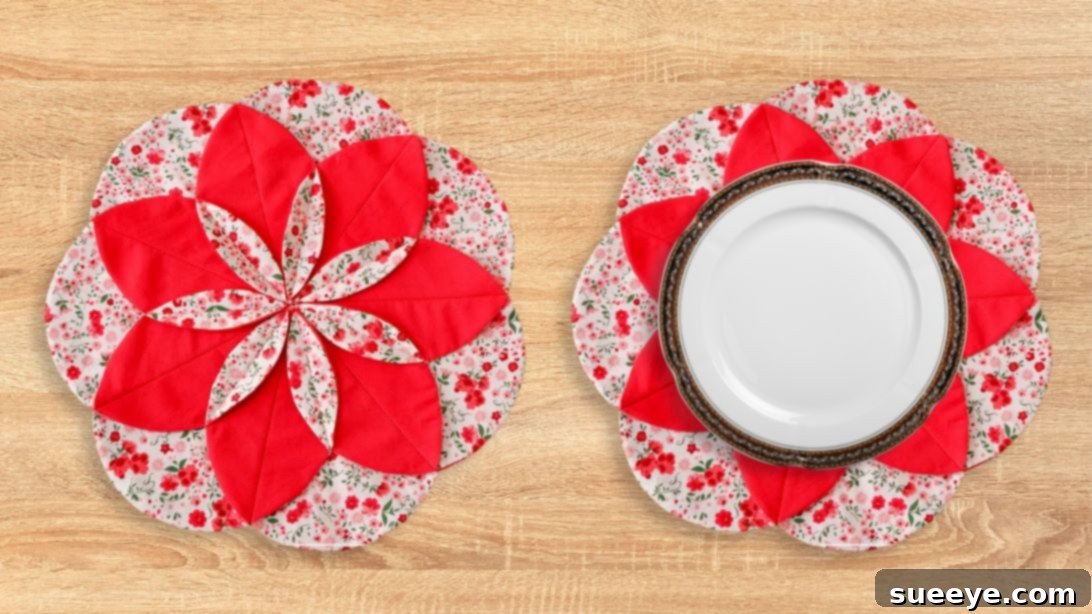
DIY Folded Flower Placemat: Craft Your Own Elegant Table Decor
There’s an undeniable charm and warmth that handmade items bring to a home, and this stunning folded flower placemat is no exception. From the moment I first laid eyes on a similar design, I was captivated by its intricate pattern and the unique texture it promised to add to my dining table. It sparked an immediate desire to recreate it, and I’m thrilled to share that the result, crafted from fabrics I already had, turned out absolutely gorgeous. This creative journey was wonderfully guided by the detailed insights from Thuy crafts on YouTube, whose tutorial made this beautiful project achievable. If you’re eager to infuse your dining space with a touch of personalized elegance and embark on a rewarding sewing adventure, continue reading this comprehensive guide or watch the inspiring video below to master the art of making your very own DIY folded flower placemat.
Why Choose a Handmade Folded Flower Placemat?
Crafting your own folded flower placemats offers a multitude of benefits beyond just decorating your table. Firstly, it provides an incredible opportunity for personalization. You get to select fabrics that perfectly match your existing home decor, a specific season, or even a special occasion, something mass-produced items can rarely offer. Secondly, it’s a fantastic way to utilize fabric scraps or remnants, making it an eco-friendly and cost-effective project. Thirdly, the process itself is incredibly satisfying, allowing you to develop new sewing skills or refine existing ones. Finally, these unique placemats make thoughtful, handcrafted gifts that truly show you care. Elevate your everyday meals or special gatherings with a unique, artistic touch that reflects your personal style.
Essential Materials for Your Folded Flower Placemat Project
Before you dive into the exciting world of fabric folding and sewing, gather all your necessary tools and materials. Having everything ready will ensure a smooth and enjoyable crafting experience. Here’s what you’ll need:
- Paper: Standard printer paper or thicker craft paper works well for creating your initial pattern templates.
- Pencil: A sharp pencil for precise marking on both paper and fabric. Consider a fabric marker or tailor’s chalk for fabric for better visibility.
- Scissors: A good pair of fabric scissors is crucial for clean, accurate cuts, and a separate pair for paper.
- Solid Fabric: Approximately 1/2 yard of a medium-weight cotton fabric is ideal. Choose a color that complements your printed fabric and your dining area. This fabric will form the base and inner structure of your flower petals.
- Printed Fabric: Approximately 1/2 yard of a coordinating patterned cotton fabric. This fabric will be the visible, decorative side of your flower petals. Opt for prints that bring joy and character to your table. Quilting cottons are an excellent choice due to their durability and wide range of patterns.
- Sewing Machine: Essential for stitching your fabric circles together.
- Iron and Ironing Board: Crucial for pressing seams and achieving crisp, professional-looking folds.
- Pins: For securing fabric pieces before sewing, ensuring they stay aligned.
- Hand Sewing Needle and Thread: For closing the small opening after turning the fabric right side out.
Step-by-Step Guide: Crafting Your Elegant Folded Flower Placemat
Follow these detailed instructions carefully to transform your chosen fabrics into a beautiful folded flower placemat. Precision at each stage will contribute to a polished final product.
Step 1: Create Your Base Circle Pattern
Begin by drawing a perfect circle on a piece of paper. This circle should have a diameter of 5.9 inches (approximately 15 cm). You can use a compass for accuracy, trace around a circular object of the correct size, or even create a makeshift compass with a string and pencil. Once drawn, carefully cut out this circle. This will serve as your primary template for all subsequent fabric cuts.
Step 2: Prepare Your Fabric Circles
Using the paper circle you just created, prepare your fabric pieces. You will need seven pieces of your solid fabric and seven pieces of your printed fabric. When cutting these fabric circles, remember to add a 3/4 inch (about 1.9 cm) seam allowance all around the perimeter of your paper pattern. This allowance is critical for the sewing process. Trace the circle onto the wrong side of your fabrics and cut carefully, ensuring clean edges for best results.
Step 3: Stitching the Fabric Circles Together
Take one solid fabric circle and one printed fabric circle. Place them right sides together, aligning their edges perfectly. Lay your original 5.9-inch paper pattern on top of the fabric layers, centered, and trace the circle onto the fabric. This traced line will be your sewing guide. Now, using your sewing machine, sew precisely along this traced line. IMPORTANT: Remember to leave an approximately 1-inch (2.5 cm) opening unsewn along the edge. This opening is vital for turning the fabric right side out later. Repeat this process for all remaining pairs of solid and printed fabric circles. Once all circles are sewn, carefully trim the excess fabric from the seam allowance, leaving about 1/4 inch (0.6 cm) from the sewn line, but be very careful not to cut into your stitches. Do not trim the fabric around the unsewn opening.
Step 4: Turning and Pressing
Through the 1-inch opening you left in each fabric circle, carefully flip each piece right side out. Use a pointy tool (like a chopstick or a turning tool) to gently push out the curved edges, ensuring they are smooth and well-rounded. Once all circles are turned, the raw edges of the opening will be tucked inside. Hand-sew this opening closed using a ladder stitch or slip stitch. This stitch is virtually invisible and will give your circles a neat, finished look. After sewing, take each circle to your ironing board and press it thoroughly with a hot iron. This step is crucial for achieving crisp edges and a professional finish, making subsequent folding steps much easier.
Step 5: Crafting the Flower Petal Pattern
Now, let’s create the unique pattern for folding your flower petals. Take your original 5.9-inch paper circle pattern and fold it exactly in half, then cut along the fold to create two half-circles. Take one of these half-circles. From one corner of the straight edge, measure 2.36 inches (approximately 6 cm) along the curved side and mark this point. Connect this new mark with the *opposite* corner of the straight edge with a straight line. Fold the paper along this diagonal line. Next, you’ll notice a small curved part of the original half-circle that is still exposed; fold this small curved part back along the diagonal fold. When you unfold it partially, you should have a pattern that resembles a ‘pizza slice’ shape – a triangle with a slight curve along one side. This is your petal folding template.
Step 6: Marking Your Petals for Folding
Take each of your prepared fabric circles and fold it exactly in half. Mark the midpoint along the straight folded edge. This mark will help with alignment. Place your newly created ‘pizza slice’ paper pattern onto the folded fabric circle, aligning the straight edge of the pattern with the folded edge of the fabric circle and the midpoint. Trace the diagonal edge of the paper pattern onto the fabric using a fabric marker or tailor’s chalk. Repeat this precise marking for all seven fabric circles. These lines are your guides for the final folding and sewing of the petals, so accuracy is key.
Step 7: Assembling the Flower Structure
Now it’s time to connect your individual petals to form the flower. Take two of your marked fabric circles. Place them one on top of the other, with their solid sides facing each other. Carefully match up the midpoints you marked in the previous step and align the traced diagonal lines. Secure these two pieces together with pins, ensuring they don’t shift. Using your sewing machine, sew precisely along the traced diagonal line. Next, take a third fabric circle, pin it to the sewn pair, aligning midpoints and traced lines, and sew them together in the same manner. Continue this process, adding one fabric circle at a time, pinning and sewing, until you have connected six of your seven circles. For the seventh and final piece, connect its raw edge to the first piece you started with, effectively closing the circle and forming the full flower shape. Ensure all connections are strong and neat.
Step 8: Final Folds and Finishing Touches
With all seven fabric circles now sewn together in a ring, you will have a series of connected “flaps.” Go back to your ironing board and press all the seams open. This helps the fabric lie flat and reduces bulk. Now, carefully connect the “petals” together with pins. To do this, fold each individual sewn section along the crease that naturally forms when the seams are pressed open. This will create the dimensional, folded look of the flower. Ensure your folds are crisp and aligned. Once pinned, sew along the drawn lines (the diagonal lines you traced in Step 6) to secure these folds in place. After sewing these final lines, give your entire placemat one last thorough press with the iron. This final pressing step is essential for setting the folds, giving your placemat its finished, structured, and beautiful flower appearance.
Pro Tips for a Flawless Finish
- Fabric Selection: While cotton is recommended for its washability and crispness, consider other medium-weight fabrics like linen blends for different textures. Always pre-wash and press your fabrics before cutting to prevent shrinking after your project is complete.
- Precision is Key: In sewing, even small inaccuracies can affect the final look. Take your time with measuring, marking, and cutting. A rotary cutter with a mat can offer more precision than scissors for circles.
- Pressing Power: Don’t underestimate the power of a good iron! Pressing at each stage not only makes your work neater but also helps set the seams and folds, leading to a much more professional finish.
- Thread Choice: Use a good quality polyester all-purpose thread that matches one of your fabric colors. This helps stitches blend in.
- Practice Makes Perfect: If you’re new to sewing circles or precise cuts, consider doing a practice run with scrap fabric first.
- Customization: Experiment with different fabric combinations. A bold print on one side and a subtle texture on the other can create dynamic visual interest. You could even try different sizes for a set of varied placemats.
Caring for Your Handmade Placemats
To ensure your beautiful folded flower placemats last for years to come, proper care is essential. Generally, machine wash them in cold water on a gentle cycle with a mild detergent. Avoid harsh chemicals or bleach, which can fade fabric colors. Tumble dry on low or air dry flat to maintain their shape. A quick press with a warm iron after washing and drying will help restore their crispness and intricate folds, making them look brand new for every meal.
Frequently Asked Questions (FAQ)
- What kind of fabric is best for this project?
Medium-weight cotton fabrics, such as quilting cottons, are highly recommended. They are easy to work with, hold their shape well, and are durable and washable, making them ideal for placemats. - Can I make these placemats in a different size?
Yes, absolutely! The dimensions provided create a standard-sized placemat. To adjust the size, simply scale your initial circle pattern (5.9 inches diameter) up or down, and then proportionally adjust the 2.36-inch measurement for the petal pattern. Remember to keep all proportions consistent. - Is this project suitable for beginners?
While it involves some precise cutting and sewing, a confident beginner with basic sewing machine skills should be able to complete this project. The detailed steps and the visual guide from Thuy crafts make it very accessible. - How long does it take to make one placemat?
The time required can vary based on your sewing experience and speed. On average, expect to spend about 2-4 hours on each placemat, especially if you take your time with cutting and pressing. - Can I use only one type of fabric instead of solid and printed?
You can, but the contrast between a solid and a printed fabric greatly enhances the folded flower effect, making the design pop. Using two different fabrics adds depth and visual interest to the petals.
Creating your own folded flower fabric placemats is more than just a craft project; it’s an opportunity to infuse your home with personal charm and elegance. The satisfaction of seeing your dining table adorned with these unique, handcrafted pieces is truly rewarding. We encourage you to gather your materials, follow these steps with patience and creativity, and enjoy the process of bringing this beautiful design to life. Don’t hesitate to experiment with different fabric pairings to create a collection that perfectly suits your style. Share your creations, inspire others, and revel in the beauty of handmade home decor!