
Cultivate Your Own Endless Supply of Fresh Herbs and Vegetables: A Guide to Bottle Gardening with Recycled Plastic
There’s an undeniable joy that comes from cooking with fresh, vibrant ingredients. For my family’s pasta dishes, homemade pizzas, and countless other meals, I always strive for the best possible herbs and vegetables. However, the pursuit of quality often comes with its challenges. Store-bought fresh-cut herbs and greens tend to wither quickly, while pre-potted options, though initially promising, often meet a similar fate. The cost of organic produce, my preferred choice, can also be prohibitive, adding up significantly over time.
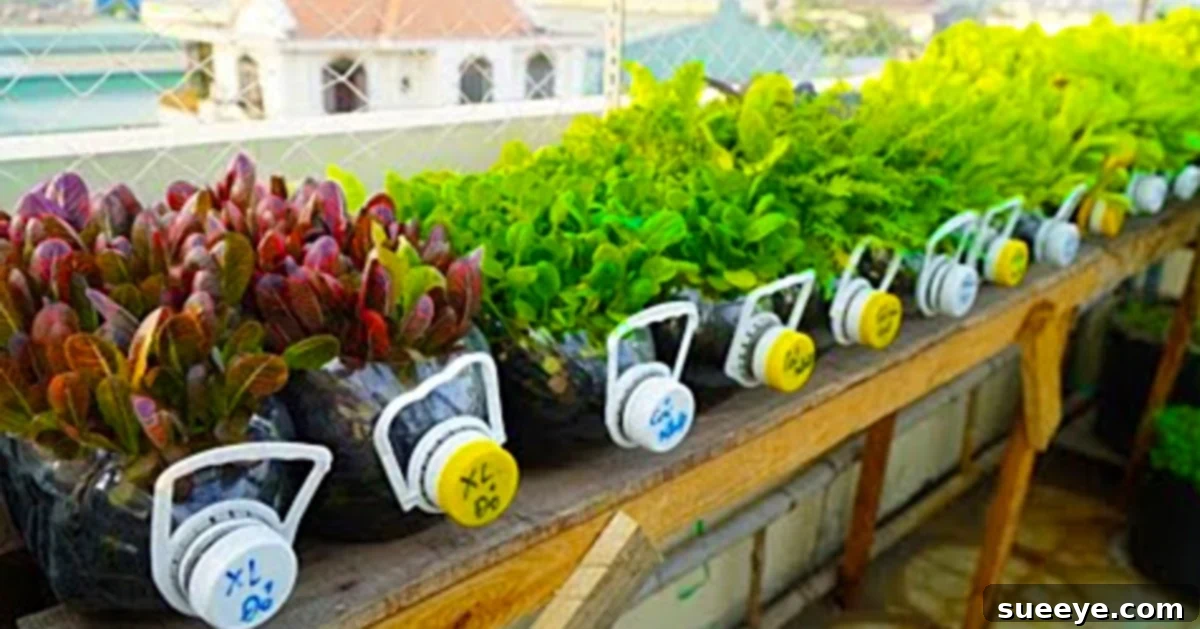
My quest for a more sustainable and affordable solution led me down a fascinating path. Recently, I stumbled upon a captivating video on YouTube that unveiled a remarkably simple yet ingenious method: growing an almost infinite number of vegetable and lettuce plants using everyday recycled plastic bottles. The video showcased a thriving rooftop garden, flourishing with all kinds of produce, achieved with minimal to zero cash outlay. The presenter demonstrated how easy it is to cultivate a continuous food supply right at home, suggesting that by adopting this method for even a year, one could significantly reduce, if not eliminate, the need to purchase fresh produce from the grocery store. The cutting and growing techniques were surprisingly straightforward, making this an accessible project for anyone.
Embrace Sustainable Living: Why Bottle Gardening is a Game-Changer
Transforming empty plastic bottles into vibrant mini-gardens is more than just a clever trick; it’s a powerful step towards a more sustainable and self-sufficient lifestyle. This method offers a multitude of benefits that extend far beyond simply having fresh greens on hand.
Unlocking Significant Cost Savings
One of the most immediate and tangible advantages of bottle gardening is the remarkable reduction in your grocery bill. The cost of fresh herbs, leafy greens, and organic vegetables can quickly deplete your budget. By growing your own, you essentially eliminate this recurring expense. Imagine the savings when you no longer need to buy pricey basil, fancy lettuce mixes, or specialty herbs every week. This method leverages readily available “waste” materials and minimal initial investment, turning what once was an expensive necessity into a free, abundant resource right in your backyard, balcony, or windowsill.
A Step Towards a Greener Planet
In an era where environmental consciousness is paramount, bottle gardening stands out as an exemplary practice of upcycling. Instead of contributing to overflowing landfills, you’re repurposing plastic bottles, giving them a new, productive life. This reduces plastic waste and minimizes your carbon footprint by cutting down on the transportation and packaging associated with store-bought produce. It’s a tangible way to participate in the circular economy and promote eco-friendly living from the comfort of your home.
The Unbeatable Taste and Nutrition of Homegrown
There’s simply no comparison to the flavor of freshly harvested produce. Vegetables and herbs picked moments before they hit your plate retain maximum flavor, aroma, and nutritional value. Unlike produce that travels long distances, losing vitality along the way, your homegrown greens are bursting with freshness. Furthermore, you have complete control over what goes into your garden, ensuring your food is free from harmful pesticides and chemicals, contributing to a healthier diet for you and your family.
Gardening for Every Space: Urban Sanctuaries
Lack of garden space is no longer an excuse. Bottle gardening is perfectly suited for urban dwellers, apartment residents, and anyone with limited outdoor areas. These compact containers can be arranged on balconies, hung on walls, placed on windowsills, or neatly organized on a rooftop. This method democratizes gardening, making it accessible to virtually anyone, transforming small, neglected spaces into thriving green sanctuaries. It’s an ideal solution for creating a vertical garden or a mini-farm in the most unexpected places.
Simple, Rewarding, and Educational
The beauty of this system lies in its simplicity. It requires no specialized skills or expensive equipment, making it an excellent project for beginners and seasoned gardeners alike. The quick growth of many leafy greens and herbs offers immediate gratification, fostering a sense of accomplishment. Moreover, it’s a fantastic educational activity for children, teaching them about plant life cycles, sustainable practices, and where their food truly comes from, fostering an appreciation for nature and healthy eating.
Essential Materials for Your DIY Bottle Garden
Getting started with your bottle garden requires only a handful of common items, many of which you likely already have around the house.
-
Selecting Your Containers: Gallon Size Plastic Bottles
The standard gallon-size plastic bottle is ideal due to its volume, which provides ample space for root development and soil. Look for sturdy bottles from water, milk, or juice. Before use, ensure they are thoroughly cleaned with soap and water to remove any residue and allowed to dry completely.
-
Tools for the Task: Box Cutter or Scissors
A sharp box cutter or a sturdy pair of scissors will be necessary to cut the opening in your plastic bottles. Always exercise caution when using sharp tools, and if children are involved, adult supervision is paramount.
-
The Foundation: Quality Potting Soil
The success of your plants largely depends on the soil. Opt for a good quality, well-draining potting mix that is rich in organic matter. You can find organic potting soils that are free from synthetic fertilizers and pesticides, aligning perfectly with the sustainable ethos of your bottle garden. Avoid using garden soil directly, as it can be too dense and may contain pests or diseases.
-
Your Green Allies: Plants or Seeds
This is where the magic begins! You can start your bottle garden from seeds or small plant starts (seedlings). Excellent choices for this method include various types of lettuce (romaine, butterhead), spinach, kale, mustard greens, Swiss chard, basil, mint, parsley, cilantro, chives, and even smaller fruiting plants like cherry tomatoes or strawberries. Choose varieties that are known to do well in containers.
-
The Elixir of Life: Water
Access to clean water is crucial for hydrating your plants. Tap water is generally fine, but if you want to be even more sustainable, consider collecting rainwater. Consistent and appropriate watering is key to healthy plant growth.
Step-by-Step Guide to Creating Your Bottle Garden
Creating your recycled bottle garden is a straightforward process. Follow these steps to transform discarded plastic into a thriving miniature farm.
1. Take a few empty gallon-size bottles and cut a hole in one of the sides in an oval shape.
Begin by thoroughly cleaning and drying your gallon plastic bottles. Using a marker, carefully draw an oval or rectangular shape on one of the wider sides of the bottle. This opening will serve as the planting area. Ensure the opening is large enough to comfortably plant and tend to your greens, but also leaves enough structural integrity for the bottle. Using your box cutter or sharp scissors, carefully cut along the marked line. For safety, you might want to start with a small puncture and then enlarge the cut, always cutting away from your body.
2. Crucial Step: Add Drainage Holes to Prevent Waterlogging
Before adding soil, it is absolutely essential to create several small drainage holes at the very bottom of the bottle. Without proper drainage, water will accumulate, leading to root rot and ultimately killing your plants. You can use a heated skewer, a small drill bit (with caution), or the tip of your box cutter to create 3-5 small holes, approximately 1/4 inch in diameter, spread across the bottom surface. This allows excess water to escape, ensuring healthy root development.
3. Then add soil and the seeds of your choosing and water, then put in a warm sunny area and water them every day.
Once your bottle has a clean opening and drainage holes, it’s time to add your potting soil. Gently fill the bottle with your chosen potting mix, leaving about an inch or two of space from the top edge of the opening. If you are planting seeds, follow the specific instructions on your seed packet for planting depth and spacing. For seedlings, carefully transplant them, ensuring their roots are well covered with soil. Lightly firm the soil around the base of the plants or over the seeds.
4. Initial Watering and Ideal Placement
Immediately after planting, give your bottle garden a thorough watering until you see water starting to drain from the bottom holes. This helps settle the soil around the seeds or roots. Next, place your newly planted bottles in a warm, sunny location where they can receive at least 6-8 hours of direct sunlight per day. South-facing windows, balconies, or rooftops are often ideal. Sunlight is critical for photosynthesis and robust plant growth.
5. Then enjoy watching your beautiful plant grow and then harvest them for food for your family. You can write what types of plants are in the container on the cap if you want to as well.
From this point on, your main task is to provide consistent care. Check the soil moisture daily by sticking your finger about an inch deep. If it feels dry, it’s time to water. Avoid overwatering, which can lead to root rot, but also prevent the soil from drying out completely. As your plants grow, you’ll witness the satisfying transformation from seed to lush green foliage. Once they reach a harvestable size, typically after a few weeks for leafy greens, you can begin to enjoy your fresh, homegrown produce. For “cut-and-come-again” greens like lettuce or spinach, you can harvest the outer leaves, allowing the plant to continue producing new growth from the center. And yes, labeling the bottle’s cap or side with the plant type is an excellent way to stay organized, especially if you’re growing a variety of plants!
Maximizing Your Bottle Garden’s Potential: Advanced Tips and Care
While the basic steps are simple, a few additional tips can help you get the most out of your bottle garden and ensure a continuous, bountiful harvest.
Optimal Sun Exposure and Rotation
Even in sunny spots, light can be uneven. Rotate your bottles every few days to ensure all sides of your plants receive adequate sunlight, promoting uniform growth. Observe how the sun moves across your chosen location throughout the day and adjust the placement of your bottles accordingly to maximize exposure.
Watering Wisely for Healthy Roots
While daily watering might be necessary in hot, dry climates, always check the soil before you water. Overwatering is a common killer of container plants. The “finger test” is your best friend: if the top inch of soil feels dry, it’s time to water. For a truly sustainable approach, consider investing in a rain barrel to collect rainwater for your garden.
Simple Nutrient Boosts
Potting soil typically provides initial nutrients, but as your plants grow and you harvest repeatedly, these nutrients will deplete. To maintain vigorous growth, especially for long-term production, consider adding a diluted liquid organic fertilizer every 2-4 weeks. Options like fish emulsion, seaweed extract, or compost tea can provide essential micronutrients without harsh chemicals.
Natural Pest Management
Container gardens are generally less prone to widespread pest infestations, but occasional visitors can occur. Inspect your plants regularly. If you spot pests, try natural remedies first: a strong spray of water can dislodge aphids, or a diluted soap solution (a few drops of mild dish soap in a spray bottle of water) can deter many soft-bodied insects. Companion planting, such as placing marigolds nearby, can also act as a natural deterrent.
Ensuring a Continuous Harvest: Succession Planting
To truly achieve an “endless food supply,” practice succession planting. This means planting new seeds or seedlings every 2-3 weeks. As one batch of plants matures and is harvested, the next batch will be ready to take its place, ensuring you always have fresh greens available and avoid periods of scarcity.
Embracing Vertical Growth
To maximize space, especially in urban environments, think vertically. You can design simple racks or hang your bottles using sturdy string or wire, creating a stunning green wall. This not only increases your growing capacity but also adds an aesthetically pleasing touch to your outdoor or indoor space.
This simple idea, born from a desire for fresh, affordable, and organic produce, has the potential to transform how we think about our food sources. By repurposing plastic bottles, you’re not just growing plants; you’re cultivating a more sustainable lifestyle, reducing waste, and enjoying the unparalleled satisfaction of eating food you’ve grown yourself. This method is incredibly adaptable and rewarding, proving that you don’t need vast land or a hefty budget to enjoy an abundance of fresh, healthy, and delicious food. So, gather your bottles, prepare your soil, and embark on your journey to an endless supply of homegrown goodness!