
Smooth Operation: How to Fix a Stuck Sliding Glass Door Like New
A stubborn sliding glass door can be a source of daily frustration, transforming a simple transition between your indoor and outdoor spaces into an unexpected workout. If you find yourself wrestling with a door that’s hard to open or close, resisting your every effort, the good news is that a complete replacement is often unnecessary. More often than not, the solution is a straightforward and satisfying DIY fix: a thorough cleaning of the tracks and proper lubrication of the lower rollers. This comprehensive guide will walk you through the process, ensuring your sliding glass door glides effortlessly, just like it did on its very first day.
This tutorial is inspired by the practical advice shared by DIY with Michael Borders on YouTube, demonstrating how simple techniques and the right products can bring remarkable results. You’ll be amazed at how quickly you can restore your door’s functionality without needing specialized skills or expensive tools.
RELATED: How To Fix A Noisy Garage Door
Imagine your patio door gliding open with just a gentle push, welcoming fresh air and easy access to your backyard. By following these steps and using the recommended products, you’ll achieve that seamless operation. This method isn’t just easy; it’s an effective way to prolong the life of your sliding glass door and enhance your home’s comfort and accessibility.
Why Do Sliding Glass Doors Get Stuck? Understanding the Common Culprits
Before diving into the fix, it’s helpful to understand what causes sliding glass doors to become difficult to operate. The primary culprits are usually straightforward and easily addressed: accumulation of dirt and debris in the tracks, and lack of lubrication or wear on the rollers. Over time, dust, pet hair, leaves, and even small pebbles can settle into the door tracks, creating friction and impeding the rollers. Without proper lubrication, the rollers themselves can become stiff or corroded, further hindering smooth movement. Addressing these issues directly is key to restoring your door’s functionality.
Essential Materials for Cleaning and Lubricating Your Sliding Glass Door Rollers
Gathering your materials before you start will make the process much smoother. You likely have most of these items already in your home, underscoring how accessible this DIY project is.
- Vacuum Cleaner with Crevice Tool: Essential for removing loose dirt and debris from the tracks.
- Clean Cloths (at least two): One for damp cleaning, one for drying. Microfiber cloths work well for a lint-free finish.
- Dawn Dish Soap or Mild Detergent: Excellent for cutting through grease and grime without being too harsh on door materials.
- White Lithium Grease (with precision straw): The star of the show for long-lasting lubrication. Its weather-resistant properties make it ideal for outdoor-facing components.
- Optional: Stiff Brush or Old Toothbrush: For scrubbing stubborn dirt out of the tracks.
- Optional: Safety Glasses and Gloves: Recommended for eye and skin protection, especially when using lubricants or cleaning solutions.
Step-by-Step Guide: How to Clean and Lubricate Your Sliding Glass Door for Smooth Operation
Step 1: Thoroughly Clean the Sliding Door Tracks
The foundation of a smoothly operating door is impeccably clean tracks. This step is critical, as any remaining dirt will quickly attract new grime and negate your efforts.
- Vacuum Loose Debris: Begin by using your vacuum cleaner, ideally with a crevice tool attachment, to suck up all visible dirt, dust, hair, and small particles from the entire length of your sliding door tracks. Pay close attention to corners and grooves where debris tends to accumulate. This initial vacuuming prevents you from turning dry dirt into muddy paste in the next step.
- Prepare Cleaning Solution: Mix a small amount of Dawn dish soap with warm water in a bowl or bucket. The goal is a slightly soapy solution, not excessive suds.
- Wipe Down with Soapy Water: Dampen a clean cloth with your soapy water solution (do not saturate it). Carefully wipe down the entire surface of the tracks, applying gentle pressure. For stubborn grime, an old toothbrush or a stiff brush can be incredibly effective in dislodging dirt from tight spaces and corners. Scrub thoroughly but gently, ensuring you don’t scratch the track surface.
- Rinse (If Necessary) and Dry: If you used a significant amount of soap or encountered heavy grime, you might want to wipe the tracks again with a cloth dampened with plain water to remove any soap residue. Immediately after, use a separate, completely dry cloth to wipe the tracks dry. Ensuring the tracks are bone dry is crucial; moisture can attract new dirt and potentially lead to rust over time.
Step 2: Lubricate the Inner Rollers on One Side
Once the tracks are pristine, it’s time to lubricate the moving parts. White Lithium Grease is an excellent choice for this application due to its durability, resistance to temperature changes, and ability to reduce friction effectively.
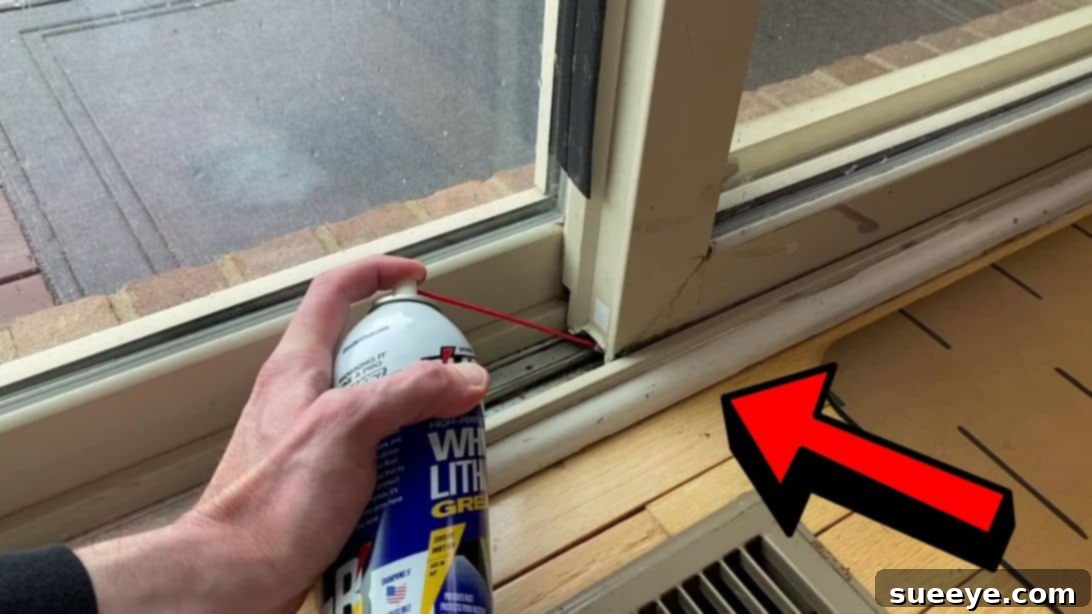
- Prepare the Lubricant: Take your can of White Lithium Grease and attach the precision straw securely. This straw is vital for directing the lubricant exactly where it’s needed without making a mess.
- Target the Top/Center Track Rod: Aim the precision straw into the top of the track or directly onto the center rod where the door’s rollers make contact. You might need to gently pry the door slightly away from the frame or track to get better access to the inner mechanism, but often the straw can fit into the small gaps.
- Apply a Small Amount: Spray a controlled, small burst of White Lithium Grease into the target area. The key is to apply a thin, even coat. Do not overspray, as excessive grease can attract more dirt and become counterproductive over time.
- Distribute the Grease: Carefully open and close the door several times. This action allows the newly applied grease to spread evenly across the inner rollers and their mechanisms, ensuring thorough lubrication and reducing friction. You should start to feel the door moving more smoothly already.
Step 3: Lubricate the Opposite Side of the Rollers for Full Coverage
To ensure comprehensive lubrication and optimal performance, repeat the process for the rollers on the other side of the door.
- Access the Opposite Side: Shift the door to expose the previously unlubricated set of rollers or the opposite end of the track where the rollers meet.
- Apply Grease: Again, using the precision straw, spray a small, controlled amount of White Lithium Grease into the corresponding roller mechanism or track rod on this side. Remember, a little goes a long way.
- Cycle the Door: Slide the door fully closed and then fully open multiple times. This continuous movement is essential for distributing the lubricant effectively throughout all the roller components, ensuring every part that contributes to the door’s movement benefits from the grease.
After completing these steps, you should notice a dramatic improvement in your sliding glass door’s operation. It should now glide with remarkable ease, feeling practically brand new!
Pro Tips for Ongoing Sliding Glass Door Maintenance
To keep your sliding glass door operating smoothly for years to come, consider incorporating these simple maintenance tips into your routine:
- Regular Track Cleaning: Make it a habit to vacuum the tracks every few weeks, or at least once a month, especially in dusty or high-traffic areas. This prevents debris from building up and causing issues.
- Seasonal Lubrication: Reapply White Lithium Grease to your rollers twice a year, perhaps in spring and fall, to ensure continuous smooth operation and protection against the elements.
- Inspect for Wear: Occasionally check the rollers for signs of wear, such as flat spots or excessive wobbling. If rollers are severely worn, cleaning and lubrication might only be a temporary fix, and replacement might be needed.
- Check for Misalignment: If your door still feels stiff after cleaning and lubricating, it might be slightly off its track or out of alignment. Some doors have adjustment screws on the bottom edge to raise or lower them. Consult your door’s manual or a professional if you suspect misalignment.
Benefits of a Well-Maintained Sliding Glass Door
Beyond the immediate satisfaction of an easily gliding door, there are several long-term benefits to proper maintenance:
- Extended Lifespan: Regular cleaning and lubrication reduce wear and tear on the rollers and tracks, significantly extending the life of your door.
- Improved Energy Efficiency: A door that closes properly creates a better seal, preventing drafts and improving your home’s insulation, which can lead to energy savings.
- Enhanced Security: A door that latches securely is more resistant to forced entry, contributing to your home’s safety.
- Increased Home Value: Well-maintained features contribute positively to your home’s overall appeal and value.
- Personal Comfort: Eliminating the struggle of a stuck door simply makes your daily life more pleasant and convenient.
*All images in this guide are credited to DIY with Michael Borders via YouTube. We highly recommend visiting his channel and subscribing for more invaluable DIY tips and tutorials!
For a visual walkthrough of these steps, be sure to watch the full video tutorial. Seeing the process in action can provide additional clarity and confidence as you undertake this simple yet effective home improvement project.
Ready to make your sliding glass door open like new? With just a little effort and the right approach, you’ll transform a frustrating feature into a smooth, effortless gateway to your home’s outdoor beauty.