
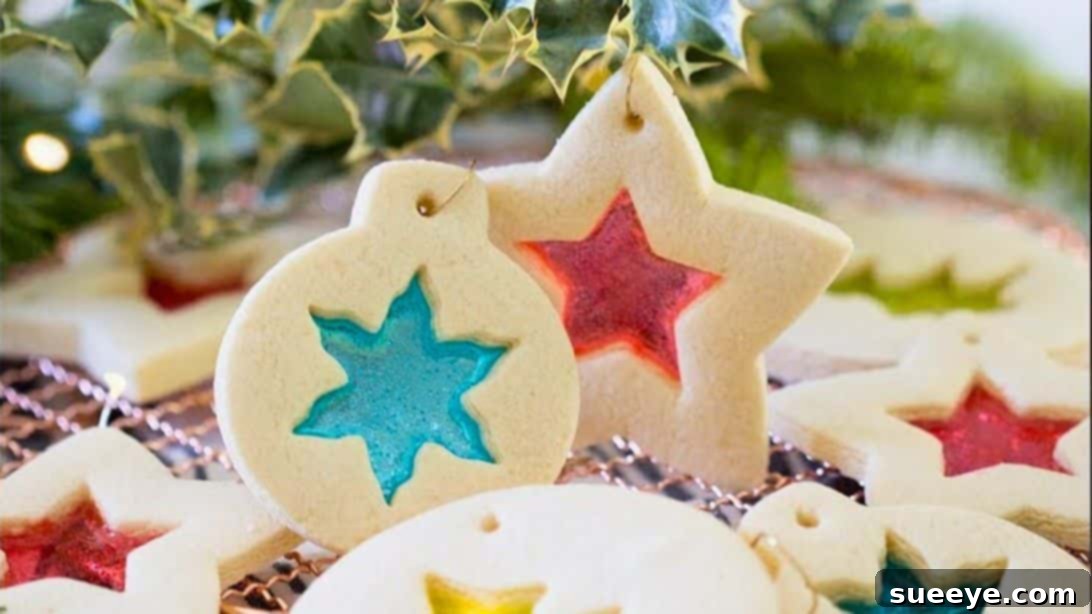
Easy Stained Glass Christmas Cookies: A Dazzling Holiday Recipe
The holiday season is a magical time, filled with warmth, joy, and the irresistible aroma of freshly baked goods. Among the myriad of festive treats, stained glass Christmas cookies stand out as true showstoppers. Their shimmering, candy-filled centers mimic the exquisite beauty of real stained glass, making them not just a delicious dessert but also a stunning edible decoration. You might think these intricate cookies are reserved for expert bakers, but prepare to be delightfully surprised! With this straightforward recipe, inspired by culinary insights from channels like Preppy Kitchen on YouTube, you’ll discover just how simple it is to craft these edible masterpieces. Get ready to impress every guest with cookies so beautiful, they’ll wonder if they’re store-bought or even too pretty to eat!
RELATED: If you’re expanding your holiday baking repertoire, don’t miss our Easy Snowball Christmas Cookies Recipe for another festive favorite that melts in your mouth.
Why Stained Glass Christmas Cookies Are a Holiday Must-Have
Stained glass cookies offer a unique blend of visual appeal and delightful taste, making them a perfect and memorable addition to your holiday baking repertoire. Their translucent candy “windows” catch the light beautifully, creating a magical glow that instantly elevates any Christmas spread. Imagine them hanging delicately on your Christmas tree as charming homemade ornaments, or arranged artfully on a dessert platter, sparkling amidst other festive treats. Beyond their aesthetic charm, these festive treats are incredibly versatile. You can customize them with different cookie cutter shapes, various vibrant candy colors, and even create small holes for ribbons or hooks, transforming them into personalized gifts or delightful keepsakes. They’re a wonderful and engaging project for baking with family, creating cherished memories as you watch the candies melt into vibrant, jewel-like panes.
The surprising ease of making these cookies means anyone, from novice bakers to seasoned pros, can achieve stunning results. They offer that coveted “wow” factor without requiring hours of complicated work or a long list of unusual ingredients. This makes them ideal for busy holiday schedules when you want maximum impact with minimal fuss. Plus, the sheer joy of seeing the radiant colors come to life in your kitchen is a reward in itself, perfectly capturing the spirit of the season.
The Simplicity Behind the Magic: Ingredients You’ll Need
One of the most appealing aspects of these dazzling homemade ornaments and treats is their surprisingly simple ingredient list. You don’t need exotic items or a special trip to a gourmet store; most of what you’ll need is likely already in your pantry! This recipe requires just eight core ingredients, combining classic butter cookie elements with the ingenious addition of hard candies to create that iconic “stained glass” effect. Prepare to gather your essential baking staples and a handful of colorful hard candies, and you’ll be well on your way to creating these holiday wonders. These cookies are not just easy; they are a testament to how simple components can yield truly extraordinary results that taste as good as they look.
Here’s another delightful recipe to add to your holiday baking list, perfect for pairing with your stained glass creations: Easy Gingerbread Cookies for Christmas.
Essential Ingredients for Dazzling Stained Glass Christmas Cookies
For the Flavorful Cookie Dough:
- 1 cup (2 sticks) unsalted butter: Ensure your butter is softened to room temperature. This is crucial for optimal creaming with sugar, which incorporates air and leads to a tender, light cookie texture.
- 1 cup granulated sugar: Provides the essential sweetness and contributes to the crisp, golden edges of the cookie.
- 2 large eggs: Act as a vital binder, adding richness, moisture, and helping to emulsify the dough, ensuring a smooth consistency.
- 4 cups all-purpose flour: The fundamental structural base of the cookie. Accurate measurement is key for achieving the right dough consistency and preventing a tough cookie.
- 1/2 cup cornstarch: This is a secret ingredient for tenderizing the dough! It helps to soften the flour’s gluten, preventing the cookies from becoming too tough or chewy, and gives them a delicate, melt-in-your-mouth texture.
- 3/4 teaspoon kosher salt: Essential for balancing the sweetness of the cookies and candies, and it dramatically enhances all the other flavors present in the dough.
- 1 teaspoon vanilla extract: Adds a warm, classic, and comforting flavor that beautifully complements the sweetness of the cookies and the vibrant notes of the candies.
For the Vibrant Windowpanes:
- 1/3 cup hard candies: The star of the show for the “stained glass” effect! Opt for clear, brightly colored, individually wrapped hard candies (such as Jolly Ranchers, peppermints, butterscotch discs, or fruit-flavored hard candies). Avoid chewy, gummy, or chocolate-filled candies, as they will not melt properly into a transparent, glossy pane.
Step-by-Step Guide: Crafting Your Stained Glass Christmas Cookies
Follow these detailed steps carefully to ensure your stained glass Christmas cookies turn out perfectly, ready to dazzle your holiday guests or adorn your festive home. Precision and a little patience will result in truly beautiful and delicious treats that embody the spirit of the season.
Step 1: Prepare Your Oven and Baking Sheets
Begin by preheating your oven to 375°F (190°C). A consistently preheated oven is crucial for even baking and proper candy melting. While the oven heats, prepare your baking sheets by lining them with parchment paper or silicone baking mats. This prevents sticking, ensures easy removal of the delicate cookies, and makes cleanup a breeze.
Step 2: Combine the Dry Ingredients for the Cookie Dough
In a large mixing bowl, take the time to sift together the all-purpose flour, cornstarch, and kosher salt. Sifting isn’t just for show; it aerates the flour, prevents lumps, and ensures all dry ingredients are thoroughly and evenly distributed, leading to a more uniform and tender cookie texture. After sifting, whisk them gently until they are thoroughly combined and set aside.
Step 3: Cream the Wet Ingredients for a Rich Base
Using the bowl of your stand mixer fitted with a paddle attachment (or a hand mixer), cream together the softened unsalted butter and granulated sugar on medium speed. Continue mixing until the mixture is light, fluffy, and pale in color, typically 2-3 minutes. This process incorporates air, which contributes significantly to a tender and delicate cookie. Next, add the eggs one at a time, mixing well after each addition to ensure full incorporation. Finally, stir in the vanilla extract. Throughout this process, remember to scrape down the sides of the bowl occasionally with a spatula to ensure all ingredients are evenly mixed and no pockets of unmixed butter or sugar remain at the bottom.
Step 4: Gradually Incorporate Dry into Wet Ingredients
With the mixer on low speed, gradually add the sifted dry mixture (flour, cornstarch, salt) to the wet ingredients. Mix only until just combined. It’s essential to be careful not to overmix the dough, as overmixing can develop the gluten in the flour, resulting in tough, less tender cookies. Stop mixing as soon as no streaks of flour are visible and the dough comes together.
Step 5: Chill the Cookie Dough for Easier Handling
Divide the freshly made cookie dough into two equal portions and gently shape each into a flat disk. This flat shape helps the dough chill more quickly and evenly. Wrap each disk tightly with plastic wrap to prevent it from drying out. Transfer the wrapped dough to the refrigerator and chill for at least 1 hour, or preferably longer (up to 2-3 hours). Chilling is a vital step: it firms up the butter, making the dough much easier to handle, preventing excessive spreading during baking, and resulting in cookies with crisp, defined edges.
Step 6: Roll, Cut, and Shape Your Cookies
Once the dough is properly chilled, unwrap one disk and place it on a lightly floured surface or between two sheets of parchment paper. Using a rolling pin, roll the dough evenly to an approximate thickness of 1/4 inch. This thickness is ideal for structural integrity and for holding the melted candy without breaking. Use a medium or large cookie cutter to cut out your desired shapes (stars, Christmas trees, bells, circles, gingerbread men – whatever festive shapes you prefer). Then, take a smaller cookie cutter or a sharp paring knife to carefully cut out the “window” shape from the center of each larger cookie. If you plan to hang your cookies as homemade ornaments, don’t forget to make a small hole at the top of each cookie using a skewer, toothpick, or the tip of a small round piping nozzle.
Step 7: Arrange Cookies on Baking Sheets
Carefully transfer your cut-out cookie dough shapes onto the prepared baking sheets lined with parchment paper or silicone mats. Leave at least 1-2 inches of space between each cookie to allow for slight expansion during baking and to prevent them from merging. At this stage, you might re-roll any dough scraps (chilling again if it becomes too warm) to cut out more cookies, ensuring minimal waste and maximizing your batch.
Step 8: Prepare and Fill with Crushed Candies
Unwrap your chosen hard candies and place them in a sturdy ziplock bag. Using a rolling pin, a meat mallet, or even the bottom of a heavy pan, carefully crush the candies into small to medium-sized pieces. You want a mix of fine dust and small irregular chunks for the best melting effect, but avoid very large pieces that might not melt evenly or completely. Place the crushed candies inside the cutout “window” of each cookie, ensuring they are distributed evenly. Don’t overfill, as the candy will spread as it melts. A good rule of thumb is to fill them slightly below the height of the cookie dough to prevent overflow.
Step 9: Bake to Perfection and Allow to Cool Completely
Carefully transfer the baking sheets to your preheated oven. Bake the cookies for approximately 10-12 minutes at 375°F (190°C), or until the edges of the cookies are lightly golden brown and the candy centers have fully melted, becoming smooth and glossy. Keep a close eye on them, as baking times can vary between ovens. The candy should look like perfectly melted glass. Once baked, remove the baking sheets from the oven and allow the cookies to cool completely on the baking sheet. This is a crucial step: the melted candy will be extremely hot and sticky, resembling molten glass, and it needs ample time to cool and harden into its beautiful, translucent state. Attempting to move them too soon will result in broken cookies and messy, unset candy. Once completely cool and firm (this can take 30-60 minutes or more), gently lift them off the parchment paper. If you’ve made holes for hanging, now is the perfect time to add a festive ribbon or an ornament hook to each one, transforming them into stunning tree decorations.
Tips for Achieving Perfect Stained Glass Christmas Cookies Every Time
- Don’t Overwork the Dough: After adding the dry ingredients, mix only until just combined. Overmixing develops gluten in the flour, leading to a tough and less tender cookie texture.
- Choose the Right Candies: Stick to hard, clear, sugar-based candies. Avoid anything chewy, gummy, chocolate-filled, or creamy, as these will not melt into a clear, solid “glass” effect and can burn.
- Crush Candies Evenly: Aim for a mix of fine powder and small chunks. Too large chunks might not melt completely, leaving gaps, and too fine powder might result in a less vibrant, somewhat opaque color.
- Monitor Baking Time Closely: Ovens vary significantly, so watch for the cookie edges to turn a light golden color and the candy to be completely melted and smooth. Overbaking can cause the candy to caramelize too much (turning amber or brown) or the cookies to become overly crisp.
- Cool Completely on Sheet: This is perhaps the most critical tip for success. The candy is molten glass when hot and needs ample time to set. Patience here prevents breakage and ensures you have perfect, clear “windows.”
- Prevent Sticking: Always use parchment paper or silicone baking mats. Lightly greasing a baking sheet alone might not be sufficient to prevent the melted candy from sticking firmly.
- Handle with Care: Once cooled, these cookies, especially their delicate candy centers, are prone to cracking if handled roughly. Store them carefully to maintain their beautiful appearance.
Creative Variations & Serving Suggestions for Your Festive Treats
While the classic stained glass Christmas cookie is beautiful on its own, don’t hesitate to experiment with variations to truly personalize your holiday baking:
- Shape Play: Go beyond traditional circles. Use cookie cutters in the shape of stars, Christmas trees, gingerbread men, bells, snowflakes, or even tiny houses for a festive village effect.
- Color Themes: Sort your candies by color to create themed cookies – all reds and greens for a classic Christmas feel, blues and whites for a winter wonderland, or a rainbow assortment for a cheerful and vibrant display.
- Dusting & Decorating: Once cooled, you can lightly dust the cookie edges with powdered sugar for a “snowy” effect, or pipe intricate designs with royal icing around the candy window for added flair and elegance.
- Gifting: These cookies make incredibly thoughtful and impressive homemade gifts. Package them individually or in small stacks in clear cellophane bags, tied with a festive ribbon and a personalized tag.
- Display Ideas: Beyond hanging them on your Christmas tree, arrange them artfully on a tiered serving tray, use them as edible garnishes for holiday desserts, or even as charming place settings at a holiday dinner.
Storing Your Stained Glass Christmas Cookies to Maintain Freshness
To keep your beautiful stained glass Christmas cookies fresh and prevent the candy from becoming sticky or cloudy, proper storage is essential. Once completely cooled and hardened, store them in an airtight container at room temperature. It’s best to place parchment paper or wax paper between layers of cookies to prevent the delicate candy windows from sticking to each other. These cookies generally keep well for up to a week. If humidity is an issue in your environment, a common trick is to add a piece of white bread to the container (away from the cookies themselves) to absorb any excess moisture, though this isn’t always strictly necessary for cookies with hard candy elements. Avoid refrigerating, as condensation can affect the candy’s clarity and make it sticky.
Stained Glass Christmas Cookies: Your New Holiday Tradition
Creating stained glass Christmas cookies is more than just baking; it’s an art form that brings a touch of magic, wonder, and vibrant color to your holiday celebrations. With this comprehensive guide, you now have all the tools and knowledge to bake stunning, delicious, and incredibly impressive cookies that will be the talk of the season. Whether you’re making them for family, friends, as gifts, or simply to adorn your home, these sparkling treats are sure to become a cherished part of your holiday traditions. So, gather your ingredients, unleash your inner baker, and prepare to fill your home with the sweet scents and dazzling sights of homemade stained glass Christmas cookies!