
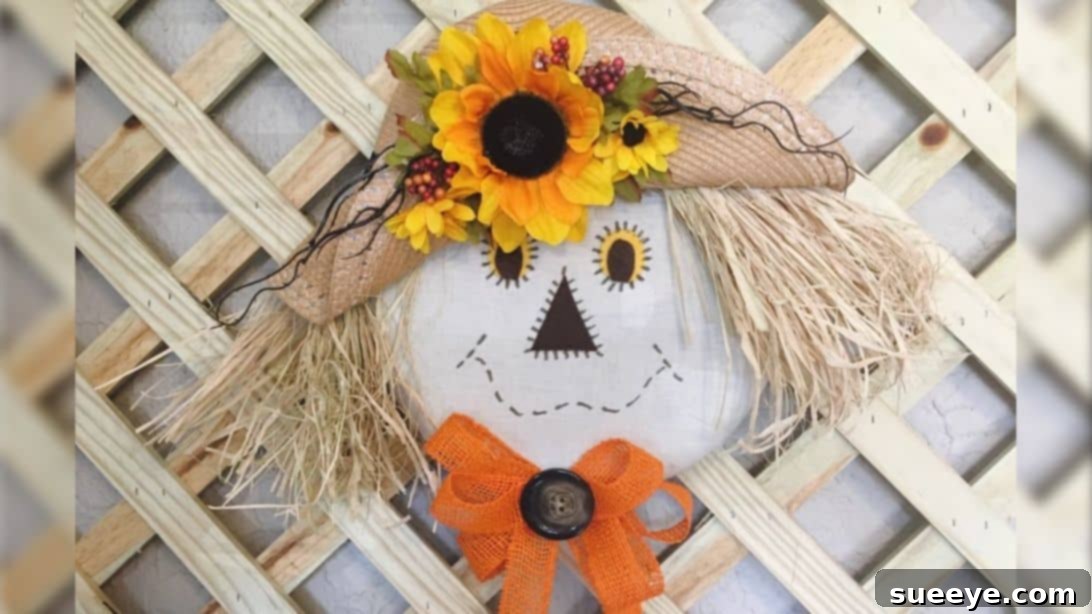
Craft a Charming DIY Scarecrow Wreath for Cozy Fall Decor
As the leaves begin to turn golden and a crisp chill fills the air, it’s the perfect time to infuse your home with the warm, inviting spirit of autumn. What better way to celebrate the beauty of the fall season than by crafting your own captivating decor? This step-by-step DIY project, inspired by the creative brilliance of Maymay Made It Crafts on YouTube, offers an incredibly charming and surprisingly simple way to create a scarecrow wreath that will become the focal point of your seasonal display. Forget complex techniques or expensive supplies; this delightful autumn craft is designed for crafters of all skill levels, requiring only a few readily available materials, many of which you can find at your local dollar store. Get ready to transform ordinary items into an extraordinary piece of fall art that will bring smiles to all who see it!
This tutorial will guide you through making a super easy scarecrow wreath that embodies rustic charm and whimsical appeal. It’s not just a decoration; it’s a statement piece that welcomes guests with farmhouse allure and celebrates the harvest season. Whether you’re looking to adorn your front door, brighten up an entryway, or add a festive touch to your living space, this handmade scarecrow wreath is the ideal project. Dive in and discover how effortless it is to bring this adorable scarecrow to life, adding a personal touch to your autumn home decor.
Materials Needed for Your Scarecrow Wreath:
Gathering your supplies is the first exciting step in any DIY project. For this charming scarecrow wreath, you’ll find that most items are affordable and easy to source, making this a budget-friendly autumn craft. Here’s what you’ll need to create your rustic masterpiece:
- 12-inch Foam Wreath Base: This forms the sturdy foundation for your scarecrow’s head. Its light weight makes it perfect for hanging.
- Floral Pins: Essential for securely attaching fabric and other embellishments to the foam wreath, ensuring everything stays in place.
- ½ Yard Beige Muslin Fabric: This fabric will elegantly wrap your wreath, providing a neutral, rustic “face” for your scarecrow. Its natural texture is ideal for achieving that authentic scarecrow look.
- Felt Scraps (Brown, Yellow, or other colors for features): Perfect for cutting out expressive facial features like eyes, nose, and mouth, allowing you to give your scarecrow a unique personality.
- Raffia: An absolute must for crafting the scarecrow’s iconic, straw-like hair and adding to its rustic charm.
- Straw Hat: A miniature straw hat adds instant character and is a quintessential element of any scarecrow. Choose one that fits proportionally with your 12-inch wreath.
- Assorted Faux Flowers: To decorate the hat and add a burst of autumnal color and vibrancy to your wreath. Think sunflowers, dahlias, or berries.
- Rustic Ribbon: For creating a decorative bow and adding an extra touch of flair to the bottom of the wreath. Burlap or plaid ribbons work wonderfully.
- Large Decorative Button: This will serve as a charming centerpiece for your ribbon bow, tying the whole design together.
- Marker (Permanent, fine-tip): For drawing on facial details and adding expressive lines to your scarecrow’s face.
- Hot Glue Gun and Glue Sticks: Your best friend for quick and strong adhesion, holding all the elements firmly in place.
- Sharp Scissors: For precise cutting of fabric, felt, ribbon, and raffia.
- Pipe Cleaners: Used for bundling raffia to create hair sections and securing the ribbon bow.
Directions for Creating Your Charming Scarecrow Wreath:
Now that you have all your materials assembled, let’s dive into the creative process. Follow these detailed steps to bring your adorable scarecrow wreath to life. Remember, crafting is about enjoying the process and letting your creativity shine!
Step 1: Preparing the Wreath Base and Adding Scarecrow Hair
Begin by taking your 12-inch foam wreath base. Carefully unroll your beige muslin fabric and start wrapping the wreath. Ensure the fabric is wrapped smoothly and snugly, completely covering the foam to create a clean, natural-looking base for your scarecrow’s face. Once fully wrapped, use your floral pins to securely fasten the fabric ends to the back of the wreath, trimming any excess fabric for a neat finish. The goal is to achieve a seamless, soft canvas.
Next, it’s time to give your scarecrow its signature straw hair. Flip the fabric-covered wreath over. Take a generous bunch of raffia, ensuring it forms a thick, voluminous bundle. Securely tie this bundle together using three pipe cleaners, spaced evenly about 1½ inches apart. This will create a structured section of hair. Repeat this process to create a second identical bundle of raffia. These two pieces will form the upper and lower sections of your scarecrow’s hair, giving it a playful, layered look.
Now, carefully position the first raffia bundle at the upper edge of the wreath, slightly to the left side, representing the top layer of hair. Using your hot glue gun, apply a generous amount of hot glue to the back of the raffia bundle and firmly press it onto the fabric-covered wreath, holding it in place until the glue sets. Then, take the second raffia bundle and adhere it just below the first one, ensuring the hair appears full and covers the top portion of the wreath effectively. This layering technique adds depth and character to your scarecrow. Once the hair is securely in place, gently shape it to fan out naturally.
Finally, crown your scarecrow with its charming straw hat. Place the hat directly on top of the raffia hair, ensuring it sits snugly and appears balanced. Secure the hat to the wreath and raffia using a few floral pins for extra stability. To give the hat a slightly tilted or more secure appearance, lift the front flap of the hat and apply a small dab of hot glue underneath, adhering it to itself or the wreath. This step adds a finished touch and ensures the hat stays perfectly positioned.
Step 2: Adding Facial Features and Final Embellishments
With the hair and hat in place, it’s time to bring your scarecrow’s face to life! Begin by trimming off any excessively long or unruly ends of the raffia hair to create a neat, yet still whimsical, hairstyle. Now, let’s add some floral charm to the hat. Select a prominent faux flower, such as a sunflower or a vibrant mum, and glue it directly to the center of the hat, slightly above the brim. Enhance this focal point by arranging smaller leaves and additional flowers or berries around it, creating a lovely autumnal cluster that complements the hat’s rustic appeal.
Now for the face! From your felt scraps, cut out a small brown triangle for the nose. Then, cut two oval shapes from the brown felt for the inner part of the eyes. To add depth and a touch of brightness, cut two slightly larger oval shapes from yellow felt. These will serve as the background or “whites” of the eyes. Carefully position and glue the yellow ovals onto the fabric wreath first, followed by the brown ovals centered on top of the yellow ones. This layering gives the eyes a delightful, expressive quality. Refer to the original video for precise placement and shape suggestions if needed.
Using your fine-tip marker, draw the scarecrow’s mouth. You can opt for a simple curved smile, a stitched line, or a whimsical shape as demonstrated in the tutorial, giving your scarecrow its unique expression. Enhance the character by adding smaller lines or stitches around the nose and eyes with the marker, mimicking the rustic, stitched details often seen on traditional scarecrows. These small additions truly bring personality to your creation.
Finally, let’s add a decorative bow to the bottom of your wreath. Take your chosen ribbon and loop it over several times to create a full, elegant bow. Secure the center of the loops tightly with a pipe cleaner, twisting it at the back to hold the shape. Attach this finished bow to the bottom of the wreath using a few floral pins, ensuring it’s centered and hangs beautifully. For a perfect finishing touch, hot glue a large decorative button right in the center of the ribbon bow. Lastly, trim the ends of your ribbon at an angle or a swallowtail cut for a professional and polished look. With these steps completed, your charming DIY scarecrow wreath is now ready to enchant!
Why a DIY Scarecrow Wreath is the Perfect Fall Project
Creating your own fall decor, especially a scarecrow wreath, offers a multitude of benefits beyond just having a beautiful decoration. It’s a deeply satisfying and rewarding experience. Firstly, DIY projects allow for immense personalization. Unlike store-bought items, your handmade wreath will carry a unique charm and reflect your personal style, making your home truly one-of-a-kind. You can choose specific colors, textures, and embellishments that resonate with your aesthetic, ensuring it perfectly complements your existing fall decor.
Secondly, crafting is a wonderful way to relax and de-stress. Engaging in a creative activity like this can be therapeutic, providing a welcome break from daily routines and allowing you to focus on something enjoyable and tangible. The process of working with your hands, seeing your vision come to life, brings a sense of accomplishment that is incredibly fulfilling. Furthermore, this scarecrow wreath project is notably cost-effective. By utilizing simple, inexpensive materials, you can create a high-quality, festive decoration that would otherwise cost significantly more if purchased from a specialty store. It’s smart crafting for the budget-conscious decorator.
Beyond the personal benefits, a scarecrow wreath embodies the very essence of autumn. Scarecrows are iconic symbols of the harvest season, representing protection, bounty, and the rustic charm of farm life. Displaying one at your home instantly evokes feelings of warmth, nostalgia, and festive cheer. It’s a welcoming gesture that invites the spirit of fall into your living space, making it cozy and inviting for family and friends. This easy wreath tutorial ensures that even those new to crafting can achieve stunning results, making it an accessible and enjoyable project for everyone.
Tips for Success and Creative Variations
To ensure your scarecrow wreath project goes smoothly and to inspire even more creativity, here are some helpful tips and ideas for variations:
- Hot Glue Gun Safety: Always exercise caution when using a hot glue gun. Ensure you have a protected surface and keep fingers clear of the hot nozzle and glue.
- Fabric Choice: While muslin provides a classic look, feel free to experiment with other fabrics like burlap for a coarser texture, or even an old flannel shirt for a more “patched-up” scarecrow feel.
- Personalized Faces: The felt facial features are where your scarecrow’s personality truly shines. Experiment with different eye shapes (round, squinting), nose sizes, and mouth expressions. You could even use buttons for eyes!
- Hat Embellishments: Don’t limit yourself to just flowers. Consider adding small fabric patches, miniature faux gourds, autumn leaves, or tiny bird figures to your scarecrow’s hat for extra charm.
- Raffia Alternatives: If natural raffia is hard to find, consider using shredded brown paper bags, straw from craft stores, or even yarn in autumnal shades for the hair.
- Ribbon Versatility: Explore different types of ribbon. Plaid, gingham, or even solid fall-colored ribbons can create diverse looks. You can also add smaller accent bows on the sides of the wreath.
- Add Accessories: For an extra whimsical touch, consider gluing small faux spiders, tiny birds, or miniature pumpkins directly onto the wreath or emerging from the raffia.
- Hanging Mechanism: After your wreath is complete, loop a piece of sturdy twine, ribbon, or wire through the top back of the wreath for easy hanging on your door or wall.
Where to Display Your Charming Fall Wreath
Once your delightful scarecrow wreath is complete, the fun continues with deciding where to showcase your handmade masterpiece! The most popular spot is undoubtedly your front door, where it can greet guests and passersby with its cheerful autumn charm. A beautifully adorned front door instantly sets a festive tone for your entire home, creating an inviting atmosphere that celebrates the season. Imagine the warm welcome it extends on a crisp fall afternoon!
Beyond the front door, this versatile wreath can enhance numerous areas within your home. Consider hanging it in your entryway or foyer, setting the mood for your interior fall decor the moment someone steps inside. It would also look stunning above a fireplace mantel, becoming a cozy focal point in your living room, perhaps flanked by other seasonal arrangements like pumpkins, candles, and fall foliage. Alternatively, use it to adorn a blank wall in your dining room, adding a rustic touch to your harvest dinner gatherings. Even a kitchen wall or a covered patio can be brightened by its presence, reminding everyone of the joys of autumn.
This scarecrow wreath also makes a thoughtful and personal gift. Handmade gifts carry a special sentiment, and gifting a custom-made fall wreath to a friend, family member, or hostess is a wonderful way to show you care. It’s a gift that brings warmth, beauty, and the spirit of the season to their home. No matter where you choose to display it, your DIY scarecrow wreath is sure to be admired and cherished as a symbol of fall’s rustic beauty and your creative spirit.
Embrace the Joy of Autumn Crafting
As you can see, creating this adorable scarecrow wreath is not only incredibly easy but also immensely enjoyable and rewarding. It’s a fantastic project to tackle by yourself for a relaxing afternoon of crafting, or to share with friends and family, making memories as you create beautiful fall decor together. The simple materials and straightforward steps ensure that even beginners can achieve impressive results, producing a charming piece that looks professionally made.
So, why wait? Gather your supplies, clear a space, and get ready to infuse your home with the delightful spirit of autumn. This DIY scarecrow wreath is more than just a decoration; it’s a testament to the joy of handmade creations and a warm invitation to celebrate the most colorful season of the year. Try out this super easy scarecrow wreath tutorial today, and prepare to be delighted by your own crafting prowess. Happy fall crafting!
*All image credit belongs to Maymay Made It Crafts via YouTube. Follow and subscribe to her channel for more incredible DIY inspiration and tutorials!