
DIY Zipper Repair: Easily Fix Broken & Separated Zippers with Pliers
Few things are as frustrating as a broken or separated zipper on your favorite bag, jacket, or pair of pants. Whether it’s a trusty backpack, a go-to coat, or a cherished dress, a malfunctioning zipper can render an otherwise perfect item unusable. The immediate thought often turns to costly professional repairs or, worse, discarding the item altogether. Many of us have experienced the disappointment of a stubborn zipper, struggling to realign teeth or close a gap, often making the problem worse in the process. However, what if there was a surprisingly simple, effective, and free solution you could implement right at home?
That’s precisely what this guide aims to deliver. Drawing inspiration from clever DIY enthusiasts like Science Sir on YouTube, we’ll reveal a practical trick that can rescue many broken zippers from the brink of disrepair. This ingenious method not only saves you precious time and money but also empowers you with a valuable skill, extending the life of your most beloved items. Forget the hassle of searching for a seamstress or buying replacements; your solution might just be a pair of pliers away. Let’s dive into the details and learn how to master this essential zipper repair hack.
Understanding Why Zippers Fail: A Quick Overview
Before we jump into the fix, it’s helpful to understand why zippers go rogue in the first place. Zippers are ingenious devices composed of two rows of interlocking teeth, a slider that joins and separates them, and stoppers at either end. Most commonly, zipper issues stem from the slider, which is the small mechanism that moves up and down, engaging and disengaging the teeth.
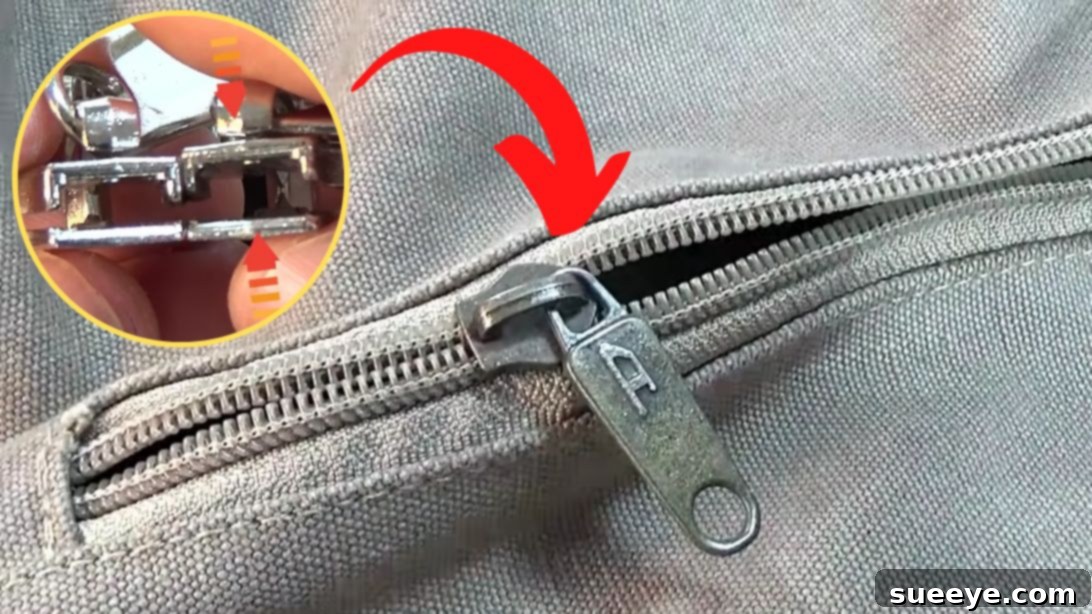
Over time and with frequent use, the metal or plastic of the zipper slider can wear down or become slightly deformed. The most prevalent issue, and the one this guide addresses, is when the “jaws” of the slider—the upper and lower plates that grip the zipper teeth—widen. When this gap becomes too large, the slider can no longer properly push the zipper teeth together or pull them apart firmly enough, leading to a separated zipper or one that simply won’t close. Other problems can include missing teeth (which often require professional repair or replacement), fabric caught in the zipper, or a slider that completely comes off the track. Our focus here will be on the widespread issue of a widened slider gap, a problem that is remarkably easy to fix.
Is This Zipper Fix Right for Your Situation?
This particular repair technique is incredibly effective for specific types of zipper failures. It’s important to diagnose your zipper problem correctly to ensure this method is applicable. This DIY fix is ideal for:
- Separated Zippers: When the zipper teeth refuse to interlock properly, leaving a gap even after you’ve pulled the slider over them.
- Zippers That Won’t Stay Closed: If your zipper frequently unzips itself from the bottom up, even when the slider is at the top.
- Loose or Widened Sliders: If you can visibly see a gap between the upper and lower plates of the zipper slider, or if the slider feels loose on the zipper teeth.
- Intact Zipper Teeth: This method assumes the zipper teeth themselves are in good condition, without any missing, bent, or broken pieces. If your zipper has missing teeth, this repair will not work, and a replacement slider or full zipper replacement may be necessary.
If your problem falls into one of these categories, congratulations! You’re likely just a few steps away from a fully functional zipper.
Materials You’ll Need: Simplicity at Its Best
One of the most appealing aspects of this zipper repair hack is the minimal tool requirement. You likely already have the only essential item in your household toolbox.
- Pliers: You’ll need a pair of pliers. Regular combination pliers, needle-nose pliers, or even small craft pliers will work. The key is to have a tool with jaws that can exert firm, controlled pressure without being too bulky. Needle-nose pliers often offer the best precision for smaller zippers, while standard pliers are suitable for larger, more robust zippers on bags or coats. Ensure your pliers have a good grip and are in good working order. Avoid using pliers with excessively rough or serrated jaws if you want to minimize any potential marking on the zipper slider, though for most functional repairs, minor cosmetic marks are acceptable.
That’s it! No specialized kits, no expensive parts, just a common household tool.
Step-by-Step Guide: How to Fix Your Broken Zipper
Follow these detailed steps carefully to bring your zipper back to life. Remember, patience and a gentle touch are crucial for success.
Step 1: Thoroughly Inspect Your Zipper and Diagnose the Root Cause
Before grabbing your tools, take a moment to carefully examine the zipper. Pull the slider up and down (as much as it will go) to observe its behavior. Is it refusing to engage the teeth? Are the teeth separating immediately after the slider passes? Can you see a noticeable gap between the upper and lower plates of the zipper slider itself? In most cases suitable for this fix, you will notice that the slider appears slightly splayed or widened. This widened gap prevents the slider from effectively pressing the two rows of zipper teeth together to interlock them. Identifying this specific issue is the first critical step.
Step 2: Position the Zipper Slider Correctly
Once you’ve confirmed the problem is a widened slider, carefully maneuver the zipper slider to the very bottom of the zipper track. This ensures that the zipper teeth below the slider are fully separated. Having the slider at the bottom provides better access and a stable starting point for the repair. If the slider is stuck somewhere in the middle, gently try to move it down without forcing it too much. If it resists, lubricate the zipper teeth with a pencil lead or a tiny bit of soap to help it move.
Step 3: Prepare Your Pliers for Action
Take your chosen pliers and open their jaws. Position the pliers so that their jaws are aligned with the top and bottom plates of the zipper slider, specifically targeting the side of the slider where the zipper teeth enter. You want to apply pressure evenly across the width of the slider, not just a small point. For optimal results, envision gently squeezing the entire width of the slider to reduce the gap that the zipper tape passes through.
Step 4: Apply Gentle, Controlled Pressure
This is the most crucial step. With the pliers positioned, begin to apply very gentle pressure to squeeze the upper and lower plates of the zipper slider together. It’s vital to start with minimal force. The goal is to slightly narrow the gap, not to crush the slider. Squeeze, release, and then inspect the slider and the zipper mechanism. Avoid applying excessive force right away, as this can permanently damage the slider or even break it, making the problem irreparable.
Step 5: Test the Zipper and Adjust Pressure Incrementally
After your initial gentle squeeze, try to move the zipper slider up and down the track. Does it feel tighter? Does it successfully engage the teeth and close the zipper without separating? If the zipper still separates or feels too loose, return the slider to the bottom. Re-position your pliers and apply slightly more pressure than before. Repeat the squeeze-test-adjust cycle. The key is to be iterative: a little pressure, test, a little more pressure, test again. This prevents overtightening, which can make the zipper too stiff to move or even crack the slider. You’ll know you’ve found the right pressure when the zipper closes smoothly and stays closed.
Step 6: Final Check and Troubleshooting
Once the zipper is closing correctly, try zipping and unzipping it several times to ensure the fix is stable. If the zipper still catches, feels too tight, or the teeth are still separating, re-evaluate. You might need to adjust the pressure slightly. If the slider feels too tight after the repair, you might have over-tightened it. In this scenario, you can very, very gently pry the plates open with a flathead screwdriver (or even the tip of your pliers) to loosen it just a tiny bit, then re-test. This process can sometimes require a delicate balance, but with patience, you’ll find the sweet spot.
Expert Tips for a Successful Zipper Repair
- Start Gentle, Increase Gradually: Always begin with the least amount of pressure and increase incrementally. It’s much easier to add more pressure than to undo over-tightening.
- Even Pressure is Key: Try to apply pressure uniformly across the slider’s plates to avoid deforming it unevenly, which could lead to new problems.
- Protect the Fabric: Be mindful of the surrounding fabric. Ensure it’s not caught between the pliers and the zipper slider, which could tear or damage your item.
- Patience Pays Off: This isn’t a race. Take your time, test frequently, and don’t get frustrated if it doesn’t work perfectly on the first try.
- Know When to Stop: Once the zipper is working smoothly, resist the urge to squeeze “just a little more.” Over-tightening can crack the slider or make it impossible to move.
- Lubrication (Optional but Helpful): After the repair, or if the zipper felt stiff initially, you can lubricate the zipper teeth with a graphite pencil (run the lead along the teeth) or a bit of silicone spray or zipper wax. This helps the slider glide more smoothly.
Preventing Future Zipper Issues
While this DIY fix is incredibly handy, a little preventative maintenance can help your zippers last longer and avoid future repairs.
- Don’t Overstuff Bags: Putting too much strain on zippers by overfilling bags or luggage is a common cause of failure.
- Zip Before Washing: Always zip up garments before washing them. This protects the zipper teeth from getting caught or bent in the washing machine.
- Regular Cleaning: Dirt, lint, and debris can accumulate in zipper teeth and sliders, causing them to stick. Use a small brush or old toothbrush to clean them occasionally.
- Lubrication: For zippers that get heavy use (like on coats or boots) or those exposed to elements (like on outdoor gear), periodic lubrication with zipper wax, silicone spray, or even a graphite pencil can significantly extend their lifespan and ensure smooth operation.
- Gentle Handling: Avoid yanking or forcing stubborn zippers. If a zipper is stuck, gently try to wiggle it free or use a bit of lubricant rather than brute force.
The Benefits of Mastering DIY Zipper Repair
Learning this simple trick offers a multitude of advantages beyond just fixing a single zipper:
- Cost Savings: Professional zipper repairs can be surprisingly expensive, often costing more than the original item, especially for clothing. This DIY method is essentially free.
- Time Savings: No trips to the tailor or waiting for repairs. You can fix most broken zippers in minutes from the comfort of your home.
- Environmental Impact: By repairing items instead of replacing them, you contribute to reducing waste and promoting a more sustainable lifestyle.
- Empowerment and Satisfaction: There’s a genuine sense of accomplishment in fixing something yourself. You gain confidence in your DIY abilities.
- Extended Lifespan of Items: Your favorite jacket, most useful backpack, or most comfortable pair of jeans don’t have to be retired prematurely due to a minor zipper issue.
Conclusion: Your Zipper Repair Superpower
A broken zipper no longer needs to be a source of stress or an expensive problem. With just a pair of pliers and a few moments of careful attention, you can revive countless items, from everyday bags to essential outerwear. This simple, effective hack, demonstrated wonderfully by creators like Science Sir on YouTube, empowers you to take control of common household repairs, saving money and reducing waste.
Next time you encounter a separated or stubborn zipper, remember this guide. A quick diagnosis, a gentle squeeze, and a thorough test are all it takes to transform a frustrating fault into a functional fix. Embrace the satisfaction of DIY and keep your beloved items in circulation for years to come. We encourage you to visit Science Sir’s channel for more ingenious tips and tricks – you never know what other simple solutions await!
*Thanks to Science Sir via YouTube for the excellent video tutorial and images used here. His practical approach to everyday problems is truly inspiring. If you found this zipper hack useful, you’ll surely discover more valuable insights on his channel. Be sure to give it a visit and subscribe for more clever solutions!