
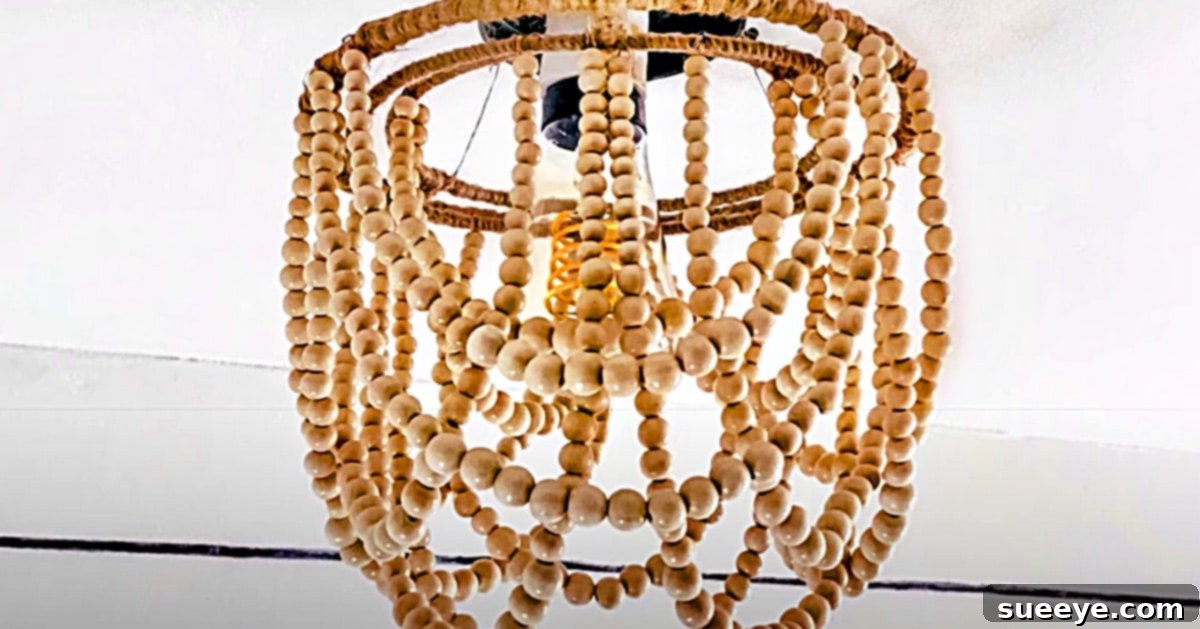
DIY Dollar Tree Wood Bead Chandelier: Achieve Boho Chic on a Budget
Embarking on a new chapter in a new apartment is always exciting, especially when it comes to personalizing your space. My latest venture involved carving out a dedicated dressing room area within my bedroom – a sanctuary for style and self-care. As I envisioned this intimate corner, I knew it needed a unique, eye-catching focal point, something that exuded warmth and effortless charm without breaking the bank. That’s when fate intervened, leading me to a brilliant DIY wooden bead chandelier idea by Justin Wray on YouTube. Crafted ingeniously from a Dollar Tree wreath form, this project immediately captured my imagination. Its promise of affordability, simplicity, and undeniable beauty was irresistible. I literally jumped in my car, driven by creative fervor, to gather my supplies. This wasn’t just another craft; it was the perfect bohemian touch my new dressing room desperately needed, and I was thrilled to bring it to life.
The allure of DIY projects lies not only in the creative process but also in the incredible savings they offer. This wood bead chandelier is a testament to that philosophy. While high-end boutique versions can cost hundreds, if not thousands, of dollars, this particular design proves that stunning aesthetic doesn’t require a lavish budget. My shopping spree began at Dollar Tree, where the foundational element – the wreath form – awaited. From there, I ventured to Michael’s craft store, a treasure trove for artisans, where I sourced the elegant copper wire and an assortment of beautiful wooden beads. Michael’s makes saving incredibly easy; a quick pull-up of their app reveals generous coupons, like the 60 percent off I happily used, transforming premium materials into affordable gems. This project seamlessly blends smart shopping with creative ingenuity, resulting in a show-stopping piece that looks far more expensive than its actual cost.
Why Choose a DIY Wood Bead Chandelier?
In a world saturated with mass-produced decor, a handmade chandelier offers a unique touch of personality and warmth. Beyond the immense cost savings, creating your own wood bead chandelier provides several compelling benefits:
- Unmatched Affordability: By utilizing materials from discount stores like Dollar Tree and strategically shopping at craft stores, you can create a high-impact decor piece for a fraction of the cost of store-bought alternatives.
- Personalized Style: Tailor the design to perfectly match your aesthetic. Choose bead sizes, colors, and even add embellishments to create a truly bespoke fixture that reflects your individual taste.
- Easy-to-Follow Process: This project is surprisingly straightforward, making it accessible even for novice crafters. The steps are intuitive, allowing for a rewarding experience without complex techniques.
- Bohemian Charm: Wood bead chandeliers are synonymous with the coveted boho-chic and modern farmhouse styles, instantly adding a relaxed, natural, and inviting atmosphere to any room.
- Sense of Accomplishment: There’s immense satisfaction in stepping back and admiring a beautiful piece you’ve created with your own hands. It’s more than just decor; it’s a story.
Materials For Your Stunning Wood Bead Chandelier:
Gathering your materials is the first exciting step toward crafting your bohemian masterpiece. Most items are easily accessible and budget-friendly, making this a truly economical DIY endeavor.
- 8-inch Wreath Form (from Dollar Tree): This is the backbone of your chandelier. The Dollar Tree wreath forms are perfectly sized and incredibly affordable, providing a sturdy base for your project. Consider getting a couple in case you want to experiment or make another one!
- Jute Twine (Large Spool from Dollar Tree): Essential for wrapping your wreath form, the jute twine adds a natural, rustic texture that complements the wooden beads beautifully. A large spool ensures you have more than enough for complete coverage.
- A Pair of Sharp Scissors: For clean cuts on twine and wire. A good pair of craft scissors will make your work much easier and more precise.
- A Hot Glue Gun and Glue Sticks: Your trusty tools for securing the twine wrap and any other elements. A fast-heating glue gun with plenty of glue sticks will be invaluable for a smooth crafting process.
- Copper Wire (I found this at Michael’s craft store): This flexible yet strong wire is ideal for stringing your beads and creating the delicate hanging strands. Copper wire adds a touch of elegance and durability. You might also consider floral wire or jewelry wire, depending on the look you prefer.
- Wooden Beads (in 3 sizes): The stars of the show! Having a variety of sizes (e.g., small, medium, large) allows you to create depth, visual interest, and unique patterns in your bead strands. Look for natural, unfinished beads for an authentic boho feel, or painted ones if you desire a pop of color. Michael’s, Hobby Lobby, or even online craft suppliers are great places to find a wide selection.
Directions: Crafting Your Boho Masterpiece
Creating this gorgeous wooden bead chandelier is a delightful and straightforward process, even for beginners. Inspired by the genius of Justin Wray’s YouTube tutorial, we’ll break down the steps to ensure a flawless and enjoyable crafting experience. Let’s transform simple materials into a stunning piece of decor!
Step 1: Preparing Your Wreath Form with Jute Twine
The foundation of your chandelier is the jute-wrapped wreath form. This step is crucial for both aesthetics and providing a secure surface for attaching your bead strands. Begin by taking your large spool of jute twine and your 8-inch Dollar Tree wreath form. Find the starting point on your wreath form and apply a small dab of hot glue to secure the very end of your twine to the inner edge of the form. Press firmly until it adheres.
Once the initial end is secure, begin tightly wrapping the jute twine around the entire wreath form. Ensure that each wrap is snug against the previous one, leaving no gaps where the wreath form might show through. Consistency is key here; aim for an even tension and overlap to create a smooth, uniform texture. As you wrap, periodically add small dots of hot glue to the back or inner edge of the wreath form to further secure the twine, preventing it from unraveling or shifting over time. Continue this process until the entire wreath form is completely covered. Once you reach the end, cut the twine, leaving a small tail, and secure it with another dab of hot glue, tucking the end neatly into the wrapped section for a clean finish.
Step 2: Crafting and Attaching Your Bead Strands
With your wreath form beautifully wrapped, it’s time for the most visually exciting part: creating and attaching the bead strands. This is where your creativity truly shines! First, decide on the desired length and pattern for your bead strands. A good starting point is to create strands of varying lengths to give your chandelier a dynamic, layered look. You might want to sketch out a few ideas to visualize the arrangement before you begin. Typically, you’ll need anywhere from 20 to 40 strands, depending on how full you want your chandelier to appear.
Take your copper wire and cut several pieces, each roughly twice the length of your desired finished strand (you’ll fold it in half). For each strand, thread your wooden beads onto a piece of copper wire, alternating sizes and colors if desired, to create interesting patterns. Once you’re happy with the bead arrangement for a single strand, twist the ends of the copper wire together at the top to form a loop. This loop will be used to attach the strand to your jute-covered wreath form. Repeat this process for all your desired bead strands, ensuring you have a good mix of lengths and patterns.
Now, it’s time to attach these stunning strands. Take a completed bead strand and locate a spot on the underside of your jute-wrapped wreath form. Using a strong bond from your hot glue gun, apply a small, firm dab of glue to the twisted loop of your bead strand and press it securely against the jute. Hold it in place for a few seconds until the glue sets. Repeat this process, carefully spacing your bead strands around the entire circumference of the wreath form. You can choose to space them evenly or cluster them in groups for a more unique effect. Experiment with different lengths and placements to achieve a cascading, layered look that truly brings your chandelier to life. Ensure all strands are firmly attached, as they will be holding the weight of the beads.
Step 3: Creating the Hanging Mechanism
A chandelier isn’t complete without a way to hang it! To create a secure and aesthetically pleasing hanging mechanism, cut three equal lengths of jute twine, approximately 18-24 inches each (adjust based on your desired hanging height). Space these three pieces evenly around the top of your jute-wrapped wreath form. Securely tie or hot-glue one end of each twine piece to the wreath form, ensuring they are equidistant from each other. Gather the three loose ends at the top, bringing them together to form a single loop. Tie these ends together with a strong knot, creating a central point from which your chandelier will hang. You can reinforce this knot with a bit of hot glue for extra security. For an added touch, you might braid these three strands before tying them off, adding another layer of visual interest to your rustic design.
Step 4: Adding Optional Lighting Elements (Purely Decorative Focus)
While this wood bead chandelier is primarily designed as a decorative accent, you can easily incorporate subtle lighting for an even more magical effect. Small, battery-operated LED fairy lights or a single LED puck light (also often found at Dollar Tree or craft stores) can be discreetly woven into the bead strands or placed within the center of the wreath form. This adds a soft, ambient glow, perfect for creating a cozy atmosphere in your dressing room or bedroom. Ensure any lighting element you add is lightweight and does not generate heat, keeping safety a top priority for your beautiful DIY creation.
Tips for Personalizing Your Chandelier
Your DIY wood bead chandelier is a canvas for your personal style. Here are some ideas to make it uniquely yours:
- Vary Bead Materials: While wood beads are classic, consider mixing in ceramic beads, painted beads, or even small glass beads for different textures and reflections.
- Add Color: Paint some of your wooden beads with acrylic craft paint before stringing them. Soft pastels, metallic accents, or vibrant hues can completely change the vibe.
- Incorporate Tassels or Feathers: For an extra dose of boho charm, attach small handmade tassels made from jute or yarn, or ethically sourced feathers to some of the lower bead strands.
- Embrace a Tiered Look: Create two smaller jute-wrapped rings and connect them with bead strands to your main wreath form for a multi-tiered, more elaborate chandelier.
- Central Element: Attach a larger, statement bead or a small macrame piece to the very center of the chandelier for an additional focal point.
Styling Your New Boho Chandelier
This wood bead chandelier proved to be everything I had hoped for and more. It provided precisely the bohemian, natural, and charming feature my new dressing room area desperately needed. The play of light on the wooden beads and the soft, organic texture of the jute twine create a serene and stylish atmosphere.
While perfect for a dressing room, the versatility of this DIY chandelier extends far beyond. Imagine it as a whimsical addition to a nursery, casting gentle shadows and bringing warmth to the space. It would also be stunning in a cozy bedroom corner, above a reading nook, or even in a sunroom, enhancing a relaxed, nature-inspired decor scheme. Pair it with other natural elements like woven baskets, macrame wall hangings, and plenty of greenery to complete the bohemian aesthetic. For a modern farmhouse look, combine it with crisp whites, distressed wood furniture, and galvanized metal accents. No matter where you decide to hang it, this handcrafted piece is sure to draw admiration and compliments, serving as a constant reminder of your creative spirit and smart styling.
Dollar Tree DIY Wood Bead Chandelier: Your Next Must-Try Project
In conclusion, the Dollar Tree DIY Wood Bead Chandelier is more than just a craft project; it’s an opportunity to infuse your home with personalized style, enjoy the satisfaction of creating something beautiful with your own hands, and prove that exceptional decor doesn’t require an exorbitant budget. From the initial spark of inspiration from Justin Wray’s genius to the final proud hang in my new dressing room, every step of this journey was rewarding.
So, why wait? Gather your materials, unleash your creativity, and embark on your own DIY adventure. You’ll be amazed at what you can achieve with a little ingenuity and a trip to your local Dollar Tree and craft store. This gorgeous, easy-to-make, and incredibly affordable wood bead chandelier is poised to become the next cherished feature in your home, bringing a touch of boho elegance and handmade charm to your everyday.