
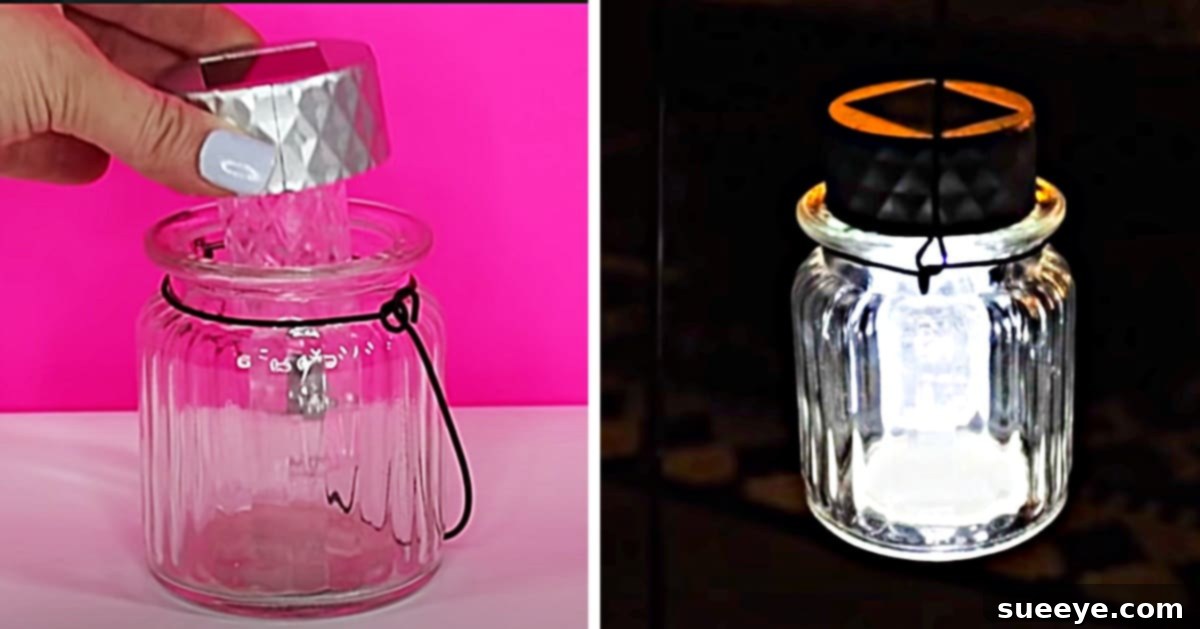
Transform Your Patio: Easy DIY Solar Light Lanterns from Dollar Tree Items
Summer beckons with longer days and warmer evenings, making it the perfect season to refresh your outdoor living spaces. Imagine soft, ambient light illuminating your patio, casting a magical glow over your garden, all without breaking the bank. This dream can become a reality with clever DIY projects, transforming inexpensive solar lights into charming, elegant lanterns. We recently stumbled upon a truly inspiring tutorial by “Chick On The Cheap” on YouTube, which showcases an incredible array of ideas for repurposing dollar store solar lights into beautiful decorative pieces. These versatile lanterns are perfect for both indoor and outdoor settings, adding a touch of warmth and sophistication to any table setting or standing proudly as standalone accents.
The beauty of these projects lies in their simplicity and affordability. With fifteen unique project ideas demonstrated in the tutorial, you’re sure to find something that sparks your creativity. From elegant frosted vase lights to innovative free-standing garden poles, each idea is not only sensational but incredibly budget-friendly. Get ready to elevate your home decor with these ingenious solar light hacks, creating inviting and well-lit spaces for relaxation and entertainment.
Why DIY Solar Lights Are a Brilliant Idea for Your Home and Garden
Embracing DIY projects for home decor, especially when it comes to lighting, offers a multitude of benefits that extend beyond mere aesthetics:
- Unbeatable Affordability: The primary appeal of these solar light hacks is their extreme cost-effectiveness. By utilizing items from dollar stores like Dollar Tree, you can achieve a sophisticated, custom look for a fraction of the cost associated with buying pre-made outdoor lighting fixtures. This allows you to decorate extensively without financial strain.
- Eco-Friendly Illumination: Solar lights harness the inexhaustible power of the sun, converting sunlight into energy during the day to provide illumination at night. This makes them an exceptionally environmentally conscious choice, significantly reducing your electricity consumption and carbon footprint. They are a sustainable way to brighten your evenings.
- Customization and Personalization: Unlike generic store-bought lanterns, DIY projects offer endless opportunities for personal expression. You have complete creative control to choose your containers, add unique embellishments like paint or twine, and arrange them in ways that perfectly complement your personal style and existing decor.
- Effortless Creation: Many of these solar light projects require minimal tools, basic crafting skills, and very little time to complete. This accessibility means that even novice crafters can enjoy the satisfaction of creating stunning decorative pieces quickly and efficiently.
- Versatile Application: These handcrafted solar light creations are remarkably adaptable. They aren’t confined to just the patio; they can beautifully adorn garden paths, serve as enchanting centerpieces for outdoor dining, add a cozy glow to a sunroom, or even act as whimsical, energy-saving nightlights indoors (if charged outdoors during the day).
- Instant Ambiance: The soft, diffused light emitted by these lanterns instantly transforms any space, creating a warm, inviting, and magical atmosphere perfect for evening relaxation, gatherings, or simply enjoying your outdoor environment after sunset.
Essential Materials for Your Creative DIY Solar Light Projects
The brilliance of these DIY projects lies in their use of readily available and inexpensive materials. You’ll find most of what you need at your local dollar store, big-box retailers, or even repurposed items from around your home. Creativity is your most valuable asset here!
- Solar Garden Lights: These are the star of the show. Look for basic stake lights at Dollar Tree, Walmart, Home Depot, or similar stores. The key component you’ll be using is the top part – the solar panel and LED light unit. Ensure they have a small “on/off” switch and are fully charged before assembly.
- Containers for Lanterns: These will serve as the decorative housing for your solar lights, allowing for endless stylistic variations.
- Mason Jars: A timeless and versatile choice, known for their rustic charm and durability. They come in various sizes (pint, quart, wide-mouth) and are ideal for creating hanging lanterns, tabletop decor, or pathway lights. Their clear glass allows for maximum light output.
- Frosted Vases: As beautifully showcased in the tutorial, frosted glass diffuses light exquisitely, producing a soft, elegant, and warm glow. Dollar Tree often carries a lovely selection of frosted or etched glass vases that are perfect for this purpose.
- Clear Glass Vases/Jars: Excellent for projects where you want to add internal decorative elements like colorful pebbles, sea glass, marbles, sand, or faux flowers to enhance the visual appeal and light dispersion.
- Repurposed Bottles: Get creative with uniquely shaped wine bottles, old condiment jars, or other interesting glass containers that can be upcycled into distinctive light fixtures.
- Hurricane Lamp Shades: Larger glass hurricane lamp shades can be used to create grander, more protected solar lanterns, perfect for prominent placement.
- A Tall Dustpan Handle: This seemingly unusual item (often available at Dollar Tree) is ingeniously repurposed in one project to create sturdy, free-standing outdoor pole lights that easily stake into the ground, mimicking more expensive garden lighting.
- Optional Embellishments and Tools: To add personality and functionality to your creations.
- Spray Paint: Use for customizing the color of your jars, vases, or even the plastic housing of the solar light itself. Frosted spray paint can mimic the look of frosted glass.
- Twine, Rope, or Ribbon: Perfect for adding rustic accents, creating hangers for suspended lanterns, or decorative wraps around the container.
- Wire (craft or garden wire): Useful for crafting secure hangers for jars, attaching components, or creating decorative cages around your lights.
- Decorative Fillers: Pebbles, marbles, glass gems, polished stones, or even small artificial plants can be placed inside clear containers to add weight, stability, and visual interest.
- Strong Adhesive (e.g., E6000, hot glue gun): Essential for securing the solar light head to the rim of containers where it doesn’t fit snugly, ensuring durability.
- Small Drill (with glass/tile bit): Optional, for adding drainage holes to containers or creating custom hanging points, if necessary.
Step-by-Step Directions: General Approach to Crafting Your Solar Lanterns
While each specific project may have its unique creative twists, the fundamental process for transforming basic solar lights into beautiful decorative lanterns is wonderfully straightforward. This general guide will provide you with the core steps, which you can adapt for countless variations:
- Gather and Prepare Your Materials: Before you begin, collect all your chosen solar lights, the containers you plan to use (jars, vases, etc.), and any decorative elements you’ve selected. Ensure your containers are clean and dry. If you intend to paint any part of your container, do so at this stage and allow ample drying time.
- Disassemble the Solar Lights: Most inexpensive solar garden lights come with a ground stake. Carefully remove the solar light head (the part with the solar panel and light bulb) from its stake. This usually involves gently pulling the two pieces apart. Locate the “on/off” switch, typically found underneath the solar panel or near the battery compartment, and ensure the light is set to the “on” position so it can charge.
- Integrate the Solar Light with Your Container: This is the creative heart of the project.
- Top Placement: For many jars and vases, the solar light head will fit perfectly into the opening, resting securely on the rim. This creates a neat, self-contained unit.
- Internal Placement: If your container has a wider opening, you might need to suspend the solar light inside using wire or place it on a bed of decorative filler (like pebbles or sand) to elevate it to the desired height.
- Securing the Light: If the fit is loose or you want to ensure durability, apply a strong, weather-resistant adhesive (such as E6000 or silicone sealant) around the rim of the container where the solar light head rests. This will help secure it in place and potentially offer some protection against moisture.
- Add Decorative Touches (Optional): Now is the time to personalize your lantern. Fill the bottom of clear jars with colorful pebbles, sea glass, or small natural elements. Wrap twine or ribbon around the neck of your containers for a rustic or elegant look. You can also use glass paint to create intricate designs or a frosted effect on clear glass.
- Charge and Enjoy: Once assembled, place your newly crafted solar lanterns in a location that receives ample direct sunlight for at least 6-8 hours during the day. This is crucial for the solar panel to fully charge the internal battery. As dusk falls, watch as your DIY lanterns magically illuminate your space with a soft, inviting glow!
Highlighting Two Favorite DIY Solar Light Projects from the Tutorial
1. Elegant Frosted Vase Outdoor Table Lights
One of the most captivating and aesthetically pleasing ideas presented in the excellent video tutorial by Chick On The Cheap involves transforming simple frosted vases, readily available at Dollar Tree, into enchanting outdoor table lights. This project immediately became a personal favorite due to its sheer elegance and the beautiful, diffused light it creates. The frosted glass acts as a natural filter, softening the often stark LED light from the solar unit, producing a warm, inviting, and ethereal glow that beautifully illuminates any outdoor table setting. It’s perfect for creating a relaxed dinner party ambiance or a serene solo evening.
The entire process is remarkably swift and straightforward, taking the YouTuber less than five minutes to complete. Astonishingly, it requires no special tools whatsoever. You simply take the solar light head (carefully removed from its original garden stake) and place it directly into the opening of the frosted vase. The design of many dollar store vases is such that the solar light head rests perfectly and securely on the rim, creating a seamless and polished look without the need for adhesives. Imagine several of these strategically placed along a picnic table, scattered across an outdoor coffee table, or lining a window ledge – they instantly elevate the ambiance of your summer gatherings. Their understated simplicity makes them versatile enough to complement virtually any decor style, from minimalist and modern to bohemian chic or traditional.
2. Innovative Free-Standing Garden Pole Lights with a Dustpan Handle
Another truly ingenious and highly practical project that captured our attention from Chick On The Cheap’s tutorial utilizes an item you might never expect to find in a garden decor project: the handle of a tall dustpan, also easily purchased from Dollar Tree. This clever hack allows you to create stylish, elevated, and free-standing pole lights that can be effortlessly placed throughout your garden, along pathways, or bordering flower beds, providing both beauty and functionality.
The concept behind this DIY light is brilliant in its simplicity and effectiveness. The hollow handle of the dustpan acts as the perfect, sturdy housing for the solar light stake. Once the solar light (with its stake) is inserted into the top opening of the dustpan handle, the pointed end of the handle itself can be easily pushed into the ground. This creates a robust, elevated light fixture that mimics the appearance and functionality of more expensive garden lighting solutions but costs mere dollars. These innovative pole lights are ideal for defining garden borders, highlighting specific plants or decorative features, or providing subtle yet essential illumination along a dark path, significantly enhancing both the aesthetic appeal and safety of your outdoor space. They are particularly effective when grouped or lined up in a series, creating a visually appealing and cohesive lighting scheme that guides visitors and illuminates your landscape.
Beyond the Tutorial: More Creative Solar Light Project Ideas
While the “Chick On The Cheap” tutorial provides a fantastic foundation and an abundance of clever ideas, the possibilities for DIY solar light lanterns are truly endless. Let your imagination soar with these additional concepts, expanding on the versatility of dollar store solar lights:
Mason Jar Hanging Lanterns: Classic Charm
Mason jars are an undisputed staple in the world of DIY decor, and they are perfectly suited for solar light projects. Simply place the solar light head (without its stake) inside the rim of a standard or wide-mouth mason jar. For a classic look, you can then attach a wire hanger to the jar, allowing you to suspend these charming lanterns from tree branches, shepherd’s hooks, pergolas, or even porch railings. For an added touch of enchantment, fill the bottom of the jar with colorful sea glass, polished river stones, decorative marbles, or even small battery-operated fairy lights (which can provide extra sparkle during cloudy days or early evenings, just remember to remove them for solar charging). These creations instantly evoke a charming, rustic, and inviting ambiance.
Decorative Tabletop Accents with Unique Containers: Personalized Flair
Don’t limit your container choices to just standard vases and jars. Explore your home, local thrift stores, or even antique shops for unique glass containers that can be repurposed. Old glass beverage bottles with interesting shapes, small apothecary jars, vintage canning jars, or even clear glass candle holders (after cleaning out wax) can all be transformed. To enhance the aesthetic, fill the containers with layers of colored sand, small shells collected from the beach, or tiny decorative items that complement your existing decor scheme. Place the solar light securely on top of the container, and you’ll have instant, personalized tabletop accents that bring a warm glow to your outdoor dining area, patio tables, or even indoor shelves and mantels (remembering to charge them outside during the day).
Pathway Markers and Border Lights: Functional Elegance
While the original stakes of solar lights are often discarded in favor of more elaborate projects, they can be effectively utilized for simple, yet elegant, pathway markers or garden border lights. Alternatively, you can adapt the ingenious dustpan handle method for a taller, more defined look. When these simple lights are strategically grouped or lined up along a garden path, driveway, or the edge of a flower bed, they create a cohesive and welcoming glow that enhances navigation and highlights your landscaping. For an extra touch of flair, consider painting the stakes in a color that blends with your garden, or attach small decorative elements like faux butterflies or beads to their bases.
Upcycled Tin Can Lanterns: Industrial Chic
For a more industrial or rustic-chic vibe, consider using cleaned-out tin cans. Punch decorative holes into the sides of the cans using a hammer and nail or a drill (be careful of sharp edges). You can create intricate patterns or simple geometric designs. Paint the cans a desired color, then place the solar light head inside the top opening. These work wonderfully as hanging lanterns or as tabletop accents, casting beautiful patterned shadows as the light shines through the perforations.
Tips for Maximizing Your DIY Solar Light Creations
To ensure your handcrafted solar lanterns shine brightly, operate efficiently, and last for many seasons, consider these practical tips:
- Strategic Placement for Optimal Charging: Always position your solar lights in an area that receives ample direct sunlight for at least 6-8 hours a day. Shady spots, even for part of the day, will significantly hinder their ability to fully charge, resulting in reduced brightness and shorter illumination times at night.
- Keep Solar Panels Immaculately Clean: Dust, dirt, pollen, bird droppings, and other debris can accumulate on the solar panels over time, significantly impeding their ability to absorb sunlight. Periodically wipe the solar panels with a soft, damp cloth (and a mild soap solution if needed) to ensure optimal charging efficiency.
- Monitor and Replace Batteries: Most solar lights utilize rechargeable AAA or AA batteries. Like all rechargeable batteries, they have a finite lifespan and can degrade over time. If your lights aren’t as bright as they used to be, or don’t stay lit for as long, try replacing the rechargeable batteries with new, high-quality rechargeable ones. This simple step can often revitalize seemingly dead solar lights.
- Ensure Adequate Water Drainage and Sealing: If your DIY project involves a container that might collect rainwater (like an open vase or a jar without a tight seal), consider drilling a small drainage hole at the very bottom of the container. For the solar light unit itself, ensure it is well-sealed and protected from water ingress, especially if exposed to rain or sprinklers, to prevent damage to the electronics.
- Personalize and Experiment Fearlessly: Don’t be afraid to experiment with different paints, textures, and embellishments. Use glass paint for intricate designs, attach natural elements like dried leaves or small branches for a nature-inspired look, or even wrap them with a string of tiny battery-operated fairy lights for a multi-layered lighting effect that can be switched on during dimmer evenings.
- Group for Greater Impact: While a single solar lantern can be charming, grouping several together (especially different styles or heights) creates a more dramatic and impactful lighting display. This adds depth and a more cohesive glow to your outdoor spaces.
Conclusion: Light Up Your Life, The DIY Way!
Redecorating your patio, enhancing your garden, or simply adding a touch of ambient light to your home doesn’t have to be an expensive or complicated endeavor. With a little creativity, a willingness to repurpose, and a trip to your local dollar store, you can transform ordinary solar lights into extraordinary decorative lanterns. The ingenious ideas presented by “Chick On The Cheap” are a testament to how simple, budget-friendly materials can yield stunning, high-impact results, bringing a soft, inviting, and magical glow to any space.
These DIY solar light projects are not just about saving money; they’re about embracing the joy of creation, experiencing the satisfaction of personalizing your home environment, and contributing to a more sustainable lifestyle through eco-friendly lighting. So, gather your materials, switch on your creative spirit, and embark on crafting your own unique collection of beautiful solar lanterns. Your patio, garden, and even your indoor spaces will thank you for the charming, energy-efficient, and ambient light you bring to them. It’s time to light up your life, the DIY way!