
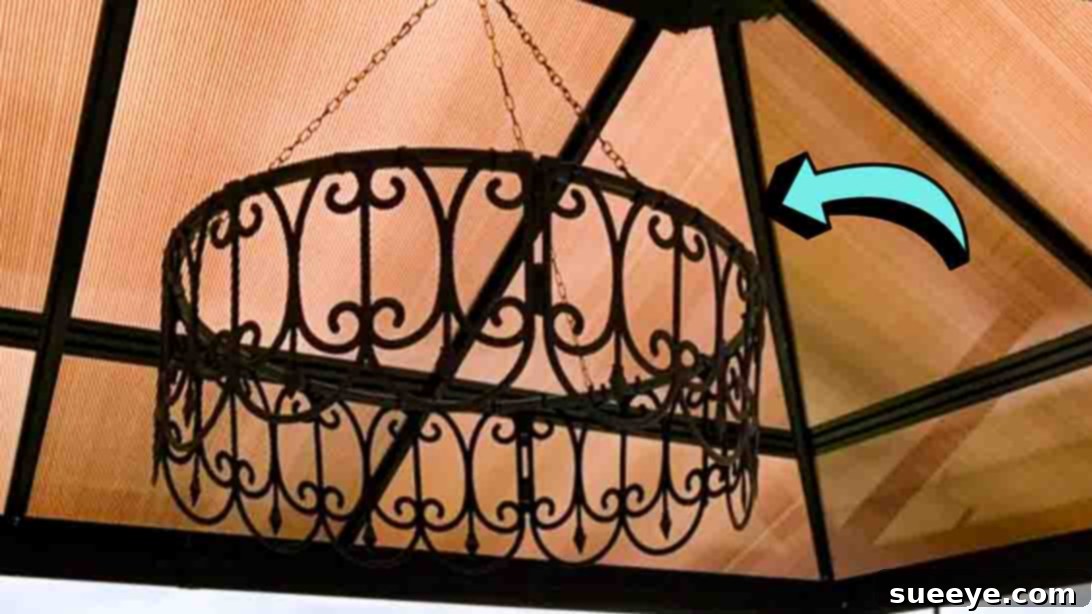
Are you ready to transform your outdoor space with a touch of charm and elegance, all while sticking to a budget? Look no further than this ingenious DIY outdoor chandelier, inspired by the creative minds at White Lab House on YouTube. This project is a fantastic way to elevate your garden or patio aesthetics without breaking the bank, utilizing affordable and easily accessible items primarily from your local Dollar Tree. It’s not just a craft; it’s a delightful weekend activity perfect for enjoying with friends or family, promising a stunning result that will impress.
Creating beautiful, functional decor for your home doesn’t have to be expensive or complicated. This specific DIY chandelier exemplifies how everyday items can be repurposed into something extraordinary. Whether you’re aiming to add a whimsical touch to your backyard, enhance your outdoor dining area, or simply embark on a rewarding creative endeavor, this project is designed for you. Its simplicity makes it ideal for both seasoned crafters and those just beginning their DIY journey, ensuring a successful and satisfying outcome.
Why Choose a Dollar Tree DIY Outdoor Chandelier?
The appeal of a Dollar Tree DIY project lies in its remarkable blend of affordability, accessibility, and the immense satisfaction of creating something beautiful from scratch. Unlike expensive store-bought fixtures, this outdoor chandelier allows you to personalize your decor without significant financial investment. Most materials can be found at dollar stores, making them incredibly budget-friendly. This project is not only cost-effective but also environmentally conscious, as it encourages repurposing items rather than buying new, often mass-produced, decor. Furthermore, the act of crafting something with your own hands brings a unique sense of accomplishment and pride, turning ordinary garden materials into a captivating focal point for your outdoor living space. It’s an opportunity to infuse your personality into your home decor, creating a piece that genuinely reflects your style and ingenuity.
Materials You’ll Need
Gathering your materials is the first exciting step in any DIY adventure. For this outdoor chandelier, you’ll be pleasantly surprised by how few items are required and how readily available they are. Before you begin, ensure you have everything laid out to make the crafting process smooth and enjoyable.
- 4 garden fences (typically small, decorative fence panels from a dollar store)
- 2 hanging baskets (the metal or plastic type, often with chains)
- Black zip ties (various sizes for secure fastening)
- Large hula hoop (the bigger, the more impactful your chandelier will be)
- Basic crafting tools: Pliers, wire cutters (or strong scissors for zip ties)
Diving Deeper into Your Supplies
Understanding your materials better can help you choose the right ones and even think about potential customizations.
- Garden Fences: These are typically small, lightweight panels designed for edging flower beds. Opt for those with a simple, open design, as they will form the main body of your chandelier. Their inherent structure makes them perfect for creating an elegant cage-like frame.
- Hanging Baskets: You’ll primarily be using the chains and hooks from these baskets. Look for baskets that come with sturdy metal chains, as these will be responsible for hanging your finished chandelier securely.
- Black Zip Ties: These are your go-to fasteners for this project. Black zip ties blend seamlessly with most garden decor and offer strong, durable connections. Have a variety of lengths on hand to accommodate different fastening needs.
- Large Hula Hoop: The hula hoop forms the foundational ring of your chandelier, providing its circular shape and structural integrity. Choose a hula hoop that is large enough to create a substantial fixture but not so large that it becomes unwieldy. The larger the hula hoop, the more pronounced your chandelier will appear.
Step-by-Step Guide to Crafting Your Chandelier
This tutorial is designed to be straightforward and accessible. Follow these detailed steps to bring your Dollar Tree outdoor chandelier to life.
Preparation is Key
Before assembling your chandelier, a bit of preparation will ensure all components are ready for integration, making the construction process much smoother.
Step 1: Deconstructing the Hula Hoop
Begin by carefully removing any decorative foil tape or covering that might be wrapped around your hula hoop. This is often present on plastic hula hoops and can peel or degrade over time when exposed to outdoor elements, compromising the aesthetic of your finished chandelier. A clean, bare hula hoop will provide a better surface for attaching your fence panels and will have a more uniform appearance. Once the tape is removed, set the hula hoop aside in a safe place.
Step 2: Preparing the Garden Fences
Next, take your four garden fence panels. These typically come with pointed spikes designed to stick into the ground. Using wire cutters or strong pliers, carefully cut off these spikes. This step is crucial for two reasons: it prevents any sharp edges from posing a safety hazard, and it creates a flat, even surface on the bottom of each fence panel, which will later become the top edge of your chandelier. After trimming, arrange all four fence sections in a circular fashion. Flip them upside down so that the side where you cut the spikes (the “unfinished” side) is now facing upwards. This orientation will allow you to connect the hula hoop seamlessly to the smooth, finished edge of the fence panels, which will face downwards in the final design.
Step 3: Unifying the Structure
Now, it’s time to assemble the main frame of your chandelier. Position the hula hoop so it sits snugly against the top (what was the bottom) of the combined fence sections. You’ll be attaching the hula hoop to the fencing pieces at a 90-degree angle, forming a stable, cylindrical structure. Use your black zip ties to secure these components together. Start by attaching one section of the fence to the hula hoop, then gradually work your way around, ensuring each fence panel is firmly connected to the hoop. Use multiple zip ties per connection point for maximum stability and durability, especially since this chandelier will be exposed to outdoor conditions. Once all fence panels are securely attached, take your wire cutters and carefully snip off all the excess tails of the zip ties. Trim any overlapped pieces of the garden fence if they create an uneven appearance or impede the circular shape. This meticulous trimming ensures a clean, professional finish for your outdoor fixture.
Adding the Practical Elements
With the main structure in place, the next steps involve preparing the hanging mechanism and adding the final touches.
Step 4: Repurposing Hanging Baskets
Take your two hanging baskets and remove their chains and hooks. These are often connected with small rings or clasps that can be opened with pliers. The goal is to obtain several individual chain pieces. Using your pliers, skillfully combine these individual chain pieces together to create three longer, equally sized chain segments. You’ll also want to retain at least one sturdy hook from the baskets, as this will be used for hanging the entire chandelier. Ensure the connections between the chain pieces are secure so they can bear the weight of the chandelier.
Step 5: Securing the Chains
Now, attach the three newly created long chain pieces to the hula hoop frame. It’s crucial to space these chains evenly around the hula hoop to ensure the chandelier hangs level and balanced. Use additional zip ties for this step, securing each chain end firmly to the hula hoop. Aim for three equidistant attachment points, roughly forming an equilateral triangle if viewed from above. Once the three chains are attached, bring their loose ends together at the top and connect them to the single hook you saved. This creates the central point from which your chandelier will hang. Double-check all zip tie connections to confirm they are tight and secure, as these chains will support the entire structure.
Step 6: The Grand Unveiling
With all components assembled and secured, your Dollar Tree outdoor chandelier is now ready for its debut! Find a suitable spot in your garden, patio, or porch area – perhaps suspended from a pergola, a sturdy tree branch, or a shepherd’s hook. Use the hook at the top of your combined chains to hang the chandelier. Take a step back and admire your handiwork. For an added touch of magic, consider placing solar-powered fairy lights, LED candles, or even small battery-operated lanterns inside the chandelier’s cage. This will create a warm, inviting glow that truly transforms your outdoor ambiance, especially as dusk settles.
Customizing Your Outdoor Chandelier
The beauty of DIY lies in customization. While the base chandelier is stunning on its own, there are numerous ways to personalize it to match your unique style and existing outdoor decor.
- Color Transformation: Consider spray painting the entire structure. Matte black offers a sophisticated, modern look, while a vibrant color like teal or coral can add a playful, whimsical touch. Ensure you use outdoor-grade spray paint for durability against the elements.
- Decorative Accents: Embellish your chandelier with beads, acrylic crystals, faux flowers, or even small wind chimes. You can attach these to the fence panels or dangle them from the hula hoop using fishing line for a floating effect.
- Lighting Enhancements: Beyond solar lights, you could weave battery-operated string lights through the fence panels for a more intricate glow. For a touch of rustic charm, small Mason jars with tea lights (LED for safety) can be hung inside.
- Seasonal Themes: Easily update your chandelier for holidays or seasons. Add festive ribbons for Christmas, autumn leaves for fall, or bright, cheerful flowers for spring and summer.
Maintenance and Longevity Tips
To ensure your DIY outdoor chandelier remains a beautiful fixture in your garden for seasons to come, a little care goes a long way. Periodically check the zip ties for any signs of wear or loosening, especially after strong winds or heavy rain. Replace any ties that appear brittle or broken to maintain structural integrity. If you’ve painted your chandelier, a fresh coat of outdoor sealant or paint every couple of years can help protect it from fading and rust. During extreme weather conditions, such as severe storms or winter snow, consider bringing your chandelier indoors to prolong its life. A simple wipe-down with a damp cloth can remove dust and grime, keeping it looking fresh and vibrant.
Why This DIY Project is Perfect for You
In a world where mass-produced items are common, creating something unique and handmade offers a refreshing alternative. This Dollar Tree outdoor chandelier project is more than just about saving money; it’s about igniting your creativity, learning new skills, and adding a personal touch to your home. It’s an easy-to-follow guide that guarantees a stylish and functional piece of outdoor decor, proving that exceptional results don’t require an exceptional budget. Imagine the joy of seeing your friends and family admire a piece you crafted with your own hands, knowing that it brought a unique aesthetic to your space. This project also serves as a wonderful introduction to the vast and rewarding world of DIY, encouraging you to explore more possibilities for transforming your environment economically and creatively.
The detailed step-by-step tutorial from White Lab House is an excellent resource, providing clear visual guidance throughout the process. For those looking for more inspiration, consider exploring “How To Make An Outdoor Solar Chandelier” for another fantastic outdoor lighting idea.