
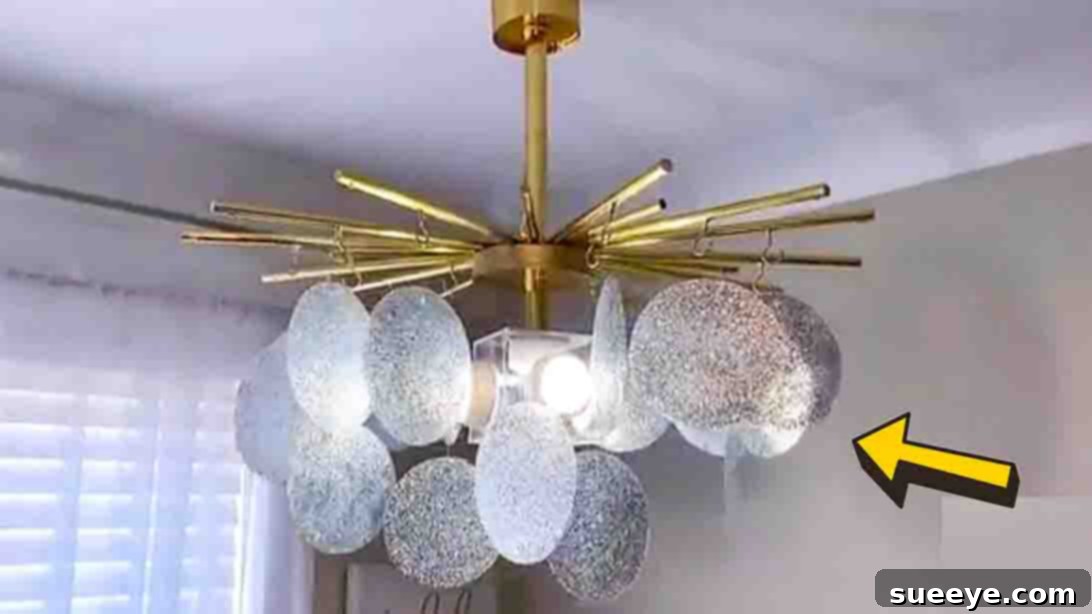
Illuminate Your Space: Create a Stunning DIY Chandelier Using Dollar Tree Items
Who says exquisite home decor must come with a hefty price tag? Unleash your inner designer and craft a breathtaking chandelier that looks like it’s straight out of a high-end boutique, all while staying within a budget that will surprise you. This remarkable DIY chandelier, inspired by the creative minds at Yoduvh Essentials, is a testament to the power of imagination and a few inexpensive supplies. Prepare to be amazed that this gorgeous lighting fixture can be fashioned almost entirely from items sourced from your local Dollar Tree! It’s a project that promises simplicity in execution but delivers an outcome of unparalleled beauty and sophistication.
Imagine a statement piece adorning your ceiling, radiating a warm, inviting glow, and elevating the ambiance of any room. Now, imagine achieving this elegant look using humble chopping mats. Yes, you read that right! This innovative design transforms everyday dollar store items into a focal point that will leave your guests in disbelief. They’ll never guess its secret origin. Gather your family or friends this weekend and embark on a rewarding crafting journey. Follow our comprehensive, step-by-step guide and the accompanying video tutorial to bring this stunning chandelier to life.
RELATED: DIY Chandelier Cage Using Chicken Wire Tutorial
Materials Needed for Your Budget-Friendly Chandelier
Before diving into the creative process, ensure you have all the necessary components. The beauty of this project lies in its accessibility, as most items are readily available and incredibly affordable. Here’s what you’ll need to assemble your elegant lighting fixture:
- 3 packs of chopping mats: These will form the main decorative elements of your chandelier. Look for flexible mats, ideally in a neutral color that can be easily transformed.
- Wooden dowels: You’ll need several smaller dowels for the support structure and one larger dowel for the central suspension point.
- Lid from an empty container: A sturdy plastic lid, such as from an empty yogurt container or similar food packaging, will serve as the base for the chandelier’s frame.
- Empty masking tape roll: This provides a perfect cylindrical form for a decorative top element.
- Glitter: Choose a fine glitter, preferably gold or silver, to add a dazzling, high-end shimmer to your decorative circles.
- Mod Podge: This versatile adhesive, sealer, and finish will be crucial for applying glitter and adding a protective gloss.
- Cup hooks: These small, curved hooks are essential for hanging the decorative circles from the dowels.
- Fishing line: A thin, strong fishing line creates an almost invisible suspension for the glittered circles, enhancing the chandelier’s ethereal appearance.
- Zip ties: Indispensable for securely fastening components together, providing strong, reliable connections.
- Gold spray paint: To give various components a consistent, luxurious metallic finish. Ensure you use it in a well-ventilated area.
- Gold contact paper: This adhesive paper will elegantly cover your dowels, giving them a sleek, metallic look without the need for extensive painting.
- Acrylic square box: A small, clear box to house and conceal the remote-control push lights (not listed in original materials, but implied in directions).
- Remote control push lights: The light source for your chandelier, allowing for easy operation and adjustable brightness if desired (optional, but highly recommended for functionality).
Step-by-Step Directions to Craft Your Dollar Tree Chandelier
Follow these detailed instructions carefully to construct your stunning, budget-friendly lighting fixture. Precision and patience will lead to a truly professional-looking result.
Step 1: Preparing the Decorative Elements and Structural Supports
Begin by transforming your chopping mats into the dazzling focal points of your chandelier. Take a lid from an empty can or a similar circular object to trace uniform circles onto your chopping mats. The consistent size of these circles is key to the chandelier’s polished aesthetic, so trace carefully. Once traced, meticulously cut out each circle. For best results, use sharp scissors or a craft knife to ensure smooth edges.
Next, it’s time to add some sparkle! Take each cut-out circle and apply a generous, even layer of gloss Mod Podge to its rough side. While the Mod Podge is still wet, generously sprinkle your chosen glitter over the entire surface. Ensure complete coverage for a uniform shimmer. Set these glittered circles aside and allow them to dry undisturbed for at least one hour. This drying time is crucial for the Mod Podge to set and encapsulate the glitter effectively. Once dry, gently shake off any excess glitter to reveal a beautifully shimmering disk. Finally, use a hole punch or a small drill bit to create a single hole near the edge of each circle. These holes will be used for hanging, so ensure they are consistent and neatly punched. Set your glittered circles aside.
Now, shift your attention to the wooden dowels that will form the skeletal structure of your chandelier. Take your gold contact paper and carefully cover each of the smaller dowels, ensuring a smooth, bubble-free finish. Trim any excess contact paper neatly. Once covered, attach a small cup hook securely to one end of each smaller dowel. For the larger, central dowel (which will bear the weight of the entire chandelier and suspend it from the ceiling), cover it with gold contact paper as well, paying extra attention to a flawless finish. Attach a robust cup hook to the very top of this larger dowel, ensuring it is firmly embedded and capable of supporting the full weight of the finished chandelier.
Step 2: Assembling the Chandelier Frame and Adding the Details
With your components prepared, it’s time for assembly. Take the lid from your empty container and spray paint it thoroughly with gold spray paint. Apply multiple light coats for an even, durable finish, ensuring you do this in a well-ventilated area. Once dry, carefully make a hole in the exact center of the lid. This central hole will be crucial for the main suspension dowel.
Arrange the smaller, gold-covered dowels symmetrically around the perimeter of the spray-painted lid. Secure them firmly in place using zip ties and hot glue. The combination of zip ties for structural integrity and hot glue for immediate adhesion creates a very strong bond. Next, carefully insert the larger, central dowel through the hole you made in the lid, ensuring it stands perfectly upright. Secure this central dowel to the lid as well, again using a combination of zip ties and hot glue for maximum stability. This forms the robust frame of your chandelier.
Now, attach your acrylic square box to the larger dowel, positioning it discreetly in the middle of the structure. This box will serve as a clever housing for your remote-control push lights, allowing you to easily operate them while keeping the mechanism hidden. With the main structure in place, it’s time to add the beautiful glittered circles. Using your fishing line, carefully tie and suspend each glittered circle from the cup hooks on the smaller dowels. Vary the lengths of the fishing line to create a cascading, multi-layered effect, adding depth and visual interest to your chandelier. The transparent fishing line ensures that the circles appear to float gracefully in mid-air.
For the final decorative touch on the structure, cover your empty masking tape roll with the golden contact paper, ensuring a clean, seamless finish. Attach this gold-covered roll to the very top of the chandelier, just beneath the main suspension hook. This element adds a polished, finished look to the top of your fixture, concealing any connectors and enhancing its overall elegance. Finally, with all components securely in place and the remote-control lights installed within the acrylic box, your magnificent DIY chandelier is ready to be mounted to the ceiling. Ensure secure installation for safety and longevity.
Why Choose a DIY Chandelier? The Magic of Budget-Friendly Decor
Opting for a DIY chandelier, especially one crafted from Dollar Tree items, offers a myriad of benefits beyond just cost savings. Firstly, it provides an unparalleled sense of personal achievement. There’s immense satisfaction in knowing you’ve created a beautiful, functional piece of home decor with your own hands. Secondly, it allows for complete customization. While this tutorial provides a fantastic foundation, you can easily adapt the colors, glitter type, and arrangement of the circles to perfectly match your existing interior design or to express your unique style. Imagine matching the glitter to your throw pillows or spray painting the dowels a bold black for a modern twist! Finally, it’s an eco-friendly approach, repurposing common items into something new and beautiful, reducing waste, and encouraging creative reuse.
Tips for Crafting Your Perfect Chandelier
- Precision is Key: When tracing and cutting your circles, strive for as much uniformity as possible. Small variations can become noticeable in the final, assembled piece.
- Layer Your Glitter: For maximum sparkle, apply Mod Podge, sprinkle glitter, let it dry slightly, then apply another thin layer of Mod Podge and more glitter. Finish with a top coat of Mod Podge for durability and shine.
- Work in a Ventilated Area: When using spray paint and Mod Podge, ensure good air circulation to avoid inhaling fumes.
- Test Your Adhesion: Before the final hang, gently tug on each hung circle and all connected parts to ensure they are securely fastened. A little extra hot glue or a tighter zip tie can prevent future mishaps.
- Vary Hanging Lengths: Experiment with different lengths of fishing line for the circles. This creates a dynamic, multi-dimensional effect that adds depth and visual interest to your chandelier.
- Consider Your Lighting: While remote control push lights are convenient, you could also explore small LED fairy lights or battery-operated tea lights for different effects, ensuring they are safely placed within the structure.
Customization Ideas for Your Unique Piece
While the gold and glitter combination exudes classic elegance, don’t hesitate to personalize your chandelier. Consider using different colors of spray paint – a matte black for industrial chic, a crisp white for minimalist appeal, or a vibrant metallic blue for a pop of color. Experiment with various glitter colors or even incorporate small beads or sequins onto the circles for added texture and shimmer. You could also mix in some translucent colored chopping mats to create a stained-glass effect when the light shines through. For a more natural look, consider using twine instead of fishing line for hanging, and perhaps even incorporating faux flowers or greenery into the design. The possibilities are endless, limited only by your imagination!
Maintaining Your DIY Masterpiece
Once your beautiful chandelier is installed, a little care will keep it looking pristine. Dust gently with a soft, dry cloth or a duster to prevent buildup. Avoid using harsh chemical cleaners, especially on the glittered surfaces, as they can dull the shine or damage the Mod Podge finish. If your chandelier uses battery-operated lights, remember to replace batteries periodically to ensure continuous illumination. With proper care, your Dollar Tree chandelier will remain a sparkling focal point in your home for years to come.
Conclusion: A Luxurious Glow, Achieved Affordably
This DIY chandelier project using Dollar Tree chopping mats proves that you don’t need to spend a fortune to infuse your home with luxury and style. It’s a creative, rewarding, and incredibly budget-friendly way to add a unique lighting fixture that will undoubtedly become a conversation starter. Embrace the joy of crafting, personalize your design, and illuminate your space with a gorgeous piece that truly reflects your ingenuity. Get ready to enjoy the compliments on your stunning new chandelier – and keep its dollar store secret close to your heart!