
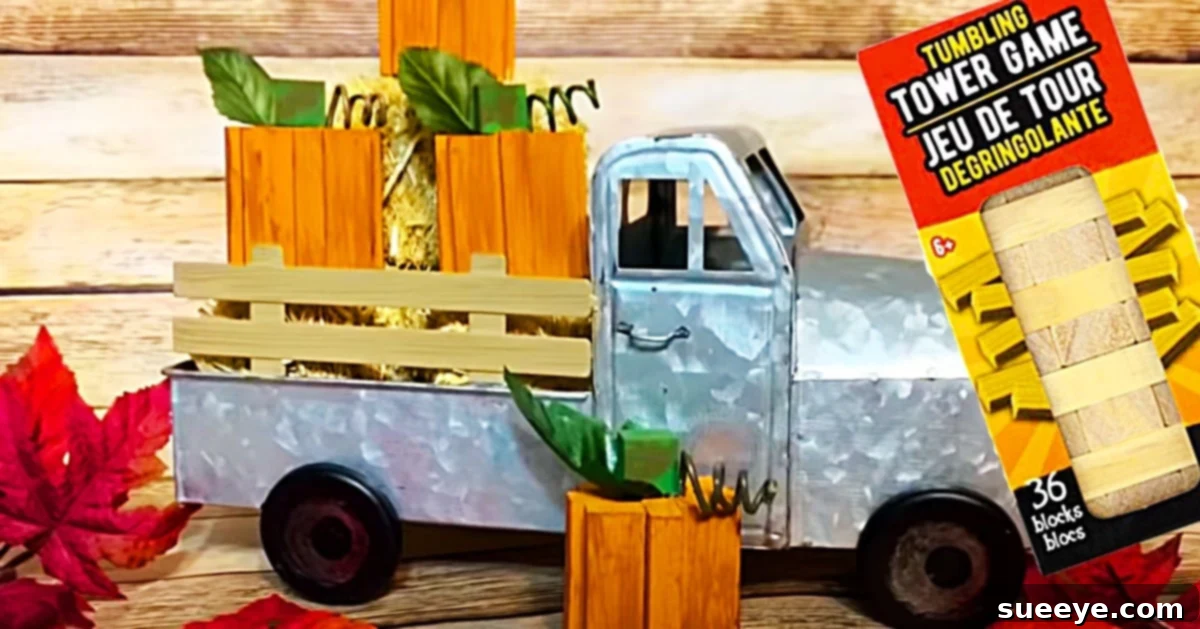
Craft Adorable Dollar Tree Tumbling Tower Pumpkins: Your Ultimate Fall DIY Guide
As autumn leaves begin to fall and a crisp chill fills the air, there’s no better time to embrace the spirit of the season with delightful DIY decorations. If you’re looking for an incredibly simple, budget-friendly, and charming way to spruce up your home for Fall, you’ve come to the right place! We’re diving into the wonderful world of Tumbling Tower Pumpkins, inspired by a fantastic video tutorial by This Southern Girl Can on YouTube. These adorable ‘Jenga block’ style pumpkins are a popular choice for their rustic appeal and the sheer ease of crafting them.
What makes this project truly exceptional is that nearly all the materials can be sourced from your local Dollar Tree, making it an incredibly affordable craft for individuals and families alike. Whether you’re aiming to create a cozy fall display in your kitchen, a festive centerpiece for your dining table, or unique accents for your mantel, these handmade pumpkins are sure to add a touch of warmth and charm. Forget expensive store-bought decor; with a pack of tumbling tower game blocks, some craft paint, and a trusty hot glue gun, you’ll be well on your way to crafting an autumn wonderland.
Why Choose DIY Tumbling Tower Pumpkins for Your Fall Decor?
The allure of handmade decor, especially during the festive fall season, goes beyond just saving money. Crafting your own decorations allows for unparalleled personalization, ensuring your home truly reflects your unique style. These Tumbling Tower Pumpkins, often affectionately called Jenga block pumpkins, offer a perfect blend of simplicity and charm. They are:
- Incredibly Affordable: With most supplies available at dollar stores, you can create multiple pumpkins without breaking the bank. This makes them ideal for decorating large spaces or gifting to friends and family.
- Beginner-Friendly: No advanced crafting skills are required! If you can glue blocks and wield a paintbrush, you can make these. They’re perfect for crafters of all ages, even as a fun activity for older children (with adult supervision for the hot glue).
- Highly Customizable: While traditional orange is classic, you can easily paint these pumpkins in any color to match your existing decor – think elegant whites, rustic creams, subtle pastels, or even glittery metallics for a touch of glam.
- Versatile in Display: From planters to tiered trays, mantelpieces to window sills, these compact pumpkins fit seamlessly into almost any fall vignette. Their sturdy nature also makes them a great option for outdoor covered areas.
- Sustainable Crafting: Repurposing game blocks is a clever way to create beautiful decor, giving new life to simple items.
Materials You’ll Need for Your Charming Fall Pumpkins
One of the best aspects of this DIY project is the accessibility and affordability of the materials. Most items can be found at Dollar Tree or similar discount stores, making it a truly budget-conscious craft. Here’s a detailed list of what you’ll need to gather:
- 1 Pack of Tumbling Tower Game Blocks: This is the foundation of your pumpkin. A standard pack usually contains enough blocks for several small pumpkins, depending on your desired size. Look for the “Tumbling Tower” or similar block-stacking games.
- 1 Pack of Small Wooden Blocks (for stems): These are usually found in the craft section of dollar stores or hobby shops. They should be significantly smaller than the tumbling tower blocks and ideally rectangular or square to serve as a realistic stem. If you can’t find small blocks, short pieces of dowel rods or even real twigs can work beautifully.
- Orange Craft Paint: A vibrant orange acrylic craft paint is perfect for the classic pumpkin body. Choose a matte or satin finish for a natural look.
- Green Craft Paint: Essential for painting any floral wire tendrils or small leaves you might add.
- Brown Craft Paint: Ideal for painting the wooden stems, giving them an authentic woody appearance.
- Floral Wire: A thin, bendable wire, typically green or brown, used to create charming curly tendrils for your pumpkins.
- Small Faux Leaves or Natural Twigs: Craft stores and dollar stores often carry small artificial autumn leaves or berry sprigs that can be cut down. Alternatively, you can collect small, dried leaves or tiny twigs from your yard for an organic touch.
- Hot Glue Gun: An indispensable tool for quick and strong bonds between the wooden blocks and embellishments. A mini glue gun works perfectly for this project.
- Glue Sticks: Ensure you have plenty of glue sticks on hand, as you’ll be doing quite a bit of gluing.
- Optional: Paint Brushes: A variety of sizes will be helpful for applying paint evenly and for detail work.
- Optional: Clear Sealant Spray: A matte or glossy clear coat can protect your pumpkins and make them more durable, especially if displayed in high-traffic areas or covered outdoor spaces.
Step-by-Step Guide: Crafting Your Tumbling Tower Pumpkins
Creating these charming pumpkins is a straightforward process that anyone can master. Follow these easy steps to bring your Dollar Tree Fall decor to life:
Step 1: Assembling the Pumpkin Body with Blocks

The foundation of your pumpkin is built from the tumbling tower blocks. For a robust and classic pumpkin shape, you’ll want to create a sturdy block stack. For the pumpkin shown in the image, you will use eight tumbling tower blocks.
- Begin by taking two tumbling tower blocks and applying a line of hot glue along one long side of the first block. Press the second block firmly against it, ensuring they are perfectly aligned. This creates your base layer, two blocks wide.
- Next, apply hot glue to the top surface of these two joined blocks. Take another two blocks, glued together in the same manner as the first pair, and place them directly on top, orienting them in the same direction (parallel to the first layer). Press down firmly to secure the bond.
- Repeat this process two more times, creating a stack that is four layers high, with each layer consisting of two blocks glued side-by-side. You will use a total of eight blocks to form a rectangular prism, measuring two blocks wide and four blocks tall.
- Ensure each layer is fully adhered before moving on. Allow the glue to cool and set completely for a strong, stable pumpkin body. This structured base provides a compact and recognizable pumpkin silhouette.
Step 2: Adding a Splash of Autumn Color
Now comes the fun part – bringing your pumpkin to life with vibrant fall colors!
- Painting the Pumpkin Body: Take your assembled block stack and apply an even coat of orange craft paint. Use a flat paintbrush to ensure smooth, consistent coverage across all surfaces. Don’t forget the top and bottom! You may need two or three coats of paint to achieve a solid, opaque color, allowing each coat to dry thoroughly in between applications.
- Painting the Stem: While your pumpkin body dries, take your small wooden block (or twig/dowel) that will serve as the stem. Paint it with brown craft paint. Again, two coats might be necessary for full coverage. You can also add a touch of green or even a subtle highlight with a lighter brown to give it a more natural, weathered look.
- Optional Details: If you plan to add any additional painted details, like subtle shading around the edges or a slightly darker orange in the crevices for dimension, now is the time to do so after the base coats are dry.
Step 3: Assembling Your Pumpkin with Embellishments
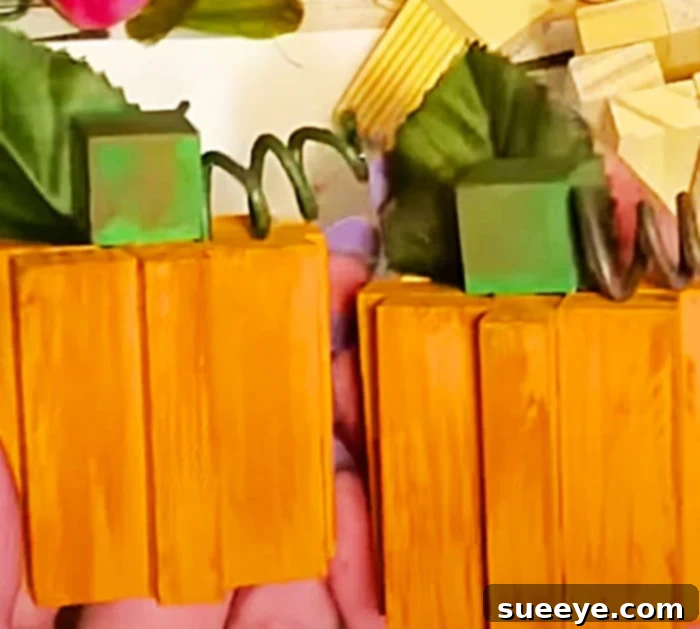
With your painted components dry, it’s time to bring all the elements together to create your finished pumpkin.
- Attaching the Stem: Apply a generous dollop of hot glue to the bottom of your painted brown wooden stem block. Carefully center it on the top surface of your orange pumpkin body and press down firmly. Hold it in place for a few seconds until the glue sets.
- Creating and Attaching Tendrils: Cut a short length (around 4-6 inches) of floral wire. Using a pencil, a paintbrush handle, or your finger, coil the wire into a spiral shape to create a charming tendril. Apply a small dot of hot glue to one end of the coiled wire and attach it near the base of the stem, allowing it to artfully curl around the top of the pumpkin. You can make one or two tendrils for a more whimsical look.
- Adding Leaves and Twigs: Select your small faux leaves or natural twigs. Arrange them around the base of the stem, perhaps overlapping the tendrils slightly. Once you’re happy with the placement, use small dots of hot glue to secure each leaf and twig firmly to the pumpkin body, ensuring a natural and balanced look. Layering a couple of leaves can add depth and realism.
Step 4: Finishing Touches and Protection (Optional)
To ensure your beautiful Tumbling Tower Pumpkins last through many fall seasons, consider these optional final steps:
- Sealing: Once all the glue is dry and your pumpkin is complete, you can apply a clear sealant spray. This will protect the paint from chips and fading, and also add a subtle sheen or a matte finish depending on your preference. Always use sealant in a well-ventilated area.
- Additional Embellishments: Feel free to get creative! You could tie a small piece of raffia or twine around the stem, add tiny berries from a floral pick, or even use a fine-tip marker to draw small details on the pumpkin’s surface.
And just like that, you’ve crafted an adorable, custom, and budget-friendly piece of fall decor! It is truly that easy to transform simple dollar store items into something special.
Creative Display Ideas for Your DIY Tumbling Tower Pumpkins
The beauty of these cute Jenga block pumpkins lies not only in their charm but also in their incredible versatility. They can be used to decorate literally anything, adding a cozy, rustic touch to every corner of your home. Here are some inspiring ideas to showcase your handmade creations:
- Centerpieces: Arrange a cluster of varying sized pumpkins (you can make larger ones by using more blocks) with mini hay bales, pinecones, faux gourds, and flameless LED candles for a stunning dining table or coffee table centerpiece.
- Mantel Decor: Line your fireplace mantel with your pumpkins, interspersing them with garlands of faux autumn leaves, scented candles, and family photos for a warm and inviting display.
- Tiered Trays: These compact pumpkins are perfect for styling tiered trays. Combine them with small signs, ceramic mugs, and other miniature fall-themed items to create charming vignettes.
- Window Sills and Shelves: Place a single pumpkin or a small grouping on window sills, bookshelves, or open shelving in your kitchen to add subtle touches of fall throughout your home.
- Entryway Accent: Welcome guests with a festive entryway by placing your pumpkins on a console table alongside a fall-themed wreath or a bowl of potpourri.
- Planters and Baskets: Tuck your pumpkins into decorative planters alongside real or faux mums, or nestle them within woven baskets filled with other seasonal elements for a rustic appeal.
- Bathroom and Kitchen Decor: Don’t forget these often-overlooked spaces! A small pumpkin on a bathroom counter or kitchen island can tie the whole home’s decor together.
- As Gifts: These handmade pumpkins make wonderful, thoughtful gifts for teachers, neighbors, or hosts during the autumn season.
- Wreath or Garland Embellishments: With a dab of hot glue, you can attach smaller versions of these pumpkins to autumn wreaths or garlands for added texture and visual interest.
Tips for Success and Customization
To make your Tumbling Tower Pumpkins truly unique and to ensure your crafting experience is smooth and enjoyable, consider these additional tips and customization ideas:
- Color Palette Exploration: While traditional orange is lovely, don’t limit yourself! Experiment with different paint colors to match your home’s aesthetic. Try antique white or cream for a farmhouse look, soft sage green for a subtle touch, or even metallics like gold or copper for a more elegant display. Distressing the edges with a little sandpaper after painting can also create a vintage feel.
- Alternative Stems: If you can’t find small wooden blocks, or simply want a different look, consider using real twigs from your yard, cinnamon sticks for a fragrant touch, wine corks, or even small wooden beads for the pumpkin stems. Each alternative adds a unique character.
- Diverse Embellishments: Beyond faux leaves and floral wire, get creative with other decorative elements. Consider tying small bows made from burlap, plaid ribbon, or twine around the stem. Small buttons, fabric scraps cut into leaf shapes, or even a dusting of glitter can add extra sparkle and personality.
- Safety First: Always supervise children when using a hot glue gun, and ensure proper ventilation when painting, especially if using spray sealants.
- Batch Crafting: If you plan to make multiple pumpkins, consider working in batches. Glue all your pumpkin bodies first, then paint all the orange parts, then all the stems, and finally assemble and embellish. This can be a more efficient way to complete several pumpkins at once.
- Varying Sizes: To create a more dynamic display, try making pumpkins of different sizes. You can achieve this by altering the number of blocks used for the base or stacking them in different configurations (e.g., a 2×3 base for a wider pumpkin, or a shorter 2-layer stack for a squat pumpkin).
Embrace the Joy of Handmade Fall Decor
Crafting these Dollar Tree Tumbling Tower Pumpkins is more than just a DIY project; it’s an opportunity to infuse your home with personal charm and the cozy essence of autumn. It’s a testament to how simple, inexpensive materials can be transformed into beautiful, festive decorations with a little creativity and effort. Whether you’re a seasoned crafter or just starting your DIY journey, this project offers an accessible and rewarding experience.
So, gather your supplies, put on some festive music, and enjoy the process of creating these adorable pumpkins. Once finished, display them proudly, knowing that each one was made with your own hands, adding a unique and heartfelt touch to your fall decor. Don’t forget to share your creations and inspire others! Happy crafting!