
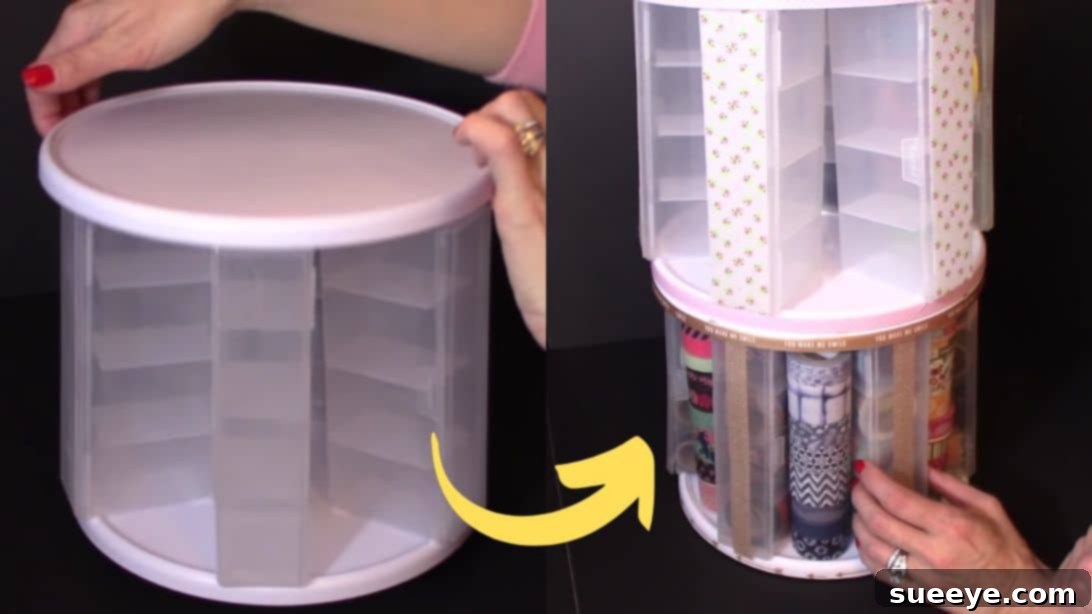
Are you tired of cluttered countertops and rummaging through drawers to find your everyday essentials? Imagine a simple, elegant, and highly functional solution that costs next to nothing and brings a touch of personalized flair to your space. Thanks to the ingenious creativity of Kelly Barlow Creations on YouTube, you can now construct your very own DIY rotating storage organizer using incredibly affordable items sourced primarily from your local Dollar Tree. This project isn’t just budget-friendly; it’s also remarkably easy to assemble, making it perfect for DIY enthusiasts of all skill levels.
This comprehensive guide will walk you through every step of creating a versatile, two-tiered rotating storage caddy that can transform any area of your home, from your vanity to your craft room or office desk. Say goodbye to disorganization and hello to a custom-built solution designed to keep your frequently used items neatly accessible. With clear instructions, helpful tips, and creative customization ideas, you’ll not only learn how to build this fantastic organizer but also discover endless ways to adapt it to your specific needs and aesthetic preferences. Get ready to embark on a fun, rewarding DIY journey that promises practicality and style.
The Appeal of Dollar Tree DIY Storage Solutions
The beauty of Dollar Tree DIY projects lies in their unparalleled accessibility and affordability. In an era where organizational tools can often come with a hefty price tag, discovering ways to create high-quality, functional items for just a few dollars is truly empowering. The “3-in-1 cotton sets” and “lazy susans” from Dollar Tree are prime examples of how everyday, inexpensive items can be repurposed into something incredibly useful and stylish. This particular rotating organizer project exemplifies smart budgeting without compromising on effectiveness or durability. By leveraging these readily available materials, you’re not just saving money; you’re also engaging in sustainable practices by giving new life to products.
Moreover, the simplicity of Dollar Tree materials often translates into straightforward assembly processes, making these projects ideal for beginners. There’s immense satisfaction in transforming simple components into a bespoke item that perfectly fits your space and organizational requirements. This rotating storage caddy is not just a container; it’s a testament to creative problem-solving and smart home management, proving that you don’t need a large budget to achieve a beautifully organized home.
Essential Materials for Your DIY Rotating Organizer
Gathering your materials is the first exciting step in any DIY project. For this rotating storage caddy, you’ll be delighted by how few and inexpensive the required items are. Most, if not all, can be found at your local dollar store, ensuring this project remains super budget-friendly. Here’s a detailed list of what you’ll need:
- 6 x 3-in-1 Cotton Set Containers: These are typically found in the beauty or personal care aisle at Dollar Tree. They usually consist of three clear plastic containers designed to hold cotton balls, cotton swabs, and similar small items. Their uniform size and shape make them ideal for creating a circular, segmented storage unit. Look for sets with removable lids and a smooth surface for easy customization.
- 2 x Turntables or Lazy Susans: These are the foundational components that provide the rotating functionality. Dollar Tree often carries small plastic lazy susans, usually about 8-10 inches in diameter, perfect for this project. Ensure they spin smoothly and are sturdy enough to support the weight of your containers and their contents. Having two allows for a multi-tiered design, doubling your storage capacity.
- E6000 or Heavy-Duty Cement Adhesive: A strong, permanent adhesive is crucial for ensuring your organizer holds together securely. E6000 is a popular choice among crafters for its industrial strength and versatility, bonding well to plastic. Alternatively, a general-purpose cement adhesive designed for crafts and household repairs will also work. Always ensure you work in a well-ventilventilated area when using these types of glues.
- Washi Tape: This decorative adhesive tape is optional but highly recommended for adding a touch of personal style. Washi tape comes in a vast array of colors, patterns, and widths, allowing you to easily customize the aesthetic of your organizer without messy paint or complicated techniques. It’s perfect for lining the rims, creating decorative bands, or adding subtle accents.
- Marking Pen: A simple permanent marker or fine-tip pen will be necessary for accurately marking placement points on your lazy susans, ensuring precise alignment of your containers.
- Flat Scraping Tool (Optional but Recommended): A small putty knife, old credit card, or even a robust plastic ruler can be helpful for carefully removing stubborn labels and residue from the containers.
- Heavy Objects (for curing): Books, weights, or other heavy household items will be needed to apply pressure while the glue cures, ensuring a strong and permanent bond between the components.
Step-by-Step Guide: Creating Your DIY Rotating Storage Caddy
This project is designed to be straightforward and enjoyable. Follow these detailed steps to build your custom rotating organizer, and remember to take your time with each stage, especially when working with adhesives.
Step 1: Prepare and Secure Your Containers to the Base
The first crucial step involves preparing your containers and establishing the foundational tier of your rotating organizer. Proper preparation ensures strong adhesion and a clean finish.
Begin by taking each of your six 3-in-1 cotton set containers. Carefully remove any labels or stickers attached to them. For stubborn labels, a flat scraping tool can be incredibly useful. Gently scrape off the paper, then use a little rubbing alcohol or Goo Gone to remove any sticky residue, ensuring the surfaces are perfectly clean and smooth. A clean surface is paramount for the glue to adhere effectively. Once the labels are removed and any residue is gone, empty out any contents if they came filled, and give the containers a quick wash and dry to ensure they are free of dust or oils.
Next, grab one of your lazy susans or turntables. This will serve as the base for your first tier of storage. Decide on the arrangement of your containers. You have two main options:
- Keep the doors intact: If you wish to retain the flip-open doors on your containers (which can be useful for keeping contents dust-free or providing a specific aesthetic), arrange the containers around the perimeter of the lazy susan with their doors facing outwards. Overlap the containers slightly to achieve a compact, stable circle.
- Remove the doors: For a more open, easy-access design, you can carefully remove the doors from each container. This allows you to place the containers further inward on the base, potentially creating a slightly smaller overall footprint and a smoother appearance.
Experiment with the placement until you are content with how the containers are arranged to form a stable and evenly spaced circle on the lazy susan. Once you’ve finalized your layout, carefully lift each container, one at a time, and apply a generous line of E6000 or cement adhesive along the entire bottom edge. Press each container firmly back into its designated spot on the lazy susan, ensuring it aligns perfectly with your chosen arrangement. Apply gentle but firm pressure for a minute or two to allow the glue to begin setting. Repeat this process for all six containers, creating a complete circular ring. It’s highly recommended to let this first tier cure for at least a few hours, or ideally overnight, before proceeding to the next step, to ensure a robust and stable bond.
Step 2: Assemble the Second Tier and Personalize Your Organizer
With the first tier securely in place and the adhesive fully cured, it’s time to add the second lazy susan and personalize your new rotating organizer. This step completes the two-tiered design and allows for creative expression.
Take your second lazy susan. Carefully place it on top of the six containers you just glued onto the first base. Align it centrally, ensuring it sits evenly across the top edges of all containers. Once positioned, use your marking pen to place small dots or lines underneath the second lazy susan, precisely where the top edge of each container meets it. These marks will serve as your guide for applying the glue, ensuring perfect alignment and a strong bond for the top tier. Lift the top lazy susan off carefully, revealing your marked spots.
Now, apply a line of E6000 or cement adhesive along the marked edges on the underside of the second lazy susan, making sure the glue will make contact with the top rim of each container. Be precise to avoid excess glue squeezing out once assembled. Carefully place the second lazy susan back on top of the containers, aligning it perfectly with your previous marks. Press down firmly to establish contact between the glued areas and the container tops.
For optimal adhesion, it’s crucial to apply weight evenly on top of the newly assembled structure. Stack several heavy books, small weights, or anything that can provide consistent downward pressure onto the top lazy susan. Leave this weighted setup undisturbed overnight (at least 12-24 hours) to allow the adhesive to fully cure and create a permanent, strong bond. This step is critical for the stability and longevity of your two-tiered organizer.
Once the glue has completely set and you’ve removed the weights, your functional rotating storage caddy is ready for its decorative transformation! This is where your personal style shines through. A popular and simple method is to use washi tape: apply it neatly along the rims of both lazy susans or create decorative bands around the sides of the containers. With its vast array of patterns and colors, washi tape can instantly elevate the look of your organizer.
Alternatively, for a touch of glamour, consider using a diamond wrap or rhinestone ribbon. You can cut strips of this sparkling material to fit and adhere them securely using a hot glue gun (exercise caution with hot glue). Other creative ideas include painting the containers and lazy susans with spray paint (ensure it’s plastic-friendly and use primer for best results), applying decorative contact paper, or even stenciling patterns. The possibilities are endless, allowing you to match your organizer perfectly to your home decor. Once decorated, your incredible Dollar Tree DIY Rotating Storage Organizer is complete and ready to house your makeup, craft supplies, office essentials, or any small items that need a stylish home!
Creative Uses for Your New Rotating Storage Organizer
The beauty of this DIY rotating storage caddy lies in its incredible versatility. Once you’ve completed your project, you’ll find countless ways to utilize it around your home. Its rotating design provides easy access to all contents, making it a fantastic solution for small items that often get lost or create clutter. Here are just a few ideas to inspire you:
- Makeup Organizer: This is perhaps the most popular use. Dedicate each compartment to different makeup categories: makeup brushes, eyeliners, mascaras, lipsticks, foundations, or even small palettes. The rotating feature means no more digging through a makeup bag!
- Craft Supplies Caddy: Keep your crafting area neat and organized. Store beads, glitter, buttons, small spools of thread, paint tubes, googly eyes, or other small embellishments. Everything you need for your next project will be just a spin away.
- Office Essentials Holder: Tidy up your desk by storing pens, pencils, markers, paper clips, sticky notes, rubber bands, small staplers, USB drives, and even charging cables. A neat desk often leads to a clear mind!
- Bathroom Vanity Organizer: Beyond makeup, use it for cotton balls, Q-tips, hair ties, bobby pins, small lotions, nail polish bottles, and other bathroom necessities. It keeps your vanity clutter-free and makes morning routines smoother.
- Kitchen Pantry or Countertop Helper: While not ideal for open food, it can be perfect for organizing small spice jars, tea bags, coffee pods, individual sugar packets, or small snack bags in a pantry. On the countertop, it can hold stirrers, creamer packets, or even small kitchen gadgets.
- Kids’ Creative Corner: Encourage tidiness by providing a fun way for kids to store their crayons, small art supplies, mini figures, or other tiny toys. The spinning action can even make cleanup feel like a game!
- Jewelry Display and Storage: Use each compartment to separate different types of jewelry – rings, earrings, bracelets, or small necklaces – making it easy to choose your accessories for the day.
- Hair Accessory Organizer: From hair ties and scrunchies to bobby pins and clips, this organizer can keep all your hair essentials in one convenient, easy-to-reach place.
The rotating functionality ensures that every item is equally accessible, eliminating the frustration of items getting lost at the back of a drawer or cabinet. This simple yet effective design truly maximizes your storage potential in a stylish manner.
Tips and Tricks for a Flawless DIY Experience
To ensure your DIY rotating storage project goes smoothly and results in a durable, beautiful organizer, consider these additional tips and tricks:
- Adhesive Application: Always apply glue in a well-ventilated area. Read the instructions on your chosen adhesive for specific drying and curing times. While it might feel dry to the touch quickly, full cure often takes 24-72 hours. Resist the urge to move or use the organizer before it’s fully cured to prevent weakening the bonds.
- Cleaning for Better Adhesion: Even if containers look clean, wiping them down with rubbing alcohol before gluing can remove invisible residues and oils, ensuring the strongest possible bond.
- Customization Beyond Washi Tape: If you’re feeling adventurous, consider spray painting your lazy susans and containers. Use a plastic-friendly primer first, then your desired color. Allow ample drying time between coats and before assembly. You could also use permanent vinyl decals for monograms or labels, or even decoupage with pretty paper.
- Even Pressure for Curing: When weighting the top lazy susan, ensure the pressure is distributed evenly across all six containers. This prevents uneven curing and potential weaknesses in the structure.
- Safety First: If using a hot glue gun for decorations, always supervise children and be mindful of hot surfaces. For strong adhesives, consider wearing gloves to protect your hands.
- Troubleshooting Adhesion Issues: If a container feels loose after curing, don’t despair. You can carefully reapply glue to the affected area, re-weight, and allow additional time for it to cure. Sometimes, a second application can fortify the bond.
- Adapt and Experiment: Don’t be afraid to experiment with different types of Dollar Tree containers if you can’t find the exact 3-in-1 sets. As long as they are uniformly sized and can form a stable ring, they might work. You could also try a single-tier version for a smaller organizer.
By following these guidelines, you’re not just building an organizer; you’re creating a durable, customized piece that will serve you well for years to come. Enjoy the process of bringing organization and beauty to your space with this incredibly clever and cost-effective DIY project!
This fantastic DIY rotating storage organizer truly embodies the spirit of smart, budget-friendly home organization. By transforming simple Dollar Tree finds into a highly functional and customizable piece, you can effortlessly declutter your spaces while adding a touch of personal flair. Whether it’s for makeup, crafts, office supplies, or bathroom essentials, this project offers an elegant solution to common organizational challenges. So gather your materials, follow these easy steps, and enjoy the satisfaction of creating something beautiful and practical with your own hands. You’ll wonder how you ever lived without this ingenious rotating caddy!
*Thanks to Kelly Barlow Creations via YouTube for all images and the brilliant inspiration for this project. Her clear, easy-to-follow tutorials are a treasure trove for DIY enthusiasts, so be sure to visit her channel for more amazing craft and home decor ideas!