
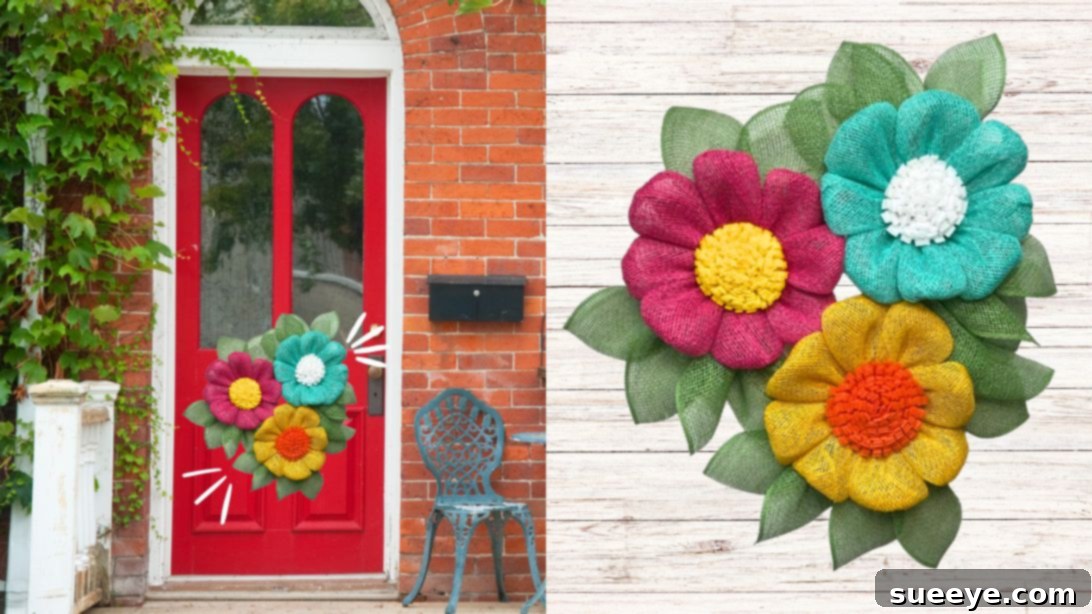
Create a Stunning Triple Flower Wreath: Your Ultimate DIY Guide
Are you searching for a unique and vibrant way to brighten up your home decor? Look no further than this exquisite triple flower wreath! This captivating project, inspired by the talented Julie’s Wreath Boutique, allows you to craft a multi-dimensional floral masterpiece that will undoubtedly become a focal point on your door or wall. Despite its intricate appearance, creating this stunning wreath is surprisingly straightforward, even for beginners. Get ready to unleash your creativity and bring a burst of color and charm into your living space!
Handmade wreaths offer a unique blend of personalization and satisfaction. Unlike mass-produced decorations, a DIY wreath reflects your personal style and adds a heartfelt touch to any room. This triple flower design is not only beautiful but also versatile, allowing for endless customization to match any season, holiday, or interior design theme. Imagine the compliments you’ll receive on your vibrant, handcrafted creation!
Materials You’ll Need for Your Triple Flower Wreath
Gathering all your supplies before you begin ensures a smooth and enjoyable crafting experience. Here’s a comprehensive list of what you’ll need, along with some helpful notes:
- Poly Burlap Fabric:
- 3 different complementary colors of poly burlap (e.g., pink, purple, yellow for flowers). Choose colors that will pop and work well together. Poly burlap is durable, weather-resistant, and holds its shape beautifully.
- 1 roll of lime green poly burlap (for the “foliage” layer). This adds a natural, leafy accent to your flowers.
- Wreath Forms:
- 3 small Dollar Tree wreath forms (or similar small wire wreath frames, approximately 8-10 inches in diameter). These will serve as the base for each individual flower.
- 1 larger wreath form (approximately 18-24 inches in diameter). This will be the main base onto which your three finished flowers are attached.
- Plastic Canvas: A sheet of plastic canvas (available at craft stores) will be used to create a solid center for each small wreath, providing a sturdy base for your flower centers.
- Zip Ties: A generous supply of small zip ties (4-6 inches) will be essential for securing petals, bases, and ultimately, the flowers themselves. Choose clear or colors that blend with your burlap.
- Craft Wire: A roll of thin floral or craft wire will be used to secure the felt flower centers.
- Floral Pins: Also known as U-pins or greening pins. These are useful for holding pieces in place temporarily or for extra security.
- Hot Glue Gun and Glue Sticks: A reliable hot glue gun is crucial for attaching felt elements and providing additional stability where needed. Always exercise caution when using hot glue.
- Felt Fabric: A small sheet of felt (matching or contrasting with your flower colors) to create the distinctive rolled centers for each flower.
- Scissors: Sharp scissors are a must for cleanly cutting poly burlap. Fabric shears are ideal.
- Measuring Tape or Ruler: For precise cutting of your burlap squares.
- Wire Cutters: To trim excess zip tie ends neatly.
Step-by-Step Instructions: Crafting Your Triple Flower Wreath
Follow these detailed steps carefully to bring your beautiful triple flower wreath to life. Patience and precision will yield the best results!
Step 1: Prepare Your Burlap Petal Pieces
Accuracy in this initial step sets the foundation for perfectly shaped petals. From each of your three chosen flower colors of poly burlap, cut 8 pieces, each measuring 10 inches by 10 inches. This will give you 24 squares total (8 for each of the three flowers). Then, take your lime green poly burlap and cut 12 pieces of the same size (10 inches by 10 inches). These green pieces will form the leafy base around your flowers, adding a lush, natural touch. Ensuring all pieces are precisely cut will lead to more uniform and aesthetically pleasing petals.
Step 2: Construct the Inner Base for Each Small Wreath
This step creates a solid foundation for the center of your flowers. Take one of your small Dollar Tree wreath forms. Place it onto your plastic canvas. Carefully trace the smallest inner circle of the wreath frame onto the plastic canvas using a marker. Cut out this traced circle from the plastic canvas. This plastic canvas disc will be the sturdy center of your flower. Securely attach this plastic canvas disc to the very center of the small wreath form using zip ties. Thread the zip ties through the canvas and around the wreath frame, pulling them taut and trimming any excess. Repeat this process for the remaining two small wreath forms, ensuring each has a firmly attached plastic canvas center.
Step 3: Create and Attach Your Flower Petals
Now it’s time to bring your flowers to life with beautiful petals. Take one of your 10-inch by 10-inch poly burlap squares. Lay it flat. Fold two opposite corners towards the middle, creating a kite-like shape. Instead of gathering in the exact middle, you will gather the fabric at the 7-inch mark from one end (or approximately 3 inches from one folded corner). This off-center gather is key to forming the distinct petal shape. Secure this gathered section tightly with a zip tie, then trim the excess tail of the zip tie. Next, take the smaller side of the gathered piece and fold it over the larger side, ensuring the two ends meet and align. Gather the fabric tightly at this new meeting point, creating a lovely petal shape. Secure this second gather with another zip tie, trimming the excess. This finished piece should now distinctly resemble a flower petal. Attach this petal to the plastic canvas center of one of your small wreath forms, using a zip tie threaded through the gathered base of the petal and around the plastic canvas or wire frame. Arrange the petal so it points outwards. Repeat this exact process for the remaining 7 pieces of poly burlap for that specific flower color. Once all 8 petals are attached, arrange them evenly around the center, forming a full flower. Set this completed flower aside and repeat the entire petal-making process for the remaining two flower colors, creating two more full, vibrant flowers.
Step 4: Craft and Install the Unique Felt Flower Centers
The distinctive felt centers add a beautiful finishing touch to your flowers. Take your felt fabric and cut it into strips, approximately 2.5 inches wide. You will need enough length to create a rolled center for each flower. Take two of these felt strips and apply a thin line of hot glue along one long edge, then press them together to form a longer, single strip. This ensures a larger, more impactful center. Now, along one of the open (unglued) long edges, make small, even cuts about halfway into the strip, creating a “frayed” or fringed effect. These frays will give your flower center texture. Apply a line of hot glue along the uncut edge of the felt strip and carefully begin to roll it tightly, starting from one end. Continue rolling until you have a dense, spiral center. Periodically check the size against the center of your poly burlap flower to ensure it’s proportional. If it appears too small, you can add more felt strips to increase its size and volume. Once you’re satisfied with the size, secure the end of the roll with a dab of hot glue. Next, take a piece of craft wire (about 6-8 inches long) and securely glue one end of it to the back of your felt flower center. Reinforce this attachment by wrapping a small strip of felt around the glued wire section and hot gluing it in place. Allow the glue to dry completely to ensure a strong bond. Once dry, carefully insert the wire through the plastic canvas center of one of your completed poly burlap flowers from the front. Flip the wreath over and twist the wire ends tightly at the back to secure the felt center firmly in place. Repeat this process for the remaining two flowers, giving each a beautiful, handcrafted core.
Step 5: Add the Lime Green Burlap Foliage Layer
To give your flowers a natural, leafy backdrop, we’ll add the lime green burlap pieces. Take one of your 10-inch by 10-inch lime green burlap squares. Fold two opposite corners together in the middle, creating a triangular shape. Gather the folded piece tightly at its center point. Then, flip the gathered piece over so the clean, gathered edge is facing you. Insert this gathered end through the back of one of your small flower wreaths, positioning it to create a leaf-like layer behind the colorful petals. Secure it firmly to the wreath form with a zip tie, pulling it taut and trimming the excess. Continue adding two more of these lime green pieces around the back of each flower, evenly spaced, to create a lush layer of “foliage.” Repeat this process for all three of your finished flowers, ensuring each has a vibrant green base that complements the petals.
Step 6: Assemble the Triple Flower Wreath
You’re in the home stretch! It’s time to bring all your beautiful components together onto the larger wreath form. Take your big wreath form. Carefully arrange your three completed poly burlap flowers onto the larger wreath form. Experiment with different placements until you find an arrangement that is visually pleasing and balanced. A common arrangement is to place them somewhat close together, creating a clustered, abundant look. Once you are happy with the positioning, use strong zip ties to securely attach each small flower wreath to the larger wreath form. Thread the zip ties through the wire frames, ensuring they are pulled very tight and trimmed neatly. You may want to use multiple zip ties per flower for added stability. Check that all flowers are firmly attached and won’t shift when the wreath is hung. Your triple flower wreath is now complete!
Why Craft Your Own Wreath? The Benefits of DIY Decor
Creating your own home decor, especially a project as rewarding as this triple flower wreath, comes with numerous benefits beyond just having a beautiful finished product:
- Personalization: A DIY wreath is uniquely yours. You choose the colors, textures, and embellishments, allowing it to perfectly match your existing decor or express your personal style.
- Cost-Effectiveness: While store-bought wreaths can be expensive, crafting your own often proves to be a more budget-friendly option, especially when you source materials cleverly (like Dollar Tree wreath forms!).
- Therapeutic Value: Engaging in creative activities like crafting can be incredibly relaxing and stress-reducing. The process of making something with your hands offers a wonderful sense of accomplishment.
- Unique Gift Option: A handmade wreath makes a thoughtful and personal gift for birthdays, housewarmings, or holidays.
- Skill Development: Each DIY project helps you hone your crafting skills, from measuring and cutting to design and assembly, building confidence for future projects.
Expert Tips for a Flawless Wreath
To ensure your triple flower wreath turns out perfectly and lasts for seasons to come, keep these expert tips in mind:
- Sharp Scissors are Key: Cutting poly burlap cleanly prevents fraying and makes the process much easier. Invest in a good pair of fabric shears.
- Measure Twice, Cut Once: Precision in cutting your burlap squares will result in more uniform and attractive petals.
- Tight Zip Ties: Ensure all zip ties are pulled as tight as possible. Loose ties can lead to saggy petals or unstable flowers. Trim the excess tails flush with wire cutters for a clean look.
- Hot Glue Gun Safety: Always be careful when using a hot glue gun. Work on a protected surface and be mindful of your fingers.
- Even Petal Spacing: As you attach petals to the small wreath forms, try to space them as evenly as possible around the center to create a balanced, full flower.
- Don’t Be Afraid to Adjust: During assembly, if a petal or flower doesn’t look quite right, it’s usually easy to snip a zip tie, reposition, and re-secure it.
- Work in Good Lighting: Good lighting helps with precision cutting and assembly, reducing eye strain.
Personalizing Your Triple Flower Wreath
While the basic design is stunning, don’t hesitate to infuse your own personality into your wreath. Here are some ideas for customization:
- Color Schemes: Experiment with seasonal colors (e.g., pastels for spring, vibrant hues for summer, rich tones for fall, metallics for winter holidays) or colors that perfectly match your home’s interior.
- Embellishments: Add small decorative elements like faux berries, tiny artificial leaves, bows, or even small battery-operated fairy lights for a magical glow.
- Different Flower Centers: Instead of felt, you could use buttons, small pinecones, or even small craft balls wrapped in burlap for different textures.
- Varying Sizes: While this tutorial uses three small flowers, you could try one large central flower with two smaller ones, or even four smaller flowers if your large wreath form allows.
- Seasonal Accents: Integrate small pumpkins or fall leaves for autumn, snowflakes or glitter for winter, or ladybugs and butterflies for spring.
Display and Care for Your Handcrafted Wreath
Once your masterpiece is complete, you’ll want to display it proudly and ensure its longevity:
- Indoor vs. Outdoor: Poly burlap is generally weather-resistant, making this wreath suitable for covered outdoor areas like a porch or front door. However, prolonged exposure to direct sunlight might cause some fading over time, and extreme weather (heavy rain, strong winds) could damage it. For maximum longevity, consider hanging it indoors or in a well-protected outdoor spot.
- Cleaning: To clean your poly burlap wreath, gently dust it with a soft brush or use a hairdryer on a cool, low setting to blow away dust and debris. Avoid harsh chemicals or excessive scrubbing.
- Storage: When not on display, store your wreath in a cool, dry place. A dedicated wreath storage box or a large garbage bag can protect it from dust and getting crushed. Hang it or lay it flat to maintain its shape.
Troubleshooting Common DIY Wreath Challenges
Even seasoned crafters encounter hiccups. Here are some common issues and how to resolve them:
- Petals Don’t Look Uniform: This often comes down to inconsistent cutting or gathering. Double-check your measurements for each square. When gathering, try to apply consistent pressure. If some petals are visibly different, you can carefully remove and re-tie them.
- Flower Centers Are Loose: Ensure the hot glue used to attach the wire to the felt center is fully dry before inserting. Twist the wire ends very tightly at the back of the wreath to secure it firmly against the plastic canvas.
- Wreath Feels Flimsy: This usually means the zip ties aren’t tight enough, especially when attaching the small flowers to the large wreath. Don’t be afraid to use extra zip ties for reinforcement, ensuring they’re well-hidden.
- Burlap Fraying: Poly burlap is less prone to fraying than natural burlap, but it can still happen. Using very sharp scissors helps minimize this. If a small fray appears, you can often trim it carefully with scissors.
Conclusion: Embrace Your Creative Masterpiece
You’ve now successfully crafted a magnificent triple flower wreath, a testament to your creativity and patience! This vibrant decoration is more than just an accent piece; it’s a personal statement, a handmade touch that transforms your home into a more inviting and beautiful space. Hang it on your front door to greet guests with a burst of color, or display it on an interior wall to add a touch of handcrafted elegance. We hope this comprehensive guide has made the process enjoyable and straightforward. Don’t forget to share your beautiful creation with friends and family, inspiring them to embark on their own DIY adventures. Happy crafting!