
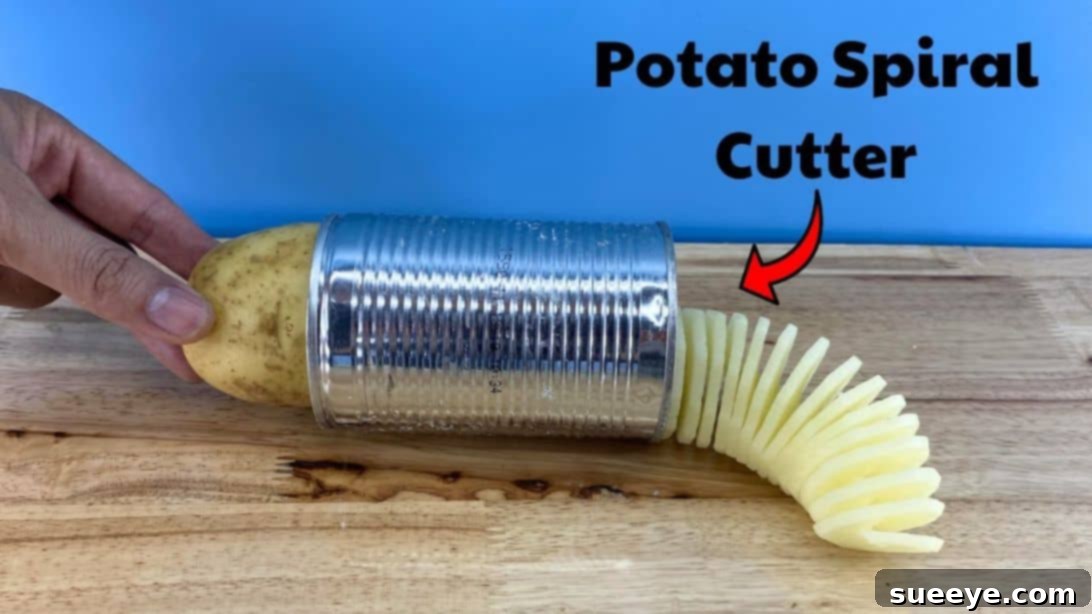
Craft Your Own Spiral Potato Cutter: A Sustainable DIY Kitchen Tool Project
Are you searching for an engaging and practical DIY project that transforms everyday household scraps into a surprisingly useful kitchen gadget? Look no further! This comprehensive guide will walk you through creating your very own spiral potato cutter, a fantastic tool for crafting delicious, crispy spiral fries right in your own kitchen. Not only is this project incredibly rewarding, allowing you to hone your DIY skills, but it also promotes sustainability by repurposing materials you likely already have at home. Imagine the satisfaction of slicing perfectly spiraled potatoes with a device you built yourself, then frying them up for a well-deserved treat! This step-by-step tutorial, inspired by the ingenious design from Creation Holic on YouTube, will empower you to build a functional and sturdy potato spiralizer from scratch. Get ready to impress your family and friends with your homemade culinary creations and your DIY prowess!
Essential Materials for Your Homemade Spiral Potato Cutter
Before diving into the construction of your DIY spiral potato cutter, gather all the necessary items. Most of these can be found around your home or purchased affordably at a local hardware store. Using readily available materials makes this project not only cost-effective but also an excellent example of creative repurposing.
- Metal Can: A standard-sized tin can, such as those used for vegetables or soup. Ensure it’s clean and free of rust. This will form the main body and cutting edge of your spiralizer.
- Driller: A power drill with appropriate drill bits for metal. Precision drilling is crucial for the mechanism.
- Ruler: For accurate measurements and straight lines, ensuring your cuts are precise.
- Pen or Marker: To mark drilling points and cutting lines on the metal can and plastic bottle.
- Circular Saw Blade: A small, sharp circular saw blade (e.g., from a Dremel tool or similar rotary tool). This will be expertly modified to create the slicing blade. Exercise extreme caution when handling.
- Flat Head Screwdriver: Useful for prying and shaping the metal edges of the can.
- Metal File: To sharpen and smooth the cutting edge you create, making it safe and effective.
- Utility Blade or Craft Knife: For precise cuts on the plastic bottle.
- Plastic Bottle: A sturdy plastic bottle (e.g., from soda or water). This will be used to create the rotating base of the cutter.
- Thin Metal Stick: A sturdy yet bendable metal rod, such as a thick coat hanger wire or a welding rod. This forms the central skewer and turning mechanism.
- Hot Glue Gun and Hot Glue Sticks: For securely fastening components, providing stability and insulation.
- Bottle Cap: A plastic bottle cap, which will serve as the handle for turning the potato.
- Small Screws (2): To secure the metal stick to the bottle cap handle.
- Heat Gun or Hair Dryer (optional but recommended): For sealing the plastic bottle to the can, creating a tight bond.
Step-by-Step Guide: Building Your Spiral Potato Cutter
Follow these detailed instructions carefully to construct your spiral potato cutter. Safety is paramount, especially when working with sharp tools and power equipment. Always wear appropriate safety gear, such as gloves and eye protection.
Step 1: Preparing Your Metal Can for the Cutting Mechanism
The foundation of your spiral potato cutter begins with a clean metal can. Start by thoroughly peeling off any labels or decorative wraps. If there’s stubborn adhesive residue, soak the can in warm, soapy water for a few minutes, then scrub it clean. Ensure the can is perfectly dry, inside and out, before proceeding. A clean, dry surface is essential for accurate markings and a hygienic finished product. This can will eventually become the main housing and the initial cutting guide for your potato spiralizer.
Step 2: Creating the Initial Cut on the Can
With your can prepared, it’s time to mark and make the crucial first cut. Using your driller, carefully create a small hole precisely in the center of the can’s bottom. Next, measure approximately 0.5 to 1 centimeter from the side edge of the can and drill another small hole. These two holes will serve as your guides. Take your ruler and pen, and draw a straight line connecting these two holes. This line represents where your primary cut will be made. Now, using a small circular saw blade (e.g., on a rotary tool), carefully cut along this marked line. This cut will begin to form the opening through which the potato will pass and get sliced. Work slowly and maintain a steady hand to ensure a clean, straight incision. Remember to wear safety glasses during this step to protect your eyes from metal shards.
Step 3: Shaping and Sharpening the Cutting Edge
After making the initial cut, you’ll need to refine the opening to create an effective slicing edge. Take your flathead screwdriver and gently push the metal strip formed by your cut upwards and outwards. This creates a raised lip that will guide the potato. The goal is to create a slightly angled opening. Once the metal is bent to your desired angle, use a metal file to carefully sharpen the inner edge of this newly formed opening. Filing should be done meticulously to create a relatively sharp, yet safe, cutting edge. This sharpened edge will be responsible for creating the continuous spiral ribbon from your potato. Ensure there are no jagged burrs that could snag or tear the potato, or pose a safety risk.
Step 4: Crafting the Rotating Base from a Plastic Bottle
Now, let’s create the base that will hold and rotate the potato. Take a plastic bottle and use a utility blade or sharp scissors to carefully cut off the very bottom section. This section should be sturdy enough to act as a stable base. Place the metal can, with its open side facing down, onto the cut bottom of the plastic bottle. Ensure it’s centered. To create a secure and sealed connection, use a heat gun or a powerful hairdryer to gently heat the edges where the can meets the plastic bottle. As the plastic softens, it will mold and seal around the can, forming a tight bond. Allow it to cool completely and harden. Once sealed, use your blade to make a single straight cut on one side of the plastic bottle base, from the edge inward towards the center, then remove the small portion you cut out. Finally, drill a hole precisely in the center of the plastic bottle bottom. This hole will accommodate the metal stick later and is crucial for the potato’s rotation. Carefully place the bottle base back onto the can, aligning the newly drilled hole with the center hole in the can.
Step 5: Preparing the Central Skewer and Marking
The thin metal stick will act as the skewer that holds the potato and guides it through the cutter. Begin by sharpening one end of the metal stick to a point. This will make it easier to pierce and skewer the potato. Next, using your pen or marker, draw several markings along the stick. These markings are crucial for guiding your bends. The first mark should be near the sharpened end, where the stick will initially bend to create a stop for the potato. Subsequent markings will define other necessary bends to fit within the cutter mechanism. Refer to the provided photo for precise placement of these markings. Once marked, carefully bend the metal stick at each marked point, ensuring the bends are firm and accurate. The goal is to create a shape that will allow the potato to be pushed through the can while rotating smoothly.
Step 6: Assembling the Handle and Finalizing the Mechanism
To create a comfortable and effective handle for rotating your potato, take a plastic bottle cap. Drill a hole precisely in the center of the cap, large enough for your metal stick to pass through. Then, drill two smaller holes on opposite sides near the edge of the cap. Insert small screws into these two smaller holes; these will help anchor the metal stick. Now, make a small, shallow cut on the center edge of the cap, between the two screws. This groove will help hold the metal stick securely. Carefully insert the sharpened metal stick through the central hole of the bottle cap. Push it all the way down until the first bend in the stick rests firmly against the inside of the cap. To secure the stick permanently and create a solid handle, fill the entire bottle cap with hot glue. Ensure the stick is perfectly centered and upright as the glue dries. Allow the hot glue to cool and harden completely; this will create a robust and comfortable handle for rotating your potato during the spiraling process. Once dry, your homemade spiral potato cutter is complete and ready for action!
The Benefits of Crafting Your Own Spiral Potato Cutter
Beyond the simple joy of a DIY project, creating your own spiral potato cutter offers a multitude of advantages:
- Cost-Effectiveness: By utilizing recycled and readily available materials, you save money compared to purchasing a commercial spiralizer.
- Sustainability and Repurposing: This project is a shining example of upcycling. You’re giving new life to items that might otherwise end up in a landfill, promoting an eco-friendly lifestyle.
- Skill Development: It’s an excellent opportunity to practice various DIY skills, including measuring, cutting, drilling, shaping metal, and assembly.
- Customization: You have the flexibility to make minor adjustments to suit your preferences, such as the thickness of the spiral or the length of the skewer.
- Sense of Accomplishment: There’s immense satisfaction in using a tool you’ve built with your own hands, especially one that produces delicious results.
- Unique Culinary Creations: Open up new possibilities for your home cooking. Spiral potatoes are not just fun to eat but also cook more evenly and crisp up beautifully.
Tips for Success and Safety When Using Your DIY Spiralizer
To ensure a smooth building process and safe, effective use of your new kitchen gadget, consider these tips:
- Safety First: Always wear safety glasses when drilling, cutting metal, or using a heat gun. Be extremely cautious with the circular saw blade and utility blade, as they are very sharp. Use cut-resistant gloves if available.
- Cleanliness: Maintain a clean workspace. Metal shavings can be sharp, and stray glue can be messy.
- Potato Selection: Opt for firm, medium-sized potatoes (e.g., Russet or Yukon Gold) that are relatively uniform in shape. Avoid very soft or irregularly shaped potatoes for best results.
- Proper Skewering: When using the cutter, push the sharp end of the metal stick through the center of your potato lengthwise. Ensure it’s centered for an even spiral.
- Steady Pressure and Rotation: Apply gentle, consistent pressure on the potato as you slowly rotate the handle. This combination will produce a smooth, continuous spiral. Don’t force it, as this can break the potato or damage your cutter.
- Experiment with Thickness: While your blade creates a fixed thickness, you can control the spiral’s integrity by how slowly you turn.
- Cleaning and Maintenance: After each use, thoroughly clean your spiralizer. Hand wash with warm, soapy water and dry immediately to prevent rust on the metal components.
- Storage: Store your DIY cutter in a dry place to prolong its lifespan.
Creative Culinary Applications Beyond Potatoes
While designed for potatoes, your homemade spiralizer isn’t limited to just one vegetable. Get creative and explore other ingredients that can be transformed into fun spirals:
- Zucchini and Cucumbers: Perfect for low-carb pasta alternatives or refreshing salads.
- Carrots: Create vibrant, crunchy spirals for salads or stir-fries.
- Apples and Pears: Delicious for healthy snacks, fruit salads, or even elegant garnishes for desserts.
- Sweet Potatoes: Offer a healthier and naturally sweet alternative to regular potato fries.
Experiment with various fruits and vegetables, keeping in mind their firmness and moisture content. Softer vegetables might require a very gentle touch.
Troubleshooting Common Issues with Your DIY Spiralizer
Even with careful construction, you might encounter minor issues. Here’s how to troubleshoot them:
- Potato Tears or Breaks: This often happens if the potato is too soft, you’re applying uneven pressure, or the blade isn’t sharp enough. Try a firmer potato, maintain steady pressure, and ensure your blade is filed to a good edge.
- Uneven Spirals: This could be due to the potato not being perfectly centered on the skewer or inconsistent rotation. Re-skewer the potato carefully and practice maintaining a uniform turning speed.
- Difficulty Turning the Handle: If the stick is stiff, check for any glue residue or debris preventing smooth rotation. Ensure the holes are large enough for the stick to turn freely but without excessive wobble. A tiny amount of food-grade oil might help lubricate the turning point if it’s purely friction-related.
- Cutter Not Working at All: Double-check that the blade is properly positioned and sharp. If the plastic base isn’t firmly sealed, it might flex, preventing effective cutting. Re-seal if necessary with more heat.
Frequently Asked Questions (FAQs)
- Q: Can I use any size can?
- A: A standard-sized can (e.g., 15oz / 425g) works best for most potatoes. Larger cans might require a wider cutting blade modification, while smaller cans might be too restrictive.
- Q: What type of metal stick is best?
- A: A thin but rigid metal stick, like a straightened coat hanger or a thick welding rod, is ideal. It needs to be strong enough to skewer a potato without bending excessively but malleable enough to shape.
- Q: How do I make the spirals thicker or thinner?
- A: The thickness of your spiral is primarily determined by the depth of your cut on the can. To adjust thickness, you would need to modify how far the metal lip (created in Step 3) protrudes and how sharply it’s angled. For this particular design, the thickness is relatively fixed by the initial cut.
- Q: Is this safe for children to use?
- A: The construction involves sharp tools and power equipment, so adult supervision is essential during building. Once built, while safer, children should still be supervised when using the cutter due to the sharp potato-slicing edge.
- Q: How long does the DIY spiralizer last?
- A: With proper care, cleaning, and storage, your homemade spiralizer can last for many uses. Rust is the main enemy for the metal parts, so always dry it thoroughly after washing.
Unleash Your Inner Chef: Enjoy Your Homemade Spiral Potatoes!
Congratulations! You’ve successfully built your very own spiral potato cutter from simple household items. This project is a testament to the power of creativity and repurposing, turning what might have been trash into a valuable kitchen asset. Now comes the best part: enjoying the fruits of your labor! Skewer a potato, get spiraling, and then deep-fry, air-fry, or bake your beautiful creations until golden and crispy. Serve them seasoned with your favorite spices, and prepare for rave reviews. This DIY spiralizer is more than just a tool; it’s a conversation starter, a sustainable choice, and a gateway to countless delicious meals. Share your creations and inspire others to embark on their own DIY culinary adventures. Happy spiraling!