
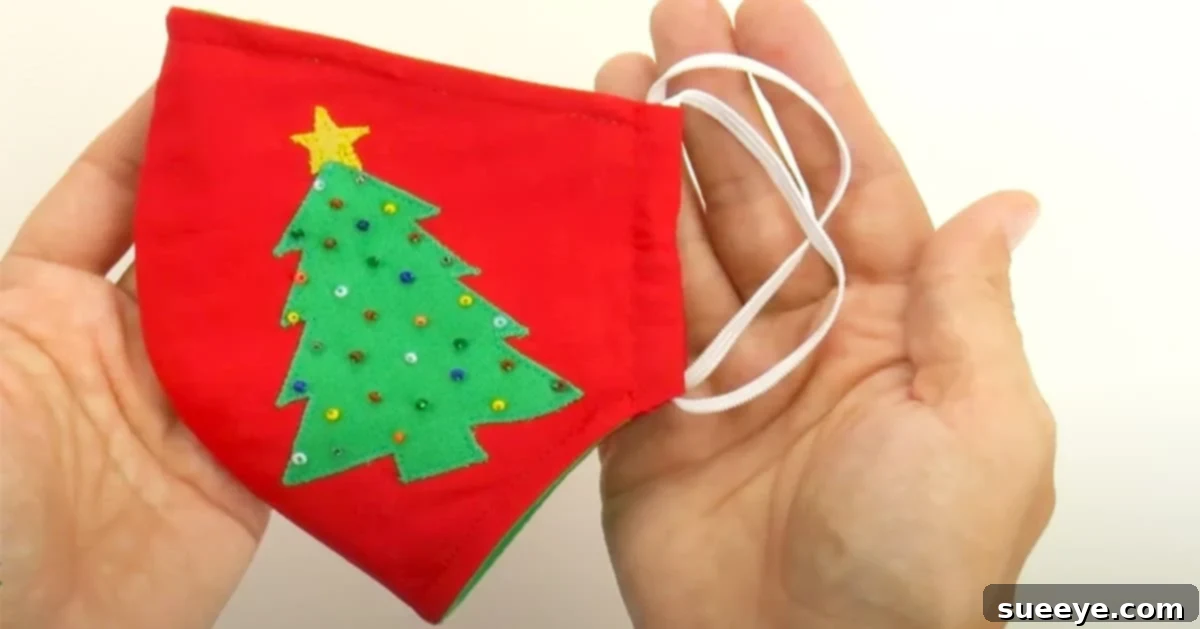
Embrace the spirit of the holiday season with a delightful and practical sewing project: a DIY Christmas Tree Face Mask! This charming accessory isn’t just a functional item; it’s a statement of festive cheer, perfect for celebrating the holidays safely and stylishly. Imagine capturing cherished family photos, everyone adorned in matching, custom-made Christmas masks – a truly memorable way to commemorate a year that has certainly been one for the history books. While some might consider matching family outfits a bit “cheesy,” we believe there’s an undeniable cuteness in this unique approach to family togetherness, especially when reflecting on the unusual circumstances of recent times. This project centers around creating a standard, comfortable face mask and then elevating it with an enchanting Christmas tree design, making it a standout piece for your holiday wardrobe.
What truly sets this DIY face mask apart from many others you might encounter is its thoughtful design and customizability. We provide a free DIY contoured face mask pattern that comes in three distinct sizes, ensuring a comfortable and secure fit for almost everyone in your family. But the innovation doesn’t stop there. This pattern features a clever casing mechanism, allowing you to easily adjust the length of the elastic for a perfect fit, or even swap it out entirely for a soft ribbon if elastic isn’t your preference. This adaptability means maximum comfort and personalization, making your handmade mask truly your own. Whether you’re a seasoned sewer or just starting your crafting journey, this project offers a rewarding way to create practical and personalized items for yourself and your loved ones this holiday season.
Why Craft Your Own Christmas Face Mask?
In a world where personalization is highly valued, crafting your own festive face mask offers numerous advantages beyond just celebrating the holidays. A handmade mask allows for unparalleled customization, from fabric choices to unique embellishments. You can select materials that are not only visually appealing but also comfortable and suitable for extended wear. Moreover, DIY masks often prove to be more cost-effective in the long run, and you have complete control over the quality of construction. There’s also an immense sense of satisfaction that comes from creating something with your own hands, especially when it’s a gift or an item that brings joy and safety to your family.
This particular pattern is designed with both aesthetics and functionality in mind. The contoured shape is superior to flat masks, providing a snugger fit around the nose and chin, which helps minimize gaps and enhance protection. This design also offers more breathing room, making it more comfortable for daily use. With multiple sizes available, you can ensure that children and adults alike receive a mask that fits them perfectly, reducing the need for constant adjustments and improving overall wearability. The ability to customize the ear loops—either with adjustable elastic or decorative ribbons—further enhances comfort, addressing common complaints about standard mask designs.
Essential Supplies for Your Festive Face Mask Project
Before you embark on this exciting crafting adventure, gathering all the necessary materials is key to a smooth and enjoyable process. We’ve curated a comprehensive list of supplies, ensuring you have everything you need to create a beautiful and functional Christmas tree face mask. From vibrant fabrics to delicate beads, each item plays a crucial role in bringing your festive vision to life.
- Red Quilting Weight Woven Cotton Fabric (36 x 24 cm): This fabric will form the festive outer layer of your mask. A quilting weight cotton is ideal for its durability and tight weave, offering a good balance of structure and breathability. The vibrant red color sets the perfect holiday tone.
- Green Quilting Weight Woven Cotton Fabric (34 x 24 cm): Selected for the inner lining, this green cotton complements the red exterior and ensures a comfortable layer against the skin. Like the outer fabric, its quality contributes to the mask’s overall integrity.
- Fabric Shears: Essential for precise and clean cuts through fabric. Good quality fabric shears make a significant difference in the accuracy of your pattern pieces.
- Scissors: A separate pair of scissors is useful for cutting paper patterns and other non-fabric materials, helping to preserve the sharpness of your fabric shears.
- Pen and Pencil: For tracing patterns onto Heat n’ Bond Lite and marking fabric. A fine-tip pen is best for detailed tracing.
- Heat n Bond Lite: This lightweight iron-on adhesive is crucial for securely attaching your Christmas tree appliqué to the mask fabric before stitching. It ensures the design stays perfectly in place.
- Pins: Indispensable for holding fabric layers together securely while cutting and sewing, preventing shifting and ensuring alignment.
- Red, Green, and Yellow Thread: High-quality polyester or cotton thread in colors matching your fabrics and Christmas tree design will ensure strong seams and vibrant embroidery. The yellow thread is specifically for the star on top of your Christmas tree.
- Hand Sewing Needle: Necessary for delicate embellishments, such as attaching seed beads, where machine stitching might be too cumbersome or imprecise.
- 2 mm Colored Seed Beads: These tiny beads will add sparkle and decorative “ornaments” to your Christmas tree design, making it truly stand out.
- FREE DIY Contoured Face Mask Pattern and Christmas Face Mask Template: This downloadable pattern is the foundation of your project, providing precise shapes for the mask and the Christmas tree appliqué in multiple sizes.
- Non-Woven Fabric for 2-Layer Filter (60 x 19 cm, or smaller depending on size): For enhanced protection, a filter layer is highly recommended. We suggest using a 60-70 g/m² weight melt-blown nonwoven cloth, which is known for its excellent filtration properties. This material can be inserted into the mask’s filter pocket.
- Pinking Shears (suggested): While optional, pinking shears create a zigzag edge that helps prevent fabric from fraying, particularly useful for the raw edges of inner seams.
- Ruler and/or Sewing Gauge: Essential tools for accurate measuring, marking, and checking seam allowances.
- 3-4 mm Elastic: This provides the crucial ear loops for your mask. Specific lengths are recommended based on size: 46 cm for size S, 50 cm for size M, and 54 cm for size L. Its elasticity ensures a snug yet comfortable fit.
- Small Safety Pin: A simple yet effective tool for threading elastic through the mask’s casing with ease.
- Florist Wire or Bread Twist Tie (for optional wire nose bridge): Incorporating a nose wire helps the mask conform better to the bridge of your nose, reducing gaps and preventing glasses from fogging up.
- Needle Nose Pliers (for optional wire nose bridge): If using florist wire, pliers are useful for bending and shaping the wire securely and safely.
Detailed Directions: Crafting Your Custom Christmas Face Mask
Now that you have all your supplies ready, let’s dive into the creative process of making your festive face mask. This project combines fundamental sewing techniques with a touch of holiday artistry, resulting in a mask that is both protective and uniquely charming.
Step 1: Pattern Preparation and Initial Cutting
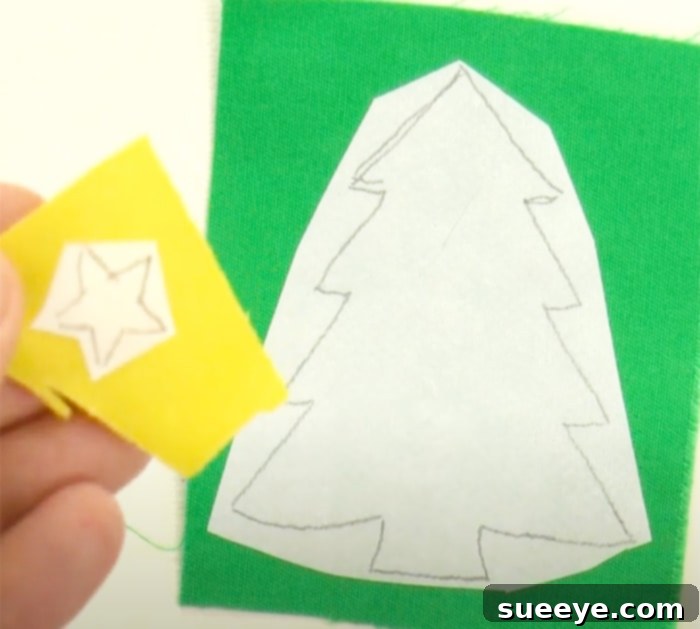
Begin by printing out the free DIY contoured face mask pattern and the Christmas face mask template. Carefully cut out the paper pattern pieces for your chosen mask size. Next, take a small piece of Heat n’ Bond Lite, ensuring it’s large enough to cover the Christmas tree design corresponding to your mask size. Place the Heat n’ Bond Lite over the tree template with the paper side facing up. Using a pen, meticulously trace over the outline of the Christmas tree. This tracing will serve as your guide for cutting out the adhesive appliqué.
Step 2: Creating the Christmas Tree Appliqué
Once you’ve traced the tree design onto the Heat n’ Bond Lite, carefully cut out the traced Christmas tree shape from the Heat n’ Bond Lite. Now, you will apply this adhesive to your chosen green fabric for the tree. Follow the specific instructions provided with your Heat n’ Bond Lite for ironing it onto the fabric. Typically, this involves pressing the paper-backed adhesive onto the wrong side of your appliqué fabric. After it cools, you can peel off the paper backing, revealing the adhesive on the fabric.
With the adhesive now on your green fabric, carefully cut out the fabric Christmas tree. This will be the appliqué you attach to the front of your red mask fabric. Position the fabric Christmas tree onto the outer red fabric piece of your face mask (referencing the pattern for optimal placement). Iron it down securely, as per the Heat n’ Bond Lite instructions. This temporary bond holds the tree in place, making it much easier to stitch.
Step 3: Assembling the Face Mask
For comprehensive, step-by-step instructions on assembling the core contoured face mask, including stitching the outer and inner fabric pieces, creating the casing for the elastic, and inserting the optional nose wire, we highly recommend watching the full tutorial provided by Cucicucicoo: Eco Sewing and Crafting on YouTube. This video offers visual guidance and detailed explanations for each stage of mask construction, ensuring you achieve a perfectly fitted and functional mask.
Step 4: Stitching and Embellishing Your Christmas Tree
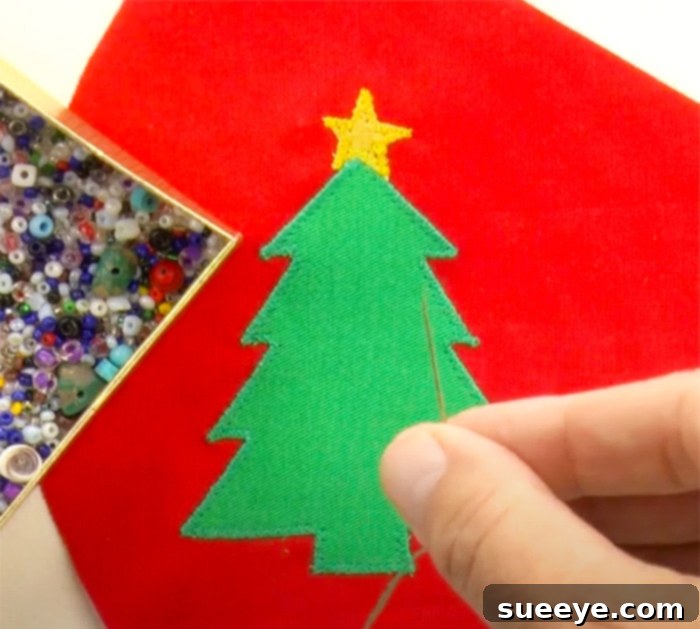
Once your Christmas tree appliqué is securely ironed onto the outer fabric of the mask, it’s time to stitch it permanently and add the festive details. Using your green thread, carefully machine stitch around the perimeter of the Christmas tree. You can use a straight stitch, a small zigzag stitch, or even a decorative appliqué stitch if your machine has one. This step not only secures the tree but also gives it a neat, finished edge. Don’t forget to use your yellow thread to stitch a small star at the very top of your tree for that classic holiday touch.
Step 5: Decorating with Seed Beads
After the tree is stitched onto the mask, the real magic of decoration begins! Thread your hand sewing needle with a matching or contrasting thread (red or green works well). Now, using your 2 mm colored seed beads, carefully hand stitch them onto the Christmas tree. Distribute the beads evenly, mimicking tiny ornaments, to create a sparkling and festive effect. You can use various colors of beads to add more vibrancy, or stick to one or two for a more elegant look. This step allows for a lot of personal creativity, so let your imagination guide you!
Step 6: Final Touches – Elastic and Fit
The last crucial step is to thread the elastic through the casings you created on the sides of your mask. Attach a small safety pin to one end of the elastic, then carefully feed it through the casing until it emerges from the other side. Remove the safety pin, adjust the elastic to your desired length for a snug but comfortable fit, and then tie the ends securely. Trim any excess elastic. If you opted for a nose wire, ensure it is properly inserted and secured within its channel. Try on your mask to double-check the fit and comfort. You can always adjust the elastic or nose wire if needed.
Conclusion: Embrace the Festive Spirit with Handmade Joy
Overall, this DIY Christmas Tree Face Mask project is truly a standout. We absolutely adore the festive charm it brings, and the availability of a free, high-quality pattern makes it accessible to everyone. The beauty of this pattern lies not only in its holiday theme but also in its versatility. While perfect for creating unique Christmas masks, you can easily adapt the base contoured face mask pattern for everyday use, crafting masks that offer all the “bells and whistles” of comfort, adjustability, and a filter pocket, without the festive appliqué. This means you’re not just making a seasonal item, but learning skills to produce highly functional and customizable face coverings year-round.
Making your own Christmas face masks is a wonderful way to infuse the holiday season with personal touches, create thoughtful handmade gifts, and stay safe with style. The joy of crafting, combined with the practicality of a well-made mask, makes this project incredibly rewarding. So, gather your supplies, follow these directions, and get ready to spread some festive cheer, one beautifully handmade face mask at a time!