
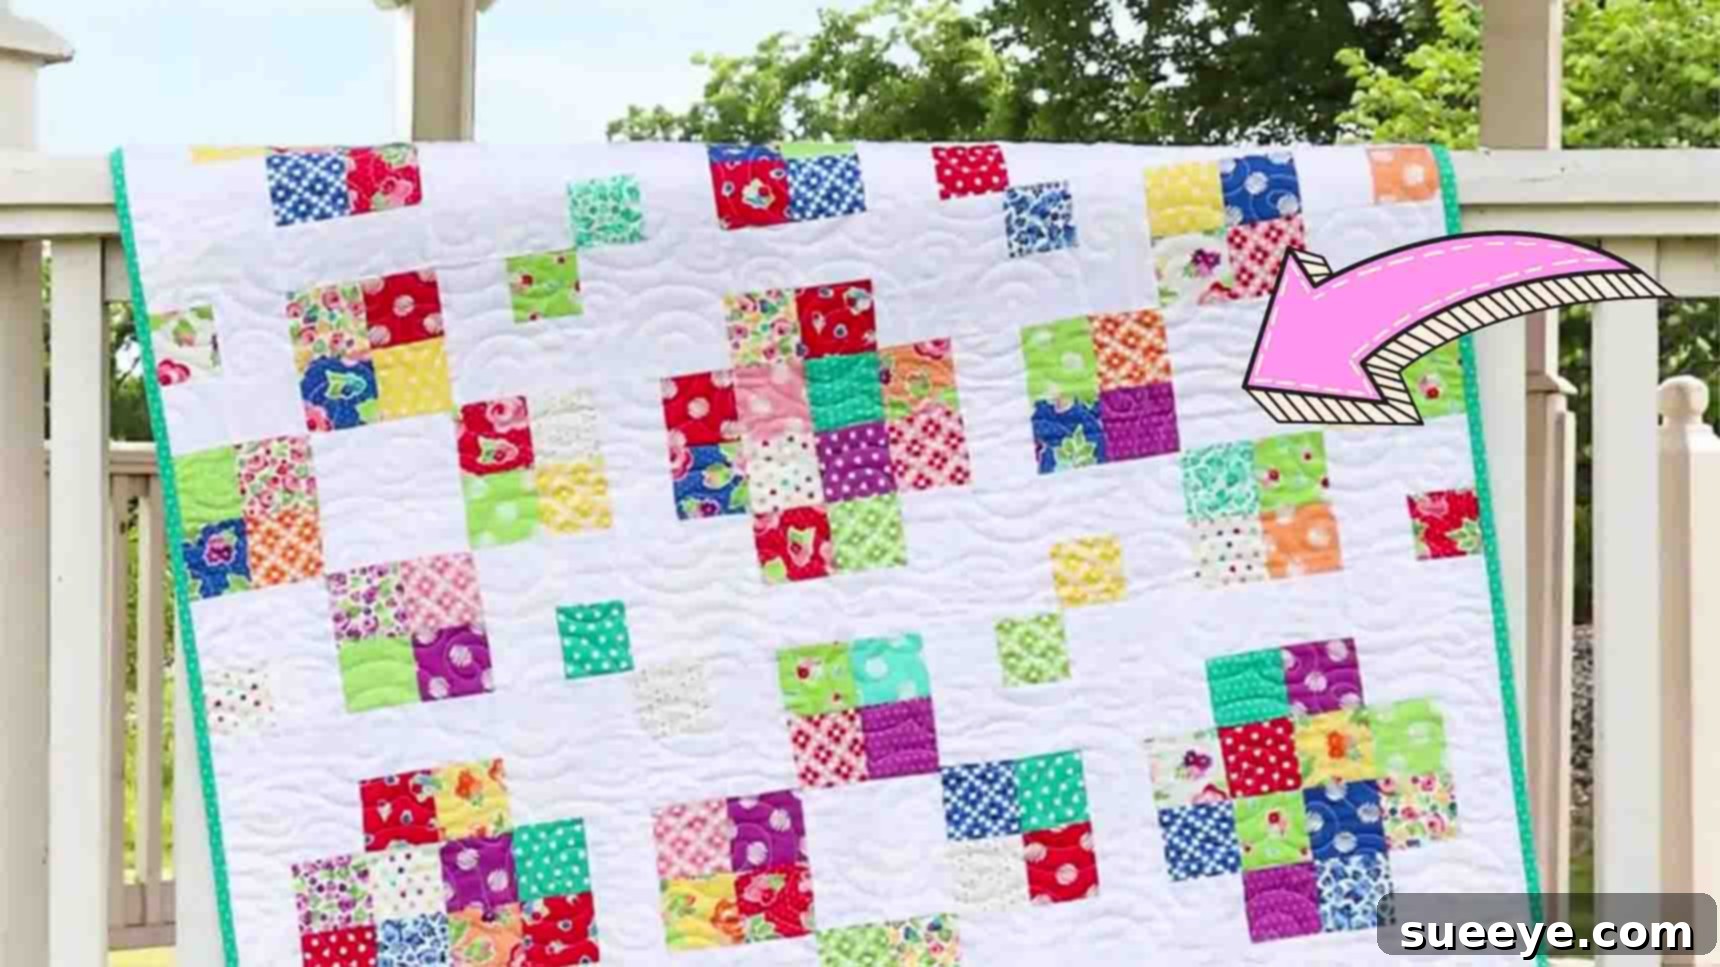
Craft an Adorable & Easy Mini Charm Chiffon Baby Quilt: The Perfect Beginner Project
Are you searching for the perfect handmade baby gift that’s both quick to make and irresistibly cute? Look no further! This delightful Mini Charm Chiffon Baby Quilt, inspired by the fantastic creators at Fat Quarter Shop, is an absolute dream come true for quilters of all skill levels. Utilizing pre-cut mini charm packs, this project transforms tiny fabric squares into a vibrant, charming heirloom that will undoubtedly brighten any nursery. Forget complicated patterns and lengthy processes; this shortcut quilt is designed for simplicity, speed, and maximum adorableness. Get ready to embark on a fun and rewarding quilting journey as we guide you through every step to create this precious keepsake.
Essential Materials for Your Chiffon Quilt
Gathering your materials is the first exciting step in bringing your Mini Charm Chiffon Quilt to life. This pattern is incredibly efficient, primarily relying on readily available pre-cuts and basic quilting supplies. Here’s everything you’ll need:
- Four Mini Charm Packs (or 140 – 2 & 1/2″ squares): These delightful 2.5-inch fabric squares are the star of our quilt. Mini charm packs offer a curated collection of coordinating fabrics, making fabric selection a breeze. If you prefer to use fabric from your stash, simply cut 140 squares from various prints and colors.
- 1 Yard Background Fabric: A solid or tone-on-tone background fabric provides a serene contrast to your colorful charm squares, allowing them to truly pop. Choose a color that complements your chosen mini charm pack palette.
- 1/2 Yard Binding Fabric: The binding not only finishes the edges of your quilt beautifully but also adds another layer of design. Pick a fabric that ties all the colors together or provides a bold border.
- 2 & 5/8 Yards Backing Fabric: The backing fabric will be the cozy underside of your quilt. Select a soft, comfortable fabric that feels good against a baby’s skin. Consider a fun print or a solid that harmonizes with the quilt top.
- Batting (Twin Size): While not explicitly listed in the original, batting is essential for any quilt. A twin-size batting will be ample for a baby quilt of this size, providing warmth and texture.
- Basic Quilting Tools: You’ll also need a sewing machine, rotary cutter, cutting mat, quilting ruler, fabric scissors, thread, pins or wonder clips, and an iron.
Precision Cutting: Preparing Your Fabric
Accurate cutting is the cornerstone of a successful quilt. Taking your time during this stage will ensure all your pieces fit together perfectly, leading to crisp points and straight seams. Labeling your fabric pieces as you cut them can be incredibly helpful for organization.
- Fabric A (Mini Charm Squares): You will need 140 – 2 & 1/2″ squares. If using mini charm packs, these are already pre-cut. If cutting from yardage, stack your fabrics neatly and use your rotary cutter and ruler to achieve precise 2.5-inch squares.
- Fabric B (Background Squares): From your background fabric, cut 24 – 4 1/2″ squares. These larger squares will create striking open spaces within your blocks, allowing the eye to rest and emphasizing your charm square arrangements.
- Fabric C (Background Rectangles): Also from your background fabric, cut 36 – 2 1/2″ x 4 1/2″ rectangles. These will act as connectors and borders for your pieced units.
- Fabric D (Smaller Background Squares): From your background fabric, cut 16 – 2 & 1/2″ squares. These small squares play a crucial role in the third type of unit, integrating the background subtly.
- Fabric E (Binding Strips): From your binding fabric, cut 5 – 2 1/2″ x WOF (Width of Fabric) strips. These strips will be joined end-to-end to create one continuous binding piece for the final edge of your quilt.
Step-by-Step Guide to Your Chiffon Quilt
Step 1: Assembling the Quilt Units
This quilt design cleverly uses three distinct units, which are then combined to form the main blocks. Precision in your 1/4″ seam allowance is vital here for all your pieces to align beautifully. Using a consistent seam allowance throughout your project will make a significant difference in the final outcome.
Unit 1: The Four-Patch Unit
Begin by selecting four random colors from your collection of Fabric A (2.5-inch squares). The beauty of using random colors is the playful, dynamic look it creates. Arrange these four squares into a 2×2 grid. Sew two squares together in a row with a 1/4″ seam allowance, then press the seam open or to one side. Repeat with the other two squares. Finally, sew these two rows together, carefully nesting your seams to ensure the center intersection is crisp and flat. Press this unit again. You will need to create 21 pieces of these vibrant four-patch units. Chain piecing can save you a lot of time here – sew all your pairs, then all your rows.
Unit 2: The Rectangle and Two Squares Unit
For the second type of unit, take one Fabric C (2.5″ x 4.5″ rectangle) and one Fabric A square. Place the Fabric A square on one end of the Fabric C rectangle, right sides together, and sew with a 1/4″ seam. Press the seam. Then, take another Fabric A square and attach it to the opposite end of the Fabric C rectangle, ensuring both Fabric A squares are aligned with the short ends of Fabric C. Sew with a 1/4″ seam and press. This unit will have the Fabric C rectangle in the middle, flanked by two Fabric A squares. You will need to make 20 of these units. These units add a lovely elongated element to your quilt blocks.
Unit 3: The L-Shape Unit
The third unit involves a combination of Fabric A, Fabric D, and Fabric C. Start with one Fabric A square. Take one Fabric D (2.5″ background square) and place it below Fabric A, aligning the bottom edge, right sides together. Sew with a 1/4″ seam and press. Now, take one Fabric C (2.5″ x 4.5″ rectangle) and position it along the side of the combined Fabric A and D unit, extending down from the Fabric A square. Ensure it forms an ‘L’ shape with the Fabric A square, with Fabric D forming the base of the ‘L’. Sew with a 1/4″ seam and press. You will create 16 of these distinctive L-shape units. This unit will provide a subtle background accent within your blocks.
Step 2: Assembling Quilt Blocks and the Quilt Center
With all your individual units pieced, it’s time to arrange them into blocks and then construct the central portion of your quilt. This is where your quilt design truly starts to emerge!
Block Type 1: The Corner Accent Block
For your first block type, which you will make five of, lay out your pieces in a 3×3 grid. Begin by placing four Fabric B (4.5″ background squares) at the four corners of your grid. In the very center, position one of your four-patch units (Unit 1). Now, for the remaining four spots (the middle of each side), place one of your Unit 2 (rectangle and two squares) units. Crucially, ensure that the Fabric A squares from Unit 2 are touching the corners of your central four-patch unit. This creates a charming visual flow. Carefully pin all your pieces in each row together, sew with a precise 1/4″ seam, and press your seams open or to the side. Then, sew the three rows together, carefully nesting the seams where they meet. Press the finished block. You will need to create five of these beautiful blocks.
Block Type 2: The Framed Four-Patch Block
Next, you’ll construct a second type of block, creating four of these. For this block, you’ll again set up a 3×3 grid. Place one Fabric B (4.5″ background square) in the absolute center of your grid. Around this central Fabric B square, arrange four of your four-patch units (Unit 1), positioning them at the top, bottom, left, and right, effectively framing the background square. For the four corner spots of this block, you will use your L-shape units (Unit 3). Make sure the colored part of the L-shape unit (Fabric A) is on the outside corner, facing away from the center of the block. As before, sew your rows together with a 1/4″ seam, pressing after each seam, and then join your rows to form the completed block. You will need to make four of these blocks.
Assembling the Quilt Center
Now it’s time to bring your blocks together to form the main body of your quilt! You will arrange your nine completed blocks into three rows, with three blocks in each row. The key is to alternate your two block types for a balanced and visually interesting design. A common approach is to place Block Type 1 in the corners and center, and Block Type 2 in the remaining spots (e.g., Block Type 1, Block Type 2, Block Type 1 for the first row). Experiment with your layout on a design wall or on the floor until you are happy with the arrangement. Once satisfied, sew the blocks together within each row using a 1/4″ seam allowance, carefully matching all seams and pressing. Then, sew your three completed rows together to form your quilt center, pressing the final seams. This completes your beautiful quilt top!
Finishing Your Charming Baby Quilt
Completing a quilt involves a few more crucial steps after your top is pieced. These steps transform your quilt top into a cozy, finished blanket.
Adding Borders (Optional but Recommended for Size and Frame)
Although not in the original brief design, adding borders is a wonderful way to increase the size of your baby quilt and give it a polished, framed look. You could use leftover background fabric or a coordinating print. Typically, you’d cut strips of a desired width (e.g., 2.5″ or 4.5″) and sew them to the sides first, then to the top and bottom, ensuring the borders are cut to the exact length of your quilt top to prevent waving.
Creating the Quilt Sandwich
This is where your quilt becomes a true blanket. Lay your backing fabric (right side down) smoothly on a clean floor or large table, taping the edges down to keep it taut. Next, layer your batting on top of the backing, ensuring it’s centered and smooth, with no wrinkles. Finally, place your completed quilt top (right side up) on top of the batting, again making sure it’s smooth and centered. Secure these three layers together using safety pins, basting spray, or thread basting, starting from the center and working your way outwards every 4-6 inches.
Quilting Your Layers Together
Now it’s time to stitch through all three layers to hold them permanently together. For a baby quilt, you can choose simple straight-line quilting, stitch-in-the-ditch (quilting along existing seam lines), or even a free-motion meandering pattern if you’re feeling adventurous. Use a walking foot on your sewing machine for best results, as it helps feed all three layers evenly. Keep your stitches consistent and remember to relax your shoulders! This step adds texture, durability, and a lovely crinkly finish to your quilt.
Trimming and Squaring Up
Once your quilting is complete, remove all basting pins. Use your rotary cutter and a large quilting ruler to trim the excess backing and batting, squaring up your quilt edges. Aim for 90-degree corners and straight sides to prepare it perfectly for binding.
Attaching the Binding
Take your five Fabric E (2.5″ x WOF) strips. Join them end-to-end using diagonal seams to create one long continuous strip. Press the seams open. Then, fold this long strip in half lengthwise and press, creating your binding. Starting on one side of your quilt, align the raw edge of your folded binding with the raw edge of your quilt top. Sew with a 1/4″ seam allowance, mitering the corners as you go. Once sewn all the way around, bring the folded edge of the binding to the back of the quilt, encasing the raw edges, and hand stitch or machine stitch it down for a clean finish. This step adds both durability and a professional touch.
Tips for Quilting Success
- Maintain a Consistent 1/4″ Seam Allowance: This is arguably the most important rule in quilting. Invest in a 1/4″ presser foot for your machine if you don’t have one.
- Press, Don’t Iron: When pressing seams, lift and place your iron rather than sliding it. This prevents distorting your fabric pieces.
- Use Good Quality Thread: A strong, lint-free 100% cotton thread will make your quilting experience smoother and ensure your quilt lasts longer.
- Stay Organized: Keep your cut pieces labeled and your units sorted. A design wall or even a clear floor space can help you visualize your layout.
- Don’t Rush: Quilting is a journey, not a race. Enjoy the process, take breaks, and savor the creation of something beautiful.
- Watch the Video Tutorial: The Fat Quarter Shop video provides excellent visual guidance, especially for beginners.
Your Handcrafted Masterpiece
Congratulations! You’ve just created a stunning Mini Charm Chiffon Baby Quilt that is bursting with charm and made with love. This project is a testament to the joy of quilting and the incredible impact a handmade gift can have. Whether it’s for your own little one, a grandchild, or a cherished friend, this quilt will be a treasured item for years to come. So, grab your mini charm packs, clear your sewing space, and get ready to stitch up this incredibly rewarding and adorable quilt today!