
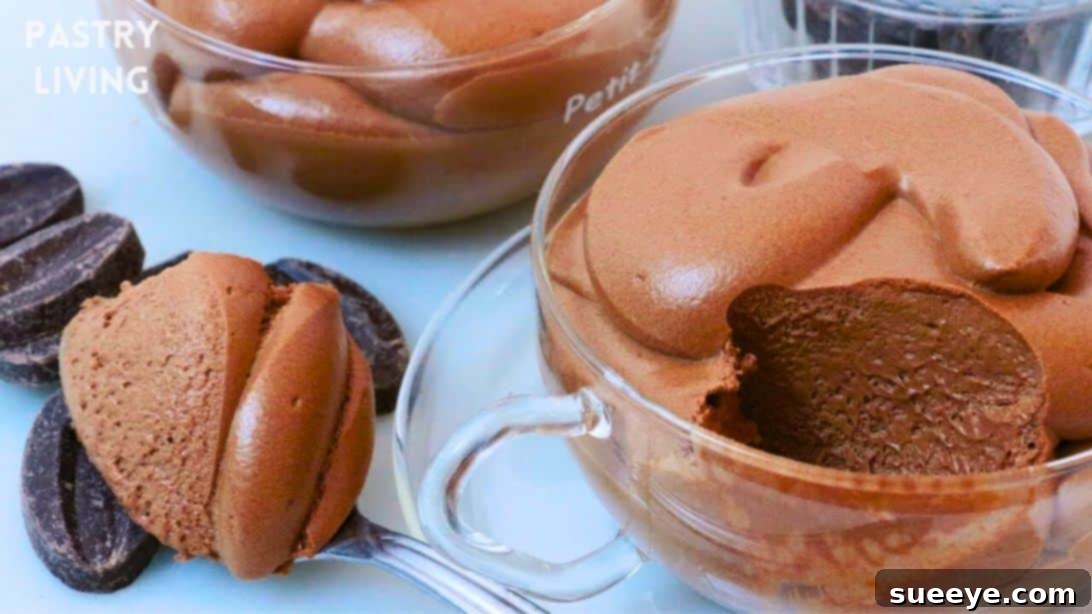
The Ultimate Guide to Making Perfect Homemade Chocolate Mousse
Few desserts evoke such a sense of sophisticated indulgence as a perfectly crafted chocolate mousse. Its ethereal texture, profound chocolate flavor, and delicate richness make it a timeless classic, a truly luxurious treat for any occasion. While often perceived as complex, creating a sublime chocolate mousse at home is entirely achievable with the right guidance. Today, we’re diving into a remarkable recipe shared by Pastry Living with Aya, a culinary revelation that stands head and shoulders above the rest. This isn’t just a recipe; it’s a gateway to an unparalleled dessert experience, promising a creamy, soft texture that melts on your tongue, leaving a lasting impression of decadent chocolate bliss.
Why This Chocolate Mousse Recipe Stands Out
Many have attempted the art of chocolate mousse, only to find themselves with a result that is either too dense, too airy, or lacking in that signature melt-in-your-mouth quality. What sets this particular recipe apart is its meticulous balance and the intelligent use of a classic French technique: the pâte à bombe. This technique is key to achieving a mousse that is both incredibly rich and surprisingly light, with a stable emulsion that ensures a consistently smooth and velvety texture. It delivers a deeply satisfying chocolate flavor that is intense but never overpowering, making every spoonful an exquisite journey. Forget those past attempts; prepare for a homemade chocolate mousse that tastes like it came straight from a gourmet patisserie.
Mastering the Pate au Bombe: A Foundation for Perfection
A crucial component of this recipe, and often the intimidating part for many home bakers, is the creation of the pâte à bombe. This sabayon-like base involves cooking egg yolks with a hot sugar syrup and heavy cream, a process that not only enriches the mousse but also ensures food safety by gently pasteurizing the eggs. It’s a step that demands your full attention, as the goal is to create a light, airy, and stable emulsion, not scrambled eggs. However, with a little patience and a careful eye on the temperature, you’ll unlock the secret to a superior mousse. The reward for your precision will be a mousse with unparalleled stability, an incredibly smooth mouthfeel, and a rich foundation that elevates the entire dessert.
RELATED: Looking for other light and refreshing desserts? Don’t miss this Easy and Light Lemon Mousse Recipe for a delightful citrus alternative.
If you’re a true chocolate enthusiast, your culinary adventures shouldn’t stop here. Explore more delightful chocolate creations with these fantastic recipes: Easy Baked Chocolate Donuts Recipe, a comforting Southern Chocolate Delight Recipe, and the intriguing Crunchy Chocolate Coconut Custard Bars.
Essential Ingredients for Your Perfect Chocolate Mousse
Crafting an exceptional chocolate mousse begins with selecting the right ingredients. Quality truly makes a difference here, especially when it comes to your chocolate and cream. Ensure all your ingredients are measured accurately before you begin, as precision is key in pastry making. Here’s what you’ll need for this decadent dessert:
- 6.3 oz (approximately 180g) of Dark Chocolate: Opt for a high-quality dark chocolate with 60-70% cacao content for the best flavor depth. Chopped chocolate or good quality chocolate chips work well for melting evenly.
- 4.2 oz (approximately 120g) of Egg Yolks: These provide richness, color, and are vital for the pâte à bombe. Ensure they are fresh.
- 2.1 oz (approximately 60g) of Granulated Sugar: This provides sweetness and helps stabilize the pâte à bombe.
- 2.1 oz (approximately 60g) of Heavy Cream for Pâte à Bombe: This cream is incorporated into the sugar syrup, adding to the richness of your base.
- 15.9 oz (approximately 450g) of Heavy Cream for Whipped Cream: This generous amount of cold heavy cream will be whipped to soft peaks, providing the light and airy structure of the mousse. Ensure it’s very cold for optimal whipping.
How to Make Indulgent Homemade Chocolate Mousse: Step-by-Step Guide
Embark on your journey to create the best chocolate mousse you’ve ever tasted. Remember to read through all steps before you begin and have your tools ready, including a reliable kitchen thermometer for the pâte à bombe.
Step 1: Gently Melt the Dark Chocolate
Begin by preparing a double boiler (bain-marie). Fill a pot with a few inches of water and bring it to a boil. Once boiling, turn off the heat. Place your dark chocolate chips or finely chopped dark chocolate into a heatproof bowl. Set this bowl securely on top of the pot, ensuring the bottom of the bowl does not touch the hot water. The residual steam will gently and gradually melt the chocolate. Allow it to sit for a few minutes to soften before you begin stirring. Stir periodically until the chocolate is completely smooth and free of any lumps. This gentle melting method prevents the chocolate from seizing or burning, which can happen with direct heat.
Step 2: Prepare the Egg Yolks
While your chocolate is melting, separate your eggs and place the egg yolks into a clean, medium-sized heatproof bowl. These yolks will form the backbone of our pâte à bombe, providing incredible richness and stability to the finished mousse. Set them aside for now.
Step 3: Crafting the Perfect Pâte à Bombe
This is arguably the most crucial step for achieving that signature mousse texture. In a separate, clean saucepan, combine the granulated sugar and 2.1 oz of heavy cream. Place this mixture over medium heat, stirring constantly with a whisk until the sugar completely dissolves and the mixture comes to a full rolling boil. Immediately remove it from the heat once boiling. Now, working quickly, take a small amount of this hot sugar-cream mixture and drizzle it into your prepared egg yolks while vigorously whisking the yolks. This process, known as tempering, slowly brings the temperature of the egg yolks up without scrambling them. Continue to gradually whisk in the remaining hot sugar-cream mixture until fully incorporated. Pour the entire egg yolk mixture back into the saucepan. Place the saucepan over very low heat. Continuously stir the mixture with a spatula or whisk. The key here is gentle, constant motion. Cook until the mixture reaches a temperature of 150°F (65°C). Use a reliable kitchen thermometer to monitor this precisely. Do not let it boil or reach too high a temperature, or it will curdle. As it thickens slightly, it will become lighter in color and more viscous. Once 150°F is reached, remove it from the heat immediately.
Step 4: Aerate the Pâte à Bombe
Carefully pour the warm pâte à bombe mixture into the bowl of your stand mixer, fitted with the whisk attachment. Begin whisking on medium-high speed. Continue to whisk until the mixture cools down, becomes very light in color, significantly increases in volume, and develops a fluffy, ribbon-like consistency. When you lift the whisk, the mixture should fall back into the bowl in a thick ribbon that holds its shape for a few seconds before dissolving. This aeration is vital for the mousse’s final light texture.
Step 5: Prepare the Whipped Cream
In a separate, chilled bowl (preferably a metal bowl that has been in the freezer for 10-15 minutes), pour the remaining 15.9 oz of very cold heavy cream. Using an electric mixer (handheld or stand mixer), whip the cream on medium-high speed until it forms soft peaks. Soft peaks mean that when you lift the whisk, the cream holds its shape but the tip gently curls over. Do not over-whip to stiff peaks, as this can make your mousse too dense and less airy. The goal is a light, billowy consistency that will seamlessly fold into the chocolate base.
Step 6: Combine Pâte à Bombe with Melted Chocolate
Once your melted chocolate has cooled slightly but is still pourable (not hot), it’s time to combine it with the aerated pâte à bombe. Add about half of the fluffy pâte à bombe mixture to the bowl with the melted chocolate. Using a rubber spatula, gently but thoroughly fold the two together. This initial incorporation helps to lighten the chocolate and ensures a smooth, even mixture. Once well combined, fold in the remaining pâte à bombe until the mixture is uniform and streak-free. Be careful not to deflate the air you’ve incorporated.
Step 7: Gently Fold in the Whipped Cream
Now comes the final touch for that signature airy texture. Add half of your soft-peaked whipped cream to the chocolate-pâte à bombe mixture. Using your rubber spatula, very gently fold the whipped cream into the chocolate mixture. Use an ‘under and over’ motion, scraping the bottom of the bowl and folding it over the top. The goal is to incorporate the cream without deflating the precious air you’ve built into both the pâte à bombe and the whipped cream. Once that batch is mostly incorporated, fold in the remaining whipped cream until the mousse is light, uniform in color, and beautifully airy. Be careful not to overmix.
Step 8: Chill and Serve Your Decadent Mousse
Spoon the finished chocolate mousse into individual dessert cups, ramekins, or a large serving bowl. For an elegant presentation, you can pipe the mousse into cups using a piping bag with a star tip. Once portioned, cover the mousse tightly with plastic wrap and transfer it to the refrigerator. Allow it to chill for at least 4 hours, or preferably overnight, to allow the flavors to meld and the mousse to properly set. Chilling is crucial for achieving that firm yet delicate texture. Once thoroughly chilled, your exquisite homemade chocolate mousse is ready to be served and enjoyed!
Tips for Chocolate Mousse Success
- Quality Ingredients Matter: Since there are so few ingredients, the quality of your dark chocolate and heavy cream will significantly impact the final taste. Invest in good quality products.
- Temperature Control is Key: Especially for the pâte à bombe, using a reliable kitchen thermometer is non-negotiable. Reaching 150°F (65°C) is vital for both safety and proper texture.
- Gentle Folding: When incorporating the whipped cream, treat it with care. Overmixing will deflate the air and result in a denser mousse. Fold gently with a spatula.
- Don’t Rush the Chill: While tempting to dive in, proper chilling time (at least 4 hours, preferably overnight) allows the mousse to set beautifully and its flavors to deepen.
- Cold Equipment for Whipping: A chilled bowl and whisk for whipping the heavy cream will help it whip faster and achieve better volume.
Delicious Variations and Serving Suggestions
While this classic chocolate mousse is perfect as is, you can certainly customize it to suit your taste or occasion:
- Liqueur Boost: Add a tablespoon or two of your favorite liqueur to the melted chocolate or the finished mousse. Grand Marnier, Kahlúa (coffee liqueur), rum, or even a raspberry liqueur would be delightful.
- Flavor Extracts: A touch of vanilla bean paste, almond extract, or a hint of peppermint extract can subtly alter the flavor profile.
- Chocolate Types: While dark chocolate is recommended, you can experiment with milk chocolate for a sweeter mousse, or even white chocolate for a different experience (adjusting sweetness might be necessary).
- Garnishes Galore: Elevate your presentation with simple garnishes. Fresh berries (raspberries, strawberries), a dusting of cocoa powder, chocolate shavings, a dollop of extra whipped cream, or a sprig of mint can add visual appeal and extra flavor.
- Serving Ideas: Beyond individual cups, you can layer the mousse in a trifle dish with crumbled cookies or cake, use it as a filling for tarts or cakes, or even pipe it onto a chocolate cookie for an elegant mini-dessert.
Storing Your Homemade Chocolate Mousse
This exquisite chocolate mousse is best enjoyed fresh, but it can be prepared ahead of time, making it an ideal dessert for entertaining. Store individual servings or the entire batch covered tightly with plastic wrap in the refrigerator for up to 3-4 days. This mousse does not freeze particularly well due to its delicate texture, so it’s best to enjoy it within the recommended refrigeration period.
The Best Chocolate Mousse Recipe: Your New Go-To Dessert
Creating this homemade chocolate mousse is an incredibly rewarding experience. From the meticulous crafting of the pâte à bombe to the delicate folding of the whipped cream, each step contributes to a dessert that is truly special. The rich chocolate flavor, combined with a texture that is both creamy and light, promises an unforgettable culinary moment. This recipe by Pastry Living with Aya has earned its place as a favorite, and we’re confident it will become yours too. So, gather your ingredients, take your time, and prepare to impress yourself and your guests with this truly magnificent chocolate mousse. Enjoy the process, and savor every delightful bite!