
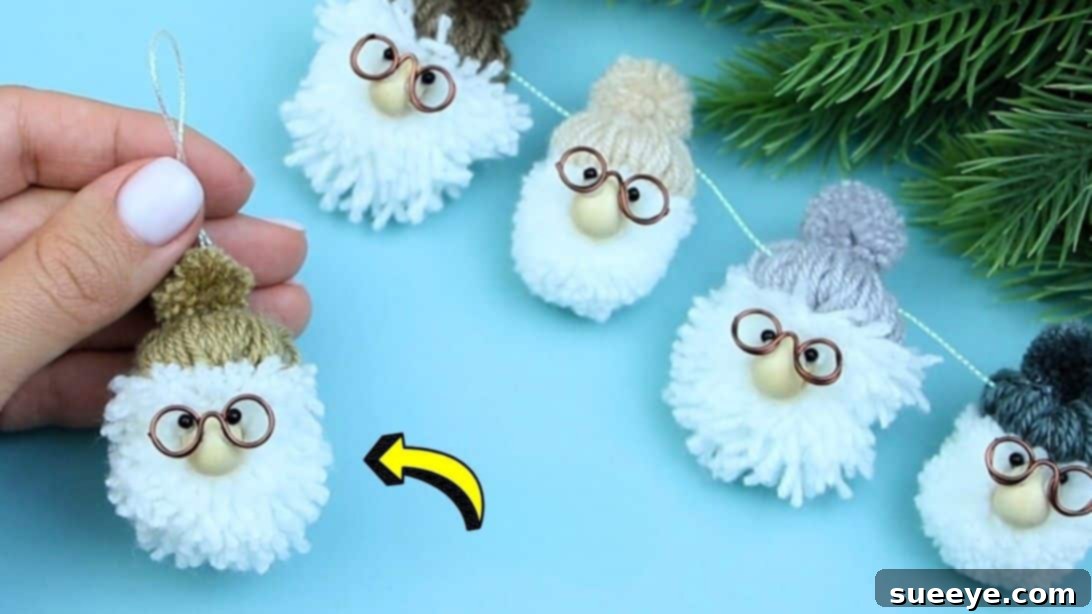
Are you searching for your next delightful crafting adventure? Look no further than these absolutely adorable yarn gnomes with charming little glasses! Inspired by the fantastic tutorial from NataliaDoma DIY, this project is not only incredibly cute but also surprisingly easy to create. You don’t need any specialized equipment or advanced crafting skills – just your basic craft supplies and a little creativity. These charming handmade gnomes are perfect for adding a touch of whimsical flair to your home decor, or you can craft them as thoughtful, personalized gifts for friends and family. Dive into the wonderful world of yarn crafting and bring these delightful characters to life!
Why Craft Your Own DIY Yarn Gnomes?
Crafting offers a unique blend of relaxation and reward, and making yarn gnomes is no exception. These enchanting little figures have gained immense popularity as symbols of good luck and warmth. By creating them yourself, you get to infuse them with your personal touch and choose colors and styles that perfectly match your aesthetic. They make fantastic seasonal decorations, wonderful additions to a child’s room, or heartwarming tokens of affection for loved ones. The process itself is therapeutic, allowing you to unwind as you transform simple yarn into a beloved decorative item. Plus, it’s an excellent way to use up leftover yarn scraps and explore your creative potential.
Essential Materials for Your Yarn Gnomes
One of the best aspects of this DIY gnome project is the simplicity of the materials required. Most items can be found in your existing craft stash or are readily available at any craft store. Gather these supplies before you begin, ensuring a smooth and enjoyable crafting experience:
- Acrylic Yarn (White and Colored): Acrylic yarn is ideal for its durability, softness, and wide array of vibrant colors. The white yarn will form the gnome’s fluffy beard and body, while the colored yarn will be used for the hat and nose. Feel free to experiment with different textures or even wool blends for varied effects.
- Wooden Bead: A small wooden bead will serve as the gnome’s nose, adding a distinct feature to its charming face. You can choose different sizes based on your desired gnome scale, typically a bead between 1-2 cm works well.
- Black Beads for Eyes: Two small black beads will bring your gnome to life, giving it expressive eyes. Seed beads or small plastic craft beads are perfect for this detail.
- Soft Wire for Glasses: A thin, flexible craft wire is essential for shaping the gnome’s iconic spectacles. Floral wire or jewelry wire works wonderfully due to its malleability.
- Hot Glue: A hot glue gun and glue sticks are indispensable for securely assembling your gnome. Hot glue provides a strong, fast-drying bond crucial for attaching various components.
- Scissors: A sharp pair of craft scissors will be needed for cutting yarn precisely and shaping your pom-poms.
- Pencil: A standard pencil will be used as a mold for shaping the wire into perfectly round spectacle frames.
- Thread and Needle (Optional but Recommended): For an extra secure hat and a potential hanging loop, a sewing needle and matching thread can be very useful.
Having all your materials organized and within reach will make the crafting process much more enjoyable and efficient.
Step-by-Step Instructions: How to Make Your Adorable Yarn Gnomes
Ready to start crafting? This detailed guide will walk you through each step of creating your very own charming yarn gnomes, complete with their distinctive glasses. Follow these instructions carefully, and soon you’ll have a delightful handmade creation to admire.
Step 1: Creating the Gnome’s Body and Beard
Begin by taking your chosen white acrylic yarn. This will form the main body of your gnome, which doubles as its voluminous beard. Wrap the white yarn securely around your index finger approximately 100 times. Aim for an even tension as you wrap to ensure a consistent and full pom-pom. Once you’ve completed the wraps, carefully slide the loops off your finger, keeping them intact. Take a separate small piece of yarn, about 6-8 inches long, and tie it very tightly around the middle of the collected loops. This crucial knot will define the center of your pom-pom, holding all the strands together securely. Double-knot it to prevent unraveling. This initial yarn bundle will be the base for your gnome’s body and its fluffy white beard.
Step 2: Crafting the Gnome’s Hat and Nose Base
Next, it’s time to create the components for your gnome’s hat and nose. Pick your desired colored yarn. Wrap this colored yarn around your index finger approximately 50 times. Just like in Step 1, maintain an even tension and carefully remove the loops from your finger. Secure these loops by tying a separate small piece of yarn tightly around their middle, forming a smaller, colored yarn bundle. You will need two such colored yarn bundles. Repeat this process to create a second identical colored yarn bundle. One of these will become the gnome’s distinctive pointed hat, and the other will be shaped into its rounded nose.
Step 3: Assembling the Yarn Components
Now it’s time to transform your yarn bundles into recognizable gnome features. Take your large white yarn piece (from Step 1) and carefully cut through all the loops on both sides, transforming it into a full, shaggy pom-pom. This will form the gnome’s beard and body base. Next, take one of your colored yarn pieces (from Step 2) and cut through all its loops as well. Gently trim and shape this piece into a neat, compact ball – this will be your gnome’s nose. Now, take the other colored yarn piece, leaving its loops untrimmed (this will be the hat). Carefully glue the small, trimmed colored yarn ball (the nose) onto the top center of the untrimmed colored yarn piece (the hat base). Then, using your hot glue gun, securely attach this combined hat-and-nose piece onto the top center of your large white pom-pom (the beard/body). Once these pieces are securely glued, you can slightly trim the very top of the colored yarn hat to give it a more defined, conical shape if desired, but ensure you don’t cut too much off the main structure.
Step 4: Crafting the Gnome’s Face: Eyes and Glasses
This step brings personality to your gnome! Take your wooden bead, which will serve as the nose, and glue two small black beads onto its side. Position them carefully to mimic eyes, ensuring they are evenly spaced. Set the bead aside to allow the glue to dry completely. While the eyes dry, prepare the gnome’s distinguishing glasses. Get your soft wire and a pencil. Wrap the wire around the pencil to create a perfect circle. Make sure the circle is proportional to your gnome’s face. Slide it off, then create another identical circle right beside the first one, carefully twisting the wire in the middle to join them, forming a pair of spectacles. Trim any excess wire, leaving small ends to help with attachment. Gently fold the joined wire in the middle to give the glasses a slight curve, mimicking how they would sit on a nose. Once the wooden bead’s eyes are dry, carefully glue the wire glasses onto the middle of the wooden bead, just above the eyes, ensuring they are centered and secure.
Step 5: Attaching the Face to the Gnome
With the gnome’s face now complete, it’s time to bring all the elements together. Take the wooden bead, now adorned with its eyes and glasses, and carefully glue it into position on the gnome’s head. Place it centrally on the white pom-pom, just below the colored hat, allowing the beard to fall naturally around it. Ensure the glue is applied generously enough for a firm hold, but avoid excessive application that might seep through the yarn. Hold the pieces together gently until the hot glue sets, creating a seamless transition from the face to the body.
Step 6: Final Touches and Hanging Loop (Optional)
For an extra secure hat and the option to hang your gnome, grab a thread and needle. Insert the needle through the back of the gnome’s head, pushing it all the way up through the top of the hat. Then, bring the needle back down from the very top of the hat, inserting it again and pulling it through to the back of the head, close to your initial entry point. This creates a loop of thread that reinforces the hat’s attachment and can also serve as a small hanging loop. Tie the ends of the thread together tightly at the back, trimming any excess. If you don’t wish to hang your gnome, this step can still be used to simply stitch the hat more securely to the head, hiding the knot within the yarn fibers. Give your gnome a final fluff and admire your handcrafted masterpiece!
Customization Ideas for Your Unique Yarn Gnomes
The beauty of DIY crafts lies in the ability to personalize them. While these instructions provide a solid foundation, there are countless ways to make your yarn gnomes truly unique:
- Varying Sizes: Experiment with different finger sizes or even cardboard templates for wrapping yarn to create gnomes of various heights and widths. A large gnome could be a statement piece, while smaller ones make cute ornaments.
- Color Palettes: Don’t limit yourself to traditional colors. Try vibrant rainbow hues, sophisticated pastels, or earthy tones to match your home decor or a specific season.
- Embellishments: Add small decorative elements to their hats, such as miniature bells, buttons, felt patches, or tiny faux flowers. Ribbons or bows can also add a charming touch.
- Facial Expressions: Instead of simple black beads, you could embroider small smiles or use different shaped beads for eyes to give your gnomes distinct personalities.
- Accessories: Give your gnomes tiny props! They could hold miniature craft tools, tiny books, or even a small coffee cup made from felt.
- Seasonal Themes: Create gnomes for specific holidays. Use red and green for Christmas, pastels for Easter, orange and black for Halloween, or patriotic colors for national holidays.
- Beard Textures: Instead of just white yarn, try using curly or fuzzy yarn for the beard to give it a unique texture.
Tips for a Successful Gnome Crafting Project
To ensure your gnome-making experience is smooth and enjoyable, keep these helpful tips in mind:
- Consistent Yarn Wrapping: Try to maintain an even tension when wrapping yarn around your finger. This results in a fuller, more uniform pom-pom. If your fingers get tired, a piece of cardboard cut to the desired width can be a great alternative.
- Tight Knots: When tying the yarn bundles, make sure your knots are as tight as possible. This prevents the yarn from unraveling when you cut the loops and ensures a sturdy base for your gnome. Double knotting is always a good idea.
- Sharp Scissors: Using sharp scissors will make cutting through the yarn loops much easier and give you cleaner edges when shaping the pom-poms. Dull scissors can lead to frayed ends and a messier finish.
- Hot Glue Caution: Hot glue can be, well, hot! Always exercise caution when using a hot glue gun to avoid burns. Small silicone finger protectors can be very useful. Apply glue in small amounts to prevent it from soaking through the yarn.
- Patience with Trimming: When shaping the pom-poms, especially the nose, trim a little at a time. You can always remove more yarn, but you can’t put it back! Step back and assess the shape as you go.
- Pre-plan Your Colors: Before you start, lay out your yarn colors to visualize how they will look together. This helps ensure your gnome’s hat, beard, and overall aesthetic are cohesive.
- Let Glue Dry: Allow ample time for the hot glue to dry and set between steps, especially when attaching the eyes and glasses. This prevents pieces from shifting and falling off later.
Caring for Your Handmade Yarn Gnomes
Once your charming yarn gnomes are complete, you’ll want to keep them looking their best. These simple care tips will help preserve their appearance:
- Gentle Dusting: Over time, gnomes can collect dust. Use a soft brush, a lint roller, or a can of compressed air to gently remove dust from the yarn fibers. Avoid harsh rubbing.
- Spot Cleaning: If a small stain occurs, use a damp cloth with a very mild soap solution to gently blot the area. Do not immerse the gnome in water, as this can distort its shape and loosen glued parts.
- Keep Away from Moisture: Yarn can absorb moisture, which might lead to mildew or structural damage. Keep your gnomes in a dry environment.
- Store Carefully: When not on display, store your gnomes in a box or bag that protects them from being crushed or tangled with other items. This is especially important for gnomes with delicate accessories or glasses.
- Avoid Direct Sunlight: Prolonged exposure to direct sunlight can fade the colors of your yarn over time. Position your gnomes in areas where they are not constantly exposed to harsh UV rays.
Start Your Gnome Adventure Today!
Creating these delightful yarn gnomes with glasses is a truly rewarding craft project that’s accessible to everyone. From selecting your yarn colors to watching the gnome’s personality emerge with each step, the process is filled with creative joy. Whether you’re making them for festive decor, as heartwarming gifts, or simply to enjoy the process of crafting, these gnomes are sure to bring a smile to your face. So gather your materials, follow this guide inspired by NataliaDoma DIY, and unleash your inner crafter. Share your unique gnome creations with the world and spread a little handmade happiness!