
Discovering the joy of planting has truly transformed my living space and sparked a new passion for nurturing greenery. As spring and summer arrive, bringing with them the promise of vibrant blooms, my home and garden become canvases for botanical beauty. Planting is not just a delightful pastime; it’s a therapeutic journey that enhances your environment, making both indoor and outdoor areas feel more vibrant and welcoming.
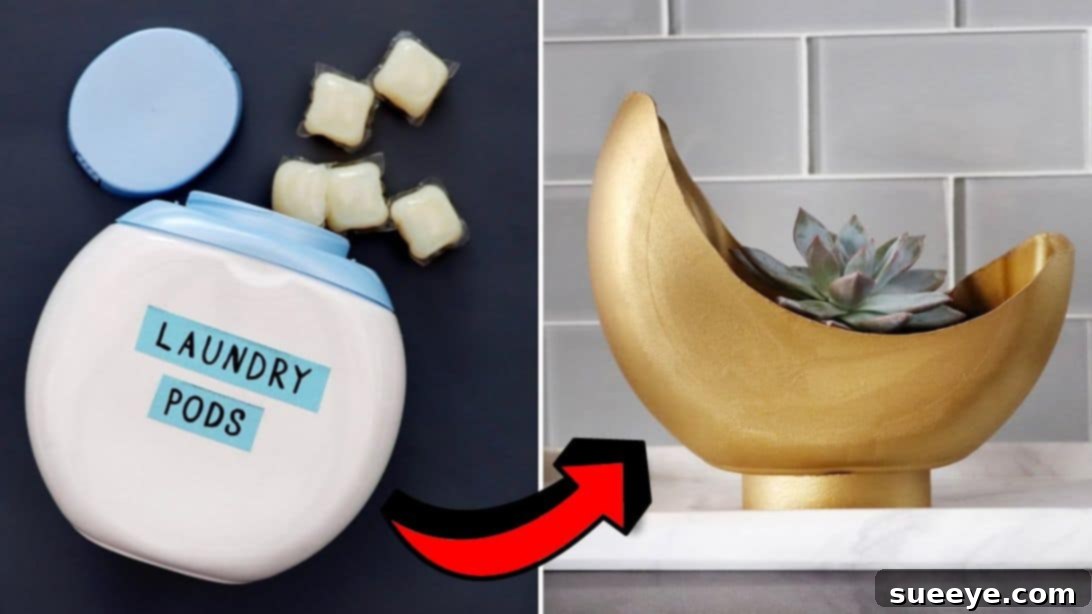
My collection of plants and flowers has grown considerably, with many now flourishing inside the house. This expansion naturally led to a search for creative and affordable ways to house my green companions. Traditional planters can be costly and sometimes lack that unique touch I desire. This quest for innovative solutions brought me to an inspiring video tutorial by HGTV Handmade on YouTube. The idea of transforming empty laundry pod containers into stylish “Moon Planters” immediately captured my imagination. Not only is it an incredibly ingenious way to upcycle common household items, but it also provides a perfect solution for the several plants I plan to bring indoors, especially since I already have a few empty laundry pod containers waiting for a new purpose!
RELATED: Easy DIY Dollar Tree Disco Ball Planter Tutorial
Craft Your Own Celestial Decor: The DIY Moon Planter from Laundry Pod Containers
Embrace sustainable living and unleash your creativity by transforming an everyday item into a captivating piece of home decor. This DIY Moon Planter project is an excellent example of upcycling at its finest, turning a humble laundry pod container into a chic, celestial-themed holder for your beloved plants. Not only is this project incredibly budget-friendly, but it also allows you to add a personalized touch to your indoor garden while contributing to a greener planet.
Why This DIY Moon Planter is Your Next Must-Try Project
Before diving into the creation process, let’s explore why this specific DIY project stands out:
- Eco-Friendly Upcycling: Give new life to plastic containers that would otherwise end up in landfills, significantly reducing waste.
- Cost-Effective: Utilize materials you likely already have at home or can acquire very cheaply, making it an incredibly budget-friendly decor solution.
- Unique Aesthetic: The moon shape offers a distinctive, artistic touch that will make your plants stand out. It’s a conversation starter and a testament to your creativity.
- Customizable: While gold is suggested, the design is a blank canvas. You can personalize it with any color, pattern, or finish to perfectly match your existing home decor.
- Beginner-Friendly: With clear steps and readily available tools, this project is accessible to crafters of all skill levels, even those new to DIY.
- Functional Decor: Beyond its aesthetic appeal, it serves a practical purpose as a beautiful home for your plants, enhancing the air quality and ambiance of your space.
Materials You’ll Need for Your DIY Moon Planter:
Gathering your materials before you begin ensures a smooth and enjoyable crafting experience. Most of these items are common household staples or can be easily found at any craft or hardware store:
- An Old Laundry Pod Container: The star of our project! Ensure it’s clean and thoroughly rinsed.
- Craft Knife: Essential for precise cutting of the plastic. Always use with caution.
- Scissors: Useful for refining edges and smaller cuts.
- Marker: For tracing your moon shape onto the container.
- 7″ Cooking Pot Lid (or similar circular object): Serves as a template for a perfect moon curve.
- Rubbing Alcohol: Effective for removing marker lines and adhesive residue.
- Paper Towels: For cleaning and applying alcohol.
- Sanding Paper (medium to fine grit): Crucial for smoothing edges and preparing the surface for paint adhesion.
- Empty Masking Tape Roll (or a similar cylindrical item): This will form the stable base of your planter.
- White Paint (acrylic or spray paint): A great primer coat and base for brighter colors.
- Gold Paint (acrylic or spray paint): To give your planter a rich, elegant, celestial finish.
- Paintbrush: For applying acrylic paints (if not using spray paint).
- Hot Glue Gun and Glue Sticks: For securely attaching the base.
Step-by-Step Guide: How to Craft Your Own Moon Planter
Follow these detailed instructions to transform your laundry pod container into a stunning moon planter. Remember to prioritize safety, especially when working with sharp tools.
Step 1: Thorough Preparation and Precise Shaping of Your Container
The foundation of any great DIY project lies in careful preparation. Begin by completely removing all labels from your laundry pod container. This is crucial for a clean aesthetic. Don’t stop there; make sure to get rid of any sticky residue left behind by the labels. Rubbing alcohol or a specialized adhesive remover works wonders here, ensuring a perfectly smooth surface for tracing and painting.
Next, grab your 7-inch cooking pot lid. This will be your guide for creating the elegant crescent moon shape. Position the lid on the side of the container, allowing you to trace a gentle curve with your marker. Visualize the “moon” you want to create – a slender crescent or a fuller half-moon – and adjust the lid’s placement accordingly. Once you’re satisfied with your tracing, carefully use a craft knife to cut along the marked line. For safety, always cut away from yourself on a protected surface. After cutting one side, flip the container over and repeat the process on the opposite side, aiming for symmetry. Take your time with the cutting; precision here will greatly enhance the final look of your planter.
Step 2: Smoothing, Sanding, and Painting the Main Body of Your Planter
With the initial cuts made, it’s time to refine your planter. Dampen a paper towel with rubbing alcohol and gently rub it over any visible marker lines to erase them completely. This ensures a clean base for your paint. Next, carefully use your scissors to trim down any rough corners or uneven edges that may have resulted from cutting. A smooth edge is not only aesthetically pleasing but also safer.
Now, for a crucial step: sanding. Using medium-grit sandpaper first, then moving to a finer grit, thoroughly sand the entire surface of the pod, both inside and out. Sanding serves multiple purposes: it smooths out any remaining imperfections, creates a subtle texture that helps paint adhere better, and ensures a professional-looking finish. After sanding, wipe away any dust with a clean, damp cloth or paper towel and allow it to dry.
Once clean and dry, it’s time to add color! Apply an even coat of white paint to the entire container. This acts as a primer, allowing the subsequent gold paint to appear more vibrant and consistent. Let the white paint dry completely according to the manufacturer’s instructions. Patience here prevents smudges and uneven finishes. After the white paint is dry, apply a rich, even coat of gold paint. You may need two thin coats for optimal coverage and a truly lustrous finish. Again, allow the gold paint to dry thoroughly before moving on.
Step 3: Crafting the Base and Final Assembly for Your Moon Planter
While the main planter body is drying, prepare its base. Take your empty masking tape roll and first paint it with white paint. This provides a clean, even base. Once the white paint is dry, apply a coat of gold paint to match the planter. This uniformity will give your finished piece a cohesive and sophisticated look. Ensure it’s completely dry before handling.
With both the container and its base fully dry, it’s time for assembly. Using your hot glue gun, apply a generous amount of hot glue to one rim of the painted masking tape roll. Carefully center the container on top of the glue-coated roll and press down firmly, holding it in place for a minute or two until the glue sets. This creates a stable and elegant base for your moon planter.
Congratulations, your DIY Moon Planter is complete! Now comes the most exciting part: adding your plant. To ensure good drainage for your plant’s health, place a layer of small rocks or pebbles at the bottom of the planter before adding soil. Then, carefully transfer your chosen plant into its new, stylish home. This unique planter is perfect for small to medium-sized indoor plants like succulents, small herbs, or air plants, adding a touch of celestial charm to any room.
Creative Variations and Personalization Ideas
While the gold moon planter is undeniably elegant, don’t hesitate to let your creativity soar! Here are a few ideas to personalize your DIY moon planter:
- Color Palette: Experiment with different paint colors. Matte black for a dramatic look, pastel shades for a softer vibe, or vibrant blues and purples for a galaxy theme.
- Patterns and Textures: Use stencils to add stars, dots, or geometric patterns. You could also try sponge painting for a textured effect or even use metallic spray paints for a different shimmer.
- Embellishments: Attach small rhinestones, glitter, or even glow-in-the-dark paint for an enchanting nighttime glow.
- Different Bases: Instead of a tape roll, consider a small, sturdy plastic cup, a small tin can, or even stacking a few large bottle caps for a different base aesthetic.
- Sizing Up: If you find larger containers, you could create a series of moon planters in varying sizes for a cohesive display.
Caring for Your Upcycled Planter
To ensure your beautiful moon planter lasts for a long time, here are a few care tips:
- Indoor Use Recommended: While plastic is durable, constant exposure to direct sunlight and extreme weather outdoors might fade the paint or degrade the container over time. For best longevity, use it indoors.
- Gentle Cleaning: If the planter gets dusty, wipe it gently with a soft, dry cloth. Avoid harsh chemicals or abrasive scrubbers that could damage the paint finish.
- Watering Wisely: Thanks to the drainage rocks, your plants will be happier. However, be mindful not to overwater, as the container doesn’t have traditional drainage holes, and excessive standing water can lead to root rot.
The Broader Impact of Upcycling
This DIY Moon Planter project is more than just a craft; it’s a testament to the power of upcycling. By repurposing materials like laundry pod containers, we contribute to a more sustainable lifestyle in several significant ways:
- Waste Reduction: Diverting items from landfills is a direct positive impact on our environment.
- Resource Conservation: Less demand for new manufacturing means fewer raw materials and less energy consumed.
- Economic Savings: Upcycling often means creating beautiful items for little to no cost, saving money on new purchases.
- Fostering Creativity: It encourages innovative thinking and problem-solving, turning everyday objects into sources of artistic expression.
- Personal Satisfaction: There’s a unique sense of accomplishment and pride that comes from creating something beautiful and functional with your own hands.
This fantastic project was inspired by the creative minds at HGTV Handmade via YouTube. Their channel is a treasure trove of innovative DIY ideas, and we highly recommend giving them a visit and subscribing for more brilliant crafts!
So, gather your materials, clear your workspace, and get ready to transform an ordinary laundry pod container into an extraordinary piece of celestial decor. This DIY Moon Planter is not just a home for your plants; it’s a shining example of how creativity and resourcefulness can brighten your home and make a positive impact on the world around you. Happy crafting!